
On this page
Start here
Quick answer
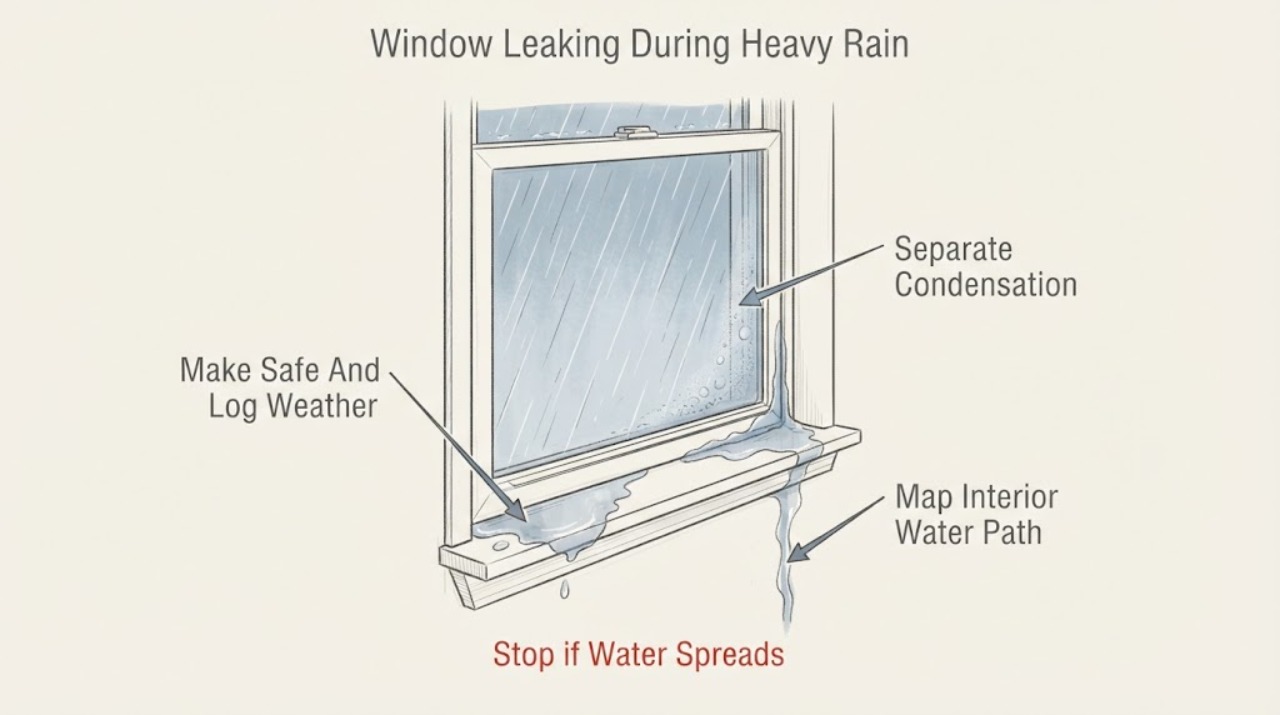
A window that leaks only during heavy rain needs the water path identified before any sealant is applied. First distinguish rainwater from indoor condensation by noting whether water appears during or after wind-driven rain, where it first appears, and whether the glass is simply wet on the room side. With the window closed and from safe interior access, inspect the sash/frame seal, sill and track, visible drainage openings, and stains above and beside the opening. If the product has weep holes, they are intended to drain water outward; a blocked opening can cause pooling, but do not seal over a drainage path or pressure-wash it. Water from the top or wall above can indicate flashing, siding, roof, or another upstream path rather than a failed window seal. Keep clear of high exterior or roof work and arrange qualified window/building-envelope service for recurring leaks, soft or rotten framing, mold, loose glass, active heavy flow, or water near electrical equipment.
Work through in order
Diagnostic checks
Use only checks that match the exact appliance or system and its official guide.
-
Check 1
Keep people away from the wet area, protect belongings without blocking the window's drainage path, and record when the leak starts relative to heavy rain, wind direction, and the end of the storm.
Expected result: Water is a few drops or a steady stream, appears only with wind-driven rain or also in calm rain, continues after rain stops, or is near an outlet, light, alarm, or other electrical equipment.
Next step: Photograph the first wet point and place a container or absorbent material without climbing or sealing the opening; keep electrical equipment away and arrange urgent qualified help when water can contact electricity.
Stop if: Stop inspecting for active heavy flow, ceiling or wall sagging, falling trim, flooding, water near electrical equipment, or any need to climb, enter the roof, or work during lightning or severe wind.
Why this matters
Why: Wind-driven timing can implicate the exterior drainage or flashing path, while water that continues after rain may indicate stored moisture in the wall or a plumbing source. Water near electrical equipment changes the response from diagnosis to safety isolation.
-
Check 2
From safe interior access, compare the moisture pattern on the room-side glass, room-side frame, track, sill, trim, and wall with the outdoor weather; do not open a wet or damaged window forcefully.
Expected result: Moisture is a uniform film on the room-side glass with no rain-linked track or trim path, or water starts at a frame joint, corner, sill, head, side trim, or wall stain during rain.
Next step: Record the pattern and weather before cleaning it; use the rain-leak path for the next checks and arrange window service for moisture between panes, recurring infiltration, or damaged glazing.
Stop if: Stop for cracked or loose glass, a sash that could fall, sharp fragments, water entering an electrical cavity, or any need to disassemble glazing or hardware.
Why this matters
Why: A room-side film can be condensation from indoor moisture, whereas a localized rain-timed path is more consistent with infiltration. Water between insulating glass panes is a separate glazing-seal issue and is not the same as room-side condensation.
-
Check 3
With the window closed and from floor-level interior access, use dry paper towels or photographs to map whether the first moisture is at the lower track, sill corners, side jamb, head, interior trim, drywall, or ceiling above; do not insert tools into the frame.
Expected result: Water is confined to the sill or track, enters at a side or head joint, appears on the wall above or beside the window, or the visible path cannot be followed.
Next step: Mark the first and last wet points, photograph stains and bubbling paint, and give the map to a qualified window or building-envelope professional rather than applying interior caulk.
Stop if: Stop for soft or collapsing drywall, visible rot, mold growth, sagging trim, active structural movement, or water near wiring, outlets, fixtures, or ceiling electrical equipment.
Why this matters
Why: A sill or track pattern supports a drainage, sash, or seal check. A head, side-wall, or ceiling pattern points toward flashing, cladding, roof, or another upstream path; an untraceable path may be traveling through the wall cavity.
-
Check 4
From ordinary interior access, inspect the visible sash-to-frame seal, weatherstrip, corners, track, screen, and sill for gaps, compression loss, debris, damage, or a sash that does not close and lock normally; do not remove the sash or glazing.
Expected result: The seal is visibly displaced or damaged, the track contains debris or pooled water, the sash closes and locks normally, or the leak begins above or outside the seal.
Next step: Follow the exact window manufacturer's care instructions for a reachable, non-damaging clean-up; otherwise document the condition and request qualified repair without forcing the sash or adding a generic seal.
Stop if: Do not pry, drill, remove glazing beads, cut a seal, force the sash, scrape glass, or seal a drainage opening simply because it is visible.
Why this matters
Why: A damaged or displaced seal can permit air or water infiltration at the operating sash, while a normal sash seal with water above or behind the wall points to exterior drainage or flashing. Pooling may also reflect a blocked product drainage system.
-
Check 5
If the installed window visibly has manufacturer-designed weep openings, inspect only reachable openings from the interior or ground level for dirt, paint, or debris and clear only what the product instructions permit with a gentle non-damaging method; do not seal, enlarge, or pressure-wash them.
Expected result: Water pools in the sill or track, a reachable opening is visibly obstructed, the openings are clear, or the window design and drainage path are unknown.
Next step: Photograph the openings and pooling, follow the exact product care instructions, and arrange service if the openings are inaccessible, unknown, damaged, or clear but leakage continues.
Stop if: Do not climb, lean out, remove exterior components, drill openings, seal over a weep path, use high-pressure water, or work near loose glass or unstable trim.
Why this matters
Why: Andersen says heavy-rain water may collect temporarily and should drain through exterior sill weep holes; continued pooling supports checking for debris. Clear openings with continued leakage indicate that the entry may be at the sash, frame, flashing, wall, or an upstream path.
-
Check 6
From the ground or another secure position, observe the exterior window perimeter, sill, head, side joints, siding seams, trim, gutters, roof-to-wall area, and nearby penetrations for visible gaps, damaged flashing, overflowing water, or a path above the window; do not climb or enter a roof.
Expected result: The exterior condition is visibly damaged or directing water toward the opening, an upper roof or wall path aligns with the interior stain, gutters overflow near the window, or the exterior cannot be safely viewed.
Next step: Record the alignment from the ground and request qualified window, siding, roofing, or building-envelope assessment as appropriate; do not apply a surface patch that could block drainage.
Stop if: Stop for high or slippery surfaces, severe weather, loose cladding, unstable trim, broken glass, electrical service equipment, or any need for a ladder, roof access, or exterior dismantling.
Why this matters
Why: A leak aligned with an upper wall, roof, gutter, or flashing path may not be a failed window seal. DOE explains that flashing and drainage-plane details direct water out of the wall; the correct repair depends on the window and wall assembly.
-
Check 7
Use the timing, moisture map, seal and track observations, weep-path condition, and upstream exterior view to decide whether the issue is a documented minor care condition or requires qualified service, without applying a trial caulk bead.
Expected result: A reachable product drainage opening is obstructed and the manufacturer's care instructions allow gentle clearing with no damage, or water recurs, the source is uncertain, the frame is soft, or the path involves flashing, wall, roof, glazing, or inaccessible height.
Next step: For recurrence or uncertainty, keep the area dry and arrange qualified window/building-envelope service; provide the weather log, photos, moisture map, window identity, and any prior repairs.
Stop if: Do not seal over weep holes, caulk every visible joint, remove siding or flashing, replace glass, climb, enter the roof, or disturb suspected rot or mold without qualified assessment.
Why this matters
Why: A permitted care step may remove a local obstruction, but recurring or structurally involved leakage needs diagnosis of the full window and wall drainage system. Sealant alone can trap water when the joint is intended to drain.
Use your observations
Decision map
Find the observation that best matches what you see, then follow the next safe action.
-
PATH 01Next step
What you see
Moisture is a broad room-side film on the glass, is not tied to rain, and has no localized track, frame, trim, or wall entry path.
Do this next
Treat it as a condensation investigation rather than a rain-leak seal repair; record indoor moisture conditions and arrange window or indoor-moisture assessment if it persists or causes mold.
-
PATH 02Next step
What you see
Water collects in the sill or track during heavy rain, while the window and surrounding wall show no obvious damage.
Do this next
Check only reachable manufacturer-designed drainage openings according to the product instructions. If openings are clear or leakage continues, arrange qualified window service and do not seal the drainage path.
-
PATH 03Next step
What you see
The sash-to-frame seal or weatherstrip is visibly damaged, displaced, compressed unevenly, or the sash does not close and lock normally.
Do this next
Document the seal and window identity and request qualified window service for the compatible repair. Do not cut, force, or substitute a generic seal without manufacturer guidance.
-
PATH 04Next step
What you see
Water first appears at the head, side jamb, trim, wall, or ceiling above/beside the opening, especially during wind-driven rain.
Do this next
Treat the window as a possible outlet for an upstream wall, flashing, siding, roof, or gutter path. Keep the area protected and request qualified building-envelope or roofing/window assessment without opening the wall yourself.
-
PATH 05Next step
What you see
A product-designed weep opening is visibly blocked and is reachable without climbing, leaning out, dismantling, or touching loose glass.
Do this next
Follow only the exact manufacturer's gentle cleaning instruction and observe whether pooling stops; if the opening is damaged, inaccessible, or leakage continues, arrange service.
-
PATH 06Next step
What you see
The interior stain aligns with damaged exterior flashing, a siding seam, an overflowing gutter, a roof-to-wall junction, or another upper penetration.
Do this next
Keep the area dry and request qualified siding, roofing, or building-envelope assessment. Do not apply interior or exterior caulk that may hide or block the drainage route.
-
PATH 07Next step
What you see
The frame or wall is soft, rotten, swollen, moldy, sagging, separating, or repeatedly wet after the rain ends.
Do this next
Stop opening or disturbing the affected assembly and arrange prompt qualified water-intrusion and structural assessment; use appropriate remediation professionals for confirmed mold or contaminated materials.
-
PATH 08Next step
What you see
Water reaches electrical equipment, the glass is cracked or loose, trim is falling, or active flow cannot be contained safely.
Do this next
Keep people away, avoid touching wet electrical equipment or loose glazing, and obtain emergency or qualified electrical, glass, and water-intrusion help from a safe location.
Helpful context
Understand the symptom
Heavy-rain leaks and condensation need different checks
A room-side pane covered with moisture can be condensation from humid indoor air, while a drip that begins at a frame corner, track, trim joint, or wall stain during wind-driven rain suggests water infiltration. Andersen notes that surface condensation can result from moisture in the air and does not by itself indicate a glass failure. Record the weather, wind direction, first wet point, and whether the water continues after rain stops before changing the seal.
Water can enter above the window and travel
The first visible drip is not necessarily the entry point. Water may be arriving from the head flashing, siding joint, roof-to-wall intersection, trim, or an opening above and then traveling inside the wall before appearing at the window. DOE building guidance describes windows as interruptions in the wall drainage plane and says lapped flashing should direct water to the exterior. A sealant bead at the interior trim can hide the symptom while trapping water, so trace before sealing.
Keep the investigation ground-level and reversible
Use photographs, paper towels, a dry-room observation, and non-contact exterior viewing from ground level. Do not climb, stand on a sill, remove siding, enter the roof, dismantle the window, or close designed drainage exits. Andersen advises checking weep holes for dirt or debris when pooling continues, while DOE cautions that flashing and sealant details vary by window type and manufacturer. Recurring rain leakage, rot, mold, loose glazing, or inaccessible exterior conditions belong with qualified service.
Safety boundary
Stop conditions
- Stop for active heavy flow, flooding, wall or ceiling sagging, falling trim, structural movement, or water near outlets, wiring, lights, alarms, or other electrical equipment.
- Stop for cracked, loose, shattered, or shifting glass, a sash that could fall, sharp fragments, or hardware that does not operate safely.
- Do not climb, stand on a sill, use a ladder, enter a roof, lean out of an opening, remove siding or flashing, or work outside during severe wind, lightning, or slippery conditions.
- Do not seal over weep holes, drainage slots, or a joint that may be designed to drain; do not caulk every visible seam before tracing the water path.
- Do not pressure-wash, drill, enlarge, pry, dismantle the window, remove glazing, or force a sash or damaged trim.
- Stop and arrange qualified assessment for soft or rotten framing, recurring mold, bubbling or collapsing drywall, or water that continues after the rain ends.
- Do not disturb suspected lead paint, asbestos-containing materials, mold, or hidden wet insulation; use appropriately qualified professionals.
Only after diagnosis
Potential parts
- window sash weatherstrip or seal
Only consider this category if the exact window manufacturer or a qualified technician confirms that the operating sash seal is damaged and is the entry path.
Seal profile, orientation, and installation vary by window type and manufacturer; do not choose a generic seal from a leak symptom alone. - weep-system component
Only consider this category if the product documentation or qualified assessment identifies a damaged or missing drainage component after confirming that the weep path is part of the installed design.
Do not enlarge, cover, or substitute a drainage opening without exact product guidance; verify the window identity before any component is selected. - compatible flashing or sealant system
Only consider this category after qualified diagnosis identifies a flashing or sealant failure and confirms the surrounding wall assembly and manufacturer-approved repair detail.
Not every joint should be caulked and a surface bead may trap water; verify the full drainage design and professional repair method before selecting materials.
When checks do not resolve it
Need a professional?
Arrange qualified window or building-envelope service for recurring heavy-rain leakage, a damaged sash seal, clear weep openings with continued pooling, water entering at the head or wall, failed flashing, soft or rotten framing, mold, or any inaccessible exterior path. Use emergency or qualified electrical help from a safe location for active flooding, water near electrical equipment, and emergency glass service for loose or broken glazing.
Common questions
FAQ
Why does my window leak only during heavy rain?
Wind-driven rain can expose a weak sash seal, blocked sill drainage, damaged flashing, siding joints, overflowing gutters, or an upper wall or roof path. Record where the water first appears and trace from the ground or interior; do not assume the visible drip is the entry point.
How can I tell window condensation from a rain leak?
A broad film on the room-side glass without a rain-linked frame, track, trim, or wall path can be condensation. A localized drip or stain that starts during rain is more consistent with infiltration. Moisture between insulating glass panes is a separate glazing-seal issue.
What are window weep holes for?
Weep holes are designed drainage openings that allow water collected in a sill or track to exit. Andersen says heavy rain can temporarily pool and should drain through exterior sill weep holes. Check only reachable openings according to the exact product instructions and never seal or enlarge them.
Should I caulk around a leaking window?
Not before tracing the water path. DOE guidance says flashing, sealants, and weatherstripping details vary and not every joint should be caulked; some joints provide an exit for water. A bead can hide the symptom or trap water when the source is above or behind the wall.
What if water is coming from above the window?
Treat the window as a possible outlet for an upstream flashing, siding, gutter, roof-to-wall, or other wall-drainage path. Photograph the alignment from safe ground-level or interior access and arrange qualified building-envelope, roofing, or window service.
Can I clean the exterior weep holes myself?
Only if the openings are reachable without climbing, leaning out, dismantling, or touching loose glass, and only with the exact manufacturer's permitted gentle method. Do not drill, pressure-wash, remove exterior components, or seal the opening.
When does a leaking window need urgent service?
Seek prompt help for active heavy flow, water near electrical equipment, sagging or soft walls, rot, mold, loose or broken glass, falling trim, or water that continues after rain. Keep people away and use emergency or qualified electrical and glass help from a safe location when appropriate.
What information should I give the window technician?
Provide the window identity and location, weather and wind direction, first wet point, photos before drying, interior moisture map, seal and track observations, reachable drainage observations, exterior ground-level notes, whether water continued after rain, prior repairs, and any rot, mold, glass, structural, or electrical concern.
Read the exact guide
Official sources
- Important Product, Care and Maintenance Information for Andersen Windows and DoorsAndersen Windows · Manufacturer guidance on heavy-rain sill pooling, weep-hole drainage, condensation, and window maintenance
- Repairing Windows & Doors: How To's for the Handy HomeownerU.S. Department of Energy · Window water-intrusion, flashing, sealant, weatherstripping, utility shutoff, and manufacturer-specific repair guidance
- Sealing PenetrationsU.S. Department of Energy Building Science Education · Roof and wall water-intrusion paths, flashing, drainage, mold, and structural-rot risk around penetrations
Community feedback
Share a repair observation
Share a plain-text repair observation. Accepted observations are published automatically; this page may take a moment to update.