
On this page
Start here
Quick answer
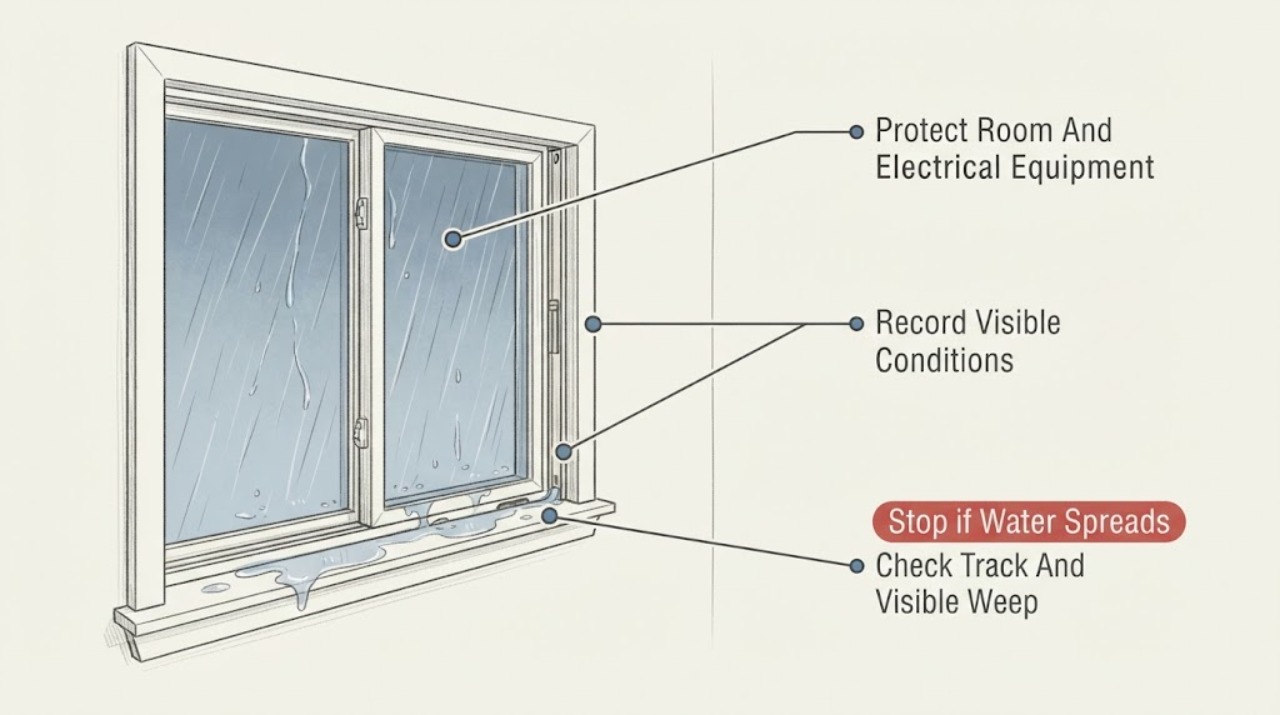
During heavy rain, a small amount of water in a window track can be normal if the track drains through clear exterior weep openings. Water that stays in the track, crosses the inner sill, or appears at the wall needs a source check. First protect the room and any nearby electrical equipment, photograph the water path, and determine whether it starts at the outer track, sash seal, frame corners, or above and beside the window. From the inside and from ground-level exterior access only, clear visible dirt from the track and weep openings with a soft brush, verify that the sash closes and locks evenly, and watch for drainage after the rain eases. Do not drill new holes, block weeps with caulk, remove the track, spray a hose at the window, climb, or open wall finishes. If the leak continues after the track is clear, appears around the frame or trim, leaves wet insulation, rot, mold, loose glass, or active electrical water, arrange a qualified window or building-envelope inspection; heavy-rain leaks often originate in flashing, cladding, roof, or wall drainage above the window rather than in the window itself.
Before you begin
Safety first
- This article covers safe interior and ground-level observation, loose-debris cleaning from visible track and weeps, and model-directed sash checks only. Do not climb, work outside in storms, touch wet electrical equipment, remove glass or wall finishes, drill or seal weeps, pressure-test with a hose, or dismantle the window or building envelope.
Work through in order
Diagnostic checks
Use only checks that match the exact appliance or system and its official guide.
-
Check 1
Move furnishings and catch water from inside without climbing, keep water away from outlets, switches, power strips, and electronics, and inspect only from a dry stable position.
Expected result: Record a small controlled drip, a growing pool, water entering an electrical area, ceiling or wall bulging, loose glass, or an unsafe height or access condition.
Next step: Stop ordinary checks and use qualified electrical, water-damage, glazing, or building-envelope help for electrical water, active large leakage, bulging finishes, unstable glass, or unsafe access. Contain only what can be reached without climbing or opening the wall.
Stop if: Do not touch wet electrical equipment, stand on a sill or ladder in storm conditions, remove trim, or enter a saturated or visibly damaged area.
Why this matters
Why: Flooding, electrical contact, structural damage, and fall exposure take priority over locating a weep hole or testing the window.
-
Check 2
During or immediately after the heavy rain, photograph the interior sill, sash corners, jambs, head, trim, adjacent ceiling and wall, and note whether water started at the track, glass edge, frame, above the window, or a side joint.
Expected result: Classify the path as track pooling, water crossing the inner seal, a frame-corner drip, water running down trim, water from above or beside the unit, or a uniform interior film.
Next step: Keep the photo record and compare it after the rain stops. Continue with the matching track, sash, condensation, or upstream-envelope branch instead of applying sealant everywhere.
Stop if: Do not remove drywall, probe soft framing, spray water into the assembly, or climb outside to trace the path.
Why this matters
Why: The first wet point helps separate the window's drainage and weatherstripping from an installation, roof, siding, or wall-envelope source; a uniform film may be condensation rather than rain entry.
-
Check 3
When the storm has eased and access is safe, inspect the lower track and visible exterior weep openings from inside or ground level for leaves, dirt, paint, sealant, sand, insect blockage, or a stuck weep baffle.
Expected result: Record clear openings with water draining outside, visible debris with standing water, a missing or damaged cover, or no visible drainage path for the window type.
Next step: Clear only loose surface debris with a small soft bottlebrush or dry brush as the manufacturer permits, then observe natural drainage after rain. Leave hidden or damaged drainage paths to a qualified window professional.
Stop if: Do not drill, enlarge, seal, caulk, paint over, or push a rigid object deep into a weep channel, and do not remove the track.
Why this matters
Why: A blocked weep system can allow normal rainwater collected in the track to pool and cross the inner sill. A clear system with water still entering points toward sash seals, frame joints, or upstream construction.
-
Check 4
After a safe surface cleaning and only when the weather is calm, observe whether water already in the track drains to the exterior and whether the interior sill remains dry; do not create a forceful hose test.
Expected result: Record prompt outward drainage, slow but complete drainage, persistent standing water, or water crossing the inner seal despite clear visible weeps.
Next step: Document the result and keep the window closed during the next storm if possible. Request service for persistent pooling, inward flow, or a design-specific drainage problem.
Stop if: Do not pressure-wash, flood the track, insert wire to force a hidden channel, or repeat testing during heavy rain or wind.
Why this matters
Why: Outward drainage supports a track-maintenance issue. Persistent pooling or inward flow means the weep channel, sash seal, frame geometry, or installation needs closer professional assessment.
-
Check 5
From inside and without forcing the hardware, close and lock the sash or operating panel, inspect visible weatherstripping for gaps, compression loss, cracks, or displacement, and check whether the panel sits evenly in the frame.
Expected result: Record an even locked seal, a sash that rocks or does not latch, visible damaged weatherstripping, a corner gap, or water entering at the glass-to-sash or sash-to-frame edge.
Next step: Clean only visible dirt and use the manufacturer's adjustment or replacement guidance for the exact window. Arrange glazing or window service for damaged seals, hardware, glass, or alignment; do not substitute generic caulk.
Stop if: Do not force a lock, remove glazing beads, cut weatherstrip without the model instructions, or operate a loose or cracked sash.
Why this matters
Why: An uneven sash or damaged weatherstrip can let wind-driven rain bypass the intended drainage path. A normal seal with water starting above, beside, or behind trim shifts suspicion to the building envelope.
-
Check 6
Compare the moisture pattern with weather and indoor conditions: inspect whether droplets form uniformly on the room-side glass or frame without a track path, or whether water arrives at the track and follows a distinct path only during wind-driven rain.
Expected result: Record a uniform interior film or droplets during high indoor humidity or cold surfaces, versus rain-timed water that pools, crosses the inner seal, or runs from a frame or wall joint.
Next step: For condensation, reduce indoor moisture and monitor the frame and wall. For rain intrusion, preserve the path record and follow the track, sash, or upstream-envelope branch; recurring moisture needs assessment.
Stop if: Do not seal a weep opening or paint over wet materials before the source is identified, and do not assume every wet window is condensation.
Why this matters
Why: FGIA and DOE describe interior condensation as humid indoor air meeting a colder surface. Rain-timed directional flow is more consistent with drainage, seal, flashing, or wall-envelope intrusion.
-
Check 7
From ground level or an interior safe position, inspect visible head flashing or drip-cap area, siding or cladding joints, sealant gaps, roof or gutter discharge above, and trim staining without removing materials or climbing.
Expected result: Record water beginning above or beside the window, failed or cracked exterior sealant, overflowing gutter or roof discharge, stained or soft trim, or no visible upstream defect.
Next step: Arrange a qualified window installer or building-envelope professional for flashing, cladding, roof, gutter, or wall drainage diagnosis. Keep the area dry and documented rather than sealing the inside as a cure.
Stop if: Do not climb, remove siding or flashing, cut wall finishes, inject foam, or reseal over a blocked drain or wet cavity.
Why this matters
Why: Water can enter the wall or rough opening above the window and emerge at the interior trim, even when the track and sash are sound. Marvin identifies flashing, weather-resistant barriers, drip caps, and perimeter sealant as part of the water-infiltration path.
-
Check 8
After the area is safe and accessible, check for recurring staining, soft or swollen trim, peeling finishes, musty odor, visible mold, damaged insulation, or moisture spreading into the wall or ceiling; do not open the wall to investigate.
Expected result: Record a surface that dries with no damage, repeated or expanding staining, soft or rotten material, visible mold, or moisture near wiring and electrical boxes.
Next step: Stop and arrange qualified water-damage, mold, electrical, or building-envelope assessment as appropriate. Preserve photos and the timing record and keep the affected area dry and unoccupied if unsafe.
Stop if: Do not scrape extensive mold, energize wet electrical circuits, remove wall finishes, or continue testing active large leakage.
Why this matters
Why: A repeated heavy-rain leak can damage surrounding components and may be an upstream building-envelope problem. Soft framing, mold, or electrical moisture exceeds a window-track cleaning task.
-
Check 9
After visible track and sash checks are normal and conditions are calm, observe one subsequent rain event from a safe interior position only; do not hose-test, climb, or dismantle the assembly.
Expected result: Record clear track drainage with no interior entry, a repeat track overflow, water at the sash or frame, water from above or beside, or worsening wall and trim moisture.
Next step: Keep the window closed during severe weather and arrange qualified window, glazing, roofing, plumbing, water-damage, or building-envelope service according to the observed path.
Stop if: Do not repeat storm tests if water reaches electricity, damage is expanding, glass is loose, access is unsafe, or the leak is active and substantial.
Why this matters
Why: A repeat location and timing result tells the service professional whether to start at the weep system, sash seal, frame installation, or upstream wall and roof drainage; it does not prove a hidden part.
-
Check 10
Prepare the window type, approximate age or installation history, room and elevation, weather direction, photos of the first wet point and exterior weeps, track-cleaning result, sash-seal condition, and any wall or ceiling damage for the service professional.
Expected result: Record whether the issue is isolated to one unit, repeats on multiple windows or elevations, began after exterior work, and occurs only with wind-driven heavy rain or also in calm rain.
Next step: Give the evidence to a qualified window installer or building-envelope professional and separately identify any electrical, mold, roof, gutter, or structural concern.
Stop if: Do not authorize drilling, broad caulking, wall opening, or replacement before the source path and drainage design are identified.
Why this matters
Why: A pattern across elevations or above-window paths favors building-envelope or drainage investigation, while one unit with blocked weeps or a damaged sash may begin with window service.
Use your observations
Decision map
Find the observation that best matches what you see, then follow the next safe action.
-
PATH 01Safety boundary
What you see
Water is visible in the lower track during wind-driven rain but drains outside, does not cross the inner seal, and leaves the wall and sill dry.
Do this next
Keep the track and visible weeps clear of loose debris and monitor the next storm from a safe position.
Why this path and its safety boundary
Why it matters: This can be normal operation of a weep system rather than a failed window.
Safety stop: Stop if water remains after rain, crosses inside, or damages trim; do not seal the weeps.
-
PATH 02Safety boundary
What you see
Water pools in the track, drainage is slow or absent, and visible weep openings contain dirt, paint, sealant, or debris.
Do this next
Clear only loose surface debris with a soft brush from safe access and observe natural drainage; request window service for hidden or damaged channels.
Why this path and its safety boundary
Why it matters: The intended drainage path may be blocked, allowing accumulated rainwater to rise toward the inner sill.
Safety stop: Do not drill, enlarge, caulk, remove the track, or push a rigid tool deeply into the frame.
-
PATH 03Safety boundary
What you see
Water crosses the inner seal or begins at the sash edge, corner, lock rail, glass-to-sash joint, or visibly damaged weatherstripping while the weeps appear clear.
Do this next
Keep the window closed during rain and arrange qualified window or glazing service with photos of the exact entry point; use only model-specific adjustment guidance.
Why this path and its safety boundary
Why it matters: The sash may not be compressing evenly or the weatherstrip, frame joint, or glazing seal may be damaged.
Safety stop: Do not force hardware, remove glazing beads, cut seals, or smear caulk over a drainage opening.
-
PATH 04Safety boundary
What you see
Water first appears above or beside the frame, runs down trim or the wall, recurs after exterior work, or affects more than one opening or elevation.
Do this next
Arrange building-envelope or qualified window-installation inspection; coordinate roofing, gutter, or cladding service when the observed path points there.
Why this path and its safety boundary
Why it matters: The source may be flashing, drip cap, siding, cladding, roof, gutter, rough-opening drainage, or another wall-envelope path rather than the window track.
Safety stop: Do not seal the interior as a cure, remove siding or flashing, cut the wall, or climb during a storm.
-
PATH 05Safety boundary
What you see
Moisture appears as a relatively uniform film or droplets on the room-side glass or frame during high indoor humidity or cold surface conditions, without a rain-timed directional track path.
Do this next
Reduce indoor moisture and improve safe air exchange as practical, dry the surfaces, and monitor whether the wall or trim remains dry.
Why this path and its safety boundary
Why it matters: This pattern is more consistent with condensation from humid indoor air meeting a colder surface than with rain intrusion.
Safety stop: Stop treating it as condensation if moisture follows a frame or wall path, occurs only in rain, or causes staining, soft materials, or mold.
-
PATH 06Safety boundary
What you see
The leak leaves recurring stains, soft or rotten trim, musty odor, visible mold, wet insulation, or moisture spreading into the wall or ceiling.
Do this next
Keep the area dry and arrange qualified water-damage, mold, and building-envelope assessment; use electrical service for moisture near wiring.
Why this path and its safety boundary
Why it matters: The issue has exceeded routine track care and may involve concealed water damage, mold, or structural and building-envelope deterioration.
Safety stop: Do not open the wall, scrape extensive mold, energize wet electrical circuits, or conceal damage with paint or interior caulk.
-
PATH 07Safety boundary
What you see
Water reaches an outlet, switch, light, wiring, or electrical box, the glass or sash is loose or cracked, the frame is unstable, or access requires climbing in wind or rain.
Do this next
Keep people away, isolate affected power only from a dry safe position if possible, and arrange qualified electrical, glazing, or structural service.
Why this path and its safety boundary
Why it matters: Shock, fire, glass, fall, and structural risks take priority over locating the leak.
Safety stop: Do not touch wet electrical equipment, climb, operate the window, remove glass, or continue a storm test.
-
PATH 08Safety boundary
What you see
The track is clear, the sash appears sealed, condensation is unlikely, but water still enters during heavy rain or the source cannot be located safely.
Do this next
Keep the window closed during severe weather and arrange qualified window or building-envelope diagnosis with the photo and timing record.
Why this path and its safety boundary
Why it matters: A hidden weep, frame joint, installation, flashing, cladding, roof, gutter, or wall path remains possible; a generic caulk repair could trap water or obscure the source.
Safety stop: Do not drill, pressure-test, remove wall or exterior materials, or apply broad sealant before diagnosis.
Helpful context
Understand the symptom
A wet track is not automatically a failed window
Many window systems are designed to receive some wind-driven rain in the sill or track and route it back outside through weep openings. The useful question is not whether the track is ever wet, but whether it drains, whether water crosses the inner weather seal, and whether the surrounding wall is staying dry. Heavy rain can also expose a failed sash seal, frame joint, flashing detail, siding or roof transition, or an upstream wall leak.
Trace the first wet point
Use a dry paper towel or removable marker on the interior trim to identify where water first appears, and photograph the track, sash corners, head, jambs, sill, and adjacent wall. Water only in the lower track that drains outward suggests a drainage condition. Water crossing the inner seal, starting at a corner, running down trim, or appearing above the window shifts the diagnosis toward weatherstripping, frame joints, flashing, cladding, roof, or wall drainage.
Clean drainage without changing the window design
When the opening is reachable safely from inside or ground level, remove loose dirt from the track and visible exterior weep openings with a soft brush or dry cloth. Do not seal the openings, drill a new path, push a rigid object deep into the frame, or remove a sill or sash to expose hidden channels. Marvin's installation guidance specifically warns that sealant must stay away from lower drain weeps.
Keep condensation separate from rain intrusion
Condensation forms when humid indoor air meets a colder glass or frame surface and can occur without a rain leak. Compare the timing and location: a uniform film or droplets during humid or cold conditions may be condensation, while water that arrives only with wind-driven rain and follows a track, frame, trim, or wall path is an intrusion branch. Repeated moisture can damage window components and surrounding wall surfaces, so do not ignore staining or soft trim.
Safety boundary
Stop conditions
- Stop immediately if water reaches outlets, switches, wiring, or electrical equipment; do not touch wet electrical parts or continue testing.
- Stop for active substantial leakage, bulging or soft wall or ceiling materials, visible mold, rotten framing, or moisture spreading into the building.
- Stop for loose or cracked glass, an unstable sash or frame, or any inspection that requires climbing or working outside during wind or heavy rain.
- Do not drill, enlarge, seal, paint over, or block weep openings; do not remove tracks, flashing, siding, glazing, or wall finishes as an owner leak test.
- Do not use a forceful hose or pressure washer to reproduce a storm leak, and do not inject foam or broad caulk before the water path is identified.
- After a clear track and sash check fails, or an upstream wall, roof, gutter, or flashing path is suspected, keep the window closed in severe weather and arrange qualified service.
Only after diagnosis
Potential parts
- window weatherstripping or sash seal
Consider only when water crosses the sash seal and qualified inspection finds damaged, missing, or poorly compressed weatherstripping after the track weeps are clear.
Confirm the exact window type and manufacturer profile; generic weatherstrip may change drainage or sash operation. - window weep cover or drainage component
Consider only when the visible weep cover or drainage component is missing or damaged and the manufacturer or window professional confirms it is the source of poor drainage.
Weep geometry is product-specific; do not drill a substitute opening or block the designed path. - window flashing, sill-pan, or perimeter sealant repair
Consider only after a qualified envelope inspection finds water entering at the installation, rough opening, flashing, or perimeter rather than through the track or sash.
Sealant and flashing must match the window, cladding, and water-resistive-barrier system; broad caulk is not proof of a compatible repair.
When checks do not resolve it
Need a professional?
Arrange qualified window or glazing service when a clear weep system still allows water across the inner seal, weatherstripping or hardware is damaged, the sash does not close or lock evenly, or the leak recurs. Arrange building-envelope, roofing, gutter, or cladding inspection when water begins above or beside the frame, affects multiple openings, follows exterior work, or leaves trim and wall damage. Use qualified water-damage or mold help for soft, stained, rotten, or moldy materials and qualified electrical service for water near wiring or outlets. Do not climb, dismantle the window, drill weeps, or reseal broadly during heavy rain.
Safety scope: This article covers safe interior and ground-level observation, loose-debris cleaning from visible track and weeps, and model-directed sash checks only. Do not climb, work outside in storms, touch wet electrical equipment, remove glass or wall finishes, drill or seal weeps, pressure-test with a hose, or dismantle the window or building envelope.
Common questions
FAQ
Is water in my window track during heavy rain normal?
A small amount can be normal when wind-driven rain enters the sill or track and drains back outside through clear weep openings. It is not normal if water remains, crosses the inner seal, runs down trim, or damages the wall. Keep the track and weeps clear without blocking or drilling them.
How do I clear window weep holes safely?
From safe ground-level or interior access after the storm, remove loose dirt from the track and visible openings with a small soft brush or dry cloth, following the product instructions. Do not drill, enlarge, seal, paint over, or push a rigid tool deep into the frame.
Why does my window leak only during heavy or windy rain?
Wind-driven rain can load the sill and track more heavily and expose blocked weeps, a sash seal gap, frame or flashing defect, or water entering the wall above or beside the window. Trace the first wet point and do not assume the track is the source.
How can I tell rain leaking from condensation?
Uniform droplets or film on the room-side glass or frame during humid or cold conditions can be condensation. Rain-timed water that pools in the track, crosses the inner seal, or runs from a frame or wall joint is an intrusion pattern. Repeated moisture or staining needs assessment.
Should I caulk the inside of a leaking window?
Do not use interior caulk as the first diagnosis. It can hide the entry path or block designed drainage. First identify whether the track drains, the sash closes and seals, or water begins above or beside the unit; use product-specific sealant and flashing repairs only after qualified assessment.
What if the track is clear but water still comes inside?
If clear weeps still allow water across the inner seal, inspect the sash weatherstrip and alignment from inside. If water begins above, beside, or behind trim, the source may be flashing, siding, roof, gutter, rough-opening, or wall drainage. Arrange qualified window or building-envelope service.
Can a window leak damage the wall?
Yes. Repeated moisture can stain, soften, swell, rot, or promote mold in trim and surrounding wall materials. Stop DIY tracing when materials are soft, the leak is active and substantial, moisture reaches electrical components, or structural damage or unsafe glass is present.
When should I stop inspecting a leaking window?
Stop for water near electricity, active large leakage, bulging or soft wall materials, visible mold, loose or cracked glass, an unstable frame, or any need to climb or work outside in wind and rain. Contain only what is safely reachable and arrange qualified service.
Read the exact guide
Official sources
- Maximize Window, Door & Skylight LifespanFenestration and Glazing Industry Alliance · FGIA homeowner resource for window, door, and skylight systems; individual product manuals and installation details take precedence.
- Essential Window InstallationMarvin · Marvin Essential Collection installation instructions; details are product and installation-system specific, but illustrate why drainage openings must remain clear.
- Purchasing Energy-Efficient Residential Windows, Doors, and SkylightsU.S. Department of Energy · DOE/FEMP technical guidance for residential fenestration; it does not diagnose a specific window or building leak.
- Window Parts: Learn About the Components of a WindowMarvin · Marvin component glossary; terminology is general, while dimensions and repair details vary by product.
Community feedback
Share a repair observation
Share a plain-text repair observation. Accepted observations are published automatically; this page may take a moment to update.