
On this page
Start here
Quick answer
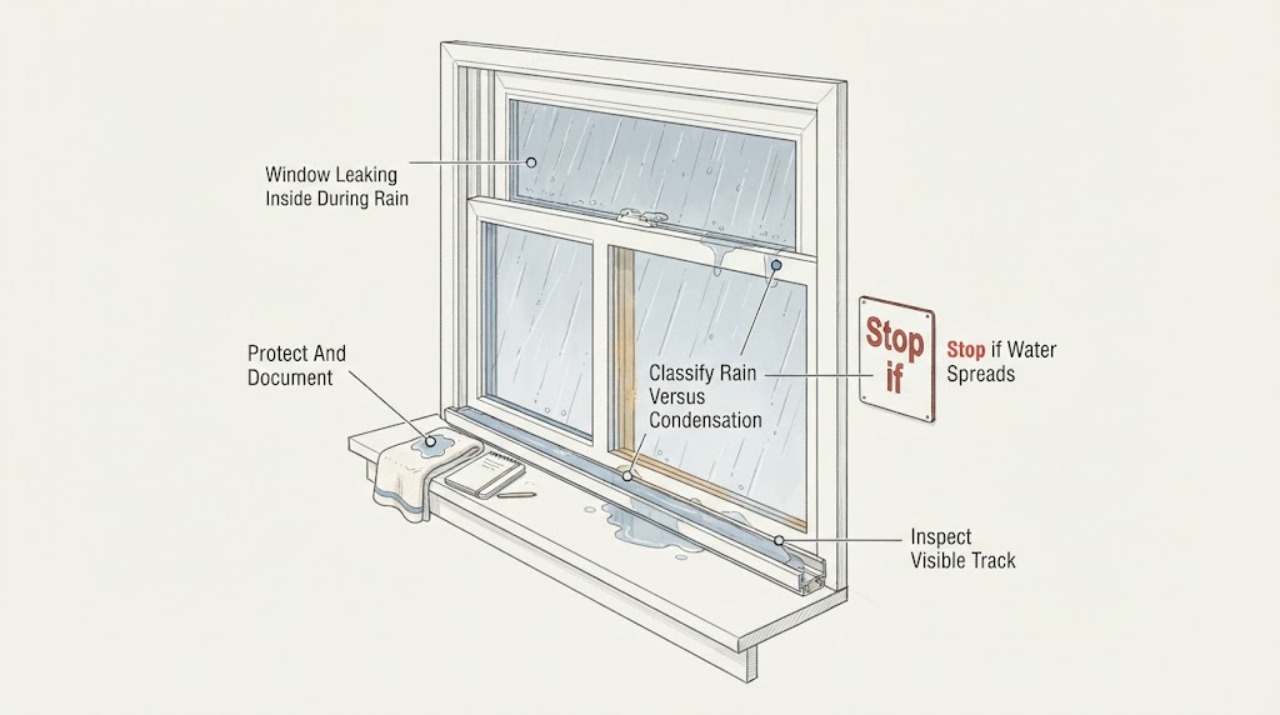
Water inside a window track during rain may be overflowing from a blocked or undersized drain path, passing the sash seal, entering at a frame joint, or arriving from flashing, siding, roof, or another wall opening above the window. First protect the room, photograph where water first appears, and inspect only the visible track, drain openings, sash seal, frame, sill, and nearby wall from a safe position. Never seal a drain opening or cover wet material before the path is known. If water is reaching electrical equipment, the wall or floor is saturated, the frame or glass is loose, mold or soft wood is present, the leak is active and large, or the exterior can only be checked from height, stop and arrange qualified window or building-envelope service.
Before you begin
Safety first
- This article supports ordinary-access observation and a narrow response on a dry, sound, known component only. Do not open walls, remove glass or cladding, block drainage, work at height, touch wet electrical equipment, or conceal active water damage.
Work through in order
Diagnostic checks
Use only checks that match the exact appliance or system and its official guide.
-
Check 1
During rain, place towels or a container to protect the room and photograph the first wet point, water trail, track, sill, frame corners, trim, and wall below without opening the wall or disturbing the window.
Expected result: Record whether water first appears in the track, at the sash edge, at a frame-to-trim joint, above the window, below the sill, or from the wall; note whether flow is a drip, repeated trail, or active stream.
Next step: Keep the photos and a simple rain-time note, then follow the branch that matches the earliest wet location.
Stop if: Stop for active large flow, ceiling or wall saturation, water near electrical equipment, unstable finishes, or any need to create a test spray.
Why this matters
Why: The first wet point is more useful than the largest puddle. Track overflow suggests a drainage or sash path; water above or beside the frame suggests an upstream wall or flashing path; water with no rain relationship raises condensation or another indoor source.
-
Check 2
Compare the moisture timing with rainfall, indoor cooking or bathing, outdoor cold, and other windows while keeping the affected surface dry and visible.
Expected result: Record moisture only during or after rain, room-side moisture during cold weather without rain, moisture between panes, or a leak that is unrelated to weather.
Next step: Do not apply a seal until the moisture category is known; use the rain-entry, condensation, glazing, or other-source branch as appropriate.
Stop if: Stop for concealed wall moisture, musty odor, visible mold, damaged glazing, or water near electrical equipment.
Why this matters
Why: Rain-linked water supports an exterior, track, seal, or wall-entry path. Room-side moisture without rain is more consistent with condensation. Moisture between panes suggests a failed insulated unit, while weather-independent water may come from plumbing or another source.
-
Check 3
With the window in its normal position, inspect the visible track, sill, drain openings, sash edge, and frame corners; remove only loose surface dirt by the exact window instructions and do not probe the frame.
Expected result: Record standing water, debris at a drain opening, a blocked or damaged outlet, a displaced sash seal, a track crack, or a clear track with water arriving from another edge.
Next step: Keep visible drain openings clear of loose debris when the instructions allow it, photograph the result, and do not add holes or sealant.
Stop if: Do not drill, enlarge, punch, wire, pry, remove sash components, or fill any drain opening with caulk.
Why this matters
Why: Standing water or a blocked visible path can explain overflow, but a clear track with water from a frame or sash joint shifts attention to seals, alignment, flashing, or an upstream wall detail. A cracked track or hidden outlet requires model-specific service.
-
Check 4
Open and close the window once by its normal handle or lock, then inspect the visible sash contact, meeting rail, gasket, latch, and frame alignment without forcing the sash or removing hardware.
Expected result: Record even contact and normal latch engagement, a torn or missing gasket, a corner gap, a sash that binds or sits unevenly, or glass or frame movement.
Next step: Identify the exact window type and seal only for a compatible part assessment; arrange window or glazing service when closure, glass, or frame stability is abnormal.
Stop if: Stop for loose or cracked glass, a sash that may fall, binding that needs force, damaged hardware, or a frame that moves.
Why this matters
Why: A moving-contact defect can allow rain into the track or room. Binding, uneven alignment, moving glass, or frame movement suggests a hardware, glazing, or structural issue rather than a simple weatherstrip replacement.
-
Check 5
From inside and from a safe ground-level view outside, compare the wet pattern at the head, jambs, sill, trim, siding, roof edge, and nearby wall; do not remove exterior cladding or use a ladder.
Expected result: Record water beginning above the head, at one side, beneath the sill, at the track, or inside the wall; note staining, peeling finish, soft material, gaps, or a nearby roof or wall penetration.
Next step: Document the whole path and arrange building-envelope or window service when the entry is not limited to an accessible, dry track or sash seal.
Stop if: Stop for exterior work at height, soft or displaced structure, active large leakage, or any need to remove cladding, trim, or flashing.
Why this matters
Why: Water above or beside the window can be an upstream flashing, siding, roof, or wall-opening problem. Water only at the track may be a sash or drainage issue. Soft material, staining, or a path inside the wall means surface caulk could conceal ongoing damage.
-
Check 6
Blot accessible water, ventilate the room in a way that does not worsen the rain entry, and inspect the sill, trim, and wall for recurring dampness, musty odor, or visible growth; do not cover wet material.
Expected result: Record whether the surface dries, remains damp, shows a stain or softened finish, has mold-like growth, or reveals moisture in an electrical area or inside the wall.
Next step: Keep the leak documented, correct the source through qualified service, and use a moisture or mold professional when damage is concealed, extensive, or unsafe to disturb.
Stop if: Stop for extensive mold, contaminated water, wet insulation, a softened frame or wall, or water near electrical equipment.
Why this matters
Why: Prompt drying reduces secondary damage, but persistent dampness or a hidden wet area means the water source remains active. EPA guidance treats rain leaks around windows and flashing as source problems and recommends professional escalation for extensive damage or mold.
-
Check 7
Only when the source is a clearly identified, dry, sound, ordinary-access component, match the response to it: clear loose debris from a visible permitted track path or assess a compatible sash seal; do not alter the window drainage design.
Expected result: After the next ordinary rain, record whether water exits through the intended path, stays in the track, reaches the room, or appears at a different frame or wall location.
Next step: Keep drain openings and egress clear, stop adding sealant, and arrange service if the leak persists or changes location.
Stop if: Do not seal over a wet joint, block drain openings, close an emergency exit, or perform an exterior repair from an unsafe position.
Why this matters
Why: A dry track and normal exterior drainage after a narrow correction supports a local track or sash issue. Continued or redirected water indicates a concealed seal, flashing, drainage, or wall path and needs professional diagnosis.
-
Check 8
Before touching the wet area again, identify nearby outlets, wiring, equipment, structural finishes, and the full water extent from a dry position; do not touch wet electrical equipment or open a wall.
Expected result: Record a dry isolated sill, water near an outlet or device, a tripped protective device, smoke or burning odor, soft or moving structure, or water spreading beyond the opening.
Next step: Keep people clear, isolate power only from a dry safe position when possible, and contact emergency, electrical, moisture, or building-envelope service according to the finding.
Stop if: Stop for arcing, smoke, burning odor, hot equipment, water near energized equipment, unstable structure, or active uncontrolled flow.
Why this matters
Why: Electrical contact, fire signs, or structural wetness changes the response to urgent safety and qualified service. A small isolated surface leak without hazards can remain on the documented window-repair path.
Use your observations
Decision map
Find the observation that best matches what you see, then follow the next safe action.
-
PATH 01Safety boundary
What you see
Rain collects in the visible track and the first wet point is near a drain opening or track outlet.
Do this next
Remove only loose surface debris that the window instructions permit, keep the drain opening clear, and arrange service if water still reaches the room.
Why this path and its safety boundary
Why it matters: A blocked, damaged, or undersized drain path or a sash path may be involved, but the exact design is model-specific.
Safety stop: Do not drill, enlarge, wire, or caulk the drain opening; stop for a cracked track or concealed water path.
-
PATH 02Safety boundary
What you see
Water starts at the moving sash contact, meeting rail, latch side, or a visibly uneven sash.
Do this next
Identify the exact window type and arrange a compatible weatherstrip or alignment assessment; do not force the sash.
Why this path and its safety boundary
Why it matters: A worn contact seal, latch compression, or alignment issue is more likely than an exterior wall leak.
Safety stop: Stop for binding, falling-sash risk, loose glass, damaged hardware, or a closure that cannot be made safe.
-
PATH 03Safety boundary
What you see
Water begins above or beside the window, follows trim or wall, or appears at the room side away from the track.
Do this next
Document the complete path and arrange building-envelope or window service to correct the source rather than adding interior caulk.
Why this path and its safety boundary
Why it matters: Flashing, siding, roof, rough-opening, or another wall penetration may be sending water to the window area.
Safety stop: Do not remove cladding, open the wall, seal wet material, or work at height.
-
PATH 04Safety boundary
What you see
Moisture appears on the room-side surface during cold or humid conditions without a rain-linked trail.
Do this next
Dry the surface, use ordinary kitchen and bath ventilation, and seek moisture-control or glazing advice if it recurs or affects multiple windows.
Why this path and its safety boundary
Why it matters: Condensation is more likely than rain entry, although recurring moisture can still damage finishes and encourage mold.
Safety stop: Stop for moisture between panes, visible mold, softened trim, or dampness inside the wall.
-
PATH 05Safety boundary
What you see
Glass is cracked or loose, the sealed glazing is visibly failed, or the frame is soft, displaced, or unstable.
Do this next
Keep people away from the opening, avoid operating the sash, and arrange qualified glazing or window service.
Why this path and its safety boundary
Why it matters: Glazing or structural service is required; a track cleaning or surface seal cannot make the opening safe.
Safety stop: Do not remove glass, glazing beads, trim, or frame components.
-
PATH 06Safety boundary
What you see
The sill or wall remains damp, smells musty, has visible growth, or contains softened or stained material.
Do this next
Dry what is safely accessible, document the extent, correct the leak source, and arrange qualified moisture or mold assessment.
Why this path and its safety boundary
Why it matters: The source is not resolved and moisture or mold remediation may be needed; covering the surface can hide ongoing damage.
Safety stop: Do not disturb extensive growth, wet insulation, contaminated water, or concealed wall material.
-
PATH 07Safety boundary
What you see
Water reaches an outlet or device, a protective device trips, or there is smoke, burning odor, or arcing.
Do this next
Keep clear, isolate power only from a dry safe position when possible, and contact emergency or qualified electrical service.
Why this path and its safety boundary
Why it matters: This is an electrical and water-safety emergency, not a window-seal repair.
Safety stop: Do not touch wet equipment, reset protection repeatedly, or continue leak testing.
-
PATH 08Safety boundary
What you see
The leak is confined to a known dry, sound, ordinary-access track or sash contact, with no structural, electrical, glazing, or mold warning.
Do this next
Follow the exact window instructions, keep drain openings open, and monitor the next ordinary rain without creating a test spray.
Why this path and its safety boundary
Why it matters: A narrow reversible inspection or compatible seal response may be reasonable, but the drainage and egress design must remain intact.
Safety stop: Stop if water persists, moves into the wall, or the correction prevents normal opening, latching, drainage, or egress.
Helpful context
Understand the symptom
Water in the track is a starting location, not proof of the failed part
A sliding or hung window can collect a limited amount of rain in a track and route it through designed drain openings. Overflow, water that reaches the room-side sill, or a wet wall means that capacity, drainage, seals, frame joints, or an upstream wall detail needs investigation. Water may also appear at the inside trim even when it entered above or beside the window. EPA building guidance lists rain leaks around windows and flashing as moisture problems whose source should be corrected, rather than hidden with interior sealant.
Document the first wet point before wiping everything dry
During or immediately after rain, use towels and a container to protect finishes, then photograph the first wet point, the water trail, the track, sill, frame corners, trim, and the wall below. Room-side condensation usually appears without a rain-linked trail, while rain entry often follows a repeatable path from a corner, joint, sill, or upper wall. Do not run a hose or create a larger leak as a test.
Keep the track and its drainage path intact
After the window is dry enough to inspect safely, remove only loose surface dirt from the visible track as the window instructions permit. Look for drain openings, a damaged track, debris at the outlet, a displaced sash seal, or water that cannot leave the track. Do not drill new holes, enlarge an opening, fill a drain with caulk, or push debris deeper into the frame. The exact drainage design varies, and a blocked path may direct water into the frame or wall instead of outside.
Separate sash-seal leakage from an upstream wall leak
Inspect the sash contact, meeting rail, frame corners, sill, trim, and the wall above the window. A gap that appears only when the sash is closed points toward contact, alignment, or seal condition; water that starts above the head, at side trim, or in the wall can involve flashing, siding, roof, or another penetration. DOE and EPA guidance emphasize keeping water-management layers and drainage working together, so surface caulk at the room side is not a substitute for finding an upstream entry.
Condensation follows a different decision path
If the glass or room-side frame becomes wet during cold weather without a rain trail, consider indoor humidity and a cold surface rather than assuming the track is leaking. Dry the accessible surface and note whether the same moisture appears on multiple windows. EPA and ENERGY STAR identify condensation as a separate moisture condition; recurring dampness, musty odor, soft trim, or visible mold still needs moisture control and may need professional assessment.
Use a narrow, reversible response only when the evidence is clear
A visible, dry, sound sash-contact seal may justify an exact compatible weatherstrip assessment. A dry stationary frame-to-trim joint may justify a compatible sealant assessment only when drainage, flashing, and structural movement have been ruled out. Keep all designed drain openings open and do not close an emergency exit. If the path is concealed, wet, separating, or outside ordinary safe access, document it and call a window or building-envelope professional.
Safety boundary
Stop conditions
- Stop immediately for active large leakage, water near electrical equipment, smoke, burning odor, arcing, a tripped protective device, or any unsafe wet area.
- Do not drill, enlarge, wire, or caulk a track drain or weep opening; do not block a designed drainage path or an emergency exit.
- Do not seal over wet, moldy, soft, separating, or structurally moving material, and do not use interior caulk to hide an upstream flashing, roof, siding, or wall leak.
- Do not remove glass, glazing beads, sash components, trim, exterior cladding, or flashing as a home diagnostic; do not work at height without qualified equipment and training.
- Stop for cracked or loose glass, an unstable frame, a sash that binds or may fall, extensive mold, contaminated water, wet insulation, or concealed wall moisture.
- Do not create a hose or spray test, touch wet electrical equipment, reset protection repeatedly, or continue testing a leak that has not been made safe.
Only after diagnosis
Potential parts
- window track or sash drain insert
Consider this category only when the exact window design has a documented replaceable drain component and the visible part is damaged rather than merely dirty.
Confirm the exact window manufacturer, model, track design, and drainage direction; do not drill a new outlet or substitute a part that changes water flow. - window sash weatherstrip or gasket
Consider this category only when rain enters at a moving sash contact and the seal profile and operating type are known.
Match the exact operating type, groove or channel, compression, and closure clearance; do not install a seal that prevents normal latching or egress. - window latch or keeper
Consider this category only when the sash does not draw evenly into its seal and the hardware is visibly damaged without frame or glass movement.
Confirm the exact window hardware pattern and mounting method; do not drill new holes into glass or a structural frame. - compatible window glazing unit
Consider this category only when a qualified glazier confirms failed insulated glazing, cracked glass, or a damaged sealed unit.
Confirm exact dimensions, glazing safety requirements, spacer or seal design, and frame compatibility through qualified service; do not remove or cut glass as a home check.
When checks do not resolve it
Need a professional?
Arrange window or building-envelope service when water persists after a narrow, clearly matched track or sash check; begins above or beside the frame; follows trim or wall; or requires flashing, exterior, structural, glazing, or concealed rough-opening work. Arrange moisture or mold service for softened material, wet insulation, recurring staining, extensive growth, contaminated water, or dampness inside the wall. Use emergency or qualified electrical service for water near energized equipment, smoke, burning odor, arcing, or repeated protective shutdown.
Safety scope: This article supports ordinary-access observation and a narrow response on a dry, sound, known component only. Do not open walls, remove glass or cladding, block drainage, work at height, touch wet electrical equipment, or conceal active water damage.
Common questions
FAQ
Why is water appearing inside the window track when it rains?
It may be track overflow, a blocked or damaged drain path, rain entering past the sash seal, or water arriving from the frame, flashing, siding, roof, or wall above. Photograph the first wet point and do not seal the track until the path is known.
Can I drill a hole in the track to drain a leaking window?
No. Track and frame drainage is part of the window design. Do not drill, enlarge, wire, or caulk a drain opening. Clear only loose surface debris when the exact instructions permit it, and arrange service if water still reaches the room.
How can I tell whether rain is getting past the sash seal?
After a safe inspection, note whether water begins at the moving sash contact, meeting rail, latch side, or an uneven corner. A torn gasket or closure gap supports a sash-seal path; water beginning above or beside the frame points more toward flashing or wall entry.
Should I caulk the inside of a leaking window?
Only a dry, sound, stationary joint may be a sealant candidate after drainage and upstream water entry are ruled out. Do not caulk wet or moldy material, block drainage, seal an emergency exit, or use interior caulk to hide an active wall leak.
Is window moisture always a rain leak?
No. Room-side moisture during cold or humid conditions without a rain trail may be condensation on a cold surface. Dry it and improve ordinary ventilation, but seek moisture or glazing advice if it recurs, appears between panes, or damages trim.
When does a window leak need a professional?
Call when water persists, begins above or beside the window, reaches the wall, requires exterior or height work, or is associated with soft material, mold, damaged glass, or an unstable frame. Use emergency or qualified electrical service for water near energized equipment, smoke, arcing, or a tripped protective device.
Read the exact guide
Official sources
- Mold and Your HomeU.S. Environmental Protection Agency · EPA household mold guidance; it does not diagnose a particular window or distinguish every water-entry path.
- A Brief Guide to Mold, Moisture and Your HomeU.S. Environmental Protection Agency · EPA general household moisture guidance; concealed damage, contaminated water, and health concerns may require qualified assessment.
- Guide to Air SealingU.S. Department of Energy · DOE residential air-sealing guidance; it does not replace a window manufacturer's drainage and flashing instructions.
- Energy Savings Plus Health: Indoor Air Quality Guidelines for Multifamily Building UpgradesU.S. Environmental Protection Agency · EPA building-upgrade guidance; it provides moisture-control principles, not a model-specific window installation procedure.
- Residential Windows, Doors, & SkylightsENERGY STAR · ENERGY STAR residential window guidance; the installed window instructions and local building requirements control a particular drainage design.
Community feedback
Share a repair observation
Share a plain-text repair observation. Accepted observations are published automatically; this page may take a moment to update.