
On this page
Start here
Quick answer
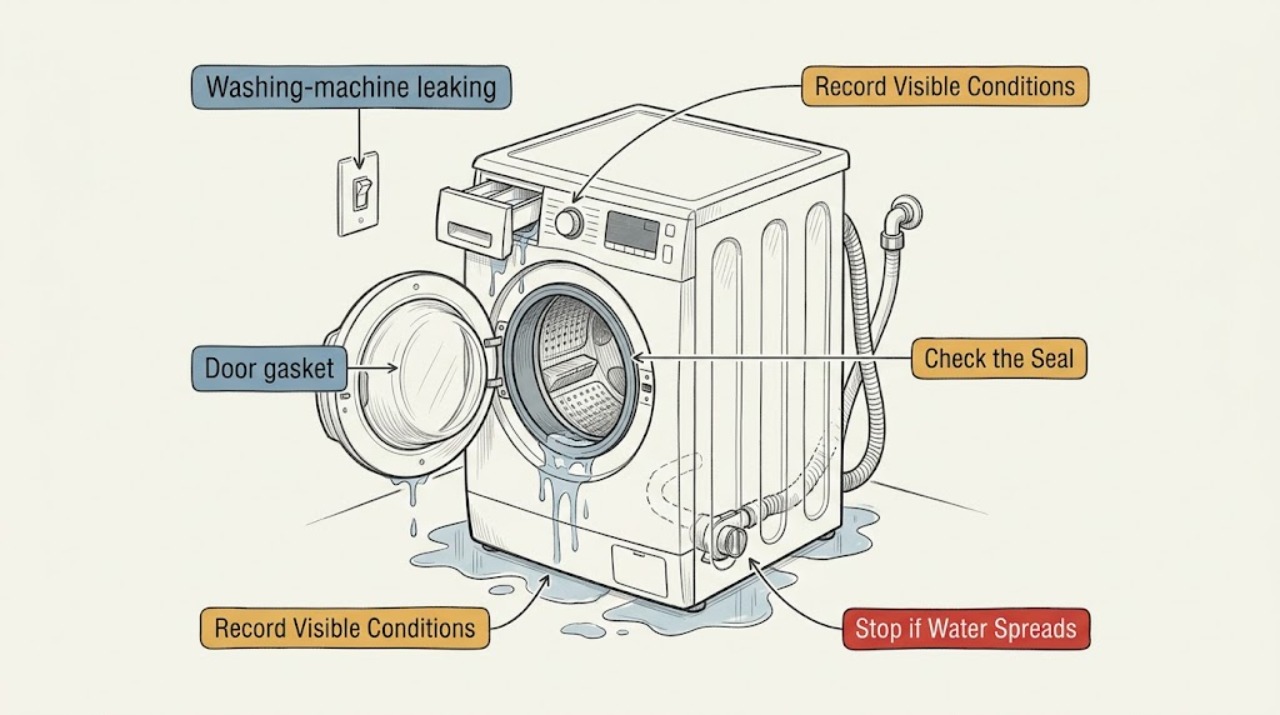
Stop a Crosley washer as soon as a puddle forms, keep water away from the plug and controls, and close the water supply if the flow continues. Identify whether the first wet point is at the door, dispenser, rear hose, drain connection, or underneath, and note whether it occurs during filling, washing, or draining. Crosley troubleshooting guidance points to a damaged or dirty door gasket, loose or damaged fill or drain hoses, an obstructed household drain, dispenser buildup, excess suds, and pump or filter problems. Safe visible checks are reasonable with power and water isolated; a large, internal, recurring, or electrically unsafe leak needs qualified service.
Work through in order
Diagnostic checks
Use only checks that match the exact appliance or system and its official guide.
-
Check 1
Stop the cycle, switch the washer off, and isolate it from power only when the plug and surrounding area are dry and safely reachable; close the household water faucets if water continues entering. Mop standing water without reaching into wet electrical areas.
Expected result: The flow stops when the supply is closed, or water continues as residual water drains from the drum, hose, or floor path.
Next step: Keep the washer out of use while locating the first wet point. If water has reached controls, wiring, or the plug, or the leak is fast, stop troubleshooting and arrange service.
Why this matters
Why: A continuing flow after the faucets are closed makes residual or internal water more likely and raises the need for service if the source is not visible.
-
Check 2
With the appliance stopped, place dry towels around the front, rear, and sides and record when the first new moisture appears: filling, washing, spinning, draining, or after the door is opened.
Expected result: Moisture at the door or dispenser points to a front path; a rear trail during fill points to an inlet connection; a rear or bottom trail during drain points to the drain hose, household drain, filter, or pump path.
Next step: Use the matching gasket, hose, dispenser, or drain check below. Do not run another test if the leak is spraying, flooding, or near an electrical area.
Why this matters
Why: Cycle phase and location narrow the source more reliably than the final puddle position.
-
Check 3
Inspect the visible door gasket and door contact area for a gasket that is unseated, torn, dirty, or holding a garment or object; check that the door closes evenly and that the load is not overfilled.
Expected result: A torn or displaced gasket, trapped item, or visible water tracking over the front confirms a door-seal path; Crosley also notes that a small drip when opening the door can be normal, while a continuing leak is not.
Next step: Wipe the accessible rubber seal and contact area, remove only an accessible obstruction, and use a correctly sized load. If the gasket is torn, will not seat, or the door is damaged, stop and arrange service.
Why this matters
Why: The gasket is the barrier around the door, and dirt or clothing caught in it can create a small front leak.
-
Check 4
With water and power isolated, inspect the visible fill and drain hose connections for cracks, bulges, kinks, loose joints, or a wet trail; check that the drain hose is secured in the household drain without an obstructed or incorrectly routed path.
Expected result: A wet joint, damaged hose, kink, or household drain that backs up identifies the external water path; dry visible connections shift attention to the dispenser, filter, pump, or internal hose.
Next step: Correct only an obvious hose position or accessible connection permitted by the model instructions, keeping the water supply closed. Replace a damaged hose or investigate an internal path through qualified service.
Why this matters
Why: Crosley lists improperly connected fill or drain hoses, a clogged household drain, and incorrect drain-hose routing as leak or drain causes.
-
Check 5
Inspect the detergent dispenser for hardened residue, a drawer that is not fully seated, or a visible crack, and note whether foam or water escapes from the back or front during filling; use only the detergent type and amount specified for the model.
Expected result: A clogged or cracked dispenser, an unseated insert, or excessive suds with wetness around the dispenser supports a front or oversudsing path; a clean dispenser with no foam shifts attention to hoses and drainage.
Next step: Clean the accessible drawer and box as directed by the manual and use the correct detergent amount on the next suitable cycle. If the drawer still overflows or is cracked, stop and request service.
Why this matters
Why: Crosley troubleshooting identifies dispenser blockage, a cracked dispenser box, and excess or incorrect detergent as causes of water escaping near the dispenser or back of the washer.
-
Check 6
If the leak occurs during draining, keep towels and a shallow container ready and follow the Crosley model manual for the accessible pump-filter check; inspect the visible drain hose and household drain for a blockage or siphoning route.
Expected result: A blocked filter or drain path, a kinked hose, or a hose routed without the manual's required air gap supports restricted drainage; a clear path with continued water underneath points toward the pump or internal hose.
Next step: Restore the filter and hose only as the exact model instructions allow. If water remains, the filter is inaccessible, the pump path is damaged, or the leak returns, stop using the washer and arrange service.
Why this matters
Why: Crosley lists a clogged pump or filter, drain hose problems, household drain blockage, and siphoning as causes of drain-related symptoms and leaks.
Use your observations
Decision map
Find the observation that best matches what you see, then follow the next safe action.
-
PATH 01Safety boundary
What you see
Water starts at the front door or dispenser.
Do this next
Check the visible gasket, door closure, load size, dispenser seating, residue, cracks, and detergent amount. A damaged seal or continuing overflow needs service.
Why this path and its safety boundary
Safety stop: Continue with the rear hose and drain-phase checks.
-
PATH 02Safety boundary
What you see
Water appears at the rear during filling or when the washer drains.
Do this next
Keep the faucets closed and inspect accessible hose connections and the household drain. A damaged hose, blocked drain, or internal connection needs the model manual or qualified service.
Why this path and its safety boundary
Safety stop: Continue with the front, filter, and pump-path checks.
-
PATH 03Safety boundary
What you see
A drain-related leak occurs and the accessible filter or drain path is blocked.
Do this next
Use the exact model manual to clean the accessible filter and restore the drain route with power and water safely isolated, then monitor one suitable cycle only if no hazard remains.
Why this path and its safety boundary
Safety stop: A continuing leak during drain or spin is more likely to involve the pump or an internal hose and should be assessed by service.
-
PATH 04Safety boundary
What you see
The floor is flooding, water reaches electrical areas, the cord is damaged, or the washer becomes unstable.
Do this next
Stop immediately, close the water supply if safely possible, keep clear of wet electrical areas, and arrange qualified appliance service.
Why this path and its safety boundary
Safety stop: Continue only with the single safe check matching the leak location, then stop if the leak returns.
Helpful context
Understand the symptom
A puddle may travel from its source, so the place you find water is not always the place the washer first leaked. Look for the earliest wet trail and note the cycle phase. Water at the front during filling or washing has a different path from water under the rear during drain or spin.
Do not keep running a leaking washer to see whether it gets worse. Stop for flooding, water near the plug or controls, a damaged cord, smoke, burning odor, or a machine that becomes unstable. Do not open cabinet panels; use the model manual for any accessible filter or hose procedure.
Only after diagnosis
Potential parts
- washing machine door gasket
Consider this only when the visible gasket is torn or will not seat after accessible cleaning and obstruction removal, and the exact model fit is confirmed.
Confirm the complete Crosley model identifier and the manufacturer's fit information before ordering any part. - washing machine fill or drain hose
Consider this only when an accessible hose is visibly cracked, bulged, or leaking at a confirmed hose path.
Confirm hose type, connection, and exact Crosley model before ordering; do not infer fit from the brand alone. - washing machine drain pump
Consider this only after the filter, hose, and household drain are clear and a technician confirms that the pump path is leaking or blocked.
Use the exact model identifier and service diagnosis to confirm compatibility before selecting a component.
When checks do not resolve it
Need a professional?
Stop using the Crosley washer and arrange qualified service for a large or fast leak, water near the plug or controls, a damaged cord or cabinet, a torn door gasket, a cracked dispenser, an inaccessible or continuing drain blockage, an internal hose or pump leak, an unstable machine, or a leak that returns after safe gasket, hose, dispenser, load, and filter checks.
Common questions
FAQ
Why is my Crosley washing machine leaking from the front?
Check the door gasket and closure, a trapped garment, load size, detergent amount, and dispenser drawer. A torn gasket or continuing front overflow needs qualified service.
Why is my Crosley washer leaking from underneath?
Water underneath can come from a fill or drain hose, household drain, pump filter, pump, tub seal, or water that ran from the front or rear. Note the first wet point and cycle phase before arranging service.
Can too much detergent make a Crosley washer leak?
Yes. Crosley troubleshooting identifies oversudsing and incorrect detergent use as possible leak contributors. Use the detergent type and amount specified for the exact model.
When should I stop troubleshooting a Crosley washer leak?
Stop for flooding, water near electrical areas, a damaged cord or cabinet, a torn gasket, an internal leak, a blocked path you cannot safely access, or a leak that returns after visible checks. Close the water supply and arrange qualified service.
Read the exact guide
Official sources
- Taking Care of Your Top LoadCrosley Home Products · Crosley top-load washer door, lid, seal, dispenser, and routine care
- Troubleshooting Tips... Before you call for serviceCrosley Home Products · Crosley front-load washer leak, drain, dispenser, gasket, hose, and no-operation troubleshooting
- QUICK START GUIDE CROSLEY PROFESSIONAL® TOP LOAD WASHING MACHINECrosley Home Products · Crosley washer safe operation, start controls, load handling, and owner-manual service boundary
Community feedback
Share a repair observation
Share a plain-text repair observation. Accepted observations are published automatically; this page may take a moment to update.