
On this page
Start here
Quick answer
If a GE dehumidifier is overflowing, stop it before water reaches the cord or outlet and disconnect power only from a safe, dry, accessible point. Empty and correctly reseat the bucket, then determine whether this model is meant to collect in the bucket, drain by gravity, or use an internal pump. GE says not to use a drain hose when the bucket is the chosen collection method; for a gravity hose, the connection, washer, downward route, and drain opening must be suitable, while pump models require the pump to be enabled, the bucket in place and full enough to trigger pumping, and the hose within the model's stated limit. If water comes from the cabinet or pump, the bucket or fitting is damaged, the external drain path is correct but overflow continues, or water reached electrical parts, keep the unit unplugged and arrange qualified local dehumidifier service. GE notes that Bodewell does not service dehumidifiers, so use a servicer that accepts this appliance type and follow the exact model manual.
Before you begin
Safety first
- The owner may empty and reseat an accessible bucket, inspect a visible hose and drain route while unplugged, record the model and indicators, and clean only as the manual permits. A qualified technician must assess internal pump, sensors, wiring, cabinet leaks, and any energized or sealed-system condition.
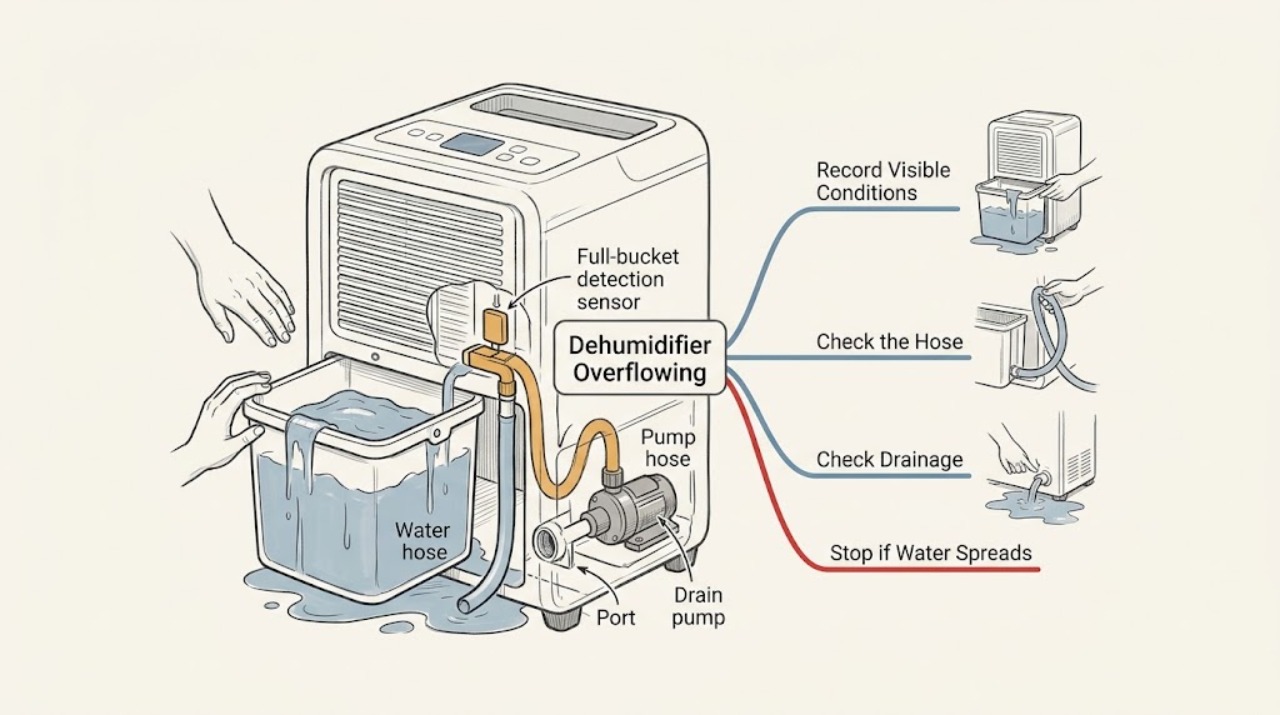
Work through in order
Diagnostic checks
Use only checks that match the exact appliance or system and its official guide.
-
Check 1
Stop the dehumidifier and inspect the floor, cord, plug, outlet, and cabinet from outside. If water is close to electrical parts, disconnect power only when the plug and surrounding area are safe and dry; otherwise leave the circuit isolated and get electrical help. Record the exact model from its label.
Expected result: Water is under the front bucket, at a rear hose connection, along the hose, near a pump outlet, or emerging from the cabinet. The cord or plug may also be wet, hot, damaged, or discolored.
Next step: Keep the appliance unplugged if any electrical hardware is wet, hot, damaged, or exposed to water. If the source is inside the cabinet or cannot be located safely, arrange qualified service; otherwise continue only with external checks while unplugged.
Stop if: Do not touch wet electrical equipment, restore power to watch a leak, remove panels, or move the unit through standing water.
Why this matters
Why: The first water location separates bucket seating from an external drain setup and from a possible internal leak. Water or heat at the cord, plug, or outlet is a stop-use electrical condition rather than a drainage adjustment.
-
Check 2
For bucket collection, disconnect any drain hose, empty the tank, inspect the bucket for a crack or distortion, and slide it fully into the appliance as the model manual shows. Check only the accessible bucket-full or float area for an obvious obstruction; do not dismantle the sensing mechanism.
Expected result: The bucket was partly inserted, the tank is cracked or distorted, water appears when it becomes full, the full-bucket indication is active, or a hose was left connected during bucket use.
Next step: Use the bucket alone with the hose disconnected, seat it exactly as documented, and replace a damaged bucket only with a model-confirmed part. If the tank still overflows or cannot seat correctly, keep the unit unplugged and arrange service.
Stop if: Do not force the bucket, defeat the bucket-full mechanism, drill or seal a cracked tank, or operate with the bucket missing.
Why this matters
Why: A mis-seated or damaged bucket, a full collection tank, or conflicting bucket-and-hose setup can allow water to escape or prevent the intended shutoff. These findings do not prove an internal pump or control failure.
-
Check 3
For gravity drainage, unplug the appliance and inspect the accessible hose connection, its washer, and its route. The hose should run in a short, straight, continuously downward path to a suitable drain; keep the outlet above the drain waterline and do not use a kinked, split, or deteriorated hose.
Expected result: There is a drip at the threaded fitting, a missing or damaged washer, an upward loop or excess hose, a hose end submerged in standing water, or a floor drain that is blocked or backing up.
Next step: Correct only the accessible washer, hose condition, connection, drain opening, and downward routing specified by GE. Clean the accessible drain or hose with a small suitable brush only while unplugged; if the fitting or cabinet itself leaks, stop and arrange service.
Stop if: Do not force a fitting, open the cabinet, use a wet appliance, or substitute a hose arrangement that the model manual does not support.
Why this matters
Why: A loose or poorly sealed fitting can put water on the floor, while an upward, submerged, or blocked gravity route can back up and make the dehumidifier appear to overflow. A sound route with water emerging from the cabinet points elsewhere.
-
Check 4
If the exact model has an internal pump, compare the setup with GE's instructions: the pump option must be enabled, the bucket must be securely in place and full enough to trigger pumping, and the supplied or model-approved hose must terminate at a suitable drain within the documented hose limit. Inspect only the visible hose and outlet.
Expected result: The pump is disabled, the bucket is missing or below its trigger level, the hose exceeds the model limit or cannot reach its drain, water never reaches the hose end, or water escapes at the pump outlet.
Next step: Restore only the documented pump setting, bucket seating, trigger condition, and hose routing. If the pump remains silent, leaks, or needs internal access, keep the unit unplugged and arrange a local servicer that works on dehumidifiers.
Stop if: Do not open the pump, expose wiring, bypass bucket detection, run an energized pump test, or assume the 16-foot limit applies to a model whose manual does not state it.
Why this matters
Why: An incorrect pump setting, bucket condition, hose length or route can prevent pumping and leave water on the floor. A correctly configured setup with no pumping or a leak at the pump points to an internal pump or water-path fault.
-
Check 5
Check the model's displayed indicators without entering a service mode. If the unit has a pump-related E0 or P1 indication, record it with the model and drainage method; on a non-pump bucket setup, note whether the full-bucket light or repeated beep occurs. Do not repeatedly reset the appliance to reproduce an error.
Expected result: The display shows E0 or P1 during pump use, a full-bucket indication appears, the unit beeps while the bucket is full, or no indicator explains the water escape.
Next step: Follow the exact model manual for the recorded code and recheck only the external pump conditions already described. If the code returns or the unit overflows without a supported explanation, leave it unplugged and arrange service.
Stop if: Do not assume an unknown code, enter diagnostic mode, or keep cycling power after an overflow or electrical hazard.
Why this matters
Why: GE associates E0 or P1 on applicable pump-equipped models with water not being pumped, while a full-bucket indication or beep can simply mean the bucket has reached its shutoff level. An unexplained overflow after the external path is correct needs service rather than code guessing.
-
Check 6
After the selected bucket or drain path has been corrected and the appliance and floor are dry, use at most one brief supervised operating check if the model manual permits it. Watch the original leak location from a dry position and stop immediately for water near electrical parts, smoke, burning odor, unusual heat, or a cabinet leak.
Expected result: Water stays in the bucket or reaches the drain normally; overflow returns only when the bucket fills; water leaks at a hose or pump outlet; or water comes from inside the cabinet.
Next step: If overflow returns or its source is internal, unplug the unit and arrange qualified service. Give the servicer the model, chosen drainage method, water location, indicators, and timing; do not continue cycling a leaking appliance.
Stop if: Do not operate a visibly damaged unit, repeat the test to force a code, open internal covers, or perform live electrical or refrigeration tests.
Why this matters
Why: A corrected setup that remains dry supports a configuration or routing problem. Recurrence at a fitting may require a model-specific seal or hose, while a cabinet or internal pump leak exceeds safe external diagnosis.
Use your observations
Decision map
Find the observation that best matches what you see, then follow the next safe action.
-
PATH 01Next step
What you see
Water is under the bucket and bucket collection is intended.
Do this next
Unplug, empty and seat the bucket correctly, disconnect the hose for bucket use, and escalate a damaged tank or persistent overflow.
Why this path and its safety boundary
Why it matters: Bucket seating, tank condition, full-bucket shutoff, or a conflicting drainage method is more likely than an isolated pump fault.
-
PATH 02Next step
What you see
Water appears at the rear hose connection or along a gravity-drain route.
Do this next
While unplugged, correct only the accessible seal and continuously downward route described by GE. If the fitting or cabinet leaks, arrange service.
Why this path and its safety boundary
Why it matters: A connection, hose, or receiving-drain problem is more likely than an internal collection leak.
-
PATH 03Next step
What you see
A pump-equipped model leaves water on the floor despite an attached pump hose.
Do this next
Restore only the model-documented pump setup. If pumping still fails or the outlet leaks, keep the unit unplugged and use a qualified local dehumidifier servicer.
Why this path and its safety boundary
Why it matters: Pump activation or model-specific hose conditions are more likely than a bucket-only overflow; a correctly configured but non-pumping or leaking pump needs service.
-
PATH 04Next step
What you see
The unit shows E0 or P1 during pump use, or a full-bucket indication/beep occurs without a visible external leak.
Do this next
Recheck only the documented external pump conditions or empty and reseat the bucket. If the code or overflow returns, stop using the unit and arrange service rather than guessing at the code.
Why this path and its safety boundary
Why it matters: GE uses E0/P1 on applicable pump models for water not being pumped; a full-bucket light or beep can indicate normal collection-tank shutoff. The exact model manual controls code meaning.
-
PATH 05Safety boundary
What you see
Overflow persists after the selected external drainage method is correctly configured, or water comes from inside the cabinet.
Do this next
Keep the dehumidifier unplugged, isolate water from electrical parts, and arrange qualified local service. Provide the model, drainage method, leak location, indicators, and timing.
Why this path and its safety boundary
Why it matters: An internal pump, water path, control, tank support, or other model-specific fault is more likely and cannot be safely isolated with generic owner checks.
Safety stop: Do not open the housing, probe internal wiring, bypass the bucket sensor, or continue operation to collect more evidence.
Helpful context
Understand the symptom
Overflowing is a drainage-path symptom, not one universal failure
Water on the floor can come from a full or mis-seated bucket, a gravity hose that is leaking or cannot drain, a pump setup that is not activating, or an internal leak. The model determines which drainage options exist, so photograph or record the model label and note exactly where the water first appears before changing the setup.
Choose one supported water-removal method
GE documents manual bucket collection, gravity drainage through a garden hose, and pump drainage on models equipped for it. Do not combine bucket collection with an attached hose, and do not assume that a pump or a pump-hose limit applies to every GE dehumidifier. The exact Owner's Manual controls the connection and operating details.
Keep internal water and electrical work out of owner checks
Owner checks can cover the accessible bucket, visible hose, drain opening, model-approved cleaning, and the selected operating mode while unplugged. Do not open the housing, reach into the pump, bypass bucket detection, probe wiring, or work on the compressor or refrigerant circuit. If water has reached electrical parts or the leak remains after the external path is correct, stop and arrange qualified service.
Safety boundary
Stop conditions
- Stop using the dehumidifier for water near the cord, plug, outlet, or other electrical parts; smoke, burning odor, unusual heat, arcing, a damaged cord, or a cabinet leak.
- Do not repeatedly reset or operate an overflowing unit, bypass bucket-full detection, run a pump with exposed wiring, or perform live electrical tests.
- Do not open the housing or work on the internal pump, control board, compressor, refrigerant circuit, or hidden water path.
- Use the exact GE model manual for supported bucket, hose, pump, drain-plug, and error-code details; persistent overflow belongs with a qualified local dehumidifier servicer.
Only after diagnosis
Potential parts
- water bucket or bucket-full/float assembly
Consider only if the exact model's bucket is cracked, distorted, cannot seat, or its accessible full-bucket mechanism is confirmed defective after external diagnosis.
Bucket and sensing parts are model-specific; confirm the exact GE model and fit information before ordering and do not bypass the sensing mechanism. - drain hose, washer, or pump hose
Consider only when a visible hose, washer, or connection is damaged or leaking and the exact model's drainage method calls for that item.
Hose type, fitting, length, and pump limits vary by model; confirm the manual and part fit before replacement. - internal drain pump
Consider only after the pump setting, bucket trigger condition, hose route, and receiving drain are correct but the pump still fails or leaks.
An internal pump requires qualified diagnosis and model-confirmed fitment; it is not an owner live-test or generic replacement.
When checks do not resolve it
Need a professional?
Arrange qualified service if water comes from the cabinet or pump, the bucket or fitting is damaged, the external bucket, gravity-hose, or model-approved pump setup is correct but overflow continues, or an E0/P1 indication returns after the documented external checks. If water reached the cord, plug, or outlet, leave the unit unplugged and have the electrical condition assessed before any restart. GE states that Bodewell does not service dehumidifiers, so choose a qualified local servicer that accepts this appliance type.
Safety scope: The owner may empty and reseat an accessible bucket, inspect a visible hose and drain route while unplugged, record the model and indicators, and clean only as the manual permits. A qualified technician must assess internal pump, sensors, wiring, cabinet leaks, and any energized or sealed-system condition.
Common questions
FAQ
Why is my GE dehumidifier overflowing into the room?
Identify whether water starts at the bucket, rear hose connection, hose route, pump outlet, or cabinet. GE separates bucket, gravity-hose, and pump drainage and says a hose should not be used when bucket collection is intended. Correct the selected external method while unplugged; a recurring cabinet or pump leak needs service.
Can I use the bucket and a drain hose at the same time?
GE says not to use the drain hose when the bucket is the collection method. Choose the bucket alone, a supported gravity hose, or the internal-pump method on a model equipped for it, and keep the bucket securely in place as the model instructions require.
Why does my GE dehumidifier pump leave water on the floor?
Check the model's documented pump setup: the pump must be enabled, the bucket must be seated and full enough to trigger pumping, and the hose must stay within the model's allowed route and length. If the setup is correct and the pump still does not drain, keep the unit unplugged and arrange service.
What do E0 and P1 mean on a GE dehumidifier?
GE associates E0 or P1 with water not being pumped on applicable pump-equipped models. Record the exact model and check only the documented pump hose, bucket, and pump settings; do not guess at an unknown code or open the appliance. A returning code needs service.
Read the exact guide
Official sources
- Dehumidifier - Draining OptionsGE Appliances · Use for the supported drainage-method split, bucket seating, pump trigger conditions, and model-specific hose limits.
- Dehumidifier - Internal Pump Not WorkingGE Appliances · Use only for models equipped with an internal pump; do not generalize pump behavior to every GE dehumidifier.
- Dehumidifier - Cleaning and MaintenanceGE Appliances · Use for unplugged maintenance and the boundary against operating without a required filter; it does not establish an internal repair procedure.
- Dehumidifier - Drain Hose IssuesGE Appliances · Use for visible hose, washer, drain-route, and receiving-drain checks while unplugged.
- Support for GE Dehumidifiers and Air PurifiersGE Appliances · Use to direct the owner to exact model support and the appropriate service path when generic external checks do not resolve overflow.
- Dehumidifier - Fault or Error CodesGE Appliances · Use for E0/P1 only on applicable pump-equipped models; exact model documentation controls unknown codes.
- Dehumidifier - BeepingGE Appliances · Use to distinguish a full-bucket indication from a pump-mode failure; model capacity and pump configuration matter.
- Dehumidifier - CleaningGE Appliances · Use for the safety boundary before accessible bucket or drain cleaning and for secure bucket placement.
- Dehumidifier - Leaking, Water on FloorGE Appliances · Use for the visible floor-leak branch and escalation after external drainage checks.
Community feedback
Share a repair observation
Share a plain-text repair observation. Accepted observations are published automatically; this page may take a moment to update.