
On this page
Start here
Quick answer
A leaking GE freezer is usually a water-path problem, but the correct check depends on whether it is a self-defrost upright, a manual-defrost chest freezer, a bottom-freezer refrigerator, or a freezer with an ice maker. First protect people from the puddle, keep water away from outlets and wiring, and record where the water starts: inside the freezer floor, around the door, at the rear or base, or near an ice maker or supply line. GE explains that current upright freezers use a defrost drain and pan, while chest freezers are generally manual-defrost and may have a drain plug instead; an ice or water buildup on a bottom-freezer floor can indicate a clogged defrost drain that requires service. Unplug the appliance before maintenance, shut off an attached ice-maker water supply if a water-line leak is suspected, and do not chip ice, open sealed panels, or keep using the freezer when water is reaching electrical parts, food is thawing, or the source is not accessible.
Before you begin
Safety first
- This article covers safe water-source observation, food and floor protection, model identification, visible gasket and drain checks, and model-approved ice-maker or defrost controls only. Do not work near wet electrical parts, puncture the liner, enter sealed refrigeration systems, move a heavy unit, or improvise drain or water-line repairs.
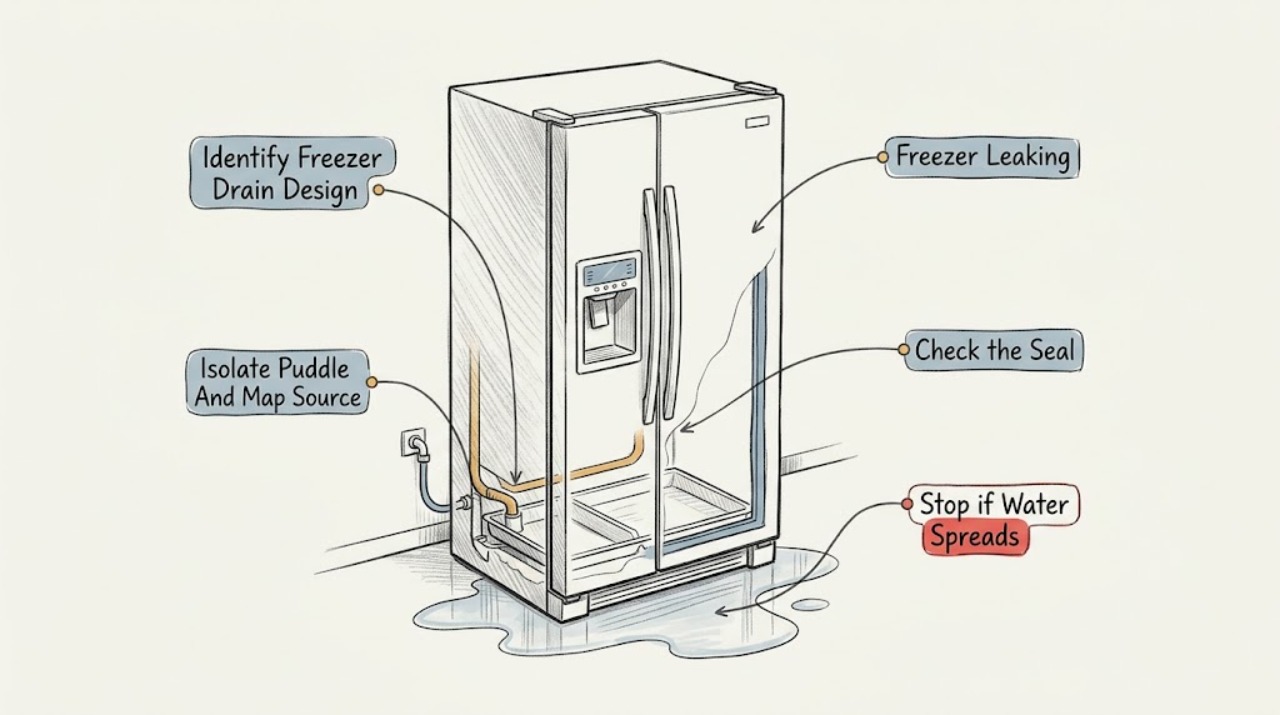
Work through in order
Diagnostic checks
Use only checks that match the exact appliance or system and its official guide.
-
Check 1
From a dry, stable position, keep people and pets away from the puddle, blot or contain only accessible water, and photograph the first wet point without touching wiring, outlets, the compressor area, or pooled water beneath the appliance.
Expected result: Water begins inside the freezer, at the door or gasket, beneath a drawer, at the rear or base, near an ice maker or fill tube, or its origin cannot be seen because the appliance must be moved or opened.
Next step: Record the freezer type, model, first wet point, food temperature or thawing condition, and whether the leak follows defrost or ice-maker activity; continue only with the safe checks that match the location.
Stop if: Stop and isolate the area for water near an outlet, cord, control, or exposed electrical part; active flooding; a hot or damaged cord; or any need to stand in water or move the freezer unsafely.
Why this matters
Why: An interior floor or drawer wet spot supports a defrost or door-seal path; water near an ice maker or fill tube supports a supply-water check; rear or base water can involve a drain pan, tube, valve, or plumbing connection. Water that cannot be traced safely should not be diagnosed by moving the appliance or removing panels.
-
Check 2
Read the GE model and serial information and identify whether the appliance is a self-defrost upright, manual-defrost chest freezer, or refrigerator with an upright, bottom, or side-by-side freezer compartment; use the exact owner's manual to locate any approved drain or defrost feature.
Expected result: The model has a visible drain tube and pan, a manual-defrost drain plug, an integrated freezer drain behind a panel, an ice maker and water line, or no drain feature is identified in the manual.
Next step: Keep the exact manual and model identity with the leak record and perform only the drain, defrost, or plug step expressly described for that model; request service when the drain is behind a panel or the feature cannot be identified.
Stop if: Do not drill, chip, pry, puncture a liner, remove a sealed panel, use an electrical defrosting device, or assume another GE model's drain arrangement applies.
Why this matters
Why: GE says current upright freezers use a defrost drain tube and drip pan, while chest freezers are manual-defrost and may use a drain plug or have no tube. A bottom-freezer drain may require disassembly, so the type and manual change whether a user check is appropriate.
-
Check 3
With power isolated and the freezer safe to access, inspect the visible floor, lower drawer area, back wall, and door gasket for ice buildup, a wet trail, a torn or folded seal, food packages blocking closure, or water entering from above; do not scrape the liner or force the door.
Expected result: Ice or water is concentrated on the freezer floor; the gasket does not contact evenly; the door is blocked or left ajar; water enters from an upper area; or the visible interior is clear.
Next step: Remove only a plainly accessible package blocking closure, restore the gasket without tools if the manual permits, and use the exact model's drain or defrost instructions; arrange service if ice returns, water persists, or the path is hidden.
Stop if: Do not chip ice with a sharp object, puncture the liner, use an electrical heater, cut the gasket, or restart the freezer while water can reach electrical components.
Why this matters
Why: GE associates ice or water on a bottom-freezer floor with a possible clogged defrost drain, while a door that does not seal can allow moisture and frost to accumulate. A clear visible interior does not rule out a hidden drain, valve, sealed-system, or pan problem.
-
Check 4
If the GE freezer has an ice maker or water connection, inspect visible fittings, the fill-tube extension, and the accessible water line from a dry position; if water is coming from that system, turn off the ice maker and the external water supply only as the exact manual permits.
Expected result: A fitting is loose, a visible line or fill tube is split or wet, the water valve appears to be leaking, the ice maker is overfilling or dripping, or the supply path is dry.
Next step: Keep the ice maker and water supply off for a suspected supply leak, contain only accessible water, and arrange qualified service; do not tighten a fitting or move the appliance if doing so exposes wet electrical parts.
Stop if: Do not handle wet wiring, loosen pressurized connections, pull the freezer away from the wall near a wet outlet, or keep the ice maker operating while a water line or valve is leaking.
Why this matters
Why: GE lists water-line fittings, the valve, fill-tube extension, and a clogged or overflowing defrost drain as different leak sources. A supply leak changes the next step to water isolation and service; a dry supply path keeps the defrost drain, door seal, drain pan, or condensation path in consideration.
-
Check 5
After the safe external checks, note whether the freezer maintains temperature, whether food is thawing, whether the leak returns after a defrost or ice-maker event, and whether the drain or pan is accessible without disassembly.
Expected result: Cooling remains normal and the leak is a one-time controlled defrost event; water returns or accumulates; food is thawing; the drain pan overflows; or the source remains hidden.
Next step: Leave the freezer out of service when the leak persists or cooling is affected, preserve the model and photo record, and arrange qualified GE appliance diagnosis; follow food-safety guidance for thawed items.
Stop if: Do not continue operation with water near electrical parts, do not open sealed refrigeration components, and do not keep food in a freezer that cannot maintain a safe temperature.
Why this matters
Why: A one-time manual-defrost discharge may be expected only when the model manual describes it and the water is controlled. Recurring water, overflowing drainage, thawing food, or a hidden source can involve a clogged or frozen drain, door seal, water valve, defrost control, pan, or another appliance fault.
Use your observations
Decision map
Find the observation that best matches what you see, then follow the next safe action.
-
PATH 01Safety boundary
What you see
The freezer is a manual-defrost model and water appears only during a model-documented defrost with a visible drain plug or controlled collection path.
Do this next
Follow the exact GE manual's defrost and drain-plug instructions, collect water safely, restore the plug or cap as specified, and verify the area is dry before restoring power.
Why this path and its safety boundary
Why it matters: The water may be expected defrost water, but the plug, container, floor, and electrical surroundings still need to remain controlled.
Safety stop: Do not use sharp tools, electrical heaters, uncontrolled hoses, or a drain arrangement not identified for the model.
-
PATH 02Safety boundary
What you see
Ice or water repeatedly collects on the floor of an upright or bottom-freezer compartment, especially around or after defrost.
Do this next
Use only the model-approved visible drain check; arrange service when the drain is behind a panel, the ice returns, or water reaches the floor.
Why this path and its safety boundary
Why it matters: A clogged, frozen, overflowing, or inaccessible defrost-drain path is plausible; GE says bottom-freezer drain access may require disassembly and service.
Safety stop: Do not chip ice, puncture the liner, pour unknown materials into a hidden drain, or remove panels as a user test.
-
PATH 03Safety boundary
What you see
Water or frost tracks around the door edge and the gasket is folded, torn, dirty, or unable to contact the cabinet evenly.
Do this next
Remove only a plainly accessible obstruction and restore the gasket according to the manual; request service if the gasket, hinge, door, or cabinet is damaged or the leak persists.
Why this path and its safety boundary
Why it matters: Poor door sealing can allow warm moist air to enter and produce frost or water, but a damaged gasket is not the only possible source.
Safety stop: Do not cut, glue, heat, stretch, or force the gasket or door into alignment.
-
PATH 04Safety boundary
What you see
Water is visibly coming from the ice-maker fill tube, water valve, supply fitting, or an external line.
Do this next
Turn off the ice maker and external water supply through the model-approved controls, keep water away from electrical parts, and arrange qualified appliance or plumbing service.
Why this path and its safety boundary
Why it matters: This is a water-supply leak rather than a confirmed defrost-drain problem and can continue even when the freezer is cooling normally.
Safety stop: Do not handle wet connectors, loosen pressurized fittings, or run the ice maker while the supply path is leaking.
-
PATH 05Safety boundary
What you see
The freezer is leaking and food is thawing, the source is behind a panel or beneath the appliance, the drain pan overflows, or the leak continues after a safe visible check.
Do this next
Keep people away, isolate power or water only when safe, protect food according to food-safety guidance, and arrange prompt qualified GE service.
Why this path and its safety boundary
Why it matters: A hidden drain, defrost, pan, door, water-valve, or refrigeration fault needs diagnosis; continued operation can cause food loss, floor damage, or electrical exposure.
Safety stop: Do not move a heavy or built-in freezer, open sealed refrigeration parts, or restore operation while water can reach wiring or outlets.
-
PATH 06Safety boundary
What you see
Water is near an outlet, cord, control, compressor wiring, or other electrical component, or there is active flooding, smoke, sparking, or a hot damaged cord.
Do this next
Keep away from the water, use only a safe accessible power shutoff if it can be reached without contact, and arrange urgent qualified service; seek emergency help for fire or immediate electrical danger.
Why this path and its safety boundary
Why it matters: The leak has become an electrical, fire, or physical safety hazard rather than an ordinary appliance-maintenance issue.
Safety stop: Do not step into water, touch wet electrical parts, unplug through a puddle, move the freezer, or restart it to locate the leak.
Helpful context
Understand the symptom
The leak location is more useful than the puddle size
Start at the first wet point, not the edge of the floor puddle. Water can travel from an interior defrost drain, door gasket, ice-maker fill tube, supply fitting, drain pan, or a surface above the freezer. A self-defrost upright and a manual-defrost chest freezer do not have the same drain arrangement, and a bottom-freezer refrigerator may hide its drain behind a panel. Photograph the trail from a dry, stable position and keep the appliance's model information with the record.
Defrost water and supply water need different decisions
Ice on the freezer floor followed by water during or after defrost points toward a defrost drainage path. Water near an ice maker, fill tube, valve, or supply fitting points toward the water system instead. GE says current upright freezers have a defrost drain tube and pan, while manual-defrost chest freezers use a drain plug or may have no tube. Do not assume a drain hole exists or pour a substance into a hidden path until the exact manual identifies it.
Protect food, floors, and electrical parts before troubleshooting
Move food only when it can be handled without entering a flooded or electrically unsafe area, and follow food-safety guidance for anything that has thawed. Use towels or a stable container only to control a small amount of water from a dry position; do not place wet materials against an outlet or cord. GE recommends unplugging before maintenance or cleaning. A leak that continues, reaches wiring, or is accompanied by loss of freezing is a service boundary rather than a reason to dismantle the freezer.
Safety boundary
Stop conditions
- Keep water away from outlets, cords, controls, compressor wiring, and other electrical parts; stop for flooding, smoke, sparks, or a hot damaged cord.
- Unplug before maintenance or cleaning only when the plug and outlet can be reached without contacting water; otherwise use a safe accessible power shutoff and wait for service.
- Do not chip ice, puncture the freezer liner, use sharp tools or electrical heaters, or pour unknown substances into a hidden drain.
- Do not remove sealed panels, open refrigeration components, move a heavy or built-in freezer, or loosen pressurized water connections as a user test.
- Stop using the freezer and arrange qualified service when water returns, the drain pan overflows, food is thawing, the source is hidden, or an ice-maker valve or line leaks.
Only after diagnosis
Potential parts
- GE-compatible freezer door gasket
Consider this category only if inspection and service confirm that a torn, deformed, or non-sealing gasket is allowing moisture entry or a leak.
Confirm the exact GE model, gasket profile, door alignment, hinge condition, and manufacturer fit information; do not stretch, glue, or cut the seal. - GE-compatible defrost drain or drain-pan component
Consider this category only when the exact model's drain path or pan is confirmed damaged or failed after the cause of recurring water is diagnosed.
Confirm whether the freezer uses a tube, plug, pan, or integrated drain design and use qualified service when access requires panel removal. - GE-compatible ice-maker water valve or fill-tube component
Consider this category only if a qualified diagnosis confirms a leaking or failed supply component rather than a loose fitting, frozen path, or drain overflow.
Confirm the exact GE model, water connection, valve or tube design, and safe water-isolation procedure before any replacement.
When checks do not resolve it
Need a professional?
Arrange qualified GE appliance service when a leak recurs after the exact model's visible drain or manual-defrost check, when ice or water accumulates on a bottom-freezer floor, when a drain or pan requires panel access, when a door gasket or water valve is damaged, or when the freezer is losing cooling or food is thawing. Arrange appliance or plumbing service for an ice-maker supply leak, and seek urgent help for water near electrical parts, flooding, smoke, sparking, or a hot damaged cord.
Safety scope: This article covers safe water-source observation, food and floor protection, model identification, visible gasket and drain checks, and model-approved ice-maker or defrost controls only. Do not work near wet electrical parts, puncture the liner, enter sealed refrigeration systems, move a heavy unit, or improvise drain or water-line repairs.
Common questions
FAQ
Why is my GE freezer leaking water onto the floor?
The first wet point matters. Common paths include a clogged or overflowing defrost drain, a manual-defrost drain plug, a door gasket that does not seal, an ice-maker fill tube or water valve, or a hidden drain-pan problem. Identify the freezer type and model, keep water away from electrical parts, and arrange service when the source is not accessible.
Can a clogged defrost drain make a GE freezer leak?
Yes. GE says ice or water on the floor of a bottom-freezer compartment can indicate a clogged defrost drain, and access may require disassembly. Use only the exact model's visible drain instructions; do not chip ice, puncture the liner, or remove a panel as a user test.
Do all GE freezers have a drain tube?
No. GE says current upright freezers are self-defrost models with a drain tube and pan, while chest freezers are generally manual-defrost and may use a drain plug or have no drain tube. Check the exact owner's manual before looking for or opening a drain.
What if the GE freezer leak is from the ice maker?
From a dry position, look for water at visible fittings, the fill-tube extension, or the water valve. Turn off the ice maker and external water supply only as the model permits, keep water away from electrical parts, and arrange appliance or plumbing service for a leaking line or valve.
Should I keep using a GE freezer that is leaking?
Stop using it when water reaches electrical parts, food is thawing, the leak returns, a drain pan overflows, or the source is hidden. Protect food according to food-safety guidance and arrange qualified service. Do not keep running the appliance to reproduce the leak.
Read the exact guide
Official sources
- Refrigerator & Freezer - Drain TubesGE Appliances · Directly applies to determining whether a GE freezer model has a defrost drain tube, drip pan, or manual-defrost drain plug.
- Bottom Freezer Refrigerator - Clogged Drain Tube, Ice on Freezer FloorGE Appliances · Applies to GE bottom-freezer refrigerator compartments where ice or water appears on the freezer floor or floor in front of the freezer.
- Refrigerator - Water on FloorGE Appliances · Use for GE freezer-compartment or refrigerator water that reaches the floor; the exact model manual determines the accessible repair path.
- GE Fridge Making Noise, Leaking Water, Not Freezing Well?Reddit · A user-reported GE freezer leak and cooling-loss case used only as an anecdotal escalation example, not a verified diagnosis or repair instruction.
- Refrigerator - Icemaker Leaking or Dripping WaterGE Appliances · Applies when a GE freezer or refrigerator with an ice maker leaks into the compartment or onto the floor.
- Refrigerator and Freezer Troubleshooting and Support | GE AppliancesGE Appliances · Use to identify the GE appliance model and reach product-specific freezer and ice-maker support content.
Community feedback
Share a repair observation
Share a plain-text repair observation. Accepted observations are published automatically; this page may take a moment to update.