
On this page
Start here
Quick answer
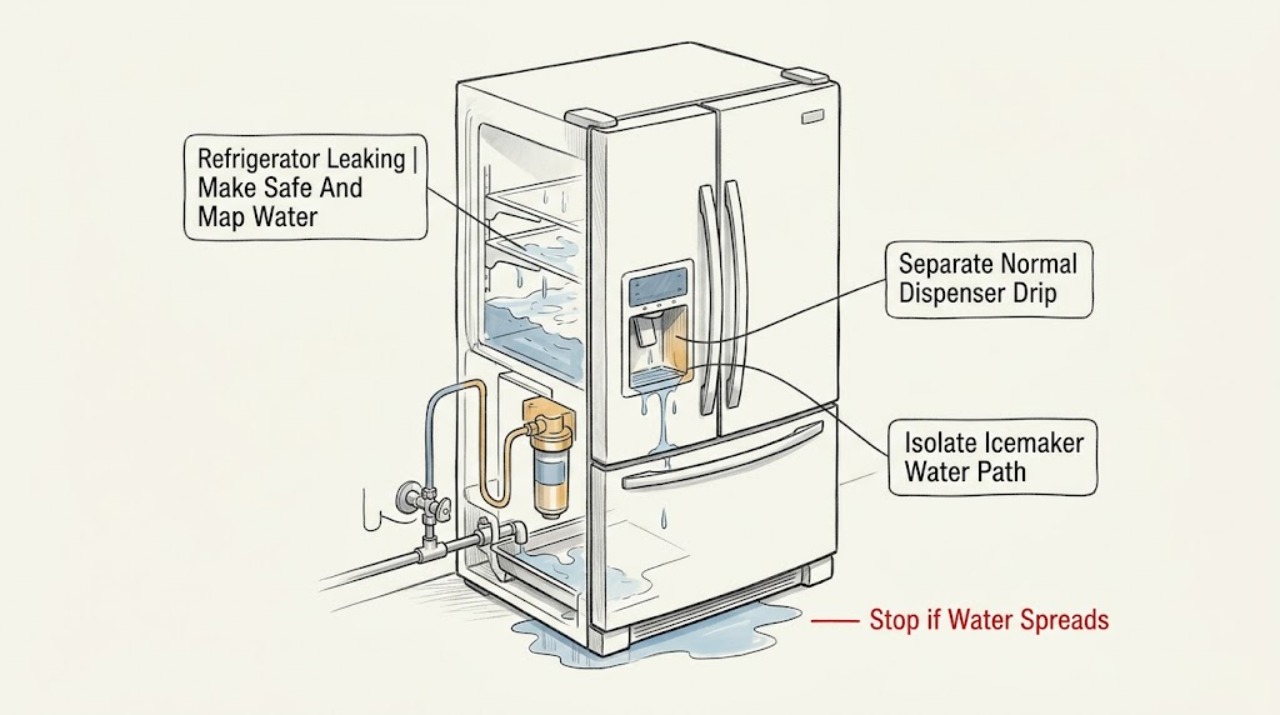
First dry the visible water and trace where it appears: a few drops at the dispenser immediately after filling a glass can be normal, while water that continues long after dispensing is not. Ice on the freezer floor or under fresh-food vegetable pans points toward a clogged defrost drain, but GE says the owner-cleanable procedure is model and architecture dependent and most models need service. If the leak follows icemaker operation, turn the icemaker off first; if flooding continues, shut off the refrigerator water supply from a safe, accessible valve. Inspect only visible, dry connections for a loose or split household line, appliance water line, fill tube, or filter area; a leaking valve, internal tube, filter housing, or persistent leak needs service. For a GE model with an LCD and RPWFE filter, a Leak Detected message may be related to filter fit or the filter area, but that feature is limited to specified bottom-freezer models. Do not move a built-in or heavy refrigerator alone, remove panels, clear an internal drain with tools or heat, handle wet electrical parts, or continue using an appliance with water near electrical components.
Before you begin
Safety first
- The user may dry accessible water, identify the model and architecture, wipe a dispenser tray, use documented icemaker controls, shut off an accessible water valve, and inspect visible dry connections. Qualified service must handle hidden drains, internal tubing, valves, filter housings, drip pans, panels, electrical parts, and any heavy or built-in appliance movement.
Work through in order
Diagnostic checks
Use only checks that match the exact appliance or system and its official guide.
-
Check 1
Keep the refrigerator doors closed, wipe up accessible water, and identify the highest visible wet point without moving the appliance or touching a wet outlet or cord. Record whether the water is in the freezer, beneath fresh-food drawers, at the dispenser or filter, behind the unit, or on the floor, and whether it appeared after dispensing or icemaker activity.
Expected result: Water is isolated to the dispenser area, follows ice production, appears inside with ice or wet pans, comes from a rear line, or returns on the floor without a visible source.
Next step: Use the matching branch and inspect only the corresponding accessible area. If the water is near electrical parts, isolate power only from a dry, safe point and arrange service.
Stop if: Do not touch wet electrical parts, move a built-in unit, or continue operating during uncontrolled flooding.
Why this matters
Why: The pattern separates normal dispenser drip, icemaker or supply-line paths, defrost drainage, and plumbing or appliance-valve paths. Water near electricity or an unknown active leak is a stop-use condition.
-
Check 2
On a model with a water dispenser, dry the grille or spill tray and observe only after a normal glass of water has been filled. Do not remove tubing or panels. Note whether a few drops stop shortly after the glass is removed or whether water continues to drip long afterward or pools below the dispenser.
Expected result: Only a few immediate drops occur and stop, the tray is wet but the drip stops, or dripping continues well after dispensing.
Next step: Wipe the accessible tray dry and monitor normal use if the drops stop promptly. Arrange service if the drip continues, the dispenser body leaks, or water reaches the floor.
Stop if: Do not dismantle the dispenser, pull tubing from the door, or use the dispenser to repeatedly reproduce a leak.
Why this matters
Why: GE says a few post-dispense drops can result from water-line pressure and condensation. Persistent dripping is not the same normal condition and may need dispenser or water-line service.
-
Check 3
If water appears in the ice bucket, around the icemaker, or on the floor after an ice harvest, turn the icemaker off using the exact model control. If it continues flooding, shut off the refrigerator water supply at an accessible household valve; do not pull a heavy or built-in refrigerator to reach a rear valve without help.
Expected result: The leak stops when the icemaker is disabled, flooding continues while it is off, a visible fill-line fitting is loose or split, or the water valve continues supplying water.
Next step: Keep the icemaker and water supply off until the leak source is repaired. Use a plumber for a household line and qualified appliance service for the valve, fill tube, icemaker, or internal connection.
Stop if: Do not reach behind a moving appliance, remove the valve, tighten inaccessible fittings, or operate with uncontrolled water near electricity.
Why this matters
Why: GE directs owners to disable the icemaker first and then shut off water if flooding continues. A damaged line or stuck valve needs appliance or plumbing service, not repeated icemaker cycles.
-
Check 4
If the refrigerator shows Leak Detected or water is concentrated around the water filter, record the complete model and filter designation before changing anything. Only on a model documented for the RPWFE filter and LCD Leak Detected message, inspect the filter area for a visible leak and confirm the filter is seated in the model-specified orientation.
Expected result: The model and RPWFE feature match the GE guidance, the filter is visibly mis-seated or leaking, the model uses another filter or has no such message, or the message remains after the documented filter check.
Next step: Follow the exact model manual for a filter reseat or approved replacement. If the leak or message remains, keep the water feature off and arrange service.
Stop if: Do not install a filter based only on appearance, force the housing, remove filter plumbing, or open the refrigerator door or control assembly.
Why this matters
Why: GE limits this diagnosis to specified bottom-freezer models and says filter fit or replacement may resolve a filter-area message. A different model or persistent message cannot be diagnosed by borrowing that procedure.
-
Check 5
If ice or water is on the freezer floor or beneath the fresh-food vegetable pans, identify the refrigerator architecture and consult its exact Owner's Manual or GE model-specific drain article. Inspect only the visible compartment for an obvious ice or food buildup; do not remove an evaporator cover or apply heat or sharp tools.
Expected result: The pattern matches a side-by-side, bottom-freezer, or top-freezer drain concern, the model manual permits a specific owner check, or the drain area is inaccessible or repeatedly freezes.
Next step: Perform only the exact model-approved external or accessible check. For an inaccessible, recurring, or unresolved drain, arrange qualified refrigerator service and keep water away from electrical areas.
Stop if: Do not chip ice, use a heat gun or hair dryer, pour chemicals, drill the drain, or remove freezer panels.
Why this matters
Why: GE says ice in these locations can indicate a clogged defrost drain but directs different procedures by architecture; on most models it requires service. A recurring or inaccessible blockage is not a generic drain-cleaning job.
-
Check 6
If water is behind or beneath the refrigerator and the connection is safely visible, inspect the household copper or plastic line, appliance water valve area, and visible icemaker fill line for a split, loose connection, or active spray. Shut off the water at the accessible supply before any permitted tightening; do not move a built-in unit or work on a wet connection.
Expected result: The household line is damaged, the appliance fill line is damaged, the valve is visibly leaking or flooding, or no visible supply leak is found.
Next step: Keep the water supply off and arrange the appropriate plumber or appliance technician. If no visible line source is found, do not remove panels to continue tracing.
Stop if: Do not pull the appliance across a wet floor, disassemble the valve, cut tubing, or restore water to a leaking connection to test it.
Why this matters
Why: GE separates a plumbing-line leak from an appliance valve or fill-line leak. A household-line problem belongs to plumbing service; a stuck or leaking appliance valve and internal tubing require appliance service.
-
Check 7
Stop owner troubleshooting when water continues after the icemaker or supply is shut off, the water source is inside the cabinet or under the appliance, a valve or filter housing leaks, the drain pattern recurs, the appliance cannot be moved safely, or water is near electrical parts. Provide the model, architecture, leak location, timing, and photos or observations without restoring water to reproduce it.
Expected result: An accessible tray, filter fit, or visible obstruction resolves the leak once, or water returns, spreads, or requires internal access.
Next step: Leave the water feature off, protect flooring and food as practical, and arrange qualified appliance service or plumbing service for the confirmed path. Isolate electrical power only from a dry, safe point when water threatens electrical parts.
Stop if: Do not remove panels, handle wet wiring, open the sealed system, or continue operating during uncontrolled leakage.
Why this matters
Why: A one-time accessible correction supports monitoring. A recurring or hidden leak can involve a drain, valve, fill tube, dispenser tubing, filter housing, drip pan, or sealed cabinet path that cannot be selected from the symptom alone.
Use your observations
Decision map
Find the observation that best matches what you see, then follow the next safe action.
-
PATH 01Safety boundary
What you see
Only a few drops appear immediately after dispensing and stop, with no water elsewhere.
Do this next
Wipe the spill tray and monitor. If dripping continues after the glass is removed or spreads to the floor, arrange service.
Why this path and its safety boundary
Why it matters: GE describes this limited post-dispense dripping as a normal effect of line pressure and condensation.
Safety stop: Do not dismantle the dispenser or pull its tubing.
-
PATH 02Safety boundary
What you see
Water follows ice production, appears in the ice bucket, or continues while the icemaker is off; a visible fill line, valve, or household water line is wet or split.
Do this next
Turn off the icemaker, shut off the accessible water supply, and arrange appliance or plumbing service according to the wet component.
Why this path and its safety boundary
Why it matters: An icemaker fill path, appliance valve, or plumbing connection is more likely than a defrost drain.
Safety stop: Do not repeatedly cycle the icemaker or reach behind a heavy appliance on a wet floor.
-
PATH 03Safety boundary
What you see
Ice or water collects on the freezer floor or under fresh-food vegetable pans, especially after defrosting, and no supply-line leak is visible.
Do this next
Identify side-by-side, bottom-freezer, or top-freezer architecture and use only its exact model guidance; arrange service for an inaccessible or recurring blockage.
Why this path and its safety boundary
Why it matters: A clogged or overflowing defrost drain is more likely. GE says the correct owner procedure depends on refrigerator architecture and most models need service.
Safety stop: Do not chip, heat, drill, chemically clear, or panel-access the drain.
-
PATH 04Safety boundary
What you see
A bottom-freezer model with LCD and RPWFE filter shows Leak Detected, and moisture is localized around the filter housing.
Do this next
Use the model instructions to verify filter seating or an approved replacement. If the message or leak remains, keep the water feature off and arrange service.
Why this path and its safety boundary
Why it matters: GE's limited guidance makes filter fit or the filter area a plausible first check for this specific configuration; it does not generalize to other GE models.
Safety stop: Do not force the filter, substitute an unverified filter, or remove housing plumbing.
-
PATH 05Safety boundary
What you see
Water continues with the icemaker and supply off, comes from under or inside the appliance, reaches electrical parts, or cannot be traced without moving or opening the refrigerator.
Do this next
Keep water and electrical power isolated as safely possible and arrange qualified appliance service; use plumbing service for a household water-line leak.
Why this path and its safety boundary
Why it matters: A hidden drain, drip pan, valve, tube, filter housing, or cabinet leak remains possible, and the water-electricity hazard overrides owner diagnosis.
Safety stop: Do not move a built-in or heavy unit alone, handle wet connections, remove covers, or restore water to reproduce the leak.
Helpful context
Understand the symptom
The location and timing narrow the leak path
Water at the dispenser, inside the freezer, under vegetable pans, behind the refrigerator, and on the floor can come from different systems. Dry the puddle, note whether it returns during dispensing or ice production, and inspect the highest visible wet point without removing panels. Water can travel along a cabinet or floor, so the first puddle is not always the source.
Defrost drains are not universal owner checks
GE says full-size self-defrost refrigerators generally route defrost water to a drip pan, while compact models and some older manual-defrost designs differ. Its water-on-floor guidance directs side-by-side, bottom-freezer, and top-freezer owners to different model-specific drain information. Do not assume that one drain-cleaning method applies to every GE refrigerator.
Water supply and appliance electricity need separation
A water-line leak can be stopped at the household shutoff, but pulling out a refrigerator can strain flooring, tubing, and the person doing the work. If the appliance is built in, the shutoff is inaccessible, or water is near the outlet or cord, leave it in place and use qualified appliance or plumbing help. Never handle wet electrical connections.
A Leak Detected message has a narrow model scope
GE's Leak Detected article describes bottom-freezer refrigerators with an LCD touch screen and RPWFE filter. It is not evidence that every GE refrigerator has a leak sensor or uses that filter. For a different model, record the exact message and use the matching manual rather than installing an unverified filter.
Safety boundary
Stop conditions
- Stop using the refrigerator's water and icemaker functions for uncontrolled flooding, a leaking valve, a split line, water near an outlet or cord, or a leak that continues after the supply is shut off.
- Do not touch wet electrical parts, move a built-in or heavy refrigerator alone, restore water to reproduce a leak, or continue operating while water reaches electrical components.
- Do not remove panels, clear an internal drain with sharp tools or heat, disassemble a valve or filter housing, open tubing inside a door or cabinet, or work on a wet connection.
- Use the exact GE Owner's Manual for refrigerator architecture, drain access, icemaker controls, water filter, and shutoff procedure. Hidden drain, valve, tubing, drip-pan, and electrical work requires qualified service.
Only after diagnosis
Potential parts
- water inlet valve
Consider this category only when a qualified diagnosis confirms the appliance valve is leaking, stuck open, or flooding after the household line and icemaker controls are checked.
Valve connections and electrical interfaces vary by GE model; do not select a valve from a floor puddle alone. - icemaker fill tube or water line
Consider this category only when the leak is localized to the model-specific fill line or tube and service confirms damage or a loose connection.
Tubing route and fittings differ among top-freezer, bottom-freezer, and side-by-side models; verify the complete model before any repair. - defrost drain or drain component
Consider this category only when the architecture-specific drain diagnosis confirms a blocked, damaged, or recurring drain problem.
Drain access and parts are model dependent; most internal drain work belongs to qualified refrigerator service. - water filter or filter housing component
Consider a filter category only when the exact model's documented filter area is leaking or shows a matching Leak Detected condition and service confirms the filter or housing.
Filter types and sensing features are not universal across GE refrigerators; confirm the model and approved filter designation.
When checks do not resolve it
Need a professional?
Arrange qualified refrigerator service for a leaking or flooding appliance valve, internal tubing, filter housing, drip pan, hidden or recurring defrost drain, or any leak that persists after safe external checks. Use plumbing service for a split or leaking household water line. Stop immediately for water near electrical parts, uncontrolled flooding, a hot or damaged cord, smoke, or an appliance that cannot be moved safely.
Safety scope: The user may dry accessible water, identify the model and architecture, wipe a dispenser tray, use documented icemaker controls, shut off an accessible water valve, and inspect visible dry connections. Qualified service must handle hidden drains, internal tubing, valves, filter housings, drip pans, panels, electrical parts, and any heavy or built-in appliance movement.
Common questions
FAQ
Why is my GE refrigerator leaking water onto the floor?
Trace whether it follows the icemaker or dispenser, comes from a visible household or appliance line, or appears with ice under the freezer or fresh-food pans. GE lists valves, water lines, icemaker fill lines, and defrost drains as different possibilities; shut off water for an active supply leak and arrange service for a hidden or recurring source.
Are a few drops from a GE refrigerator water dispenser normal?
A few drops immediately after dispensing can be normal because of line pressure and condensation. GE says dripping that continues long after the glass is removed may need service. Wipe the accessible tray and escalate if water pools or reaches the floor.
What should I do if my GE icemaker is flooding?
Turn the icemaker off using the model control. If it continues flooding while off, shut off the refrigerator water supply at a safe accessible valve and keep both off until service. Do not repeatedly cycle the icemaker or reach behind a heavy appliance on a wet floor.
Does ice on the GE refrigerator freezer floor mean the defrost drain is clogged?
It can. GE says ice on the freezer floor or beneath fresh-food vegetable pans can indicate a clogged defrost drain, but the safe procedure depends on side-by-side, bottom-freezer, or top-freezer architecture. Use the exact manual and do not chip, heat, or drill the drain.
What does Leak Detected mean on a GE refrigerator?
GE's cited Leak Detected guidance is limited to certain bottom-freezer models with an LCD touch screen and RPWFE filter. On that configuration, check the filter area and documented filter fit; a persistent message or leak requires service. Do not generalize that filter procedure to another model.
Can I pull out my GE refrigerator to fix a water leak?
Only if the model and installation allow safe movement and another adult can control the weight and water line. GE directs owners to locate the shutoff, but a built-in or heavy refrigerator, wet floor, inaccessible valve, or water near electricity is a reason to leave it in place and call qualified service.
Read the exact guide
Official sources
- Refrigerator - Water Leaking Onto The FloorGE Appliances · General GE refrigerator floor-leak guidance; exact line routing and shutoff location vary by installation.
- Refrigerator & Freezer - Drain TubesGE Appliances · General GE refrigerator and freezer architecture guidance; compact, full-size, self-defrost, and manual-defrost models differ.
- Refrigerator - Icemaker Leaking or Dripping WaterGE Appliances · Applies to GE refrigerators with an automatic icemaker; specific drain and icemaker arrangements vary by model.
- Refrigerator - Leak Detected Message on DisplayGE Appliances · Limited to bottom-freezer refrigerators with an LCD touch screen and RPWFE filter; not a universal GE refrigerator procedure.
- Refrigerator - Water on FloorGE Appliances · General GE refrigerator guidance; drain access and owner steps vary by side-by-side, bottom-freezer, and top-freezer model.
- Refrigerator - Cleaning the DispenserGE Appliances · Applies to GE refrigerators with ice and water dispensers; specific pads, shelves, and cleaning access vary.
- Refrigerator - Dripping or Leaking Water from DispenserGE Appliances · Applies to GE refrigerators equipped with a water dispenser; drip trays and dispenser designs vary.
Community feedback
Share a repair observation
Share a plain-text repair observation. Accepted observations are published automatically; this page may take a moment to update.