
On this page
Start here
Quick answer
Start by locating where the water first appears: the door or gasket, dispenser, rear hose connections, drain hose or standpipe, or underneath the GE washer-dryer. GE says leak location changes the likely cause, and its guidance points to dirty or obstructed door seals, blocked dispenser ports, damaged or poorly installed hoses, household drain back-up, excess suds, or a water valve that lets water enter while the washer is off. If water is spreading or near electrical equipment, stop the cycle only from a dry, safe position, do not unplug while standing in water, and close the household water valves once power is safely off. Clean only accessible areas allowed by the exact model manual; do not open panels or keep testing an unresolved leak.
Before you begin
Safety first
- The reader may observe from a dry position and clean accessible gasket or dispenser areas according to the exact manual. Cabinet removal, pump or valve access, wiring work, moving a stacked or built-in unit, and plumbing alterations belong to qualified service.
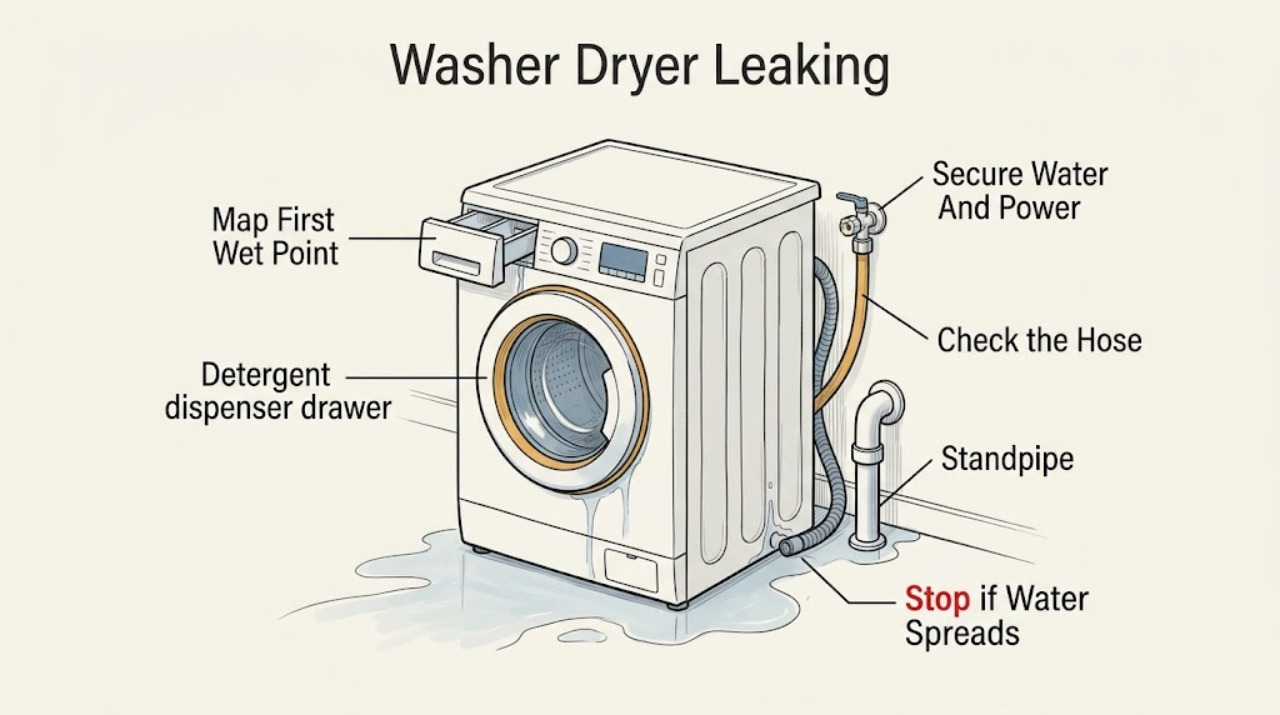
Work through in order
Diagnostic checks
Use only checks that match the exact appliance or system and its official guide.
-
Check 1
If the floor is dry enough to work safely, pause the cycle or leave the appliance off and use dry towels to identify the first wet point without moving the washer-dryer. Note the appliance stage when the water appears: fill, wash, spin, drain, drying, door opening, or idle.
Expected result: The first wet point is at the door or gasket, dispenser, rear fill-hose connections, drain hose or standpipe, beneath the cabinet, or it appears while the appliance is off.
Next step: Follow only the matching location check below. Photograph the wet point and save the cycle stage for model-specific service if the source cannot be seen safely.
Stop if: Stop immediately for active flooding, water near electrical equipment, a hot or damaged cord, smoke, a burning odor, or any need to move the appliance or open its cabinet.
Why this matters
Why: A location-and-timing pattern narrows the next check. A rear or standpipe pattern favors hose installation or household plumbing; a door or dispenser pattern favors the front-load path; water entering while off points toward the water supply valve. Water beneath the cabinet without an accessible source is unresolved internal leakage.
-
Check 2
For spreading water or a substantial leak, use the control panel to pause or turn the washer-dryer off only from a dry, safe position. Do not unplug while standing in water; after power is safely off, close the household water valves behind the appliance.
Expected result: The leak stops after the water valves are closed, continues from trapped water, or cannot be approached without stepping into water.
Next step: Keep the appliance off, dry the area only from a safe position, and arrange qualified appliance or plumbing help for a substantial or inaccessible leak. If the area is unsafe, leave it undisturbed and get appropriate emergency assistance.
Stop if: Do not unplug while standing in water, touch wet electrical equipment, reset a tripped protective device repeatedly, or remove panels during a flood.
Why this matters
Why: Stopping the supply limits further filling but does not identify an internal fault. Water that continues briefly can be residual water in the tub or hoses; a leak that continues or cannot be isolated needs service. An unsafe electrical position is a stop condition, not a reason to reach for the plug.
-
Check 3
With the household water valves closed and power safely off, inspect only the visible rear fill-hose ends and drain-hose connection for a kink, split, loose-looking connection, missing or damaged rubber washer, or an incorrectly seated drain hose. Do not pull the appliance or reach into a wet area.
Expected result: A fill-hose end is wet, a washer is missing or damaged, the hose is visibly damaged, the drain hose is loose or not fully inserted and secured, or the standpipe is dry while the appliance connection leaks.
Next step: Leave the valves closed and use the exact model installation instructions or qualified service to replace a damaged hose or restore the specified washer and drain-hose routing. Do not run another cycle to prove the leak.
Stop if: Stop for a cracked fitting, water behind the appliance, an inaccessible connection, a stacked or built-in unit that would need moving, or any repair requiring internal access.
Why this matters
Why: GE identifies fill-hose washers or hose damage as possible rear leaks and says the drain hose must be secured and fully inserted. A visible hose defect supports a hose or seal repair; a dry standpipe with water at the appliance connection keeps the appliance installation or hose in focus. Do not assume hand-tightening or a generic hose fixes every model.
-
Check 4
From a dry, safe position, observe the household standpipe or drain outlet during a supervised drain or spin only if there was no flooding and the hose connections are secure. Keep hands and tools out of the pipe and stop the cycle if water rises.
Expected result: Water backs up in the standpipe and spills onto the floor, the standpipe remains clear while the washer connection leaks, or the drain outlet cannot be observed safely.
Next step: For standpipe back-up, stop using the appliance and arrange plumbing service. For a clear drain with a confirmed appliance-side leak, provide the location and timing to appliance service rather than opening the cabinet.
Stop if: Stop testing for any rising water, sewage contamination, unstable appliance, electrical exposure, or need to push the drain hose deeper or alter the standpipe.
Why this matters
Why: GE says water that backs up and overflows from the standpipe during spin often indicates a household plumbing problem. A clear standpipe with a leaking appliance connection points back to the drain-hose installation or appliance path; an unobservable outlet leaves the cause unresolved.
-
Check 5
If water first appears at the front and the appliance is off, cool, and empty, inspect the accessible door gasket folds and edge for lint, soil, soap, or a trapped garment; then check that the detergent drawer is fully closed and follow the exact model manual for cleaning the dispenser tray and ports.
Expected result: Debris is present in the gasket, clothing was caught at the door edge, the drawer or dispenser ports show product buildup, or the front remains clean while a substantial leak occurs.
Next step: Clean only accessible gasket or dispenser areas using the model manual, ensure the load is fully inside the drum, and stop if the leak persists. Do not remove the gasket, dispenser box, or cabinet panels as a generic repair.
Stop if: Stop for a torn gasket, a leak from under the cabinet, a substantial or repeated leak, trapped water near electrical parts, or any need to disassemble the front of the appliance.
Why this matters
Why: GE says soil or soap on a front-load door seal can cause small leaks, and blocked dispenser ports can back up fill water and overflow the dispenser. A clean gasket and dispenser do not rule out a hidden internal leak or a different leak path; a large leak should not be treated as a wipe-down issue.
-
Check 6
If the appliance is specifically a GE Profile UltraFast Combo and the only symptom is a few drops into the gasket when the door opens after a completed cycle, wait a few seconds before removing clothes and inspect the gasket drain holes or pump only as the Combo manual permits; also check visible leveling without moving the unit.
Expected result: The drops are minimal and limited to door opening after a cycle, or water appears during a cycle, on the floor, in quantity, or on a different GE washer-dryer model.
Next step: For the limited Combo symptom, follow the exact manual and monitor without forcing parts. For any floor leak, larger quantity, persistent water, or uncertain model, keep the appliance off and arrange service.
Stop if: Do not assume all GE washer-dryers share the Profile Combo behavior, do not force a pump or gasket apart, and stop for a floor leak, flooding, or electrical exposure.
Why this matters
Why: GE describes minimal post-cycle dripping into the gasket as potentially normal for the referenced Combo. Water during operation, a floor puddle, blocked drain holes, or a different model is not established as that normal condition and requires the exact model's troubleshooting path.
-
Check 7
If the tub drips or fills while the washer-dryer is not turned on, close the water supply valves and leave the appliance off rather than starting another cycle.
Expected result: Water accumulation stops when the supply valves are closed, or water continues from the floor, hose, or another source.
Next step: Give service the idle-drip observation, valve position, leak location, and model/serial details; do not open or replace the valve assembly without exact model instructions and appropriate service capability.
Stop if: Stop for active flooding, water near electrical equipment, a damaged hose, or any attempt to access internal plumbing without qualified service.
Why this matters
Why: GE says water entering an idle washer can indicate a failed water valve allowing water into the tub. A leak that continues with the valves closed is not explained by that inlet-valve path and needs a separate appliance or plumbing assessment.
Use your observations
Decision map
Find the observation that best matches what you see, then follow the next safe action.
-
PATH 01Safety boundary
What you see
Water is spreading, the floor is wet around electrical equipment, or the leak cannot be approached from a dry position.
Do this next
Use the controls only from a dry safe position, do not unplug while standing in water, close household water valves once power is safely off, and obtain qualified help.
Why this path and its safety boundary
Why it matters: The immediate risk is water and electricity, not identifying a part.
Safety stop: Do not touch wet electrical equipment, move the appliance, or open panels.
-
PATH 02Safety boundary
What you see
The first wet point is a fill-hose end, drain-hose connection, or visible rear installation point.
Do this next
Keep water valves closed and use the exact installation instructions or qualified service to correct the visible hose or seal issue.
Why this path and its safety boundary
Why it matters: A hose, rubber washer, damaged connection, or drain installation is plausible.
Safety stop: Stop if the fitting is cracked, inaccessible, behind a stacked unit, or the leak remains after the specified correction.
-
PATH 03Safety boundary
What you see
The standpipe rises and overflows during spin or drain.
Do this next
Stop using the washer-dryer and arrange plumbing service; do not force the drain hose deeper or improvise a drain modification.
Why this path and its safety boundary
Why it matters: GE identifies this pattern as often indicating a household plumbing problem rather than only a washer hose fault.
Safety stop: Stop immediately if water is contaminated, rising quickly, or near electrical equipment.
-
PATH 04Safety boundary
What you see
A small leak starts at the door edge, gasket fold, or dispenser during filling or washing.
Do this next
Clean only the accessible areas named by the exact manual, confirm the drawer is closed and the load is inside the drum, then stop if the leak returns.
Why this path and its safety boundary
Why it matters: Accessible gasket soil or debris, a trapped garment, a dispenser blockage, or excess suds is possible on applicable front-load models.
Safety stop: Do not remove the gasket or dispenser assembly, and do not keep testing a substantial leak.
-
PATH 05Safety boundary
What you see
Only a minimal amount of water drips into the gasket when a GE Profile UltraFast Combo door is opened after a cycle.
Do this next
Wait a few seconds, follow the Combo manual for drain-hole and pump checks, and verify visible leveling without moving the unit.
Why this path and its safety boundary
Why it matters: GE describes this limited, model-specific post-cycle symptom as potentially normal residual water.
Safety stop: A floor puddle, substantial leak, during-cycle leak, or different model requires service rather than this explanation.
-
PATH 06Safety boundary
What you see
The tub drips or fills while the appliance is turned off.
Do this next
Close the water valves, leave the appliance off, and arrange model-specific appliance service.
Why this path and its safety boundary
Why it matters: GE says the water valve may have failed and may allow water into the tub while off.
Safety stop: Do not open the valve assembly or run another cycle to test it.
-
PATH 07Safety boundary
What you see
The source is under the cabinet, the leak persists after accessible checks, or the visible parts do not explain the water.
Do this next
Keep the washer-dryer off, provide the model/serial details and photos or timing observations, and request qualified appliance service.
Why this path and its safety boundary
Why it matters: An internal hose, pump, valve, seal, or installation issue remains unconfirmed and cannot be safely diagnosed from outside.
Safety stop: Do not remove cabinet panels, probe wiring, reach into the tub or pump, or substitute parts based only on the puddle location.
Helpful context
Understand the symptom
Locate the first wet point before moving the appliance
Water can travel across an uneven floor, so a puddle at the front does not prove that the front of the washer-dryer is the source. Use a dry towel to mark the first wet edge from a safe position and note whether the leak begins during filling, washing, spinning, draining, drying, or while the appliance is idle. Do not pull a stacked or built-in unit or reach behind it while the floor is wet. GE's general troubleshooting page directs users to choose a leak path by location rather than treating every leak as the same fault.
Treat active flooding as a water-and-electricity stop
If water is actively spreading, pause or switch the appliance off at its controls only if you can do so without standing in water. GE specifically warns not to unplug while standing in water; once power is off safely, close the household water valves behind the appliance. Keep the washer-dryer out of service until the source is identified, and do not remove a cabinet panel to search for a pump, valve, or internal hose.
A small amount of Combo gasket water is not the same as a floor leak
GE's Profile UltraFast Combo guidance says a minimal amount of residual water can drip into the door-gasket fold when the door is opened after a cycle. Waiting a few seconds, checking the gasket drain holes and pump only as the model manual allows, and checking that the Combo is level can reduce that specific symptom. Persistent water on the floor, a large leak, blocked drain holes, or a model other than the referenced Combo needs model-specific troubleshooting or service rather than assuming the residual-water explanation applies.
Safety boundary
Stop conditions
- Do not unplug while standing in water or touch wet electrical equipment; stop from a dry position and close household water valves once power is safely off.
- Do not move a stacked, built-in, or unstable washer-dryer alone, and do not pull the appliance across a wet floor to inspect behind it.
- Do not open cabinet panels, probe wiring, reach into a pump or tub, or replace an internal valve, seal, or hose without the exact model procedure and appropriate service capability.
- Stop testing for rising water, a standpipe overflow, sewage contamination, a cracked fitting, smoke, burning odor, damaged cord, or repeated electrical trips.
- Do not assume minimal post-cycle water in the gasket is normal on every GE washer-dryer; that explanation is limited to the referenced GE Profile UltraFast Combo guidance.
Only after diagnosis
Potential parts
- washer fill-hose set or hose washers
Consider this category only if the accessible fill-hose inspection finds a damaged hose or missing or damaged washer at the connection.
Confirm the exact washer-dryer model, hose ends, installation requirements, and manufacturer's fit information before ordering; keep the water valves closed until the leak path is corrected. - washer drain hose
Consider this category only if the exact model's installation path and inspection show a damaged or incorrectly fitted drain hose rather than a household standpipe back-up.
Confirm the model-specific hose routing, securement, outlet arrangement, and fit information; do not alter the standpipe or push the hose farther down as a workaround. - front-load door gasket
Consider this category only if the applicable front-load model has a torn or deformed gasket and accessible cleaning or load placement does not explain the leak.
Confirm the exact model and gasket design; gasket removal and installation may require model-specific procedure or qualified service. - washer water inlet valve assembly
Consider this category only when the washer drips or fills while off and service confirms the inlet valve path.
Confirm the exact model, valve configuration, and service procedure; do not open the appliance or assume an inlet valve is the cause of a floor leak during a cycle.
When checks do not resolve it
Need a professional?
Call for active or substantial flooding, a leak that returns after the applicable accessible check, water under the cabinet, a standpipe back-up, a drip while the appliance is off, a torn gasket, a damaged hose connection, or any symptom requiring movement, panel removal, electrical contact, or internal plumbing access.
Safety scope: The reader may observe from a dry position and clean accessible gasket or dispenser areas according to the exact manual. Cabinet removal, pump or valve access, wiring work, moving a stacked or built-in unit, and plumbing alterations belong to qualified service.
Have this ready
- GE model and serial details from the appliance label or model-specific support lookup
- The first wet point, cycle stage, approximate amount, and whether the household water valves stop the leak
- Photos of accessible hose ends, drain outlet, door gasket, dispenser, puddle path, and any visible damage from a dry safe position
- Whether the unit is a front-load washer, top-load washer, or GE Profile UltraFast Combo and whether it is stacked or built in
Common questions
FAQ
Why is my GE washer-dryer leaking from the back?
GE says rear leaks often involve fill hoses, drain-hose installation, or household plumbing. Close the water valves before inspecting visible hose ends, check for damaged washers or hoses, and watch the standpipe only from a dry safe position; a standpipe that backs up and overflows needs plumbing service.
What should I check when a GE front-load washer leaks from the door?
With the appliance off, cool, and empty, inspect accessible gasket folds for soil, soap, debris, or a trapped garment and make sure the detergent drawer closes fully. GE also says blocked dispenser ports can cause water to back up and overflow. Clean only as the exact model manual allows, and stop for a substantial, repeated, or under-cabinet leak.
Is a little water in the GE Profile UltraFast Combo gasket normal?
GE says a minimal amount of residual water may drip into the gasket when the referenced Profile UltraFast Combo door is opened after a cycle. Waiting a few seconds and following the Combo manual for drain-hole, pump, and leveling checks may help. A floor puddle, substantial leak, during-cycle leak, or different model should be treated as unresolved.
Why does my GE washer fill when it is turned off?
Close the washer's water supply valves and leave it off. GE says a water valve may have failed and let water enter the tub while the washer is not running; arrange model-specific service rather than opening the valve assembly yourself.
Can I unplug a leaking washer-dryer?
Only operate the controls from a dry, safe position. GE's front-load guidance says not to unplug while standing in water; after power is safely off, close the household water valves. If the area cannot be approached safely, keep clear and obtain qualified help.
Read the exact guide
Official sources
- Support for GE Washers and DryersGE Appliances · GE washer, dryer, and washer-dryer support lookup when model-specific guidance is needed
- Washer - Leaking in RearGE Appliances · GE top-load and front-load washer rear-leak diagnosis; use the exact model instructions for a washer-dryer Combo
- Front Load Washer - Leaking WaterGE Appliances · GE front-load washer leaks; apply to a washer-dryer Combo only where the exact model manual agrees
- GE Profile™ UltraFast Combo Washer/Dryer - Water in Gasket or Dripping From Open DoorGE Appliances · Only the GE Profile UltraFast Combo symptom of minimal water dripping into the gasket after a cycle
- Washer - Leaking TroubleshootingGE Appliances · General GE washer leak triage when the specific model and leak location are not yet known
- Washer - Drips or Fills When Not Turned OnGE Appliances · GE washer or washer-dryer symptoms where water drips or the tub fills while idle
Community feedback
Share a repair observation
Share a plain-text repair observation. Accepted observations are published automatically; this page may take a moment to update.