
On this page
Start here
Quick answer
If a Haier dryer leaves clothes damp, first determine whether the drum tumbles and whether the load is warm at all. Check that the selected cycle is intended to heat, the drum is not overfilled, the lint filter is clean, and the visible external vent is not blocked. In Auto-Dry, a small or poorly contacting load can make the displayed time change while the sensor gathers a reading; a sensor surface can be cleaned only as the model manual permits. If Rack Dry or Air Dry is selected, the dryer may not add heat. For an electric model, a supply or breaker problem can remove heating; for a gas model, do not inspect or relight the gas system yourself. Stop for smoke, a burning smell, scorching, an unusually hot cabinet, or gas odor, and arrange qualified service if a properly loaded dryer has clear airflow but still does not dry.
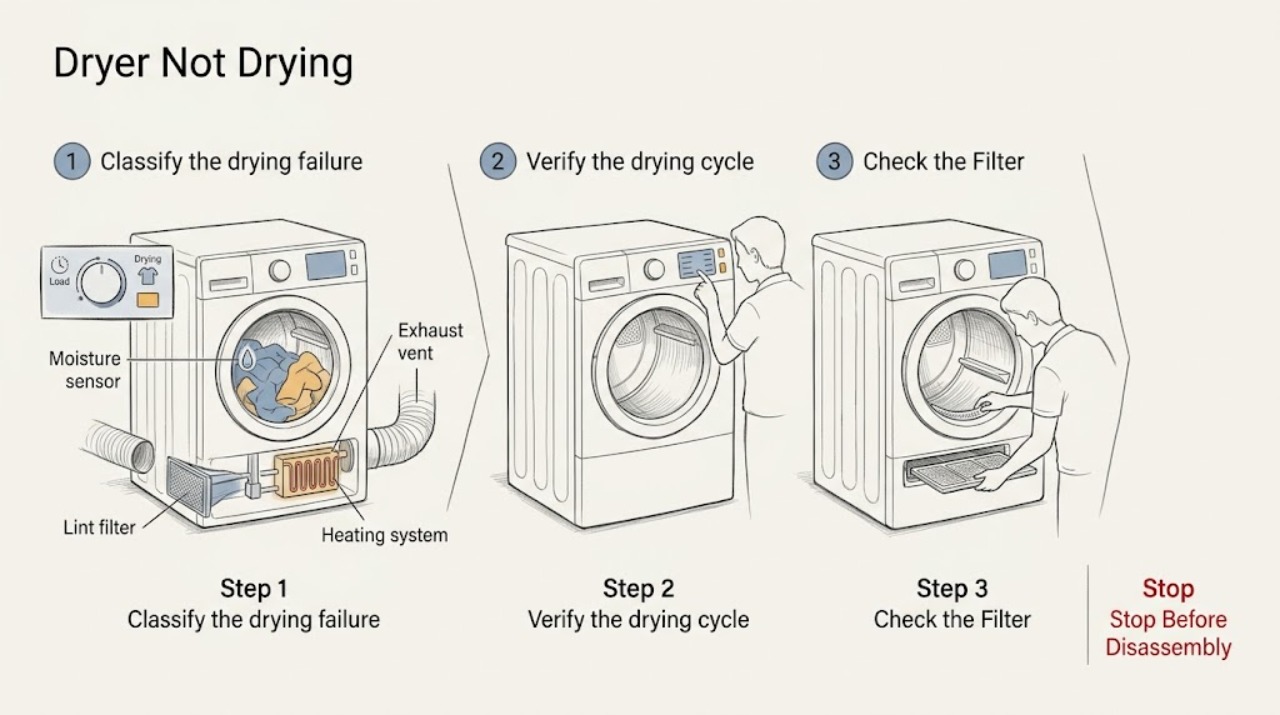
Work through in order
Diagnostic checks
Use only checks that match the exact appliance or system and its official guide.
-
Classify the drying failure and screen for hazards
Stop the dryer and let it cool enough to handle the load safely. Note whether the drum turns, whether clothes are cool or slightly warm, whether moisture remains inside the drum, and whether there is smoke, a burning smell, scorched fabric, a very hot cabinet, or a gas odor. Do not keep running it to see if a hot smell clears.
Expected result: The drum tumbles with cool damp clothes, the clothes are warm but still wet, the drum does not turn, or smoke, scorching, burning odor, extreme heat, or gas odor is present.
Next step: For smoke, scorching, a burning smell, extreme heat, or gas odor, leave the dryer off and disconnect power or gas only if safe; arrange qualified service or emergency help from a safe location. Otherwise remove or redistribute the load after the drum stops and check the cycle and load size.
Why this matters
Why: Cool damp clothes suggest a cycle, airflow, power, or heating path; warm damp clothes suggest load, venting, sensor, or cycle conditions. A drum that does not turn is a separate mechanical fault. Heat, smoke, scorching, or gas odor is a safety stop rather than a drying test.
-
Verify the drying cycle and load size
With the dryer stopped, check the model manual and selected controls. Make sure Rack Dry or Air Dry is not selected when heat is required, choose a cycle appropriate for the fabric and load, and do not pack the drum. Separate bulky or heavy items from ordinary clothing and shake out clothes before loading; close the door completely.
Expected result: A no-heat Rack Dry or Air Dry option was selected, the load was overfilled or bulky, or the cycle and load were appropriate from the start.
Next step: Use the model-recommended cycle and a properly sized load for one controlled test only if there is no hazard. If the dryer still leaves clothes damp, do not keep increasing heat or repeating overloaded cycles; clean the lint path and check the external vent.
Why this matters
Why: Haier identifies Rack Dry or Air Dry as settings that can explain a no-heat complaint and identifies load size, fabric, and bulky items as factors in drying time. A corrected cycle and smaller load can resolve a setting or capacity problem; a correctly selected cycle with damp clothes needs an airflow check.
-
Clear the lint filter and visible exhaust path
After the dryer is cool, clean the lint filter according to the manual and inspect the accessible external vent opening for lint or another obstruction. Keep the front of the dryer and the vent outlet clear. Do not insert tools deep into the duct, remove ductwork from a gas dryer, or open the cabinet to inspect the blower or internal duct.
Expected result: The filter or external vent is visibly restricted, or the accessible airflow path is clear while the dryer still leaves clothes damp.
Next step: Clear only the accessible filter or vent opening and stop using the dryer if it becomes unusually hot or smells burned. If drying remains poor with a clear external path, continue only with the cycle, sensor, and supply checks; do not dismantle the exhaust or cabinet.
Why this matters
Why: Haier says lint on the filter reduces warm airflow and that an obstructed external vent interferes with moisture leaving the dryer. Clearing an accessible restriction can improve drying, but a clear outlet does not rule out an internal airflow, heating, or control fault.
-
Check Auto-Dry sensor behavior and load contact
If the model has Auto-Dry or Sensor Dry, note whether the load is very small or only a few garments touch the sensor bars, and whether the remaining-time display changes during the first part of the cycle. With the dryer off and cool, clean the visible sensor area only as the model manual permits; do not scrape or reach into the drum openings.
Expected result: The load is very small and the display changes repeatedly, the sensor surface has visible residue, or the load is normal and the dryer still does not dry.
Next step: Use a properly sized load and the model's recommended sensor or timed cycle. If the clothes remain damp after a normal cycle with clean accessible sensors and clear airflow, treat the issue as unresolved and check external power or arrange service rather than overriding safety controls.
Why this matters
Why: Haier explains that Auto-Dry estimates remaining time from moisture contact and that small loads may produce changing time estimates. Residue can interfere with sensor contact, but a changing display alone does not prove the heater or vent is defective.
-
Verify the visible power or fuel condition without opening the system
For an electric dryer, confirm the plug is fully seated and inspect the visible cord for damage; if a breaker has tripped, do not repeatedly reset it or increase fuse capacity. For a gas dryer, check only the normal user-accessible control and stop immediately for any gas smell. Do not test live voltage, open a terminal block, remove a gas panel, or relight a burner.
Expected result: The visible electrical supply is absent or damaged, a breaker repeatedly operates, a gas odor is present, or the visible supply appears normal.
Next step: Leave the dryer off and obtain qualified electrical or gas-appliance service for a supply problem, gas odor, or repeated breaker operation. If the supply appears normal, perform one controlled test only after the load, cycle, lint path, and vent are suitable.
Why this matters
Why: A supply problem can prevent heating even when the drum turns. Electrical or gas-system diagnosis beyond a visible check is professional work, and a gas odor or recurring breaker operation is not a condition for another drying cycle.
-
Run one controlled test and set the service boundary
Only if the dryer is cool, stable, properly closed, free of smoke or odor, supplied normally, loaded within the manual's limit, and has a clear accessible lint path, run one brief supervised cycle from outside the appliance. Observe whether the drum turns, warm air exits, moisture leaves the external vent, and the dryer completes without overheating or stopping.
Expected result: The load dries normally, the drum turns but the air stays cool, airflow is weak or no moisture exits, the dryer overheats or stops, or the clothes remain damp despite normal warmth and airflow.
Next step: If drying is normal, monitor the next load and keep the filter and vent path clear. If any abnormal result returns, stop using the dryer and arrange qualified service; provide the model number, cycle, load, heat, airflow, sensor, and hazard observations.
Why this matters
Why: Normal drying after a cycle or airflow correction supports a temporary setting, load, sensor, or vent condition. Cool air, weak exhaust, overheating, stopping, or persistent damp clothes after the safe checks points toward an internal heating, blower, sensor, control, or mechanical fault.
Use your observations
Decision map
Find the observation that best matches what you see, then follow the next safe action.
-
PATH 01Next step
What you see
Rack Dry or Air Dry was selected, the load was too large or bulky, or the cycle was inappropriate, and drying improves after a model-appropriate correction.
Do this next
Keep loads within the manual's limit and use the correct cycle for the fabric. Stop if the dryer remains cool or damp clothes persist.
-
PATH 02Next step
What you see
The lint filter or accessible external vent was restricted, and drying improves after the obstruction is cleared.
Do this next
Clean the lint filter before each load and monitor the external vent. Arrange service if the outlet remains weak, the dryer overheats, or drying deteriorates again.
-
PATH 03Next step
What you see
Auto-Dry time changes with a very small load or sensor residue, but the dryer produces normal heat and airflow.
Do this next
Use a properly sized load and follow the model's sensor-cleaning guidance. A display change alone is not a heater failure; persistent damp clothes need service.
-
PATH 04Next step
What you see
The drum turns but the air stays cool, the visible supply is abnormal, or the dryer repeatedly stops or overheats.
Do this next
Leave the dryer off and arrange qualified service or qualified electrical/gas assistance. Do not test live circuits, open the cabinet, or relight a gas appliance.
-
PATH 05Next step
What you see
Smoke, burning odor, scorching, gas odor, damaged cord, repeated breaker operation, or extreme heat is present.
Do this next
Stop immediately, keep clear, and disconnect power or gas only if safe. Seek qualified emergency or appliance service from a safe location.
Helpful context
Understand the symptom
Not drying has two different paths: a dryer that tumbles but never produces useful heat, and a dryer that heats but takes too long to remove moisture. Haier says drying time varies with heat type, load size, fabric, wetness, and exhaust venting. Check the simple airflow and cycle conditions before treating the heater as failed, and keep the model manual nearby because cycle names and sensor locations vary.
Keep the dryer checks at the controls, door, drum, lint filter, and accessible external vent. Do not remove the cabinet, bypass a door switch, measure live voltage, open a gas connection, or relight a burner. A burning smell, smoke, scorching, gas odor, or extreme heat is a stop condition; leave the dryer off and obtain qualified help.
When checks do not resolve it
Need a professional?
Arrange qualified dryer service when a properly loaded dryer has a clear lint and vent path but remains damp, when the drum turns with no heat, when airflow is weak, when the dryer overheats or stops, or when the sensor, blower, heater, belt, motor, or control may require access behind the cabinet. Stop immediately for smoke, burning odor, scorching, gas odor, damaged cord, repeated breaker operation, or extreme heat.
Common questions
FAQ
Why is my Haier dryer running but not drying clothes?
Check the cycle, load size, lint filter, external vent, Auto-Dry sensor behavior, and whether the air is warm. Rack Dry or Air Dry may not add heat. If the drum turns but the air stays cool or clothes remain damp after safe checks, arrange qualified service.
Can a blocked vent cause a Haier dryer not to dry?
Yes. Haier identifies lint-filter and external-vent obstructions as airflow problems that lengthen drying. Clean the accessible filter and inspect the outside vent after the dryer is cool. Do not dismantle the duct or keep using the dryer if it overheats.
Why does my Haier Auto-Dry time keep changing?
Haier says Auto-Dry estimates time from moisture touching the sensor, so a small load may produce changing time estimates. Use a properly sized load and clean the visible sensor area only as the model manual permits. Persistent damp clothes or no heat need service.
Read the exact guide
Official sources
- Haier Dryer - Not Heating at AllHaier Appliances · Haier dryer no-heat mode and electric supply checks
- Haier Dryer - Remaining Time Changes During Auto DryHaier Appliances · Haier dryer Auto-Dry sensor behavior, small loads, remaining time, and sensor cleaning
- Haier Dryer - Stops Mid-CycleHaier Appliances · Haier dryer door, power, blocked-front, overheating, and service checks
- Haier Dryer - Drum Not TurningHaier Appliances · Haier dryer door, load, drum turning, and drive-related checks
- Haier Dryer - Dry Time Too LongHaier Appliances · Haier dryer cycle, load, fabric, lint-filter, external-vent, and drying-time troubleshooting
Community feedback
Share a repair observation
Share a plain-text repair observation. Accepted observations are published automatically; this page may take a moment to update.