
On this page
Start here
Quick answer
Stop the program and close the dishwasher's water tap before investigating a continuing leak. If water is near electrical connections, keep hands dry and do not reach for the plug; isolate power only from a safe, accessible control and call qualified service. Note when the water appears and where it first becomes visible. Foam or water at the door points toward detergent, loading, door alignment, or an accessible seal; water while filling points toward the supply tap, inlet hose, gasket, or valve; water during or after draining points toward the drain path; and water from beneath the cabinet or a persistent leak requires service. Hisense manuals show model-specific examples: an F40 inlet-valve leakage or F54 overfill condition calls for the water tap to be turned off and service, while an accessible inlet filter or drain-pump blockage may be addressed only as that exact manual permits. Do not pull out a built-in dishwasher, loosen hoses, remove panels, or run another cycle to locate a hidden leak.
Before you begin
Safety first
- The owner may stop the cycle, close an accessible water tap, observe from outside, clean an accessible seal or filter only as the exact manual permits, and protect the floor. Built-in removal, pressurized plumbing, inlet valves, pumps, overflow devices, concealed leaks, electrical parts, and internal tub work require qualified service.
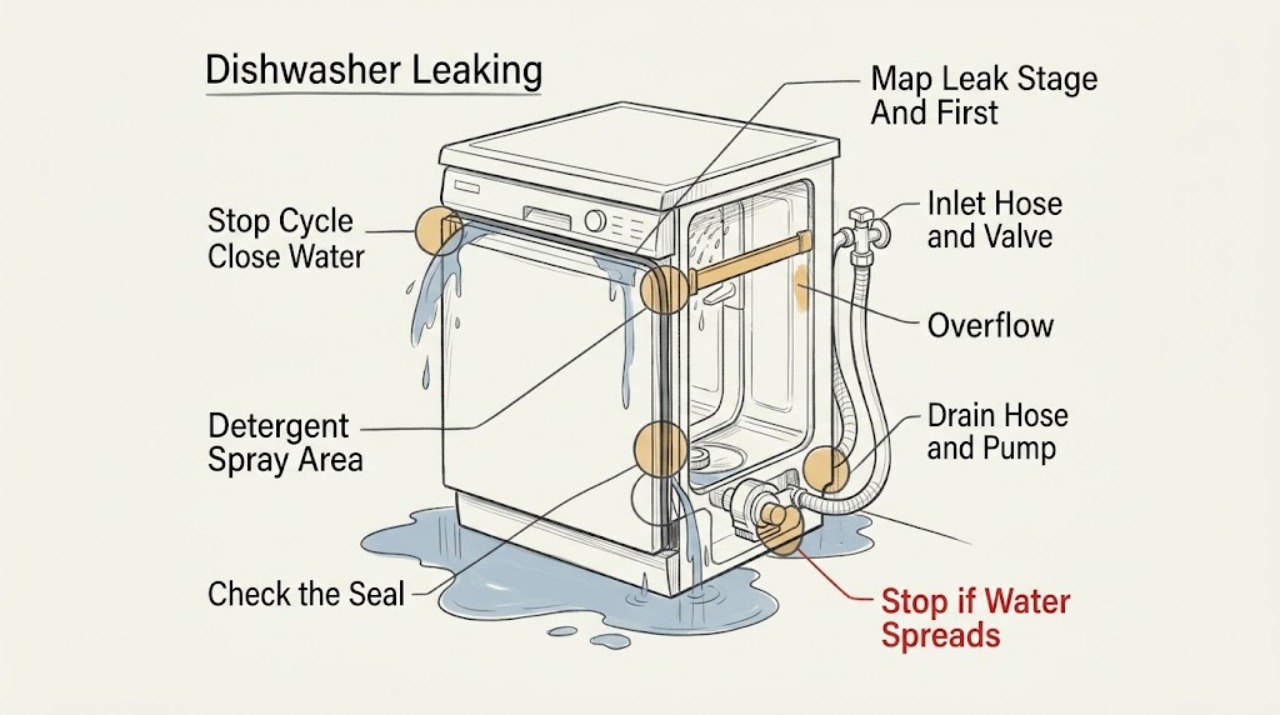
Work through in order
Diagnostic checks
Use only checks that match the exact appliance or system and its official guide.
-
Check 1
Stop the dishwasher if the controls respond, close the accessible water-supply tap, and keep hands away from standing water near the appliance. Note whether water is near the plug, outlet, wiring, or base, and whether there is smoke, burning odor, sparking, or a breaker trip. Do not reach behind a wet built-in dishwasher for the plug.
Expected result: Water stops after the tap is closed; water continues; water is near electrical parts; or smoke, odor, sparks, heat, or repeated trips are present.
Next step: For electrical or fire signs, isolate power only from a dry, safe accessible point and call qualified service. Otherwise keep the water tap closed and continue only with external observation.
Stop if: Do not touch wet plugs or outlets, repeatedly run the dishwasher, or remove the plug before the water supply is safely off when water could still enter.
Why this matters
Why: A continuing flow after a cycle stops increases the urgency of closing the water supply. Water near electrical parts or other electrical signs make ordinary leak tracing unsafe. A contained puddle without electrical involvement can proceed to external location classification.
-
Check 2
With the unit off and water supply closed, place towels outside the appliance and record when the first water appeared: during filling, during washing, during draining, or while idle afterward. From outside only, identify whether the first wet point is the door edge, under-sink supply connection, drain connection, toe-kick/floor, or a concealed cabinet area.
Expected result: The leak begins during fill at an inlet connection; at the door during spray; at drain or after the cycle; or from under the cabinet/while idle.
Next step: Follow the matching external branch. If the first wet point cannot be seen without moving the machine or removing a panel, stop and arrange service.
Stop if: Do not pull out a built-in dishwasher, loosen a hose, remove the toe-kick, or restart a cycle solely to reproduce the leak.
Why this matters
Why: Fill timing makes the inlet path more likely; door timing makes foam, loading, door alignment, or seal contact more likely; drain timing makes the outlet path more likely; and an underside or idle leak makes a concealed hose, valve, pump, tub, or overflow condition more likely.
-
Check 3
For water at the door, inspect the accessible door edge and seal for visible food, damage, folds, or a dish that prevents the door from closing. Check whether non-dishwasher washing liquid or excessive detergent could have created foam, and whether the dishwasher is level only if the exact installation instructions make that an owner-accessible check. Do not bend or remove the seal.
Expected result: Foam is present; a dish obstructs the door; the seal is visibly dirty or damaged; the door does not close squarely; or the door and seal look normal.
Next step: Remove only an accessible loading obstruction and clean an intact seal using the exact manual. Do not run another cycle while the water tap is closed unless the manual and service provider specifically direct a safe test; arrange service for a damaged seal, repeated front leak, or an unlevel/installation concern.
Stop if: Do not use household dish soap to test the dishwasher, add chemicals to suppress foam, glue or stretch a seal, or operate with a door that will not latch normally.
Why this matters
Why: Foam, an obstructed door, or a damaged seal can allow water to escape at the front. A normal visible seal does not rule out an internal door, tub, spray, or level-related fault, especially when water comes from below.
-
Check 4
With the water tap closed and power isolated from a safe, dry point, inspect the visible supply and drain hose connections under the sink for a kink, loose-looking connection, damaged hose, displaced gasket, or water track. Only if the exact Hisense manual explicitly identifies an accessible inlet filter or drain filter/pump stop may you clean and refit that part as directed; do not reach behind the appliance.
Expected result: Water is at the visible inlet connection; the drain hose is kinked or visibly damaged; water remains in the tub after draining; the exact manual shows an accessible filter/pump check; or the external hoses appear normal.
Next step: Keep the tap closed and arrange service for a damaged or leaking hose, inlet-valve condition, hidden connection, or persistent standing water. Perform a filter/pump check only when the exact manual shows it, and refit every stop and filter before any authorized return to use.
Stop if: Do not disconnect a pressurized hose, use pliers on an undocumented fitting, remove the dishwasher from cabinetry, or test a leak with water flowing.
Why this matters
Why: A visible connection or hose defect can explain a stage-specific leak. Standing water can fit an outlet restriction in the applicable manuals. A normal external path or a leak from behind the cabinet moves the diagnosis to hidden plumbing, valve, pump, tub, or overflow protection.
-
Check 5
If water came from under the cabinet, returned after the visible check, appeared while the machine was idle, or was accompanied by an F40/F54/F43 or another model-specific fault, keep the water tap closed and stop owner troubleshooting. Record the exact model, error text, leak stage, first wet point, water amount, and whether the tub contains water.
Expected result: The leak does not return with the tap closed; it returns or continues; a model-specific overflow/inlet/level code appears; or the source remains hidden.
Next step: Leave the dishwasher isolated and arrange qualified appliance/plumbing service. Protect cabinetry and flooring from standing water and do not restore the water supply for another test without professional direction.
Stop if: Do not open the base, bypass an overflow guard, remove internal hoses or pumps, or reconnect water and power to see whether the leak repeats.
Why this matters
Why: A contained door or visible connection issue is different from a hidden or continuing leak. Hisense's model examples send inlet-valve leakage, overfilling, water-level, heater, and several other faults to service; the code does not identify a user-replaceable part.
Use your observations
Decision map
Find the observation that best matches what you see, then follow the next safe action.
-
PATH 01Safety boundary
What you see
Water first appears at the door during washing and there is foam, an obstructing dish, visible residue, or a damaged/poorly contacting accessible seal.
Do this next
Keep the water supply closed, remove only the accessible loading obstruction, clean an intact seal and use only the exact manual's dishwasher detergent guidance. Arrange service for seal damage or a repeated leak.
Why this path and its safety boundary
Why it matters: A front sealing or detergent/loading condition is more likely than a concealed inlet valve or pump fault.
Safety stop: Do not use household dish soap, glue or stretch the seal, or run another cycle while the source is unresolved.
-
PATH 02Safety boundary
What you see
Water first appears while the dishwasher is filling, at the visible inlet hose connection, or with a model-specific inlet-valve code.
Do this next
Close the water tap and arrange service for a leaking valve or connection. Clean an external inlet filter only if the exact manual shows it and the hose is fully depressurized.
Why this path and its safety boundary
Why it matters: The supply hose, its gasket/filter, valve, or an inlet connection is more likely; the opened Hisense manuals treat F40 inlet-valve leakage as service work.
Safety stop: Do not loosen a pressurized hose, open the cabinet, or keep the tap on to test it.
-
PATH 03Safety boundary
What you see
Water appears during or after draining, or water remains in the tub after the program, without a visible supply-connection leak.
Do this next
Keep power and water isolated. Follow an accessible drain-filter or pump-stop procedure only from the exact manual; otherwise arrange service for the drain path or pump.
Why this path and its safety boundary
Why it matters: A drain hose restriction, filter, pump path, or concealed drain connection is more likely. Hisense manuals identify a blocked drain pump as one cause of water remaining.
Safety stop: Do not remove a pump cover or reach for glass or a pump wheel unless the exact manual explicitly shows the accessible procedure and power is disconnected.
-
PATH 04Safety boundary
What you see
The exact model displays an overfill or water-level code, such as F54 or F43 in the opened Hisense manual, or the overflow protection has activated.
Do this next
Turn off the water tap and arrange qualified service. For F54 specifically, follow the manual's order of shutting off water before disconnecting the plug to avoid additional leakage.
Why this path and its safety boundary
Why it matters: The dishwasher has detected a water-level condition that the manual sends to a water-shutoff and service branch; it is not a reason to bypass the guard.
Safety stop: Do not clear or bypass the overflow guard, restore water, or remove the plug while water may still enter through the supply.
-
PATH 05Safety boundary
What you see
Water appears from below the cabinet, behind the dishwasher, or while the machine is idle, or the first wet point cannot be seen without removing cabinetry or panels.
Do this next
Keep the tap closed and power safely isolated, protect the floor and cabinets, and arrange qualified appliance/plumbing service. Provide the timing and location record.
Why this path and its safety boundary
Why it matters: A concealed hose, valve, pump, tub, overflow, or installation connection remains possible and cannot be safely localized from outside.
Safety stop: Do not pull out the built-in unit, remove panels, reach into the base, or run another cycle to locate the source.
Helpful context
Understand the symptom
Contain the water before diagnosing it
A dishwasher can continue to receive water even when a cycle is stopped. Stop the cycle if the controls respond, close the accessible supply tap, and keep people away from standing water. If water has reached a plug, outlet, wiring, or the appliance base, do not touch the connection; use a safe isolation point and qualified service. Hisense's F54 guidance specifically prioritizes shutting off the water tap before disconnecting the plug to avoid more leakage.
Time and location are more useful than a guessed part
Record whether the first water appears during fill, while spray is running, at the end of drain, or after the machine is idle. Look from outside for the first wet point: door edge, under-sink inlet or drain connection, toe-kick or floor, or a concealed cabinet area. A visible front leak can be investigated differently from water that begins under the machine; do not pull out a built-in appliance to see more.
Keep model-specific drain and inlet checks conditional
The opened Hisense manuals describe an external inlet-hose filter and a drain-pump stop/filter procedure, but these are instructions for those model families, not permission to dismantle every Hisense dishwasher. If the exact manual does not show the part as accessible, stop at the closed-water, power-isolated visual check and arrange service.
Safety boundary
Stop conditions
- Close the water tap and stop immediately for a continuing leak, water near electrical parts, smoke, burning odor, sparking, a hot plug or outlet, or repeated breaker trips.
- Do not pull out a built-in dishwasher, remove panels, loosen pressurized hoses, bypass overflow protection, or run another cycle to reproduce a leak.
- Disconnect power only from a dry, safe accessible point and only after the water supply is safely closed when water could still enter; never touch a wet plug or outlet.
- If a leak is hidden, persists after an external check, or is accompanied by a model-specific inlet, overfill, water-level, heater, or other fault, keep the unit isolated and arrange qualified service.
Only after diagnosis
Potential parts
- door seal or door-related sealing component
Consider only when qualified diagnosis or the exact manual confirms a damaged seal or door-alignment condition after loading and detergent checks.
Door seals and related parts are model-specific. Do not glue, stretch, remove, or replace a seal from the leak symptom alone. - inlet hose, gasket, valve, drain hose, or drain pump
Consider only after the exact model and leak stage support the part and qualified diagnosis identifies a failed or damaged component.
Water-path parts vary by model and require water shutoff, electrical isolation, and correct fitment. Do not disconnect pressurized hoses or open the base as a first check.
When checks do not resolve it
Need a professional?
Arrange qualified appliance or plumbing service for water from beneath or behind the dishwasher, an inlet-valve or overfill condition, a persistent or returning leak, a damaged hose or door seal, standing water that does not resolve through an exact model-documented accessible check, or any leak near electrical parts. Use a qualified electrician as well for a wet, hot, damaged, sparking, or repeatedly tripping electrical supply. Provide the exact model, leak stage and first wet point, error text, water-supply state, and photos taken from outside.
Safety scope: The owner may stop the cycle, close an accessible water tap, observe from outside, clean an accessible seal or filter only as the exact manual permits, and protect the floor. Built-in removal, pressurized plumbing, inlet valves, pumps, overflow devices, concealed leaks, electrical parts, and internal tub work require qualified service.
Common questions
FAQ
What should I do first when my Hisense dishwasher is leaking?
Stop the cycle and close the accessible water tap. If water is near the plug, outlet, or wiring, do not touch the connection; isolate power only from a safe point and arrange service. Note when and where the leak first appeared before checking any accessible seal or connection.
Can too much foam make a Hisense dishwasher leak from the door?
Foam can contribute to a front-door leak, especially if the wrong washing liquid was used. Hisense's opened manual says to use dishwasher detergent and not washing-up liquid because the foam interferes with operation. Keep the water supply closed, do not add chemicals to suppress foam, and arrange service if the leak returns after the correct detergent and loading are restored.
What does F40 or F54 mean on a Hisense dishwasher?
Meanings are model-specific. In the opened Hisense dishwasher manual, F40 is inlet-valve leakage and F54 is overfilling water; both direct the owner to turn off the water tap and contact service. For F54, the manual warns not to remove the plug until the water tap is off because water could continue leaking.
Can I check the drain pump myself if my Hisense dishwasher has water inside?
Only if the exact model manual shows an accessible filter and pump-stop procedure. Hisense manuals describe such a power-isolated check for certain models, including removing water, inspecting for blockage, and refitting the pump stop and filter. If your manual does not show it, or the leak is hidden or persistent, keep the dishwasher isolated and arrange service.
Read the exact guide
Official sources
- Hisense SupportHisense · Supports the instruction to obtain the exact dishwasher manual and model information before applying a water-path procedure.
- Hisense Dishwasher HSAP16FB - User ManualHisense · Directly supports the HSAP16FB manual's water-path and error-code guidance; codes and accessible procedures are not generalized to every Hisense dishwasher.
- Hisense Dishwasher HSAA16FS - User ManualHisense · Supports the same diagnostic categories for the HSAA16FS manual while showing that error and component details vary by model.
Community feedback
Share a repair observation
Share a plain-text repair observation. Accepted observations are published automatically; this page may take a moment to update.