
On this page
Start here
Quick answer
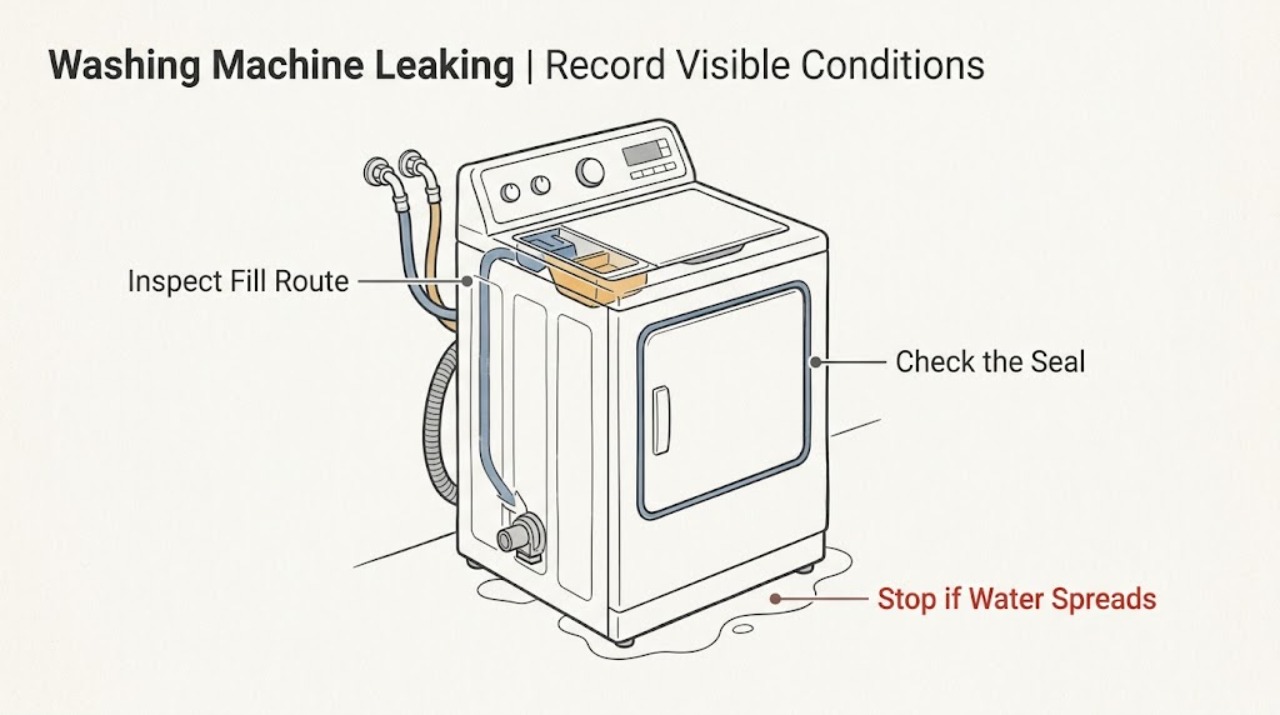
Stop the cycle, close the water supply taps, and disconnect power only if you can do so without standing in water. Note when the leak starts and where the first wet spot appears: at filling, during washing, while draining or spinning, or only after the machine stops. Check the fill hose and its tap connection, drain hose, door seal, dispenser area, and visible plumbing without removing panels. A leak at the front of a door seal or dispenser points to a different check than water at the rear hose or during pump-out. Do not run repeated cycles, tip the washer, reach into pooled water, or replace an internal part until the model and leak path are confirmed. Smoke, a burning smell, a tripped circuit, a split pressurized hose, rapid flooding, or water near electrical equipment is an immediate stop and professional-help condition.
Work through in order
Diagnostic checks
Use only checks that match the exact appliance or system and its official guide.
-
Check 1
Press stop, close the washer's water supply tap or taps, and disconnect power from a dry, safe position if water is not near the plug or socket. Record whether the first water appeared during filling, tumbling, draining, spinning, or after the cycle, and mark the first wet location without removing a panel.
Expected result: The leak stops when the supply is closed, continues from stored water, or is close to electrical equipment; its timing is fill, wash, drain/spin, or post-cycle.
Next step: Keep the washer off and continue with a dry visual inspection only. If water is near electricity, flooding is rapid, or the source cannot be safely isolated, arrange urgent qualified help.
Stop if: Stop for water near electrical equipment, smoke, burning odor, sparks, repeated circuit trips, rapid flooding, or a door that cannot be safely managed with water inside.
Why this matters
Why: A supply-controlled leak points toward the inlet route, while water that continues briefly may be retained in the drum, hose, or pump path. Timing separates the inlet, door/dispenser, and drain-path checks; water near electrical equipment makes further testing unsafe.
-
Check 2
With the supply closed and power isolated, inspect the visible inlet hose from the water tap to the washer, both threaded connections, washers, and the nearby tap or pipe. Look for a split, bulge, cross-threaded joint, or a wet trail that begins above the appliance.
Expected result: The hose or connection is visibly cracked, bulging, loose, or wet at the tap; the hose remains dry; or the water begins lower on the appliance.
Next step: Leave a damaged or pressurized hose unused and have it replaced or assessed using the exact model and connection type. If the route is dry, proceed to the front-of-machine checks without restoring power.
Stop if: Stop for a split or bulging hose, water that cannot be shut off, a damaged tap, or any need to work on a pressurized connection while it is wet.
Why this matters
Why: A defect or loose joint in the fill route can leak as the machine takes water. A dry fill route makes the door, dispenser, drain route, or an internal leak more likely, but does not prove which part is faulty.
-
Check 3
Inspect the front door seal around its visible fold for coins, fabric, cuts, or a displaced section, then inspect the dispenser drawer, its opening, and the top-front panel for residue or a wet trail. Do not pull the drawer or seal beyond the instructions for the exact model.
Expected result: The seal is torn or obstructed, water is concentrated at the door during washing, the dispenser front or underside is wet, or these areas are dry.
Next step: Remove only loose visible debris with power isolated and no pooled water, then consult the model handbook or arrange repair for a damaged seal or dispenser path. Do not run a full cycle solely to prove a suspected front leak.
Stop if: Stop for a torn seal with uncontrolled water, a door that will not latch, water inside the control area, or any need to remove the cabinet or work near wiring.
Why this matters
Why: A damaged or obstructed seal can let wash water escape at the front. A dispenser-area trail fits a blocked drawer path, excessive incoming pressure, or an unlevel installation; a dry front shifts suspicion toward hoses, the drain route, or an internal leak.
-
Check 4
Inspect the visible drain hose along its full accessible route, its waste connection or standpipe entry, and the floor below the lower rear area. Look for a kink, split, loose clamp, displaced hose, or a wet trail that starts during pump-out. Do not remove a filter or hose while water remains in the drum.
Expected result: The leak starts during draining or spinning, the drain hose or waste connection is wet, the hose is kinked or displaced, or the external drain route is dry.
Next step: Correct only a clearly displaced external hose when it can be done without opening the appliance, then keep the washer off until the connection is secure. If the route is damaged, the drum is full, or the wet point is internal, request qualified repair.
Stop if: Stop for a full drum, sewage-contaminated water, a damaged waste connection, water near electricity, or any need to open the pump or cabinet while wet.
Why this matters
Why: A drain-path defect can release water only when the pump moves it. A dry external route with water under the cabinet may indicate the pump, filter housing, sump hose, or another internal component and requires model-specific service access.
-
Check 5
If the visible hoses, seal, and dispenser are dry, review the last load and installation without restarting the washer: note whether the drum was packed tightly, the machine rocked, the feet were uneven, or water appeared from the dispenser during filling. Keep the supply closed while making these observations.
Expected result: The drum was overloaded, the cabinet is unstable or not level, or the leak is localized to the dispenser; none of these observations is present.
Next step: Do not adjust feet or move the machine across a wet floor. Use the handbook for leveling and load guidance; if the leak returns with a normal load or no visible cause is found, stop and arrange service.
Stop if: Stop for severe rocking, a machine that may tip, damaged flooring, an unstable stacked installation, or any movement that would expose wet electrical connections.
Why this matters
Why: Overloading can push water toward the door, while an unlevel machine or excessive inlet pressure can contribute to dispenser overflow. If the load and installation are normal, an intermittent or internal leak remains possible.
-
Check 6
Record the exact model and any flashing lights or displayed code without clearing them. Compare the indication with the model handbook, and note whether the washer left water in the drum or stopped while draining. Do not treat a generic code as proof of a leaking part.
Expected result: A model-specific drain or water-related indication is present, the drum still contains water, or there is no code or unusual indication.
Next step: Give the model, code, leak timing, water level, and visible wet point to the repair technician. Follow only the handbook's safe drain procedure; do not open a filter or door against retained water.
Stop if: Stop for a locked door with water inside, repeated fault indications, a burning smell, smoke, a trip, or any request to bypass a door or safety interlock.
Why this matters
Why: A drain-related indication can accompany a blocked waste path or pump issue, while retained water changes the safe access boundary. No code does not rule out a hose, seal, dispenser, or internal leak.
-
Check 7
Only after the supply connection, external drain route, door seal, and dispenser area are dry and safe, and no water is near electricity, decide whether one brief model-approved empty check is appropriate. Stay beside the washer, do not touch wet surfaces, and stop at the first drop; skip this check if the source was not identified or any hazard is present.
Expected result: No leak occurs, the same leak returns at a known stage, or water appears from an inaccessible or unsafe location.
Next step: Keep the washer out of service if any leak returns and arrange qualified appliance repair with the model, timing, wet location, and prior checks. Do not continue cycling to reproduce it.
Stop if: Stop immediately for any water, smoke, burning odor, sparks, loud abnormal noise, rapid filling, electrical trip, or water near the plug, socket, or wiring.
Why this matters
Why: A clean brief check lowers the chance of a persistent external leak but does not certify the appliance. A repeatable stage gives the technician a useful branch; an inaccessible source needs service rather than more testing.
Use your observations
Decision map
Find the observation that best matches what you see, then follow the next safe action.
-
PATH 01Next step
What you see
Water is near a plug, socket, wiring, or another electrical appliance, or the leak is rapid.
Do this next
Arrange qualified service and follow the exact model guidance.
Why this path and its safety boundary
Why it matters: Do not step into the water or touch the washer connection. Isolate power only from a dry, safe position, keep people away, and arrange urgent qualified help.
-
PATH 02Next step
What you see
Water appears as the washer fills and the visible inlet hose or tap connection is wet.
Do this next
Arrange qualified service and follow the exact model guidance.
Why this path and its safety boundary
Why it matters: Keep the water supply closed and have the hose, washer, and tap connection assessed; do not run another cycle with a damaged or pressurized hose.
-
PATH 03Next step
What you see
Water is first visible at the door during washing or at the front of the dispenser.
Do this next
Arrange qualified service and follow the exact model guidance.
Why this path and its safety boundary
Why it matters: Inspect only visible seal debris, tears, dispenser residue, load size, and level from a dry position. A damaged seal or persistent dispenser leak needs model-specific repair.
-
PATH 04Next step
What you see
Water appears when the pump drains or spins, and the external drain route or waste connection is wet.
Do this next
Arrange qualified service and follow the exact model guidance.
Why this path and its safety boundary
Why it matters: Keep the washer off, do not remove a filter with water in the drum, and have the drain hose, waste connection, and pump path assessed safely.
-
PATH 05Next step
What you see
The external hoses, door seal, dispenser, and waste connection look dry, but water appears beneath the cabinet or the source cannot be seen.
Do this next
Arrange qualified service and follow the exact model guidance.
Why this path and its safety boundary
Why it matters: Do not tip or open the washer. Keep power and water isolated and arrange qualified repair with the leak timing and first wet location.
-
PATH 06Next step
What you see
The leak was seen before or during the first use and no active external source is found.
Do this next
Arrange qualified service and follow the exact model guidance.
Why this path and its safety boundary
Why it matters: Hotpoint notes that some water may remain after factory testing, but a continuing or repeat leak still requires the hose, plumbing, dispenser, and drain-path checks and should not be dismissed.
-
PATH 07Next step
What you see
The leak returns after one safe external check, the machine leaves water inside, or a fault indication accompanies the leak.
Do this next
Arrange qualified service and follow the exact model guidance.
Why this path and its safety boundary
Why it matters: Stop using the washer and request qualified repair. Provide the exact model, code or flashing lights, timing, water level, leak location, and every safe check already completed.
Helpful context
Understand the symptom
Make the leak safe before locating it
Press stop and close the cold-water supply tap or taps. If the floor is wet, keep clear of the plug, socket, extension leads, and any appliance standing in water; isolate power from a dry, safe position rather than reaching through the water. Do not open the door while the drum is full or force a hose connection. Wipe only a small accessible area if it is safe, then mark the first wet point so water running along the floor does not misidentify the source.
When the leak appears is a useful clue
Water arriving as the washer fills makes the inlet hose, tap connection, dispenser path, or an internal fill component more likely. A front leak during tumbling or a door opening points toward the door seal, debris at the seal, excess load, or the way the door is closing. Water appearing as the pump runs points toward the drain hose, waste connection, filter or pump path. A puddle that appears only after the cycle may be retained water escaping from a low hose or pump area. Timing narrows the inspection; it does not prove that a particular part has failed.
Use only visible, model-neutral checks
Check hose ends, the door seal, the dispenser drawer and the accessible drain route without removing covers. Do not use a leak as a reason to tip the machine, remove a pump filter with water still in the drum, or work inside the cabinet. Hotpoint notes that models vary, so use the model handbook for access, drain-hose arrangement, and any filter procedure. If a safe external check does not identify the path, stop testing and arrange qualified repair.
Stop conditions
Stop immediately for a burst or bulging hose, fast-flowing water, a leak that reaches a socket or wiring, smoke, burning odor, sparks, repeated circuit trips, a locked door with water inside, or any need to work on live or wet electrical parts. Do not keep restarting a leaking washer to reproduce the symptom.
Safety boundary
Stop conditions
- Water is near a plug, socket, wiring, extension lead, or another electrical appliance.
- A hose is split, bulging, rapidly leaking, or cannot be isolated at the water supply.
- There is smoke, a burning smell, sparking, repeated circuit tripping, or an abnormal electrical odor.
- The drum is full, the door is locked, or accessing a filter, pump, hose, or cabinet would release water into an unsafe area.
- The washer rocks severely, may tip, or would need to be moved across wet flooring to continue checking.
- The leak returns after one safe external inspection or its source is inside the cabinet.
Only after diagnosis
Potential parts
- water inlet hose
Consider this category only when the visible supply hose or its connection is confirmed damaged and the exact model and connection are known.
Confirm the model, hose length, connector type, pressure rating, and installation instructions before selecting a replacement. - door seal
Consider this category only when inspection confirms a tear, split, deformation, or persistent front leak at the door seal.
Confirm the full model identifier and seal configuration; do not assume seals from similar-looking washers fit. - drain hose or pump-path component
Consider this category only after the leak is linked to the drain stage and a qualified check identifies the failed external hose or internal component.
Confirm the model, hose routing, clamps, and the safe access procedure before any replacement.
When checks do not resolve it
Need a professional?
A fill hose, drain hose, tap connection, waste connection, door seal, or dispenser is cracked, displaced, or persistently wet., Water appears beneath the cabinet, the source is inaccessible, or the leak returns after one safe external check., The washer leaves water in the drum, shows a drain-related code or flashing indication, or the door remains locked., There is smoke, burning odor, sparking, repeated tripping, rapid flooding, or water near electrical equipment., The machine is unstable or moving it would expose people, flooring, or electrical connections to water.
Common questions
FAQ
Why is my Hotpoint washing machine leaking from the front?
Check the visible door seal for debris, cuts, or displacement and inspect the dispenser area for a wet trail. Also note whether the leak starts during filling or washing. Stop using the washer if the seal is damaged or the source is inside the cabinet.
What should I check if the leak is at the back?
With water closed and power isolated safely, inspect both ends of the fill hose, the tap connection, the drain hose, and the waste connection. A split, bulging, or pressurized hose should remain unused until it is assessed or replaced for the exact model.
Why does the leak happen only when the washer drains?
Water that appears during pump-out points first to the drain hose, waste connection, filter or pump path. Do not remove a filter while the drum contains water; if the external route is dry or the leak is under the cabinet, arrange qualified repair.
Can I run another cycle to find the leak?
Avoid repeated cycles. First close the water supply and record the timing and first wet location. Only a brief model-approved check is reasonable after all visible routes are dry and no electrical or flooding hazard exists; stop at the first drop.
When is a leaking Hotpoint washer unsafe to use?
Stop for rapid flooding, a damaged pressurized hose, water near electricity, smoke, burning odor, sparks, repeated circuit trips, a full drum with a locked door, severe movement, or a leak that returns after a safe external check. Keep the washer off and arrange qualified help.
Read the exact guide
Official sources
- Hotpoint Service Washing Machine RepairHotpoint · Hotpoint washing machine leak checks, hose and plumbing checks, dispenser observations, pump-out checks, and electrical isolation guidance
- Washing Machine Troubleshooting - Quick fixes & Tips - Hotpoint - HotpointHotpoint · Hotpoint washing machine door-seal, hose, dispenser, drain-route, load, and safety troubleshooting guidance
Community feedback
Share a repair observation
Share a plain-text repair observation. Accepted observations are published automatically; this page may take a moment to update.