
On this page
Start here
Quick answer
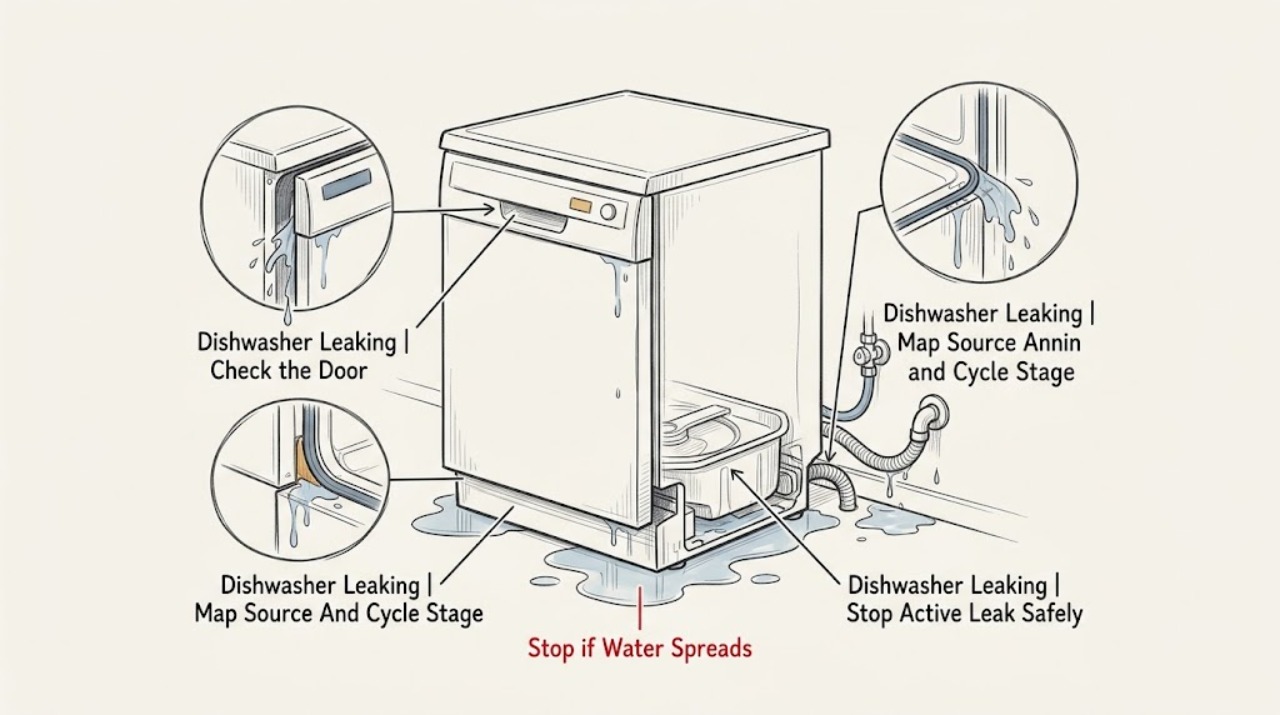
Stop the JennAir dishwasher if water is actively escaping, pooling under the cabinet, reaching an electrical connection, or producing foam; switch off power and the water supply only from a safe, dry position, and do not keep running cycles to find the leak. Then classify the location and timing: a front-corner leak can involve the door seal, a protruding rack item, over-sudsing, spray direction, or an unlevel tub; a damp spot beneath or behind the unit can involve the inlet or drain connection, hose routing, overfill, sump, pump/diverter seal, or another concealed component. JennAir's official guidance specifically separates front/door and underneath/behind leaks, calls out dish-soap suds, door-seal/loading and leveling checks, and directs model-specific service for persistent leaks, overfill, a cracked tub, or pump/diverter seals. Inspect only dry, visible conditions and the accessible under-sink shutoff/connections as the installation guide permits. Do not remove the toe panel or base, pull out an integrated dishwasher, reach into standing water, loosen a pressurized connection, perform live electrical tests, or replace a gasket, hose, valve, or pump without the exact model and a confirmed source.
Before you begin
Safety first
- The owner may stop the cycle, contain water from a dry accessible position, isolate power/water only when safe, record the model and leak pattern, and inspect visible door/loading or under-sink conditions allowed by the exact guide. Qualified personnel must handle hidden connections, integrated-unit movement, toe panels, pumps, valves, sumps, tub seals, wiring, live tests, and electrical hazards.
Work through in order
Diagnostic checks
Use only checks that match the exact appliance or system and its official guide.
-
Check 1
Stop the cycle and keep the door closed if opening it would release more water or suds. From a dry, safe position, switch off the dishwasher's circuit or unplug it only if the connection can be reached without touching water or damage, then close the under-sink water shutoff if it is clearly accessible. Mop or contain water without reaching behind the unit.
Expected result: The leak is still active; water is near an electrical connection; foam is overflowing; the shutoff or power isolation point is inaccessible; or the water has stopped and the area is dry.
Next step: Keep the dishwasher out of service and arrange qualified appliance service; use qualified electrical help when power hardware or the branch circuit is implicated. Continue only with dry, visible documentation.
Stop if: Do not touch wet electrical parts, stand in water, pull out the dishwasher, open the base, reset a tripped breaker, or restart a leaking appliance to observe it.
Why this matters
Why: An active leak or water near electrics is a stop-use condition. Foam can push water through a door seal, while an inaccessible shutoff or hard-wired connection means isolation is professional work rather than a user test.
-
Check 2
With power and water safely isolated, dry the accessible floor and record the highest visible wet point without removing panels: front corner or door vent, inside the tub, bottom/front center, beneath the unit, or under the sink. Record whether it appeared during fill, wash, drain, after opening the door, after a recent installation, or after a detergent change.
Expected result: Water starts at the door/front; a spot appears at the vent after the door opens; water is centered under the tub; water is behind/under the cabinet; or the timing is unknown.
Next step: Follow the matching branch and give the location/timing to service. Do not use a short cycle as a leak test while the source is unresolved.
Stop if: Stop if the wet point is hidden, water returns while isolated, the tub is cracked, or further observation requires removing the toe panel or moving an integrated appliance.
Why this matters
Why: JennAir maps front/door leaks toward vent condensation, seal/loading, suds, or spray direction; bottom/center leaks toward overfill, sump, pump, or diverter; and behind/under-cabinet leaks toward water or drain connections and concealed components.
-
Check 3
For a front or door leak, inspect the door gasket and tub edge from the front for food residue, cracks, tears, flattening, or an item protruding from either rack. Note whether dish soap, a spray-on pre-wash product, or excessive detergent could have introduced suds. Check that the door closes squarely; do not force it or remove the seal unless the exact manual supports that work.
Expected result: Foam is present; a utensil, dish, or debris crosses the seal; the gasket is visibly damaged or displaced; the dishwasher appears out of square; or the seal and loading look normal.
Next step: Remove only a visible loading obstruction and clean visible residue with the door open and power isolated. If foam or leaking persists, leave the dishwasher off; arrange service rather than repeatedly running a cycle.
Stop if: Do not add chemicals or oil to an unknown leak, pull out the seal, adjust leveling legs on an installed unit, or operate with the door/tub seal altered.
Why this matters
Why: JennAir identifies wrong soap or residue, loading at the seal, gasket condition, and leveling/squareness as separate door-leak causes. A clean-looking door edge does not rule out a pump, inlet, tub, or concealed leak.
-
Check 4
Only if the area under the sink is dry and accessible, inspect the visible water-supply and drain connections for moisture, a kinked or damaged hose, a loose clamp, a displaced washer, or a missing high loop. Do not loosen a connection under pressure; do not reach behind the dishwasher or disconnect a hidden hose. Record whether the dishwasher is plugged in or hard-wired and whether it was recently installed or the disposer was changed.
Expected result: A visible connection is wet or damaged; the drain hose is kinked or sags; the routing differs from the installation guide; the under-sink area is dry; or the connection cannot be safely seen.
Next step: Keep the water shut off and provide photos/notes to a qualified installer, plumber, or appliance technician. Correct only a clearly visible, model-approved routing issue when no water or electrical hazard exists; do not retest an active leak.
Stop if: Stop for water near electrical hardware, a hard-wired unit, a cracked fitting, a pressurized leak, an integrated appliance, or any need to remove panels or pull the unit out.
Why this matters
Why: JennAir's installation guidance links supply fittings, washers, inlet routing, drain connections, kinks, and high-loop/backflow arrangements to leaks or residual water. A hidden or inaccessible wet point may involve the inlet valve, drain line, sump, pump, or cabinet-side connection.
-
Check 5
Record the exact JennAir model, serial number, complete display code or flashing-light sequence, leak location, cycle stage, detergent history, and whether the water and power were isolated. Compare a code only with the exact model guide or JennAir support page; do not enter service mode or clear a recurring code by repeated resets.
Expected result: A model-matched water or leak indication appears; no code appears; the same leak returns after an external correction; or the appliance remains wet or unsafe.
Next step: Keep the dishwasher out of service and arrange JennAir or qualified appliance service. Give the technician the model, code, wet-point map, installation history, and safe photos; use electrical service where power hardware is involved.
Stop if: Do not replace a gasket, hose, float, valve, pump, diverter, or control from a code or puddle alone; do not run with panels removed or bypass an interlock.
Why this matters
Why: JennAir says exact codes vary by model and identifies water in a drip tray as one code family; a code can narrow service routing but does not prove which valve, seal, pump, or control has failed. Persistent or unsafe leaks require professional diagnosis.
Use your observations
Decision map
Find the observation that best matches what you see, then follow the next safe action.
-
PATH 01Safety boundary
What you see
Water appears at a front corner, the lower door edge, or as a spot after the door is opened.
Do this next
Keep power and water isolated while cleaning visible residue or removing a protruding item. If the gasket is damaged, the tub is out of square, or water returns without foam, arrange model-specific service.
Why this path and its safety boundary
Why it matters: The pattern is more consistent with vent condensation, suds, loading/seal interference, or leveling than with an immediate pump diagnosis. JennAir treats these as separate model-supported checks.
Safety stop: Do not run another cycle to confirm a door leak, replace the seal without model fitment, or adjust an installed tub that is not safely accessible.
-
PATH 02Safety boundary
What you see
Foam or bubbles escape from the door or appear throughout the tub around the time of the leak.
Do this next
Stop the cycle, clean the overflow, and do not add more detergent or continue normal use. Follow the exact JennAir model guidance or arrange service if the leak persists.
Why this path and its safety boundary
Why it matters: JennAir says dish soap and pre-wash products can create suds that push water out. If no foam is present or water continues after the suds are gone, a seal, fill, drain, pump, or tub cause remains possible.
Safety stop: Do not repeatedly run rinse cycles, add unapproved chemicals, or access the base to remove foam while water is near electrical parts.
-
PATH 03Safety boundary
What you see
Water collects beneath or behind the dishwasher, or the leak began after installation, sink/disposer work, or a water-line change.
Do this next
Keep water and power off and have the visible installation or hidden appliance connection assessed by qualified service. Do not pull out a built-in unit or loosen the connection to watch it drip.
Why this path and its safety boundary
Why it matters: JennAir links underneath/behind leaks to supply, drain, and connection installation conditions, but a hidden wet point can also involve an inlet valve, sump, pump, diverter, or tub seal.
Safety stop: Stop for water near electrical parts, a hard-wired dishwasher, a pressurized spray, or any need to expose the base or rear of the appliance.
-
PATH 04Safety boundary
What you see
Water appears at the bottom/front center or seems to originate under the tub, without a clear front-door or under-sink source.
Do this next
Keep the dishwasher out of service and arrange qualified JennAir diagnosis with the model and cycle-stage history. Contain standing water only from a safe, dry, user-accessible position.
Why this path and its safety boundary
Why it matters: JennAir lists overfill, sump, pump, diverter, and motor-shaft seals for bottom or center leaks. These parts are not identifiable or safely testable from a puddle alone.
Safety stop: Do not remove the toe panel, reach into the sump, test the float or pump while energized, or replace a seal or pump based only on location.
-
PATH 05Safety boundary
What you see
A water-related code or flashing sequence appears, or water is near an electrical connection, the breaker trips, or there is smoke, burning odor, or damaged wiring.
Do this next
Leave power and water off and contact qualified appliance service; use qualified electrical help for the supply or circuit. Provide the complete code and leak history without attempting a reset or reproduction.
Why this path and its safety boundary
Why it matters: JennAir treats codes as model-dependent and identifies water in a drip tray among possible indications. A physical electrical hazard overrides code interpretation and requires immediate stop-use action.
Safety stop: Do not clear the code repeatedly, enter diagnostics, touch wet wiring, or operate the dishwasher with covers removed.
Helpful context
Understand the symptom
Start with the leak location, not the suspected part
A small condensation spot at the door vent is not the same as water flowing from a door corner, the center of the base, or a hose behind the cabinet. Note the highest wet point, whether the water appears during filling, washing, draining, or after the door opens, and whether foam is present. Keep the dishwasher out of service while an active leak continues; water under a built-in appliance can reach cabinetry and electrical components before the puddle is obvious.
JennAir models and installations are not interchangeable
The official JennAir support tree covers front/door and underneath/behind leaks, but the exact tub, vent, water connection, drain route, leveling arrangement, control panel, and error-code behavior depend on the model and installation. Record the model and serial information before ordering a seal or hose. A hidden leak, an integrated unit, or a hard-wired installation moves the work beyond a safe exterior inspection.
Protect the room and the electrical system
Use towels or a shallow tray only from a dry, accessible position, and keep water away from outlets, junctions, and the dishwasher's electrical connection. If the breaker trips, a cord or socket is hot, there is burning odor, smoke, or water cannot be isolated safely, stop and use qualified electrical and appliance service. Do not run a diagnostic cycle with panels removed simply to watch for a leak.
When checks do not resolve it
Need a professional?
Safety scope: The owner may stop the cycle, contain water from a dry accessible position, isolate power/water only when safe, record the model and leak pattern, and inspect visible door/loading or under-sink conditions allowed by the exact guide. Qualified personnel must handle hidden connections, integrated-unit movement, toe panels, pumps, valves, sumps, tub seals, wiring, live tests, and electrical hazards.
Common questions
FAQ
What should I do first when my JennAir dishwasher is leaking?
Stop the cycle and keep the dishwasher out of service. From a dry, safe position, isolate power and the water supply if possible, contain the water, and record the highest wet point. Do not pull out the unit or run another cycle to reproduce the leak.
Why does water appear at the JennAir dishwasher door?
JennAir lists vent condensation, dish-soap or pre-wash suds, items or residue at the seal, rack loading, leveling/squareness, and gasket condition as separate possibilities. The location and timing matter; a front leak is not automatically a failed gasket.
Can dish soap cause a JennAir dishwasher to leak?
Yes. JennAir says dish soap or residue from pre-washing can create suds that push water out of the dishwasher. Stop the cycle, clean the overflow, and do not keep running cycles if leaking continues; follow the exact model guidance or arrange service.
Could the dishwasher's water or drain hose be leaking?
Yes, especially when water appears beneath or behind the cabinet or after installation or sink work. JennAir directs owners to inspect only accessible connection, washer, hose, clamp, kink, and routing conditions with water isolated; hidden or pressurized leaks need qualified service.
What does a JennAir FAE5 or F10E5 leak indication mean?
JennAir's official page associates that particular indication with a possible diverter leak and directs connection checks plus service if it returns. Do not apply the code to another model or replace the diverter from the code alone; record the exact model and complete display pattern.
When should a JennAir dishwasher leak be handled by a professional?
Use professional service for a leak that continues after safe visible checks, comes from underneath or behind, involves overfill or a cracked tub, returns with a water/leak code, reaches electrical hardware, or requires moving an integrated unit or opening panels. Keep power and water off until it is assessed.
Read the exact guide
Official sources
- Dishwasher Leaking Troubleshooting GuideJennAir Product Help · Opened the official JennAir troubleshooting guide; used for front/center/under-cabinet leak mapping, gasket/suds/loading/leveling context, active-leak isolation, and professional escalation.
- Leaking from DoorJennAir Product Help · Opened the official JennAir door-leak page; used for the conditional front-door branches and the boundary against assuming every leak is a gasket failure.
- Drain Line InstallationJennAir Product Help · Opened the official JennAir drain-line page; used for the conditional hose-routing/high-loop branch and the boundary against concealed or unsafe drain work.
- Dishwasher Water Supply ConnectionJennAir Product Help · Opened the official JennAir water-supply installation page; used conditionally for dry, accessible under-sink connection observations and the exact-manual boundary.
- LeakingJennAir Product Help · Opened the official JennAir leak index; used to establish the support split between front/door and underneath/behind paths and model-specific manuals/service links.
- Leaking - Underneath - DishwasherJennAir Product Help · Opened the official JennAir underneath-leak page; used for visible water-supply/drain connection checks, suds stop-use guidance, and service escalation.
- 10 Pause 5 Pause - pause, repeat - Error Code - DishwasherJennAir Product Help · Opened the official JennAir error-code page; used only to reinforce model-specific code handling and the service boundary for a leak indication, not to generalize a code across models.
Community feedback
Share a repair observation
Share a plain-text repair observation. Accepted observations are published automatically; this page may take a moment to update.