
On this page
Start here
Quick answer
A small amount of water in the filter area can be normal on JennAir models, but water covering the tub floor or returning after drain-out calls for a safe check. First stop the cycle, keep clear of standing water near electrical parts, and disconnect power from a dry safe position according to the model instructions. Remove standing water without drain chemicals, then clean the accessible filter and inspect the sump for visible food, labels, seeds, toothpicks, or glass. Under the sink, look for a kinked, crushed, sagging, or poorly routed drain hose, a blocked air gap, and a garbage-disposer connection whose knockout plug was not removed after a new disposer installation. A high loop or air gap is model- and installation-dependent, so follow the exact JennAir installation instructions. A steady hum with no water movement, grinding, no pump sound, a persistent error, water near wiring, or failure after filter and external hose checks points to a pump, impeller, wiring, or control issue and needs qualified service. Do not reach into a disposer, open the pump or toe-kick area, perform live testing, or keep running cycles to force a drain.
Before you begin
Safety first
- The user may stop the cycle, remove accessible standing water from a safe dry position, clean a model-permitted filter, inspect visible hose routing and air-gap or sink-side obstruction, and follow the exact installation manual. Qualified service must handle cabinet movement, hidden hose or disposer connections, pump/impeller/sump access, wiring, controls, valves, live testing, and water near electrical parts.
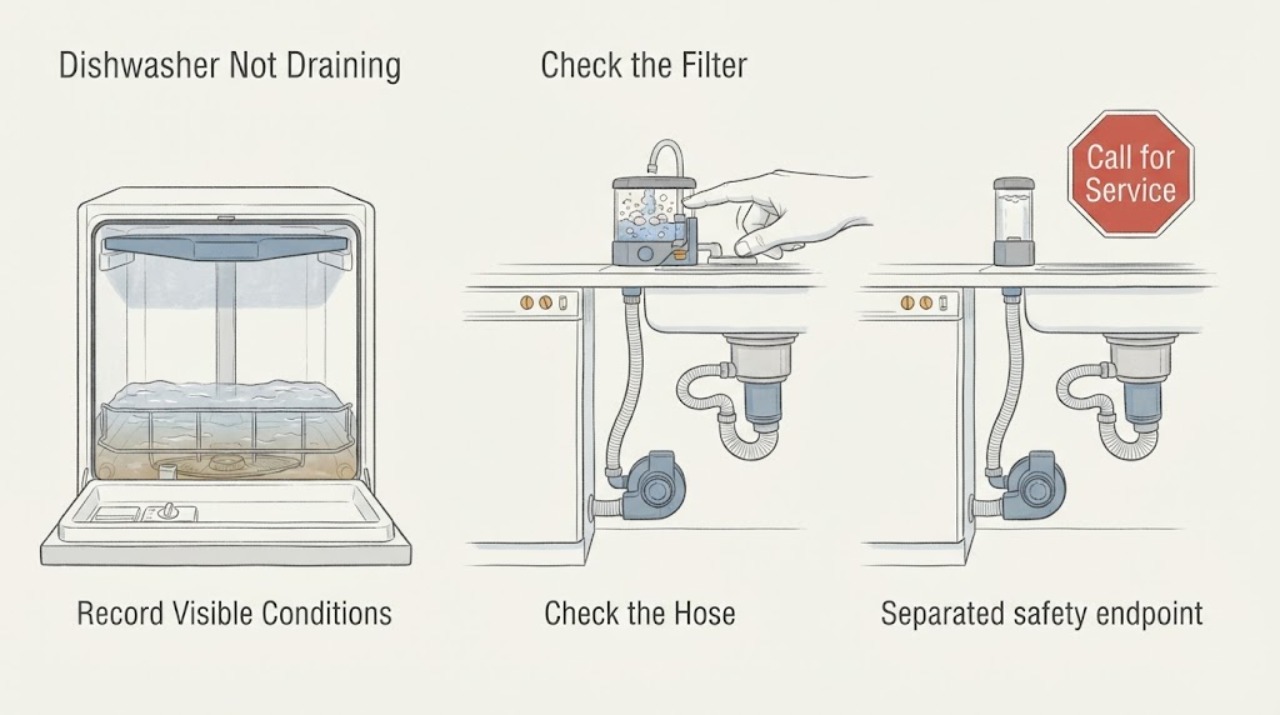
Work through in order
Diagnostic checks
Use only checks that match the exact appliance or system and its official guide.
-
Check 1
Stop the cycle, record whether water remains after washing or after drain-out, and disconnect power only from a dry safe position as the model and installation permit. Keep the water away from the outlet, cord, and wiring; hard-wired units or wet electrical areas require service.
Expected result: Water is only in the filter cup, covers the tub floor, is near the door or electrical area, or the machine has a leak or repeated error.
Next step: If safe, remove standing water and continue with the accessible filter. If water is near electrical parts or the area is wet, keep the dishwasher off and arrange qualified service.
Stop if: Do not step into water to unplug, restart a leaking appliance, open the base, or pull out a built-in dishwasher.
Why this matters
Why: A small filter-area amount may be normal, while a large or returning pool, leak, or electrical exposure raises the urgency and changes the safe access boundary.
-
Check 2
Use a cup, shallow container, hand pump, or baster to remove accessible standing water. With power safely isolated and the dishwasher cool enough to handle, remove the model-permitted filter, rinse it with water, and inspect the visible sump for food, labels, seeds, toothpicks, or glass.
Expected result: The filter is blocked, the sump has visible debris, only the normal filter-area amount remains, or the accessible area is clear.
Next step: Clear only visible debris without reaching into a hidden pump, reinstall the filter fully locked, and follow the model guide for a short drain/rinse check only if there is no electrical or leak hazard.
Stop if: Do not use drain chemicals, put hands into standing water or a disposer, pry the pump cover, or use sharp tools in the sump.
Why this matters
Why: Filter or sump debris can restrict the pump inlet; a clear filter shifts attention to the external drain path or pump/control system. A small filter-area amount alone is not proof of a failure.
-
Check 3
From under the sink, inspect the visible drain hose for a kink, crush point, sag, loose-looking clamp, or incorrect route. Identify whether the hose goes to a sink tailpiece, air gap, or garbage disposer, and note any recent disposer or dishwasher installation.
Expected result: The hose is kinked or low, the air gap is present and blocked, the disposer connection is obstructed, or the visible route appears correct.
Next step: Correct only a clearly visible hose-routing issue allowed by the installation instructions; have a qualified installer or technician handle hidden or pressurized connections. Inspect the air gap according to its manufacturer instructions and keep hands out of the disposer.
Stop if: Do not pull out an integrated dishwasher, loosen a wet connection with power present, reach into the disposer, or disconnect a hose over an uncontrolled spill.
Why this matters
Why: Restricted routing, a blocked air gap, or a sink/disposer connection can stop discharge or allow wastewater to return. High-loop requirements and exact connections vary by model and installation.
-
Check 4
If the dishwasher drains into a garbage disposer, determine whether the disposer was recently replaced and whether its dishwasher inlet knockout plug was removed. If an air gap or sink tailpiece is used, look for visible blockage or water backing up at that point without dismantling the plumbing.
Expected result: A new disposer retains its knockout plug, the air gap backs up, the sink connection is blocked, or no downstream restriction is visible.
Next step: For a recent installation, stop using the dishwasher and arrange the disposer connection correction according to the exact installation manual. Clear only an accessible air-gap cap or sink obstruction when safe; recurring backup needs plumbing or appliance service.
Stop if: Do not put fingers into a disposer, run the disposer with the dishwasher hose disconnected, or open a wet connection near energized wiring.
Why this matters
Why: A retained plug blocks a newly connected dishwasher completely; an air-gap or sink-side backup points to the hose-to-drain path or downstream plumbing rather than the dishwasher filter alone.
-
Check 5
Note what happens during the drain phase without deliberately repeating a hazardous cycle: a steady hum with no movement, grinding, no pump sound, an F9E1 long-drain indication, or a control/error condition that returns after a permitted reset.
Expected result: The pump hums but water does not move, grinding is present, the pump is silent, or a drain-related code returns.
Next step: After safe external checks, keep the dishwasher off and arrange qualified service for pump, impeller, wiring, control, or recurring error diagnosis. Use the exact model guide for any error-code interpretation.
Stop if: Do not remove the toe-kick or pump cover, turn the impeller by hand, probe wiring, or apply power for a live test.
Why this matters
Why: JennAir associates these patterns respectively with a possible impeller obstruction or hard debris, a possible electrical/control issue, and a long-drain path that still needs filter, hose, disposer, or air-gap checks before service.
-
Check 6
Look for a layer of suds or bubbles after an incorrect detergent event. If foam is present, stop the dishwasher and allow it to dissipate; do not add more chemicals or run repeated cycles to flush it.
Expected result: Suds are present, the water is clear but remains, or the drain problem returns without foam.
Next step: Use only automatic-dishwasher detergent after the foam clears. If clear water still remains, continue with service escalation rather than treating foam as the sole cause.
Stop if: Do not use drain cleaner, bleach, or other improvised chemicals inside the dishwasher.
Why this matters
Why: JennAir says hand dish soap or excessive suds can push water out and impair washing, whereas clear retained water after the foam is gone points back to a drain restriction or component issue.
-
Check 7
Stop owner troubleshooting when the accessible filter and visible external drain path are clear but water remains, or when the suspected fault is inside the pump, sump, wiring, control, valve, or cabinet installation. Give the technician the model, installation type, water amount, error code, drain sound, and checks already performed.
Expected result: Drainage remains poor, the dishwasher leaks, the base contains water, the pump is silent or grinding, or an error returns.
Next step: Keep the dishwasher off when appropriate and arrange qualified JennAir appliance service; use qualified plumbing service when the sink, disposer, or air-gap side is the restriction.
Stop if: No live testing, internal pump repair, cabinet movement, hose disconnection over standing water, or repeated test cycles with a known fault.
Why this matters
Why: An internal pump, impeller, sump, drain valve, wiring, door switch, control, or plumbing installation fault may remain and cannot be safely identified from the symptom alone.
Use your observations
Decision map
Find the observation that best matches what you see, then follow the next safe action.
-
PATH 01Safety boundary
What you see
Only a small amount of water is visible in the filter area, the dishwasher completed its cycle, and there is no water at the door, floor, air gap, or sink connection.
Do this next
Leave the filter correctly seated and monitor the next normal cycle. Escalate if the amount increases, covers the tub floor, or returns with a drain error.
Why this path and its safety boundary
Why it matters: JennAir says a small filter-area amount can be normal and helps keep seals from drying.
Safety stop: Do not remove normal water with chemicals or dismantle the filter well.
-
PATH 02Safety boundary
What you see
Water covers the tub floor and the accessible filter or sump contains food debris, labels, seeds, toothpicks, or glass.
Do this next
With power safely isolated, clean the permitted filter and remove only visible debris, reinstall the filter, and stop if water remains or hard debris is deeper in the pump area.
Why this path and its safety boundary
Why it matters: A filter or sump restriction is more likely than a control fault.
Safety stop: Do not reach into the pump, use sharp tools, or run repeated cycles to move a suspected glass obstruction.
-
PATH 03Safety boundary
What you see
The filter is clear but the visible hose is kinked, low, crushed, or loose; an air gap backs up; or a new disposer still has its dishwasher knockout plug.
Do this next
Correct only a clearly visible routing issue permitted by the model installation instructions, inspect an accessible air gap, and arrange qualified installation/plumbing service for a retained plug or hidden connection.
Why this path and its safety boundary
Why it matters: The external drain route or sink/disposer connection is more likely than the filter.
Safety stop: Do not pull out the dishwasher, reach into the disposer, or disconnect a wet hose near energized parts.
-
PATH 04Safety boundary
What you see
The hose and sink path are clear but the drain phase produces a hum with no movement, grinding, no pump sound, or a returning F9E1 or other error.
Do this next
Keep the dishwasher off and arrange qualified JennAir service with the sound and code details; do not open the pump area or perform live testing.
Why this path and its safety boundary
Why it matters: A jammed impeller, hard debris, pump, wiring, door-switch, or control fault is more likely and needs internal diagnosis.
Safety stop: No toe-kick removal, impeller probing, voltage measurement, or repeated resets.
-
PATH 05Safety boundary
What you see
Water is near the outlet, cord, hard-wired junction, or cabinet base; the appliance leaks; the breaker trips; or wiring is damaged.
Do this next
Keep clear, shut off the water supply if it can be reached safely, disconnect power only from a dry safe position, and arrange qualified appliance or electrical service.
Why this path and its safety boundary
Why it matters: Water and mains electricity create a safety boundary that overrides drain diagnosis.
Safety stop: Do not step into water to unplug, restart the dishwasher, remove panels, or continue a drain test.
Helpful context
Understand the symptom
Decide whether the water amount is actually abnormal
JennAir notes that a small amount of water in the filter area can keep seals from drying and may be replaced during the next cycle. Water covering much of the tub floor, water at the door opening, or water that returns from the sink or air gap is a different symptom. Record the water level, whether the cycle completed, and whether the water is clean or cloudy without touching hot or contaminated water.
Start with standing water and the accessible filter
Stop the dishwasher and remove standing water with a cup, shallow container, hand pump, or baster when the floor and electrical area are safe. Do not pour drain-opening chemicals into the dishwasher. With power isolated as the model instructions require, remove only the accessible filter assembly, rinse it under running water, and inspect the visible sump for food debris or glass. Refit the filter exactly; an incorrectly seated filter can reduce drainage and allow debris toward the pump.
Check the under-sink drain route without moving the appliance
Inspect the visible hose under the sink for a kink, crush point, sag, loose-looking clamp, or a route that lacks the model-required high loop or air gap. If the dishwasher drains to a garbage disposer, confirm that the inlet is appropriate and that a newly installed disposer does not still have its knockout plug. Keep hands out of the disposer and do not pull out a built-in dishwasher to reach hidden connections.
Use the drain phase and pump sound as clues
A steady hum with no water movement is more consistent with an obstructed or jammed impeller; grinding can indicate hard debris in the pump area; no pump sound when the drain phase should begin can indicate a wiring or control problem. These clues narrow the path but do not authorize opening the pump or applying power to it. A persistent leak, water in the base, or an unclear error needs service.
Treat air gaps, sink plumbing, and detergent foam separately
A blocked air gap or downstream sink connection can prevent discharge or send water back into the dishwasher. If suds are present because hand dish soap was used, stop the dishwasher and let the foam dissipate; use only automatic-dishwasher detergent thereafter. Do not mistake a detergent-foam event for a failed pump, and do not dismantle sink plumbing while the dishwasher is powered or water is uncontrolled.
Escalate when the drain path is clear but water remains
If the filter, visible sump, air gap, hose routing, and sink or disposer connection are clear and correctly installed but the dishwasher still will not drain, stop owner checks. An internal pump, impeller, valve, wiring, door switch, or control fault may remain. Qualified service can isolate the component and match a JennAir part to the exact model.
Safety boundary
Stop conditions
- Disconnect power only from a dry safe position. Stop immediately for water near an outlet, cord, junction, or wiring, a leak into the base, damaged wiring, or repeated protective-device trips.
- Do not use drain-opening chemicals, put hands in the garbage disposer, open the pump or toe-kick area, pull out an integrated dishwasher, or perform live electrical testing.
- A small amount of water in the filter area may be normal, but water covering the tub floor, returning from an air gap, or remaining after a clear filter and external drain path requires service escalation.
- Use the exact JennAir model manual for filter access, drain routing, high-loop or air-gap requirements, error interpretation, and part fit. Internal pump, impeller, sump, wiring, valve, and control work belongs to qualified service.
Only after diagnosis
Potential parts
- JennAir dishwasher filter assembly
Consider this category only when the exact model's filter is damaged, missing, or cannot seat after cleaning and the model manual confirms the assembly.
Filter shape and locking design vary by model. Confirm the complete model before ordering; a filter does not substitute for pump or sump diagnosis. - JennAir dishwasher drain hose or air-gap service
Consider this category when the visible hose is kinked, crushed, leaking, incorrectly routed, or the air-gap path remains blocked after safe external checks.
Hose length, connectors, clamps, high-loop and air-gap requirements vary by installation. Built-in movement and plumbing disconnection should be handled by qualified service. - JennAir dishwasher drain pump or impeller service
Consider this service category when a clear filter and external drain path are accompanied by a hum with no movement, grinding, persistent retained water, or no pump sound.
Pump, impeller, sump, seals, and wiring are model-specific and require safe isolation. Do not open the pump area or perform live testing. - JennAir dishwasher control, wiring, or door-switch service
Consider this service category when the drain pump does not engage, a drain error returns after external checks, or other cycle/control functions fail.
Control and harness fitment cannot be inferred from the error alone. Qualified service must diagnose the exact model and installation.
When checks do not resolve it
Need a professional?
Arrange qualified JennAir appliance service when the filter, visible sump, hose route, air gap, and sink or disposer connection are clear but water remains; when the pump hums without movement, grinds, stays silent, or a drain error returns; or when the dishwasher leaks or the base contains water. Use qualified plumbing service for a downstream sink, disposer, or air-gap obstruction. Stop immediately for water near electrical parts, damaged wiring, repeated trips, or an unsafe hard-wired installation.
Safety scope: The user may stop the cycle, remove accessible standing water from a safe dry position, clean a model-permitted filter, inspect visible hose routing and air-gap or sink-side obstruction, and follow the exact installation manual. Qualified service must handle cabinet movement, hidden hose or disposer connections, pump/impeller/sump access, wiring, controls, valves, live testing, and water near electrical parts.
Common questions
FAQ
Is a little water in the bottom of my JennAir dishwasher normal?
A small amount in the filter area can be normal on JennAir models and helps keep seals from drying. Water covering the tub floor, reaching the door, returning through the air gap, or increasing after a cycle is not the same symptom. Check the model-permitted filter and visible drain path, then arrange service if the water remains.
Why is my JennAir dishwasher humming but not draining?
JennAir's diagnostic guidance says a steady hum with no water movement can point to a jammed impeller or obstruction in the pump area. Clean only the accessible filter and visible sump with power safely isolated. If the hum continues, do not open the pump or apply power for a test; arrange qualified service.
Can a garbage-disposer knockout plug stop a JennAir dishwasher from draining?
Yes, a retained knockout plug can block the dishwasher inlet after a new disposer is installed. Check the installation history and the visible connection from a safe position, but do not put hands into the disposer or disconnect a wet hose near energized parts. Follow the exact installation manual or use qualified service for the correction.
Does a JennAir dishwasher always need a high loop?
The required drain routing depends on the model and installation. JennAir explains that a high loop or working air gap prevents backflow in applicable setups, while its installation guidance says to follow the exact model instructions. Inspect visible routing for kinks or sagging, but do not pull out a built-in dishwasher to adjust hidden plumbing.
What should I do if my JennAir dishwasher shows F9E1?
JennAir maps F9E1 to a long-drain concern. With power safely isolated, check the model-permitted filter, visible drain hose, garbage-disposer connection and knockout plug if applicable, and air gap. If the code returns or the pump is silent or grinding, keep the dishwasher off and arrange qualified service rather than opening the pump area.
Read the exact guide
Official sources
- Dishwasher Not Draining - Product Help | JennAirJennAir Product Help · Official JennAir product-help article; exact filter access, installation, and component layout vary by model.
- Not Draining - Newly Installed - Dishwasher - Product Help | JennAirJennAir Product Help · Official JennAir installation-related guidance; use only when the installation history or model arrangement fits.
- Drain Line Installation - Product Help | JennAirJennAir Product Help · Official JennAir installation guidance; the exact drain arrangement and local requirements depend on model and installation.
- Dishwasher Error Codes - Reading - Product Help | JennAirJennAir Product Help · Official JennAir error-code guidance; code availability and display behavior vary by model.
- Connecting Dishwasher Drain to Garbage Disposal - Product Help | JennAirJennAir Product Help · Official JennAir installation-support page for disposer-connected built-in dishwashers; follow the exact owner and installation manual.
- Not Draining - Water Remain at End of Cycle - Dishwasher - Product Help | JennAirJennAir Product Help · Official JennAir guidance for water remaining after a cycle; the normal filter-area amount and procedures vary by model.
Community feedback
Share a repair observation
Share a plain-text repair observation. Accepted observations are published automatically; this page may take a moment to update.