
On this page
Start here
Quick answer
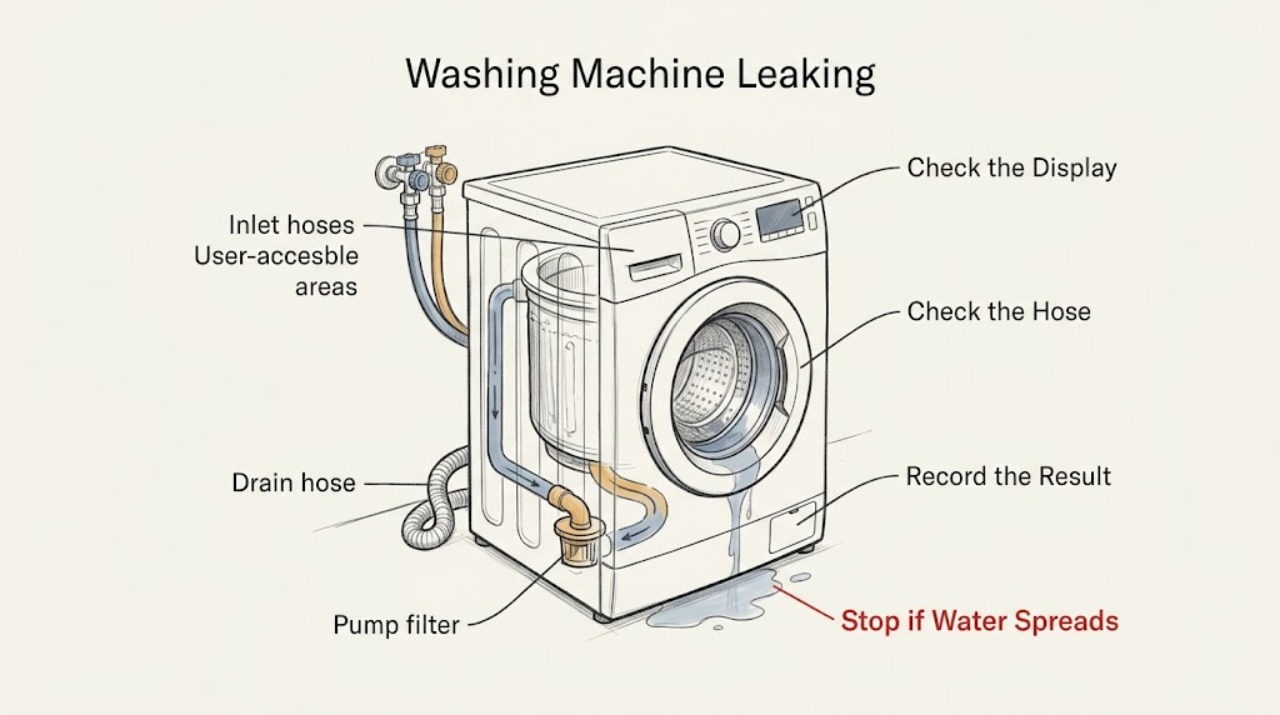
A Kenmore washer leak is easiest to diagnose by when and where the water first appears: during filling at an inlet hose or dispenser, during washing at a door or lid seal or oversudsing condition, during draining at the drain hose or household drain, or underneath from an internal hose or pump area. Stop the cycle, keep people away from standing water, turn off the household water valves if a supply hose is leaking and the valves are safely reachable, and disconnect power only from a dry location. Do not run repeated tests with water near electricity, and do not remove panels. After the area is safe, identify the first wet point, inspect only accessible hoses, dispenser, seal, and drain connections, and use the Kenmore manual for model-specific filter or service access. A cracked hose, damaged seal, leak from underneath, recurring leak, hot water hazard, or leak that reaches electrical parts needs qualified service.
Work through in order
Diagnostic checks
Use only checks that match the exact appliance or system and its official guide.
-
Check 1
Stop the cycle if the controls and floor are dry enough to do so, keep children and pets away, and turn off the household water valves only when a supply leak is suspected and the valves are safely reachable. Disconnect power from a dry, safe location if water has moved toward electrical parts.
Expected result: The leak stops when the supply valves are closed, water continues from the tub or drain, or water has reached an outlet, cord, plug, or cabinet electronics.
Next step: Do not touch wet electrical areas. If the hazard is isolated and the area is dry, continue with external observation; otherwise leave the washer out of service for qualified help.
Stop if: Stop immediately for water near electricity, a damaged cord, an active spray, hot water that can burn, smoke, sparking, or an inability to safely reach the valves or isolator.
Why this matters
Why: A valve-dependent leak points toward the inlet hose, connector, valve, dispenser, or fill path. Continued water can be residual tub water or a drain-path leak. Water near electricity changes the task from diagnosis to hazard isolation.
-
Check 2
Without moving the washer or restarting it repeatedly, dry the accessible floor and note the first wet point: back inlet connection, dispenser, front door or lid, drain hose or standpipe, pump-filter area, or underneath. Record whether it happened while filling, washing, spinning, draining, or after stopping.
Expected result: The first wet point and cycle stage identify an inlet, dispenser, seal, drain, filter, overflow, or underneath path, or the source cannot be seen.
Next step: Use the matching branch below. Photograph the dry-to-wet boundary and record the model number for the service handoff.
Stop if: Stop if locating the source would require pulling a full washer, opening the cabinet, touching hot water, or reaching behind a wet electrical connection.
Why this matters
Why: Water follows surfaces, so the origin and timing are more diagnostic than the edge of the puddle. An unknown or underneath source cannot be safely identified by tipping or removing panels.
-
Check 3
If the leak starts while filling, inspect the visible hot and cold inlet hoses, their faucet and washer connections, and the detergent or additive dispenser for cracks, cross-threading, loose washers, kinks, residue, or overflow. Do this with the water valves closed and without opening the cabinet.
Expected result: A connector is wet, a hose is cracked or bulged, a valve or tap seeps, or the dispenser contains buildup or overflows; or all accessible fill points remain dry.
Next step: Correct only an obvious accessible connection or clean the dispenser according to the Kenmore manual, then check once with the area dry. Replace a damaged hose or arrange service rather than patching it as a permanent repair.
Stop if: Stop if the leak comes from inside the cabinet, a valve cannot be isolated, the hose bursts or sprays, or water reaches electrical parts.
Why this matters
Why: A wet connection or damaged hose can leak as pressure enters. Dispenser residue can restrict the flow and cause an overflow. A dry external fill path shifts attention to an internal valve, hose, or control issue.
-
Check 4
If water first appears during washing at the front or top, check the accessible door glass and rubber gasket or lid area for hair, lint, detergent buildup, a trapped garment, a torn seal, an obstructed lid, excessive suds, or a load that makes water splash. Keep the machine off while cleaning a gasket or surface.
Expected result: Debris is trapped at the gasket, the seal is torn or displaced, the lid or door is damaged, foam overflows, or the seal and load appear normal.
Next step: Remove only accessible debris, follow the model's detergent and loading guidance, and make at most one supervised empty test when safe. Do not use a damaged door, lid, or seal.
Stop if: Stop for a torn gasket, cracked glass, a lid or hinge that will not align, hot water escaping, violent vibration, smoke, odor, or water toward electricity.
Why this matters
Why: Debris can prevent a front door seal from closing against the glass, while excess detergent or a high or floating load can create apparent overflow. A torn seal or normal external condition with continuing water points to service.
-
Check 5
If the leak begins during draining or spinning, inspect the visible drain hose where it exits the washer and enters the standpipe, sink, or floor drain. Check for a loose connection, split, kink, extension joint, hose pulled out of the drain, or a household drain that backs up.
Expected result: Water spills only as the drain pump runs, the hose is loose or cracked, water rises from the standpipe, or the drain connection remains dry and secure.
Next step: Secure a loose hose or clear a reachable household drain without mixing chemicals, following the Kenmore installation guide. If water still appears from underneath, stop and arrange service.
Stop if: Stop if the drain hose is split, the standpipe overflows, the pump area is wet, the floor becomes slippery, or the repair would require cabinet removal.
Why this matters
Why: A loose hose can discharge onto the floor, while a blocked household drain can backflow and look like a washer leak. A secure external path with water underneath the cabinet makes an internal hose, pump, or tub leak more likely.
-
Check 6
Only if the exact Kenmore manual identifies an accessible pump filter or residual-water hose, let hot water cool, disconnect power from a dry location, place a shallow container, and inspect the cap and hose for a loose seal or damage. Do not tip the washer or remove an unlisted panel to inspect underneath.
Expected result: The documented filter cap or hose is loose, debris is present, the filter area is dry and secure, or the model has no user-accessible filter.
Next step: Reseat the documented cap or hose exactly as the manual directs, dry the area, and make one supervised test. If the leak returns or is underneath, leave the washer out of service for qualified diagnosis.
Stop if: Stop if water is hot, the cap will not turn normally, the seal is damaged, water enters electrical areas, or any panel or internal wiring would need to be exposed.
Why this matters
Why: A cap or residual hose that was not reseated can leak, and an obstruction may affect drainage. A dry filter area or no documented access shifts the issue to an internal hose, pump, tub, or cabinet fault.
-
Check 7
After an obvious external correction and only when the floor, plug, cord, and controls are dry, perform one short empty rinse or other model-approved test while watching from a safe position. Stop at the first drop and record the exact stage and location.
Expected result: No leak occurs, the same external point leaks, water appears from underneath, or water reaches an electrical area.
Next step: If the test is dry, use the model's loading and detergent guidance for the next supervised load. If it leaks again, stop using the washer and provide the recorded source and timing to a qualified technician.
Stop if: Stop immediately for a large leak, hot water, violent movement, smoke, burning odor, sparking, repeated breaker trips, or water near electricity.
Why this matters
Why: A dry empty test can separate a load or detergent overflow from a machine leak, but it cannot prove that an internal component is safe. A repeat or underneath leak needs diagnosis rather than more test cycles.
Use your observations
Decision map
Find the observation that best matches what you see, then follow the next safe action.
-
PATH 01Next step
What you see
Water first appears while the washer fills or at a faucet, inlet hose, connector, valve, or dispenser.
Do this next
Close the supply valves if safely reachable, inspect the visible connections and dispenser, and follow the Kenmore model guide for cleaning or hose replacement.
-
PATH 02Next step
What you see
Water first appears during washing near the door, lid, gasket, dispenser, or top edge.
Do this next
Check accessible seal debris, door or lid alignment, excessive suds, and a floating or overloaded load without running a damaged machine.
-
PATH 03Next step
What you see
Water appears only while draining or spinning, especially at the standpipe, sink, drain hose, or rear of the washer.
Do this next
Secure the visible drain hose and inspect the household drain for backup; do not open the cabinet or repeatedly run the pump.
-
PATH 04Next step
What you see
Water appears at an accessible pump-filter or residual-water cap area after that feature was used.
Do this next
Use the complete Kenmore manual to confirm access, disconnect power from a dry location, let water cool, and reseat the documented cap or hose.
-
PATH 05Next step
What you see
The source is underneath, inside the cabinet, or cannot be identified without moving or dismantling the machine.
Do this next
Keep the washer off, isolate water and power from a dry safe location, and arrange qualified appliance service.
-
PATH 06Next step
What you see
Water reaches electrical connections, the cord or plug is damaged, hot water causes a burn risk, smoke or odor appears, sparking occurs, or the washer vibrates violently.
Do this next
Stop using the washer. From a dry, safe location isolate water and power if possible, keep people away, and contact a qualified appliance or electrical resource; do not continue testing.
Helpful context
Understand the symptom
Make the area safe before finding the first wet point
Press Pause or Stop once if the controls are dry and responsive. If water is near the outlet, plug, cord, or other electrical connection, do not step into it or reach through it. From a dry, safe location, close the hot and cold supply valves if a supply leak is active; disconnect the washer only if the plug or isolator is safely accessible. Do not restart a leaking washer merely to watch it, and do not pull it away from the wall while hoses are taut or the floor is slippery.
Leak timing is more useful than the puddle's final location
Water can travel along the cabinet or floor, so the puddle at the front may not be the source. Note whether the first drop appears while the washer fills, when detergent enters, during agitation, at high water movement, during drain, or after the pump stops. An empty-tub rinse test is appropriate only when the floor and electrical area are dry and the model instructions permit it; stop the test at the first leak.
Do not assume every Kenmore washer has the same filter or seal
Kenmore has different top-load and front-load designs, and their access points differ. Use the complete model manual from Kenmore's manual finder for the exact inlet, lid or door, drain, filter, and service instructions. A filter cap, emergency hose, cabinet panel, or manual release that exists on one machine may not exist on yours. Do not order a part from a puddle location alone.
Only after diagnosis
Potential parts
- inlet or drain hose
Consider this category only when inspection identifies a cracked, split, collapsed, or otherwise damaged hose and the complete model documentation confirms the replacement.
Confirm the complete Kenmore model number and manufacturer fit information; do not permanently patch a pressurized or drain hose. - door or lid gasket
This applies only when a front-door gasket or top-lid seal is visibly torn, displaced, or diagnosed as the leak source after safe cleaning and alignment checks.
Verify the washer design and model-specific fit before ordering; do not operate with a damaged seal. - drain pump or pump-filter cap
Consider this category only after the household drain and visible hoses are clear and a qualified diagnosis identifies a leaking or failed pump or cap.
Confirm the exact model and whether it has a user-accessible filter; the puddle location alone does not establish compatibility.
When checks do not resolve it
Need a professional?
Stop and arrange qualified service for water near electrical connections, an active spray or large leak, hot water exposure, an underneath or unknown source, a cracked hose, torn gasket, damaged glass or lid, a recurring leak after one safe test, violent vibration, burning odor, smoke, sparking, repeated breaker trips, or any repair requiring cabinet removal or live testing.
Common questions
FAQ
Where should I look first when my Kenmore washer leaks?
Note the first wet point and the cycle stage. Filling points to an inlet hose, connector, valve, or dispenser; washing points to a door or lid seal, suds, or splash; draining points to the drain hose or household drain; an underneath source needs service.
Should I turn off the water when a Kenmore washer is leaking?
If a supply hose or connection is leaking and the valves are safely reachable, close the household water valves. If water is near electricity or the floor is unsafe, do not reach through it; isolate water and power only from a dry, safe location and arrange help.
Can too much detergent make a Kenmore washer leak?
Excess detergent can create foam that overflows or contributes to rear leaks, and a dispenser can overflow when buildup blocks its path. Follow the Kenmore model and detergent instructions. A recurring leak is not solved by reducing detergent alone.
Why does my Kenmore washer leak only during drain?
A loose or split drain hose, a hose that has slipped out of the standpipe, or a clogged household drain causing backflow can leak during pump-out. Inspect visible connections without opening the cabinet; persistent or underneath leaks need service.
Can I run an empty test cycle to find the leak?
Only when the floor, plug, cord, and controls are dry and the model instructions permit it. Run one short, supervised empty rinse and stop at the first drop. Do not test a large, hot, electrical, or underneath leak.
When should I stop using a leaking Kenmore washer?
Stop for water near electricity, a large or active leak, hot water, a damaged cord, cracked hose, torn seal, damaged glass or lid, water underneath, violent vibration, smoke, burning odor, sparking, repeated breaker trips, or any repair requiring cabinet removal.
Read the exact guide
Official sources
- [LG front load washer leak] Water leaks from the drain outlet and drain hose during drainageLG USA Support · General washer drain-cycle leak, loose drain hose, drainpipe backup, and backflow distinction
- Find Your Manual | Kenmore Appliance Manuals & GuidesKenmore · Kenmore model-specific washer manuals and owner documentation
- LG Washer – Why is My Front Load Washing Machine Leaking?LG USA Support · General front-load washer leak-source classification for dispenser, door gasket, filter, inlet hose, drain hose, and underneath leaks
- [LG top load washing machine water leak] Water leaks to the floor during washingLG USA Support · General top-load washer leak timing, inlet and drain connections, overflow, load splash, and detergent-suds guidance
Community feedback
Share a repair observation
Share a plain-text repair observation. Accepted observations are published automatically; this page may take a moment to update.