
On this page
Start here
Quick answer
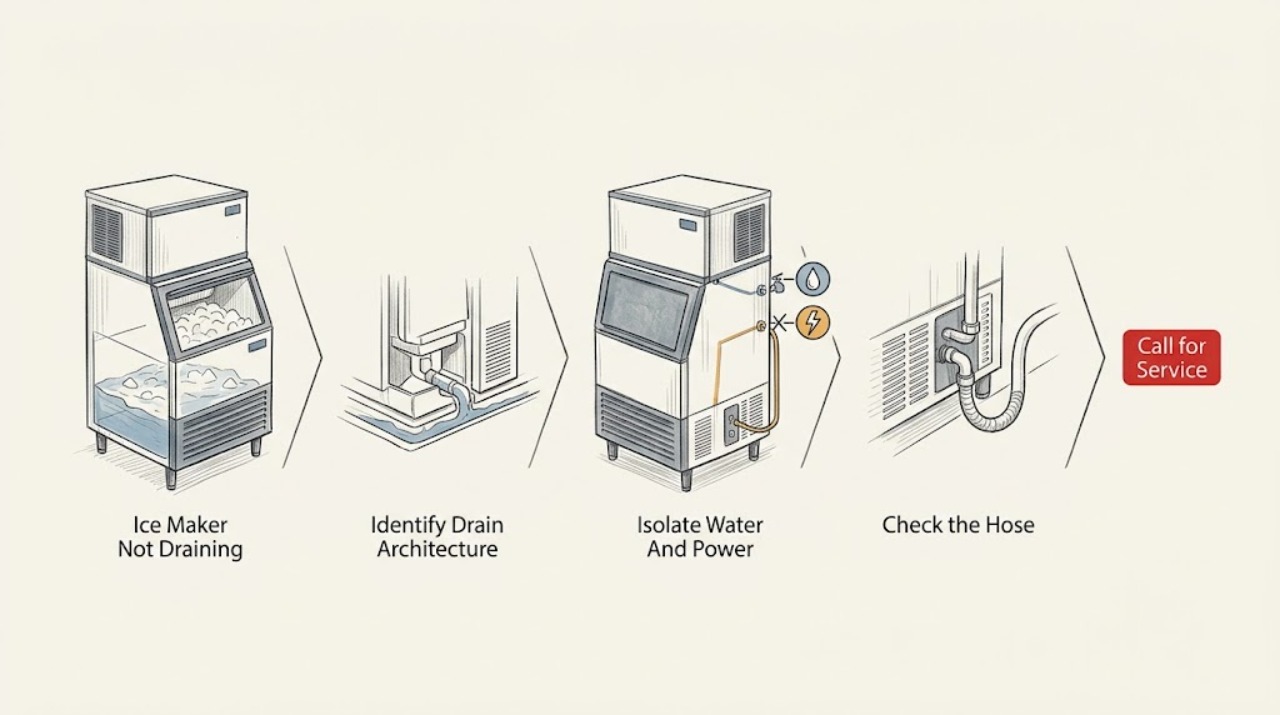
This guidance is for a KitchenAid freestanding or undercounter ice maker with a separate drain connection, not a refrigerator's internal ice-maker tray. First identify whether the unit uses a nearby floor drain by gravity or a drain pump. With the ice maker off and safe to approach, look for an accessible kink, crushed section, low spot, hose that is not aligned over the drain, or a drain cap that is not seated. Do not pull a built-in unit, open a pump compartment, disconnect water or electrical lines, or reconnect power just to watch a failed drain. KitchenAid says a gravity line must slope continuously without low points; a pump model has model-specific height and run limits. If the hose is inaccessible, the pump does not operate, water backs up or leaks, or the model's drain arrangement is unclear, leave the unit off and arrange model-specific service.
Work through in order
Diagnostic checks
Use only checks that match the exact appliance or system and its official guide.
-
Check 1
Without moving the appliance, read the model information and look only at the accessible drain exit. Determine whether the hose drops to a nearby floor drain by gravity or rises toward a separate drain-pump discharge. Use the model's owner and installation information for the definitive arrangement.
Expected result: The unit is a KitchenAid freestanding/undercounter ice maker and the drain is clearly gravity-fed, clearly pump-fed, or cannot be identified; alternatively, it is a refrigerator-integrated ice maker.
Next step: For a freestanding unit, continue with the matching branch below. If the unit is integrated into a refrigerator or the architecture is uncertain, stop applying these drain checks and use the exact refrigerator/ice-maker manual or qualified service.
Stop if: Do not slide an undercounter unit out, remove panels, or disconnect a hose merely to identify the system.
Why this matters
Why: Gravity and pump systems fail differently and have different routing limits. A refrigerator-integrated ice maker does not establish the freestanding drain architecture covered here.
-
Check 2
If water is pooling or a connection is leaking, turn off the accessible water supply. Turn the ice maker off and disconnect power only from a dry, safe position, following the model's instructions; keep the unit off while inspecting an accessible drain path.
Expected result: Water stops entering, the area remains wet, the plug or outlet is wet or damaged, or power cannot be safely isolated without reaching behind the unit.
Next step: Keep water and power off when the area is wet, the outlet is affected, or safe isolation is not possible. Arrange qualified appliance service; use a qualified electrician if the receptacle or household circuit is involved.
Stop if: Do not touch wet electrical connections, pull a wet plug, run a cycle to test drainage, or open the electrical or pump enclosure.
Why this matters
Why: Stopping water limits further overflow, but it does not clear a blocked drain or prove that a pump is faulty. Wet or damaged electrical parts and inaccessible isolation require a professional boundary.
-
Check 3
With the unit off, inspect only the visible hose and drain entry for a kink, twist, crushed section, sagging low point, excessive rise or length, closed-pipe connection, or a hose end that is no longer aligned over the drain. Do not pull the ice maker forward to reach a hidden section.
Expected result: The visible hose is kinked or misaligned, the gravity line has a low spot, the pump discharge exceeds the model's allowed routing, or the visible path appears open and correctly placed.
Next step: If the hose can be corrected without moving the appliance or opening connections, restore only the intended model-specific routing and check for visible leaks while still off. If the path is hidden, damaged, blocked, or beyond its limits, arrange service rather than improvising a hose or pump change.
Stop if: Do not connect the hose to a sealed pipe, use an unapproved substitute hose, dismantle the pump, or reconnect power to force water through a restricted line.
Why this matters
Why: KitchenAid identifies hose alignment and routing as causes of leaking or non-draining. Gravity systems need a continuous fall without low points; pump systems have model-specific rise and run limits. An apparently clear visible section does not rule out a hidden blockage or failed pump.
-
Check 4
Only if the exact owner instructions identify a user-accessible drain cap in the storage-bin water pan, and only after the unit is off, water is shut off, and ice or standing water can be handled safely, check that the cap is seated securely. Follow the model's instructions for loosening it to let the pan drain and replacing it; do not force a stuck cap.
Expected result: The model has the described cap and it is loose, blocked, damaged, or seated correctly; or the unit has no such accessible cap.
Next step: Secure only an undamaged, model-approved cap as directed. If it is missing, cracked, stuck, or the water still does not drain, leave the unit off and arrange model-specific service.
Stop if: Do not insert tools into the drain, remove internal covers, or use cleaner, compressed air, or another liquid to force a blockage through the system.
Why this matters
Why: KitchenAid states that a loose drain cap can let water leave the pan and cause thin or no ice, while its owner information identifies the cap and pan arrangement only for covered models. This is not a substitute for clearing a hidden drain or diagnosing a pump.
-
Check 5
After the safe external checks, record whether water remains in the storage bin or pan, backs up at the drain, leaks at a connection, or never reaches the drain. Note whether the unit has a pump, whether the pump is silent or repeatedly trips protection, and whether ice production also stopped. Do not energize the unit to create a new observation.
Expected result: The drain path is accessible but still blocked, the pump does not operate, water leaks from an internal connection, or the symptom remains unexplained.
Next step: Give service the model, drain architecture, hose observations, water location, and whether the unit was powered off. Arrange qualified appliance service for pump, internal tubing, wiring, or inaccessible drain work.
Stop if: Do not open the cabinet, bypass a pump or safety control, perform live electrical checks, or substitute a part based only on appearance.
Why this matters
Why: A persistent blockage, failed pump, internal leak, or electrical fault cannot be distinguished safely from outside. The fact that ice production also stopped can be a consequence of a drain restriction rather than a separate ice-making failure.
Use your observations
Decision map
Find the observation that best matches what you see, then follow the next safe action.
-
PATH 01Next step
What you see
The freestanding unit uses a nearby floor drain and the water remains in the pan/bin or backs up at the drain.
Do this next
If routing can be corrected from the accessible position without moving or opening the unit, follow the exact installation instructions. Otherwise keep the unit off and arrange service.
Why this path and its safety boundary
Why it matters: The visible installation is consistent with a gravity-drain routing problem, not proof of a failed ice-making mechanism.
-
PATH 02Next step
What you see
The unit has a drain pump or needs one because the household drain is above the ice maker or not nearby.
Do this next
Do not install or substitute a pump based on a generic diagram. Use the exact model installation information and qualified service for a pump, hidden hose, or plumbing correction.
Why this path and its safety boundary
Why it matters: A routing or pump-system problem is more likely than a gravity slope problem. KitchenAid states that pump capability and limits are installation-specific.
-
PATH 03Next step
What you see
The model has a storage-bin water pan and an accessible drain cap, and water is escaping or remaining around that cap.
Do this next
Follow the exact owner instructions only for a safe cap check. Stop and call service for a damaged/stuck cap or persistent non-draining water.
Why this path and its safety boundary
Why it matters: A loose cap can affect the water pan and ice production, but a correct cap with persistent standing water points back to the hose, drain, or pump path.
-
PATH 04Next step
What you see
The ice maker is part of a refrigerator, the drain architecture cannot be identified, or the model documentation does not show a freestanding drain tube/pan arrangement.
Do this next
Stop using this page as a procedure. Use the exact refrigerator model manual or arrange qualified appliance service for the internal ice-maker or refrigerator drain system.
Why this path and its safety boundary
Why it matters: Applying freestanding drain instructions could misidentify the appliance and create a water or electrical hazard.
Helpful context
Understand the symptom
Confirm the appliance before checking the drain
KitchenAid's drain guidance is for freestanding ice makers, including undercounter units with a water pan, storage bin, drain tube, and either gravity or pump drainage. A refrigerator ice maker normally does not use this same floor-drain layout. Read the model label and its owner or installation information before applying any hose, drain-cap, height, or pump instruction; do not infer the architecture from the word ice maker alone.
A blocked or misrouted drain can stop ice production too
KitchenAid notes that a kinked or incorrectly routed drain hose can cause draining problems and may also lead to low or no ice production, intermittent power, or no power on some freestanding models. A drain symptom is therefore not proof that the refrigeration or ice-making mechanism has failed. Start with the visible drain path and stop before an inaccessible pump, plumbing connection, or internal electrical diagnosis.
When checks do not resolve it
Need a professional?
Arrange qualified appliance service when the hose or pump is inaccessible, water remains after the model-specific external checks, a drain cap is damaged or stuck, an internal connection leaks, the pump will not discharge, or the unit's architecture is uncertain. Use a qualified electrician for an affected receptacle or household circuit.
Common questions
FAQ
Is this the same as a refrigerator ice maker that is not draining?
Not necessarily. KitchenAid's cited drain guidance concerns freestanding or undercounter ice makers with a drain tube, water pan, and gravity or pump discharge. A refrigerator-integrated ice maker may use a different system, so confirm the model before applying these checks.
How do I tell whether my KitchenAid ice maker uses gravity drainage or a pump?
Use the exact installation information and inspect only the accessible drain route. A nearby floor drain directly below the unit is the gravity arrangement; a route that must lift water generally uses a pump. KitchenAid says the pump is model-dependent and has routing limits, so do not infer the setup from a generic picture.
Can a kinked drain hose stop a KitchenAid ice maker from making ice?
Yes, on covered freestanding models. KitchenAid says a kinked or incorrectly routed drain hose can cause draining problems and may also cause low or no ice production or intermittent power. Correct only an accessible, obvious routing problem without pulling out the appliance; hidden or damaged tubing needs service.
Should I remove the drain cap if water remains in the ice maker?
Only when the exact owner instructions identify that cap and the unit is off, the water supply is shut off, and the cap can be handled safely. KitchenAid describes allowing the pan to drain and replacing the cap securely; do not force a stuck or damaged cap or use tools to clear the drain.
When does a non-draining KitchenAid ice maker need service?
Call when water still stands after the exact model's safe external checks, the hose or pump is hidden, the pump does not discharge, a connection leaks, the drain cap is damaged or stuck, or electrical parts are wet. Do not remove panels or power the unit to reproduce the problem.
Read the exact guide
Official sources
- How to Install the Drain Cap - Product Help | KitchenAidKitchenAid Product Help · KitchenAid freestanding ice-maker water-pan drain-cap fit and model-specific drain-cap handling
- Information on the Different Types of Drain Pumps - Product Help | KitchenAidKitchenAid Product Help · KitchenAid freestanding ice-maker gravity-drain and drain-pump architecture
- Not Draining - Ice Maker - Product Help | KitchenAidKitchenAid Product Help · KitchenAid freestanding ice-maker drain troubleshooting, including gravity versus pump systems, hose alignment, hose selection, and routing limits
- Owners ManualKitchenAid · KitchenAid freestanding ice-maker drain-cap, water-pan, gravity-drain, pump, ventilation, and model-specific owner guidance for the covered manual family
- Installation InstructionsKitchenAid · KitchenAid freestanding ice-maker drain connection, gravity slope, pump discharge, and electrical safety for the covered installation family
Community feedback
Share a repair observation
Share a plain-text repair observation. Accepted observations are published automatically; this page may take a moment to update.