
On this page
Start here
Quick answer
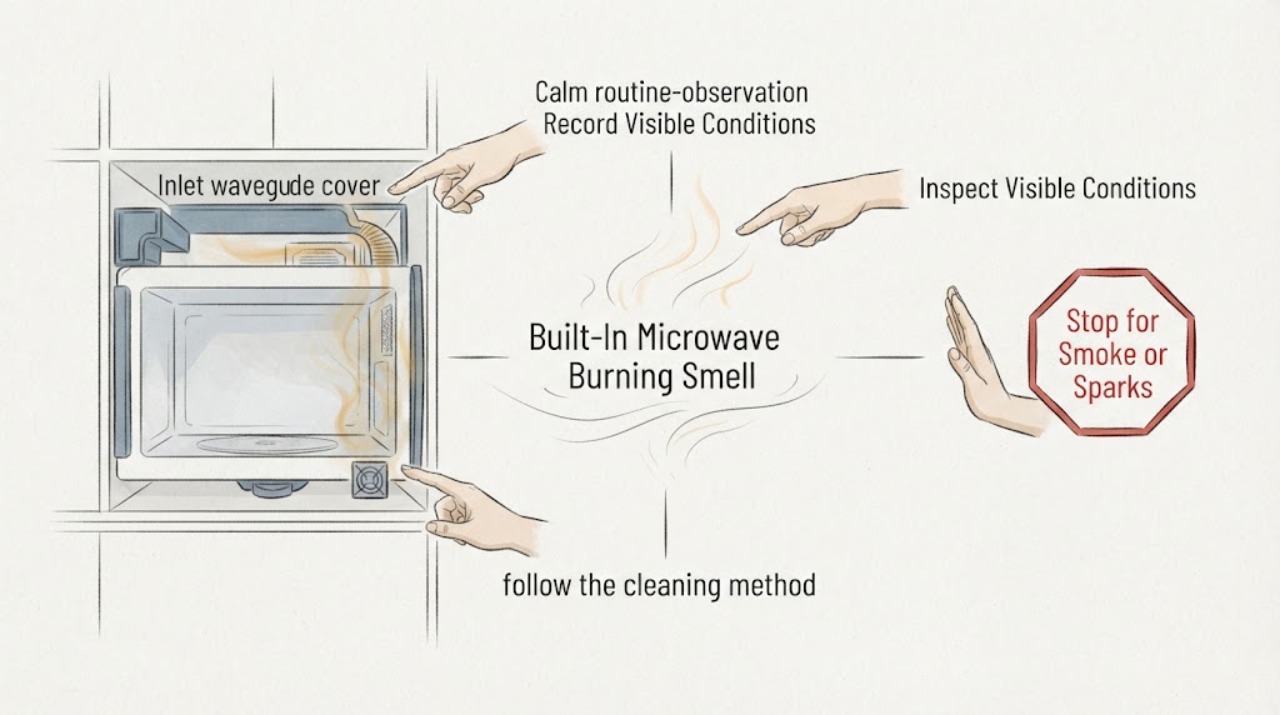
Treat a burning smell from a KitchenAid built-in microwave as a stop-and-identify symptom, not as a routine deodorizing job. Turn the microwave off and disconnect power only if you can do so safely; do not pull a built-in unit from the cabinet, remove its metal shroud, or run it empty to reproduce the smell. With power off and the cavity cool, look only at visible food splatter, scorch marks, melted material, the inlet cover, turntable, door area, and any user-accessible filter named by the exact manual. KitchenAid says burnt food odors may often be removed with steam and a non-abrasive wipe, but its manual warns not to operate the microwave empty, not to remove the microwave inlet cover, and to use qualified service for repairs. Sparks, smoke, a melted or damaged cover, electrical or plastic odor, recurring smell, or a smell that continues after visible food residue is removed requires qualified microwave service.
Work through in order
Diagnostic checks
Use only checks that match the exact appliance or system and its official guide.
-
Check 1
Stop the microwave and record what happened immediately before the smell: food type, cooking time, smoke or sparks, sound, visible flash, and whether the odor came from the cavity, vent, control area, or surrounding cabinet. Do not restart it to reproduce the smell and do not remove the built-in unit from its cabinetry.
Expected result: There was only scorched food residue, or there was smoke, arcing, a flash, melted material, a hot-electrical/plastic odor, or an odor from outside the cavity.
Next step: For any smoke, spark, melted material, electrical odor, or cabinet/vent odor, leave the microwave off and arrange qualified service. Continue only with the visible-cavity branch if the evidence is clearly limited to burnt food and there is no damage.
Why this matters
Why: A food-only odor can sometimes be cleaned, while smoke, arcing, melted material, or an external electrical/plastic odor indicates a possible appliance or installation fault. The observation does not identify a magnetron, capacitor, switch, wiring, or vent component.
-
Check 2
When the cavity is cool and power is disconnected, inspect the turntable and the visible cavity surfaces, door edge, and inlet-cover area using a light. Look for food splatter, scorch marks, bubbling or melted coating, cracks, a warped door, or a damaged inlet cover. Do not remove the inlet cover or touch anything behind it.
Expected result: Only removable food residue is visible, or the inlet cover, cavity coating, door, seal area, or other surface is scorched, melted, cracked, or damaged.
Next step: If any cover, cavity, door, or seal is damaged, keep the built-in microwave off and request a qualified inspection. Do not scrape, paint, glue, or replace the inlet cover without the exact model documentation.
Why this matters
Why: Removable food residue is consistent with KitchenAid's cleaning path. Damage to the inlet cover, cavity, door, or seal area is a service condition because it can affect arcing protection and safe containment; it is not a cleaning confirmation.
-
Check 3
If the smell is clearly from burnt food and no damage is visible, follow the KitchenAid cleaning method: use a microwave-safe bowl with water, heat it only under the product instructions, then wipe with a non-abrasive cloth or sponge, rinse away residue, and dry the cavity. Keep the built-in microwave unused while any deodorizer is inside.
Expected result: The odor decreases after the cavity and turntable are cleaned and dried, or the odor remains unchanged or returns without new food being burned.
Next step: If the odor remains, do not run another cooking cycle to test it. Arrange qualified service, especially if the smell is chemical, plastic-like, electrical, or accompanied by heat, sound, smoke, or sparks.
Why this matters
Why: A decreasing odor supports food residue as a contributor. A persistent or recurring odor after cleaning is not proof that the microwave is safe; KitchenAid's cleaning advice does not diagnose internal electrical or high-voltage faults.
-
Check 4
Check the exact built-in microwave manual for any user-accessible grease or charcoal filter and its cleaning or replacement interval. Do not assume an over-the-range filter arrangement applies to a built-in model, and do not open a vent housing or remove a filter while the unit is energized.
Expected result: The exact manual identifies a user-accessible filter, the filter is visibly greasy or overdue, or no applicable filter is documented and the odor persists.
Next step: Clean or replace only the filter and interval documented for the exact model. If the odor persists or no safe filter procedure is documented, keep the microwave off and request service rather than removing panels.
Why this matters
Why: KitchenAid says a dirty grease filter can hold odors on configurations that have one and that a charcoal filter is not cleaned but replaced. Filter presence, access, and replacement depend on the microwave configuration, so a generic filter action can be wrong.
-
Check 5
Before contacting service, record the model and serial number, whether the unit is a microwave-only or oven/microwave combination, the cavity and vent observations, the food or cookware used, filter history, and any breaker trip or visible damage. Keep the unit disconnected if the smell is not clearly food-only.
Expected result: The symptom resolves after documented cleaning without any damage, or the smell persists/recurs, the unit trips power, or any damage is present.
Next step: Use KitchenAid's model-specific service route or a qualified microwave technician. Do not remove the shroud, discharge a capacitor, bypass a door switch or thermal cutoff, or perform live tests.
Why this matters
Why: A resolved food odor can be monitored without claiming that internal components were tested. Persistence, recurrence, power trips, or damage require model-specific diagnosis; the manual does not support a consumer high-voltage repair path.
Use your observations
Decision map
Find the observation that best matches what you see, then follow the next safe action.
-
PATH 01Next step
What you see
The smell began with clearly scorched food, no smoke or spark occurred, and only removable splatter is visible in the cavity.
Do this next
Clean the cavity and turntable using the exact manual and KitchenAid's non-abrasive method. Keep the microwave unused while a deodorizer is inside and request service if the smell remains.
Why this path and its safety boundary
Why it matters: Burnt food residue is a plausible source. KitchenAid says steam cleaning, non-abrasive wiping, drying, and odor absorption can help with interior burnt smells.
-
PATH 02Next step
What you see
There was smoke, a spark or flash, melted plastic, a damaged inlet cover, a hot electrical/plastic odor, or a smell from the vent or cabinet.
Do this next
Stop using the built-in microwave, disconnect power only when safe, and arrange qualified service. Do not pull it from the cabinet, remove the shroud, or run another cycle to see whether it repeats.
Why this path and its safety boundary
Why it matters: This is outside a routine food-odor cleanup. The visible symptom may involve the cavity, inlet cover, vent, door system, wiring, or high-voltage section, but it does not identify one failed component.
-
PATH 03Next step
What you see
Cleaning removes the odor, no damage or abnormal sound is present, and the exact manual confirms the cavity and user-accessible filter are intact.
Do this next
Resume use only according to the exact manual, with microwave-safe cookware and supervised cooking. Stop immediately and request service if the smell returns or any spark, smoke, heat, or power trip occurs.
Why this path and its safety boundary
Why it matters: The event is more consistent with a transient food or grease odor, but cleaning does not establish that internal components were tested.
-
PATH 04Next step
What you see
The odor persists or returns without new food burning, the filter path is dirty but cleaning does not help, or the unit trips power or smells electrical.
Do this next
Keep the microwave off and arrange model-specific qualified service. Do not bypass safety devices, inspect energized wiring, or continue operating a damaged built-in appliance.
Why this path and its safety boundary
Why it matters: A persistent or recurrent odor is not safely explained by removable food alone. KitchenAid's public guidance does not support a consumer diagnosis of the magnetron, capacitor, transformer, door switch, thermal cutoff, or wiring.
Helpful context
Understand the symptom
Stop first and separate food odor from equipment damage
A smell from scorched popcorn, grease, or a spilled food can remain in a cavity after the microwave is switched off. A smell that began with smoke, arcing, a bright flash, melted plastic, a damaged inlet cover, or a hot-electrical/plastic odor has a different risk profile. Because this is a built-in microwave, do not pull the unit out or remove the outer cover to find the source. Disconnect power only through the normal accessible switch, plug, or breaker when safe.
Inspect only visible, user-accessible areas
After the cavity is cool and power is off, inspect the turntable, walls, ceiling, floor, door edge, and visible inlet-cover area for food splatter or damage. KitchenAid's manual says to keep the inlet cover clean but not remove it, and says a damaged oven should not be operated until a designated service technician checks it. Do not scrape a cover, probe behind it, or touch internal wiring.
Clean only when the evidence points to burnt food
KitchenAid's cleaning guidance supports steam from a microwave-safe bowl, a non-abrasive wipe, thorough drying, and overnight odor absorption with the appliance unused. It also says grease and charcoal filters may need maintenance on configurations that have them. These measures can address a food odor; they do not make a persistent chemical, electrical, smoke, spark, or melted-plastic smell safe to test again.
When checks do not resolve it
Need a professional?
Arrange qualified KitchenAid or microwave service when the smell is electrical, plastic-like, chemical, persistent, or recurrent; when there is smoke, arcing, melted or damaged material, a damaged inlet cover or door area, a power trip, or any suspected internal fault. Do not operate a damaged or empty microwave and do not open the high-voltage section.
Common questions
FAQ
Can a burnt smell in a KitchenAid built-in microwave be just food residue?
It can be when the event involved clearly scorched food and there is no smoke, spark, melted material, or visible damage. KitchenAid supports steam cleaning and non-abrasive wiping for interior burnt smells. A persistent electrical, plastic, chemical, or recurring smell needs service instead of repeated tests.
Should I remove the microwave inlet or waveguide cover to inspect a burning smell?
No. KitchenAid's manual says not to remove the microwave inlet cover and directs repairs to properly qualified service personnel. Inspect only visible surfaces with power disconnected and the cavity cool; do not scrape, paint, glue, or probe behind the cover.
Can I run the built-in microwave empty to reproduce the smell?
No. KitchenAid's manual says not to operate the microwave empty. If the smell involved smoke, sparks, melted material, an electrical odor, or returns after cleaning, keep the unit off and arrange qualified service rather than reproducing the event.
Read the exact guide
Official sources
- How to get burnt smells out of a microwaveKitchenAid · Official KitchenAid consumer guidance for microwave odor cleanup; it does not diagnose a built-in high-voltage or electrical fault.
- MICROWAVE OVENKitchenAid · Official KitchenAid manual covering several models; exact built-in model remains unprovided, so only common safety boundaries are generalized.
- How to troubleshoot a microwave that’s not heatingKitchenAid · Official KitchenAid family-level troubleshooting; it supports external checks only and does not authorize high-voltage repair.
- Scan QR codeKitchenAid · Opened official KitchenAid guide with model-specific scope; used only for general cleaning/vent boundaries and not as a universal built-in model manual.
- Owners CenterKitchenAid · Official owner-support entry point; the exact built-in model must be entered before applying model-specific instructions.
Community feedback
Share a repair observation
Share a plain-text repair observation. Accepted observations are published automatically; this page may take a moment to update.