
On this page
Start here
Quick answer
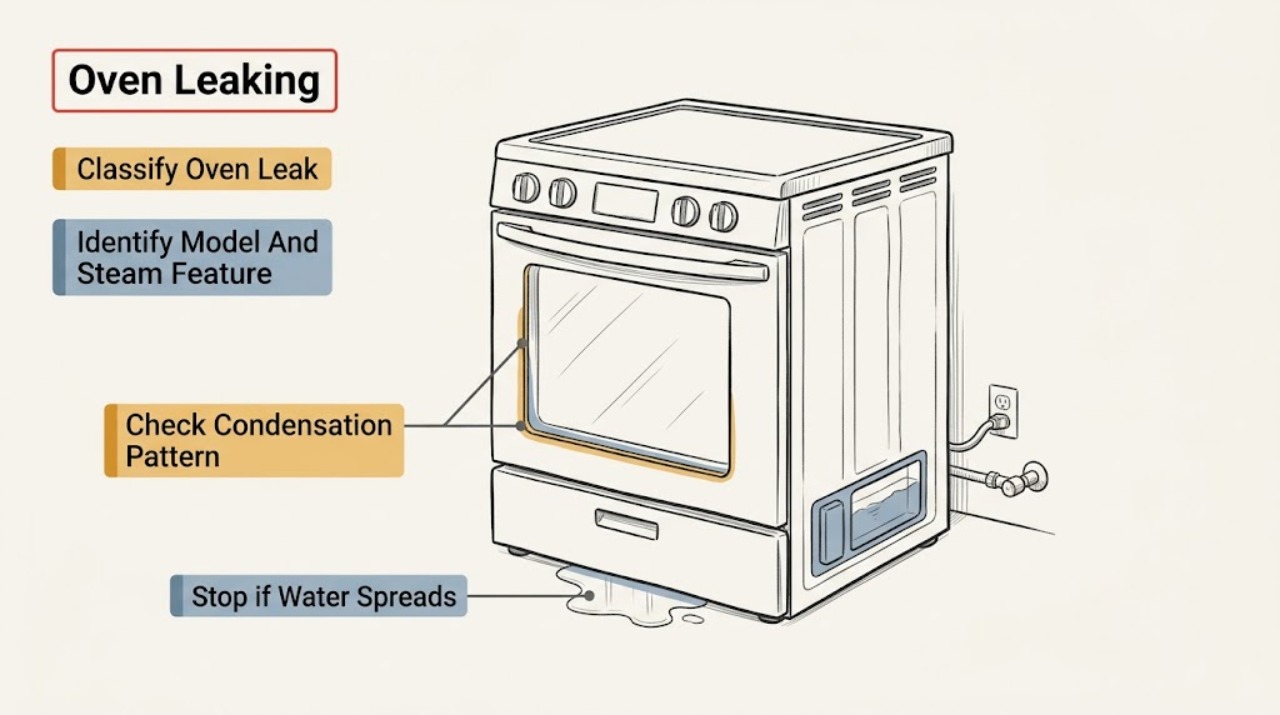
A Maytag oven that appears to be leaking may be showing condensation from moist food or gas combustion, water left by a steam feature, or a true spill from the cavity, door, reservoir, hose, or a nearby plumbing connection. Do not treat a gas odor as a liquid leak: stop using the appliance, avoid flames and electrical switches, leave, and contact the gas utility or emergency service from a safe location. For liquid, stop the cycle, keep water away from electrical parts, and wait for the oven to cool before wiping and locating the source. Steam features are model-specific; check the exact manual before filling or draining a reservoir. Persistent water from the bottom, cabinet, door area, or a steam system, or any leak near wiring, is a service boundary.
Work through in order
Diagnostic checks
Use only checks that match the exact appliance or system and its official guide.
-
Check 1
Stop the oven and record where the liquid first appears, when it appears, its approximate amount, and whether it looks like clear water, food residue, cleaning liquid, or something else. Do not taste or deliberately touch an unknown liquid.
Expected result: Moisture is a light film on the door or floor after cooking, water is pooled inside the cavity, liquid comes from below or the cabinet, or the substance has an unusual odor or color.
Next step: Keep the oven off and continue only with dry, external observations. If the liquid is near wiring, an outlet, the control area, or the floor under a wall oven, use the service branch.
Stop if: Stop immediately for a gas odor, smoke, an abnormal flame, popping with delayed ignition, a carbon-monoxide alarm, arcing, a hot cord, or water near electrical equipment.
Why this matters
Why: A light film linked to steam can be condensation; a recurring puddle or liquid from below is not explained by ordinary surface condensation. An unknown or chemical-smelling substance needs cautious handling rather than a cooking test.
-
Check 2
Use the full model information from the rating label and the Maytag manual to determine whether this oven has Steam Bake, Steam Clean, a water reservoir, a drain function, or none of these features. Do not fill a container or start a water function until the manual confirms it.
Expected result: The manual documents a steam reservoir or drain, documents Steam Clean only, or shows no water feature for the model.
Next step: Follow only the model's documented water handling instructions. If the manual does not match the controls or hardware, stop and provide the model information to service rather than improvising.
Stop if: Stop if the reservoir, hose, valve, drain opening, or cabinet is damaged, loose, leaking continuously, or inaccessible without removing a panel.
Why this matters
Why: A residual-water explanation is relevant only when the model has the corresponding water feature. A conventional oven with no water feature should not be given a reservoir or drain diagnosis.
-
Check 3
After the oven is cool, inspect the door glass, the area below the vent, and the floor or cabinet near the vent without blocking or covering any vent. Relate the moisture to high-moisture food, a gas-bake cycle, or a steam cycle.
Expected result: The moisture is a temporary film that diminishes as the oven heats or cools, or it forms a repeated stream or puddle independent of food and steam use.
Next step: For a temporary film, let the appliance cool and wipe the accessible surface. For a recurring stream or puddle, stop using the oven and arrange inspection.
Stop if: Stop for water entering a control or electrical area, a blocked or damaged vent, smoke, unusual heat, a gas odor, or a flame that is not stable and normal for the model.
Why this matters
Why: Maytag identifies temporary condensation from moist food and gas combustion as a possible normal explanation. A stream, growing puddle, or recurrence when the oven is idle points to a leak or blocked water path instead.
-
Check 4
Only on a model whose manual confirms a steam system, inspect the external water container and its seating after the oven is cool. Check that the fill level did not exceed the MAX mark and use the model's documented drain procedure only when the appliance permits it.
Expected result: Water remains in the container after a steam cycle, the container was overfilled, water is present at the container seat, the drain function is unavailable or blocked, or the reservoir and seat are dry.
Next step: Empty or drain the container exactly as the manual directs after cooling. If water returns, the container will not seat, or the drain remains blocked, leave the oven out of service.
Stop if: Stop if the container or valve is cracked, water is hot, the drain requires panel removal, or water is reaching wiring or the floor below the appliance.
Why this matters
Why: Maytag describes residual water, overfilling, and incorrect container removal as possible sources of water around an applicable steam oven. A dry, correctly seated system with continued water from the cavity or cabinet needs further service diagnosis.
-
Check 5
After cooling to a safe handling temperature, inspect for food spill, grease, or cleaning residue on the cavity floor, door, and gasket. Wipe only accessible residue using the cleaner and method permitted by the Maytag manual; never add oven cleaner or other additives to a Steam Clean or steam-water system.
Expected result: The liquid matches a recent spill or cleaning step and does not return, or clear liquid reappears from a seam, vent, door edge, bottom, or cabinet.
Next step: Clean and dry the accessible area, then leave the oven off if liquid returns. Give service the location, timing, and the cleaning product used.
Stop if: Stop for chemical fumes, a hot surface, a damaged gasket, liquid in the controls, smoke, or any need to remove a panel or use a sharp tool.
Why this matters
Why: A one-time spill can be cleaned after cooling. Liquid that reappears from an edge, seam, or concealed area is evidence of a seal, drain, reservoir, or plumbing problem rather than ordinary cleaning residue.
-
Check 6
With the oven off and cool, visually check the door gasket, hinge-side edges, visible vent openings, and the area immediately below the door for food debris, a displaced seal, a crack, or an obstruction. Do not pull out the gasket, alter the hinge, or cover a vent.
Expected result: The gasket is clean and seated, debris is visible on an accessible surface, the gasket is torn or displaced, or liquid is escaping at the door edge during use.
Next step: Remove only loose, visible residue after cooling. If the seal or hinge is damaged or the leak recurs at the door, stop using the oven and request service.
Stop if: Stop for broken glass, a loose hinge, a door that will not close, a hot leak, smoke, an abnormal flame, or liquid near the control panel or wiring.
Why this matters
Why: A removable surface obstruction may explain a poor seal or localized residue. A torn or displaced gasket, a door that does not close evenly, or water escaping at the door edge needs model-specific service assessment.
-
Check 7
If the reported 'leak' is actually a gas odor, stop the oven and do not light it, touch an electrical switch, or operate a control near the odor. Move people away and contact the gas supplier or emergency service from a safe location; do not return to test the oven.
Expected result: There is no gas odor and the issue is liquid, or a gas odor is present during or outside normal ignition.
Next step: For liquid without gas odor, resume the applicable cool, external checks. For any gas odor or abnormal ignition, leave the appliance out of service until qualified personnel clear it.
Stop if: Stop and leave immediately for gas odor, delayed ignition, abnormal flame, a carbon-monoxide alarm, smoke, fire, or a loud bang.
Why this matters
Why: Gas odor is a combustion or supply safety event, not a water diagnosis. A normal brief ignition sound does not make a persistent odor, delayed ignition, abnormal flame, or explosive-sounding event safe to repeat.
-
Check 8
Do not run another cycle merely to reproduce a leak. Once the oven is cool, dry, and free of hazardous signs, record the model, feature used, cycle stage, liquid location, amount, and whether the liquid returned while idle. Use that record to decide whether one model-approved normal-use check is appropriate or service is required.
Expected result: The moisture does not return after an accessible spill or condensation is wiped, or liquid returns, increases, reaches the cabinet, or appears with an error or abnormal operation.
Next step: Keep the oven out of service for recurring or concealed leaks and provide service with the recorded sequence. Do not open the cabinet, repair gas parts, or work on wiring.
Stop if: Stop for any gas odor, smoke, fire, carbon-monoxide alarm, arcing, repeated electrical trips, abnormal flame, hot water, or water near electrical equipment.
Why this matters
Why: A one-time surface event can be monitored during normal use only when the manual supports it and no hazard exists. Recurrence, concealed water, a fault message, or any unsafe sign means the appliance needs qualified diagnosis.
Use your observations
Decision map
Find the observation that best matches what you see, then follow the next safe action.
-
PATH 01Next step
What you see
Moisture is a temporary film on the door, vent-adjacent floor, or cabinet after moist food, gas baking, or a steam cycle, and it diminishes without forming a puddle.
Do this next
Arrange qualified service and follow the exact model guidance.
Why this path and its safety boundary
Why it matters: Treat it as possible condensation: keep vents clear, allow the oven to cool, and wipe the accessible surface. Escalate if it becomes a stream, puddle, or recurring leak.
-
PATH 02Next step
What you see
The model has a steam reservoir or drain and water remains after use, the container was overfilled, or water is found at its seat.
Do this next
Arrange qualified service and follow the exact model guidance.
Why this path and its safety boundary
Why it matters: Wait for cooling, then empty or drain only by the model's documented procedure and respect the MAX mark. A returning leak, damaged container, or blocked path needs service.
-
PATH 03Next step
What you see
The liquid matches a recent food spill or cleaning step and is limited to an accessible cavity or door surface.
Do this next
Arrange qualified service and follow the exact model guidance.
Why this path and its safety boundary
Why it matters: After cooling, clean with the method allowed by the manual and keep cleaners and additives out of steam systems. Do not use the oven if the liquid returns from a seam or concealed area.
-
PATH 04Next step
What you see
Water returns while the oven is idle, forms a puddle, exits from the cavity bottom, door edge, vent, cabinet, or floor below, or occurs on a model with no water feature.
Do this next
Arrange qualified service and follow the exact model guidance.
Why this path and its safety boundary
Why it matters: Keep the oven out of service and arrange qualified appliance inspection. Do not remove panels or attempt to seal an internal drain, valve, gasket, or connection.
-
PATH 05Next step
What you see
Water reaches the control area, power connection, outlet, wiring space, or the floor beneath a wall oven.
Do this next
Arrange qualified service and follow the exact model guidance.
Why this path and its safety boundary
Why it matters: Do not touch wet electrical equipment. From a dry, safe position isolate power only if it can be done without approaching the hazard, then arrange qualified appliance or electrical service.
-
PATH 06Next step
What you see
The reported leak is a gas odor, or there is delayed ignition, an abnormal flame, a carbon-monoxide alarm, smoke, fire, or a loud explosive sound.
Do this next
Arrange qualified service and follow the exact model guidance.
Why this path and its safety boundary
Why it matters: Stop using the oven, avoid flames and electrical switches, leave the area, and contact the gas supplier, emergency service, or fire department from a safe location. Do not relight or repeat the test.
-
PATH 07Next step
What you see
The leak persists after cooling and permitted external cleaning, the reservoir will not drain or seat, the door seal is damaged, or an error returns.
Do this next
Arrange qualified service and follow the exact model guidance.
Why this path and its safety boundary
Why it matters: Leave the oven out of service and give a qualified technician the exact model, feature, cycle stage, liquid location, and safety observations.
Helpful context
Understand the symptom
First identify what is leaking
A few drops on the door or floor after cooking moist food may be condensed steam, while a growing puddle, liquid that returns when the appliance is off, or water emerging from the cabinet needs a different response. Note the liquid's color and odor without touching an unknown substance, where it first appears, and whether it occurs during baking, Steam Bake, Steam Clean, cooling, or after the oven is idle. If what you notice is a gas odor rather than liquid, use the gas emergency branch immediately.
Steam and water features vary by model
Some Maytag ovens have a water reservoir, drain function, or Steam Clean feature; many ovens do not. Do not add water, remove a reservoir, or run a drain cycle based only on a general article. Match the full model to its Maytag manual. If the manual confirms a steam system, respect the MAX mark and wait for the appliance and water to cool before handling the container.
Clean only after the oven is cool
After a safe shutdown and cooling period, wipe food spills or accessible condensation with a soft cloth as the manual allows. Do not open the door during a Steam Clean cycle, pour cleaner or additives into a steam system, line the cavity with foil, or scrape a hot surface. Keep liquid out of controls, outlets, wiring, and the space beneath a wall oven.
When a leak is a service problem
A persistent puddle, water from the bottom or cabinet, a reservoir that will not seat or drain, a damaged door gasket, or water near electrical connections needs qualified appliance service. Do not remove panels, repair a gas path, or probe wiring. Smoke, an abnormal flame, a loud delayed ignition, a carbon-monoxide alarm, arcing, or a hot or damaged cord requires immediate stopping and the appropriate emergency or qualified-service path.
Safety boundary
Stop conditions
- A gas odor, delayed ignition, abnormal flame, carbon-monoxide alarm, smoke, fire, or loud explosive sound is present.
- Water reaches an outlet, cord, control area, wiring space, or the floor beneath a wall oven.
- The liquid is hot, chemical-smelling, unknown, or cannot be safely wiped after cooling.
- A puddle returns, liquid comes from a seam, cabinet, vent, bottom, door edge, or concealed area, or the reservoir will not seat or drain.
- The door glass, gasket, hinge, vent, container, hose, or visible housing is damaged.
- Any next step would require removing a panel, repairing gas parts, altering a safety device, or working on wiring.
Only after diagnosis
Potential parts
- oven door gasket or seal
Consider this only if the exact model manual and inspection show a damaged or displaced gasket that allows moisture or liquid to escape at the door.
Confirm the full model and the manufacturer's fit information before ordering any part. - steam reservoir or drain component
Relevant only to a model documented with a steam reservoir or drain and only after service confirms that the container, valve, or drain path is the leak source.
Steam hardware varies by model; do not select a component from a general oven description. - water inlet or steam-system component
Consider only after a qualified diagnosis identifies a leaking water connection or steam-system component on a compatible model.
Verify model-specific fitment and service instructions before any replacement.
When checks do not resolve it
Need a professional?
A true puddle or recurring water leak remains after the oven is cool and accessible residue is cleaned., Water appears beneath a wall oven, inside a cabinet, around controls, or near an outlet or cord., A steam reservoir, valve, or drain leaks, will not seat, or cannot be handled using the model manual., A gasket, hinge, door, vent, hose, or visible housing is damaged or the door does not close evenly., There is a gas odor, abnormal ignition, smoke, fire, a carbon-monoxide alarm, arcing, or repeated electrical tripping.
Common questions
FAQ
Is water on the Maytag oven door always a leak?
No. Moist food, gas combustion, and a documented steam feature can leave temporary condensation or residual water. A growing puddle, water from the cabinet or bottom, or moisture that returns while the oven is idle needs service assessment.
Can I run Steam Clean to remove water from a leaking oven?
No. First identify the model and source of the water. Steam Clean itself uses hot water, requires model-specific instructions, and should not be combined with oven cleaner or additives. Do not run it to test a persistent leak.
What should I do if the oven 'leak' smells like gas?
Stop using the oven, avoid flames and electrical switches, leave the area, and call the gas supplier or emergency service from a safe location. Do not relight the oven or return to repeat a test.
Can I wipe a Maytag oven leak while it is hot?
No. Stop the cycle and allow the oven and any steam-system water to cool. Then wipe only accessible surfaces using the model's cleaning guidance, keeping liquid away from controls and electrical connections.
Read the exact guide
Official sources
- Odors or SmellsMaytag · Maytag gas appliances; general gas-odor safety guidance
- Steam Cleaning the OvenMaytag · Maytag ovens with Steam Clean
- Water Dripping or Condensation - Wall OvenMaytag · Maytag wall ovens with applicable steam-oven features
- Whoosh or Poof Noise in Oven - RangeMaytag · Maytag gas ranges and ovens
- Pop or Popping Noise in Oven - RangeMaytag · Maytag ranges and ovens
- Odors and Smoke in OvenMaytag · Maytag ovens and ranges
- Moisture On Door - RangeMaytag · Maytag ranges and ovens
- Cleaning and Maintenance of RangeMaytag · Maytag ranges and ovens
- Using the Steam Clean FunctionMaytag · Maytag ovens with steam functions
- Condensation on Floor or Cabinet - Wall OvenMaytag · Maytag wall ovens
- Clicking Noise in a Gas OvenMaytag · Maytag gas ovens
Community feedback
Share a repair observation
Share a plain-text repair observation. Accepted observations are published automatically; this page may take a moment to update.