
On this page
Start here
Quick answer
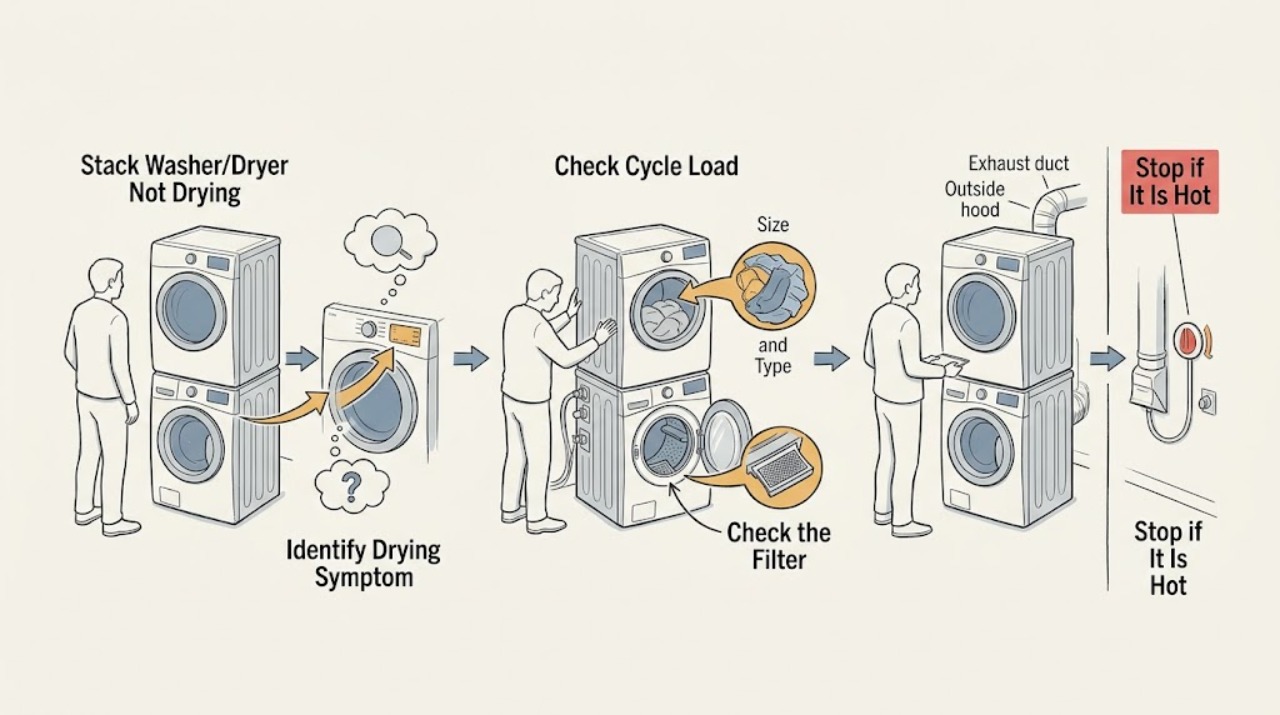
Start by separating a dryer that runs but leaves clothes damp from a dryer that does not start or heat. Check the selected cycle and temperature, load size and fabric mix, the user-accessible lint filter, and the external exhaust duct and weather hood for restriction. On a gas model, the equipment and main gas valve must be in the required position; on an electric model, accessible breakers or fuses and the installation requirements matter. Automatic cycles can advance differently depending on load moisture, while a restricted vent can lengthen drying and create a fire risk. Clean or correct only the external items covered by the exact model manual. Stop for smoke, scorching, a gas odor, a hot cabinet, a repeatedly tripping circuit, or any need to open the stacked dryer, then arrange qualified service.
Work through in order
Diagnostic checks
Use only checks that match the exact appliance or system and its official guide.
-
Check 1
Run no more than one supervised test from a safe position and record whether the dryer starts, tumbles, heats, advances through the cycle, or stops with damp clothes; note the selected cycle, temperature, and any display or indicator state.
Expected result: The dryer does not start, tumbles with no heat, heats but dries slowly, stops before completion, or finishes while the load is still damp.
Next step: Write down the complete model, gas or electric configuration if known, load type, cycle, and exact failure stage, then continue with the matching external check.
Stop if: Stop for smoke, scorching, gas odor, a hot cabinet or cord, sparks, flooding, repeated breaker trips, a damaged door, or any uncontrolled operation.
Why this matters
Why: A no-start or no-heat symptom points first to controls or supply, while slow or uneven drying points first to load, lint, vent, moisture sensing, or heat-transfer conditions. A cycle that stops early needs its control and safety evidence preserved rather than a guessed part.
-
Check 2
With the dryer stopped and cool, confirm the selected cycle and temperature are suitable for the load, then separate heavy or very wet items from lightweight items and avoid packing the cylinder beyond the model's tumbling guidance.
Expected result: The control is in No Heat, Cooling, or an unsuitable setting, the load is very small or tightly packed, or heavy items are mixed with light items and dry unevenly.
Next step: Correct the setting or load only as the exact manual allows, then run one supervised test with a suitable load and record whether heat and dryness improve.
Stop if: Stop for a load that is hot, scorched, contaminated with oil, too bulky to tumble, or any need to reach into a moving cylinder.
Why this matters
Why: A cycle or load mismatch can make a healthy dryer appear ineffective; automatic sensing and timer movement also vary with load moisture. If a suitable load and correct setting still produce no drying, continue to filter and airflow checks.
-
Check 3
After the dryer stops and cools, remove and clean the user-accessible lint filter according to the model instructions, confirm it seats correctly, and inspect the surrounding filter opening without reaching into the blower or heater area.
Expected result: The filter has a visible lint layer or residue, is damaged or missing, does not seat correctly, or is clean and correctly installed.
Next step: Clean or reseat the filter, then make one supervised test with a suitable load; if airflow or drying is still poor, inspect only the external exhaust route.
Stop if: Stop for a torn filter, lint accumulation below the accessible opening, smoke, scorching, abnormal heat, or any need to remove a panel.
Why this matters
Why: A restricted or incorrectly seated filter reduces air movement and can extend drying, while a clean filter does not prove the rest of the exhaust path is clear. Never run the dryer without its required filter.
-
Check 4
With the dryer unplugged or otherwise isolated as the installation instructions require, inspect the accessible exhaust hose from the dryer to the outside hood for a kink, crushed section, disconnected joint, lint restriction, or hood flap that cannot move freely; do not climb or disassemble the stack.
Expected result: The hose is kinked, crushed, loose, or blocked, the outside flap does not open freely, or the accessible route appears open and intact.
Next step: Correct only an obvious accessible routing or connection issue described by the manual, clear lint from the reachable external route using an approved method, and run one supervised test; arrange service if the problem remains.
Stop if: Stop for a damaged duct, lint blowing into the room, an inaccessible or high exterior hood, smoke, scorching, abnormal heat, or any need to enter the wall or cabinet.
Why this matters
Why: Restricted exhaust traps moist air, lengthens drying, and increases heat and fire risk. A clear visible route does not rule out an internal blower, sensor, heater, or hidden duct fault.
-
Check 5
If the dryer tumbles without heat or does not start, check only the accessible breaker or fuse and the model-specific power connection; on a gas configuration, verify from the installation instructions that the equipment and main gas valve are in the required position, without loosening any gas fitting.
Expected result: A breaker or fuse is open, the power connection is uncertain, a gas valve is closed or uncertain, the unit has just been installed or moved, or accessible supply appears normal while heat is absent.
Next step: Restore only an obvious accessible breaker or fuse once if safe; do not repeatedly reset it. For gas, stop at the external valve observation and use qualified service when the position or connection is uncertain.
Stop if: Stop for repeated electrical trips, a hot outlet or cord, gas odor, hissing, damaged gas tubing, exposed wiring, or any need to open the heater or burner area.
Why this matters
Why: A supply problem can remove heat while leaving some controls active. A normal accessible supply does not identify a failed igniter, heating element, thermal device, motor, sensor, or control, and an uncertain gas state is not a user repair target.
-
Check 6
Arrange qualified Speed Queen appliance service when one supervised test still leaves clothes damp, the dryer has no heat, the cycle stops, a code returns, or the accessible load, filter, exhaust, and supply checks are normal; provide the model and exact observations.
Expected result: The symptom is repeatable or intermittent, the dryer overheats, drying differs by cycle, the timer never advances normally, or the unit has an abnormal odor or sound.
Next step: Keep the dryer out of service when the fault is persistent or unsafe and give the technician the cycle, load, heat, airflow, supply, and filter history.
Stop if: Do not continue testing after smoke, gas or burning odor, scorching, overheating, sparks, repeated electrical trips, or a damaged vent or cord.
Why this matters
Why: The remaining causes may include a moisture sensor, heater, thermal device, igniter, gas valve, motor, blower, control, wiring, or hidden exhaust problem, but no-dry behavior alone cannot identify a compatible replacement part.
Use your observations
Decision map
Find the observation that best matches what you see, then follow the next safe action.
-
PATH 01Next step
What you see
The dryer does not start or the display is inactive.
Do this next
Arrange qualified service and follow the exact model guidance.
Why this path and its safety boundary
Why it matters: Check the accessible plug, breaker or fuse, door closure, and Start/Pause command as the exact manual permits. A recurring power or door issue needs service.
-
PATH 02Next step
What you see
The dryer runs but is set to No Heat, Cooling, an unsuitable dryness setting, or a load is too small, too dense, or mixed with very heavy items.
Do this next
Arrange qualified service and follow the exact model guidance.
Why this path and its safety boundary
Why it matters: Correct the cycle or load once and supervise a test. If a suitable load still stays damp, proceed to airflow and supply evidence rather than replacing a sensor.
-
PATH 03Next step
What you see
The lint filter, exhaust hose, or outside hood is restricted, loose, crushed, or blocked.
Do this next
Arrange qualified service and follow the exact model guidance.
Why this path and its safety boundary
Why it matters: Stop the dryer, correct only the accessible filter or vent condition, and run one supervised test. Persistent restriction or lint inside the cabinet needs qualified service or approved duct cleaning.
-
PATH 04Next step
What you see
The dryer tumbles cold, an accessible electrical supply is open, or the gas equipment or main valve is closed or uncertain.
Do this next
Arrange qualified service and follow the exact model guidance.
Why this path and its safety boundary
Why it matters: Address only an obvious accessible electrical reset once and follow model-specific gas-supply instructions without loosening fittings. Repeated trips or uncertain gas conditions require qualified service.
-
PATH 05Next step
What you see
An automatic cycle advances slowly but the load, filter, vent, and heat are normal and the load eventually dries.
Do this next
Arrange qualified service and follow the exact model guidance.
Why this path and its safety boundary
Why it matters: Treat the timer pace as load-dependent, sort items by similar weight and moisture, and use the model's dryness settings. Request service if the dryer no longer completes or the result changes.
-
PATH 06Next step
What you see
The dryer overheats, smells scorched, shows smoke, repeats a fault, or remains damp after safe external checks.
Do this next
Arrange qualified service and follow the exact model guidance.
Why this path and its safety boundary
Why it matters: Stop use and arrange qualified appliance, electrical, gas, or vent service. Do not run more cycles to collect evidence.
Helpful context
Understand the symptom
Damp clothes and no heat are different symptoms
If the dryer tumbles and produces some warmth but the load remains damp, begin with load composition, dryness setting, lint, and airflow. If it tumbles cold, does not start, or stops early, record that separately and check the appropriate supply and cycle state. A stacked cabinet may be gas or electric and has model-specific cycle controls, so do not assume the heat source from appearance.
Airflow is both a performance and safety check
Drying requires air to move through the lint filter, drum, exhaust duct, and outside hood. A filter can look mostly clear while the duct is kinked, crushed, or restricted. Check only the accessible route with the dryer stopped and cool; do not reach into the blower or heater area. If the cabinet is unusually hot, the room smells scorched, or lint is escaping, stop operation and arrange service.
Automatic cycles do not promise a fixed timer pace
Speed Queen explains that automatic-cycle timer movement depends on the size and moisture of the load. Heavy towels mixed with light fabrics, a very small load, or a selected dryness setting can make the cycle appear slow or finish with uneven results. Correct the external load and setting once, then escalate if the symptom persists with a suitable load and clear vent path.
Safety boundary
Stop conditions
- Smoke, scorching, burning odor, abnormal cabinet heat, sparks, or a repeatedly tripping breaker.
- Gas odor, hissing, damaged gas tubing, or uncertainty about the equipment or main gas valve.
- Lint blowing into the room, a crushed or disconnected vent, flooding, or water near electrical parts.
- A damaged cord, door, filter, cabinet, stack support, or outside hood that makes operation unsafe.
- Any need to remove a panel, reach the heater, burner, blower, motor, sensor, or live wiring, or enter a wall duct.
- The dryer remains damp, cold, or stalled after one safe external load, filter, vent, and supply test.
Only after diagnosis
Potential parts
- dryer heating element, igniter, or thermal component
Consider this category only when qualified diagnosis confirms a heat-source or thermal component fault after the selected cycle, load, filter, vent, and accessible supply are correct.
Confirm the complete Speed Queen model, gas or electric configuration, electrical or gas requirements, component revision, and manufacturer fit information; damp clothes alone do not identify the part. - dryer moisture sensor or control assembly
Consider this category only if a technician confirms that the dryer has normal heat and airflow but its sensing or control system ends, extends, or fails to advance the cycle incorrectly.
Match the exact model, cycle-control generation, sensor arrangement, wiring, and manufacturer fit information before any part decision. - dryer blower or internal exhaust component
Consider this category only when qualified testing finds inadequate internal airflow after the lint filter and accessible vent route are clear.
Confirm the complete model, vent arrangement, blower design, motor requirements, and manufacturer fit information; do not use an internal part to mask a restricted or unsafe duct.
When checks do not resolve it
Need a professional?
The dryer does not start or tumbles without heat after the accessible control and supply checks., Clothes remain damp with a suitable load, clean filter, clear accessible vent, and correct cycle., The dryer overheats, stops early, advances abnormally, shows a code, or has a recurring sensor, motor, blower, or heating symptom., The gas configuration or electrical connection is uncertain, or a breaker or fuse opens again., Any smoke, gas, scorching, electrical, lint, flooding, or structural safety condition is present.
Common questions
FAQ
Why does my Speed Queen dryer run but not dry clothes?
Check the cycle and load, clean and seat the lint filter, and inspect the accessible exhaust hose and outside hood. Heavy mixed loads, a restricted vent, or an unsuitable automatic setting can all extend drying. If the path is clear and the dryer is still damp or cold, arrange service.
Can a small load make a Speed Queen automatic dryer take too long?
Yes. Speed Queen notes that small loads may not tumble or dry evenly and that automatic-cycle advancement depends on the type and moisture of the load. Use a suitable load and the documented cycle; persistent poor results need diagnosis.
What should I check if my stacked dryer has no heat?
Confirm that the control is not in Cooling or No Heat, check accessible electrical protection, and on a gas model verify the equipment and main gas valve only as the installation instructions allow. Do not open the heater or burner area; repeated failure needs service.
When should I stop using a Speed Queen dryer that is not drying?
Stop for smoke, scorching, burning or gas odor, abnormal heat, lint escaping into the room, sparks, repeated breaker trips, or a damaged vent or cord. Also stop when testing would require removing panels or accessing the heater, blower, motor, or wiring.
Read the exact guide
Official sources
- Speed Queen | SupportSpeed Queen · Supports the service handoff when safe external dryer checks do not restore drying or when a safety condition is present.
- Speed Queen | Manuals & DownloadsSpeed Queen · Supports using the exact model manual before changing cycle settings, inspecting installation, or performing maintenance.
- What To Do About Your Dryer SqueakingSpeed Queen · Supports not continuing to run a dryer with an unresolved abnormal condition and using model-specific service information for internal work.
- Tricks your washer or dryer might be playing on you (and how to solve them!)Speed Queen · Supports checking the lint trap and vent duct when clothes remain damp and preserving a service boundary for unresolved problems.
- User's GuideSpeed Queen by Alliance Laundry Systems · Supports cycle, load, lint filter, exhaust duct, outside hood, heat-source, supply, and service checks; exact stacked model instructions remain controlling.
- STACK WASHER-DRYER SF7Speed Queen by Alliance Laundry Systems · Supports distinguishing gas and electric stacked configurations and recognizing model-specific dryer moisture-sensing and cycle features.
Community feedback
Share a repair observation
Share a plain-text repair observation. Accepted observations are published automatically; this page may take a moment to update.