
On this page
Start here
Quick answer
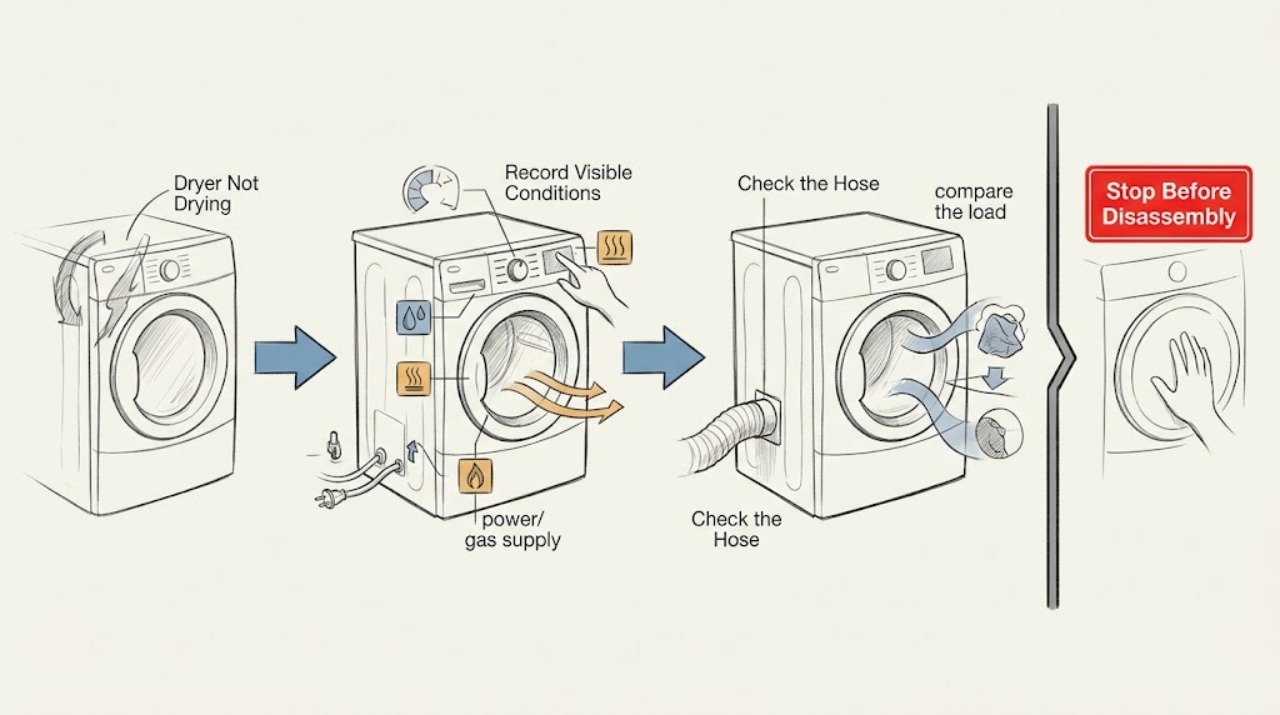
A Whirlpool dryer that is not drying should be separated into clothes that remain damp, a cycle that runs unusually long, and a dryer with little or no heat. Record the complete model, whether it is electric, gas, vented, or a model-specific ventless or condensing design, then check the selected cycle, load size, lint screen, moisture-sensing surfaces, visible vent path, and supply conditions only as the model guide allows. Air Dry or a low-heat choice can be intentional, while warm damp clothes and weak exhaust commonly point to restricted airflow. Stop using the dryer for overheating, scorched clothing, smoke, burning smell, gas odor, sparks, damaged electrical parts, or repeated breaker trips, and arrange qualified service for persistent no-heat, error, or drying faults.
Work through in order
Diagnostic checks
Use only checks that match the exact appliance or system and its official guide.
-
Check 1
Record the complete Whirlpool model number, electric or gas type, vented or model-specific ventless design, cycle and options, load, display or error, and whether clothes are cold, warm and damp, or slowly becoming dry.
Expected result: The dryer has no heat, the cycle extends, clothes remain damp, an AF or Check Vent message appears, a condensate or drain condition is shown, or the result changes with the cycle or load.
Next step: Use the matching branch and the exact model documentation. Preserve the display and do not run repeated cycles solely to reproduce a failure.
Stop if: Stop immediately for overheating, scorched fabric, smoke, burning smell, gas odor, sparks or arcing, a hot or damaged cord or outlet, water near electrical parts, or repeated breaker trips.
Why this matters
Why: The symptom class determines whether to investigate settings and load, lint and airflow, moisture sensing, model-specific condensation, power or gas supply, or a heating fault.
-
Check 2
Compare the selected cycle, heat option, dryness level, and any energy-saving or static-reduction option with the exact Whirlpool guide; confirm that the chosen program is intended to add heat rather than use Air Dry or Fluff.
Expected result: An air-only or low-heat choice is active, an energy-saving option extends the cycle, an automatic cycle ends based on sensing, or a suitable heated cycle still leaves clothes cold or damp.
Next step: Correct only a clearly mismatched setting and make one supervised, hazard-free check. If a suitable heated cycle still lacks heat or the result repeats, leave the dryer off for service.
Stop if: Do not select a hotter cycle to overcome an overheating, odor, smoke, scorching, or protection symptom.
Why this matters
Why: Cycle names change the expected heat and duration. Automatic drying senses load moisture, while timed drying follows its selected duration; neither setting repairs a supply or heating fault.
-
Check 3
With the dryer stopped and cool, compare the load with the model guide: separate heavy or bulky items from light garments, avoid overloading, and note whether a very small or tangled load is failing to contact the moisture-sensing area.
Expected result: The load is packed tightly, mixed with heavy and light pieces, mostly one bulky item, unusually small, or ordinary for the selected cycle but still damp.
Next step: For a cool, hazard-free dryer, reduce or redistribute the load according to the model guide and use the intended cycle once. If ordinary loads remain damp, continue to airflow and service branches.
Stop if: Do not continue a load with scorched items, a burning smell, excessive heat, or material contaminated with flammable substances.
Why this matters
Why: Whirlpool says large loads restrict tumbling and air movement, mixed loads dry unevenly, and automatic cycles depend on moisture sensing. A load explanation does not account for cold operation, smoke, or an electrical trip.
-
Check 4
After the dryer is cool, clean the lint screen as the model guide directs and inspect its mesh and moisture-sensing area for lint or residue; replace it fully before use and do not operate without the screen.
Expected result: The screen is visibly blocked, coated with detergent or softener residue, incorrectly seated, or clean and correctly seated while the dryer remains damp or slow.
Next step: Use only the model-approved screen-cleaning method and dry it completely before replacement. If the screen is clear but the result persists, inspect the visible exhaust path or arrange service.
Stop if: Do not operate with a missing, wet, damaged, or poorly seated screen, and do not reach into a running dryer.
Why this matters
Why: A restricted or residue-coated screen can reduce airflow and interfere with drying performance or sensing. A clean screen shifts attention to the house vent, cycle, heat, or a model-specific fault.
-
Check 5
For a conventional vented model, isolate power safely before inspecting the visible hose, wall connection, and outside hood for crushing, kinks, lint, debris, blocked flaps, excessive turns, or weak exhaust; do not dismantle concealed ductwork.
Expected result: Clothes are warm but damp, laundry-room heat or humidity is high, lint collects around the housing, the AF or Check Vent indication appears, or outside airflow is weak; the path may instead be visibly clear.
Next step: Correct only an obvious accessible kink or lint condition allowed by the installation guide, then use a qualified vent-cleaning professional for concealed or recurring restriction. Do not apply this exhaust check to a ventless design unless its manual says it has that path.
Stop if: Do not operate a vented dryer with a crushed or blocked exhaust, remove panels to reach the blower, or continue if smoke, overheating, or burning smell is present.
Why this matters
Why: Whirlpool identifies restricted exhaust airflow as a leading cause of long dry times and says applicable AF or Check Vent indicators reflect a vent or lint restriction. A clear visible section does not rule out a concealed or exterior blockage.
-
Check 6
Identify whether the dryer is a Whirlpool model-specific ventless or condensing design; if so, compare the load size, drying selection, room ventilation, condensate drain or container state, and expected post-cycle damp feel with its exact manual.
Expected result: The appliance has no exhaust duct, the model reports a drain or condensate condition, the load is too large for the combined cycle, or clothing feels slightly damp but dries after being removed; a conventional vented dryer is instead confirmed.
Next step: Follow only the model's condensate, load, and cycle instructions. If a ventless dryer remains wet, overheats, reports a code, or has a drain problem, leave it off and arrange service.
Stop if: Do not improvise a vent, bypass a condensate safety, expose water to electrical parts, or run the appliance with leaks or abnormal heat.
Why this matters
Why: Whirlpool says ventless condensing systems can take longer and can leave clothing feeling slightly damp until residual moisture evaporates. Those expectations do not explain a vented dryer with weak exhaust, no heat, or a code.
-
Check 7
For no-heat or persistent damp results, record the supply type and display condition and perform only the external, model-approved check of a secure dry connection and applicable gas-supply state; do not open the cabinet or test heating components.
Expected result: A suitable heated cycle has no heat, the electrical supply or gas condition is uncertain, a code appears, or the external supply appears normal but the dryer still does not heat.
Next step: Leave persistent no-heat, code, supply, or protection symptoms for qualified appliance service; use qualified electrical or gas professionals for installation or supply concerns. Provide the model and observations.
Stop if: Do not reset protection repeatedly, relight or adjust gas components, probe live wiring, bypass a thermal safety, or run an empty high-heat test.
Why this matters
Why: Whirlpool distinguishes electric and gas heating paths and notes that a heating element, thermal protection, supply, or other internal condition may need professional diagnosis. A normal external connection does not prove an internal heater or burner is safe.
Use your observations
Decision map
Find the observation that best matches what you see, then follow the next safe action.
-
PATH 01Next step
What you see
The dryer is on Air Dry, Fluff, low heat, an energy-saving option, or an automatic cycle that ends when the load reaches its selected dryness.
Do this next
Compare the setting and load with the exact Whirlpool guide and make one safe corrected-cycle check; persistent cold or damp results need the next branches.
Why this path and its safety boundary
Why it matters: The observed heat or duration may be intentional for that program.
-
PATH 02Next step
What you see
The load is large, heavy, mixed, tangled, or too small for the automatic sensing behavior, and the dryer otherwise operates normally.
Do this next
Reduce or redistribute the load and choose the model-appropriate cycle once; recurring damp results in ordinary loads require service or airflow diagnosis.
Why this path and its safety boundary
Why it matters: Tumbling, airflow, or moisture contact can be limiting drying performance.
-
PATH 03Next step
What you see
The lint screen is blocked or coated, the vented model has a crushed or restricted exhaust, or AF or Check Vent is displayed.
Do this next
Clean only the accessible screen or obvious vent condition with the appliance cool and safely isolated; use professional vent cleaning for concealed restrictions and do not run through smoke or overheating.
Why this path and its safety boundary
Why it matters: Restricted airflow is a likely contributor to warm damp clothing and extended cycles.
-
PATH 04Next step
What you see
A model-specific ventless or condensing Whirlpool design has a long cycle or slightly damp clothing, with no code, leak, or abnormal heat.
Do this next
Follow the exact model's condensate, load, and drying-mode instructions; arrange service if the result worsens, remains wet, overheats, or produces a code.
Why this path and its safety boundary
Why it matters: Longer drying and a temporary damp feel can be normal for that design and load.
-
PATH 05Next step
What you see
A suitable heated cycle remains cold, a code persists, the supply is uncertain, or the dryer repeatedly stops or fails to dry after screen and airflow checks.
Do this next
Keep the dryer out of service and arrange qualified Whirlpool appliance diagnosis with the model, cycle, load, code, and checks already completed.
Why this path and its safety boundary
Why it matters: A supply, heating, thermal, control, sensing, or internal airflow fault may remain.
-
PATH 06Next step
What you see
The dryer overheats, scorches clothing, produces smoke or a burning smell, has a gas odor, sparks or arcs, exposes a hot or damaged electrical connection, or trips protection.
Do this next
Stop using the dryer, avoid touching hot or wet electrical parts and avoid ignition sources during gas danger, leave the area for active smoke, fire, or gas danger, and contact emergency or qualified professional help from a safe location.
Why this path and its safety boundary
Why it matters: There may be an immediate fire, gas, burn, or electrical hazard.
Helpful context
Understand the symptom
Damp, slow, and cold are different symptoms
Warm damp clothing after a full cycle often sends the diagnosis toward airflow, load, lint, moisture sensing, or cycle choice. A cold drum points toward an air-only setting, lost supply, or a heating-system fault. A cycle that is long but eventually dries may reflect a restricted vent, a large or mixed load, an energy-saving option, or the normal behavior of a model-specific ventless system. Start with the symptom and model rather than treating every result as a failed heating element.
Model type changes the checks
Use the complete Whirlpool model number to identify electric or gas heating and whether the appliance is a conventional vented dryer or an all-in-one or heat-pump-style design with model-specific condensation or drain behavior. Do not apply a vented-dryer exhaust test to a ventless model, and do not assume a gas supply check applies to an electric dryer. Keep all inspection cool, dry, external, and within the owner's guide.
Heat and lint require a safety boundary
A clean lint screen and open visible vent do not make a dryer safe if it overheats, scorches clothing, smells burnt, smokes, sparks, trips protection, or has a gas odor. Do not keep restarting to compare temperatures, bypass a thermal or door safety, open the cabinet, or work on a gas or live electrical system. Leave the appliance off and arrange qualified help when the stop condition is reached.
Only after diagnosis
Potential parts
- dryer heating element or gas burner assembly
Consider this only after qualified diagnosis confirms a no-heat fault in the correct electric or gas heating path after cycle, load, airflow, and supply checks.
Electric and gas models differ; confirm the complete model and professional diagnosis before ordering or repair. - dryer thermal protection component
Consider this only when qualified service identifies a failed thermal component rather than a restricted vent, overload, or control setting.
Thermal parts require exact model fitment and safe internal service; do not bypass protection. - dryer moisture sensor or sensor assembly
Consider this only when an automatic cycle has a repeatable sensing error after the screen, load, airflow, and dryness setting are correct.
Confirm the complete model and manufacturer fit information; a long or short cycle alone does not prove sensor failure. - dryer exhaust or condensate-path component
Consider this only if qualified diagnosis finds a damaged vent-side or model-specific condensate component after the accessible path and installation are checked.
Vented and ventless designs use different paths; confirm the complete model and do not improvise an exhaust or drain arrangement.
When checks do not resolve it
Need a professional?
Arrange qualified Whirlpool appliance service when a suitable heated cycle remains cold, damp or long drying persists after model-approved screen, load, cycle, and airflow checks, an error or Check Vent condition returns, a ventless model has abnormal condensate behavior, or the dryer overheats. Provide the complete model, electric or gas and vented or ventless type, cycle, load, code, heat result, vent or drain observations, and any odor or electrical symptoms. Use qualified vent-cleaning, electrical, or gas-appliance help where the installation or supply requires it.
Common questions
FAQ
Why is my Whirlpool dryer warm but leaving clothes damp?
Check the load, cycle, lint screen, and visible exhaust path first. Warm damp clothing commonly fits restricted airflow or a load or sensing issue, while a model-specific ventless design can have different expectations. Persistent damp results need service.
Why does my Whirlpool dryer take so long to dry?
A large or mixed load, blocked lint screen, crushed or restricted vent, energy-saving option, or automatic sensing behavior can extend the cycle. An all-in-one ventless model may also dry more slowly by design. Use the exact model guide and stop for abnormal heat or odor.
How do I know whether my Whirlpool dryer is heating?
Identify the model and choose only a model-approved heated cycle; do not use an empty high-heat test when a safety symptom is present. If a suitable cycle remains cold, or the dryer overheats, shows a code, or trips protection, arrange qualified service.
What does AF or Check Vent mean on a Whirlpool dryer?
On applicable models it indicates restricted airflow through the lint screen or vent system. Clean the accessible screen and inspect the visible hose and exterior hood only when cool and safely isolated; use professional vent cleaning for concealed restrictions.
Can a Whirlpool ventless dryer leave clothes slightly damp?
Whirlpool says its all-in-one ventless condensing designs can take longer and clothing may feel slightly damp until residual moisture evaporates after removal. That expectation does not apply automatically to a conventional vented dryer, and codes, leaks, overheating, or persistent wetness need service.
When should I stop using a Whirlpool dryer?
Stop for overheating, scorched clothing, smoke, burning smell, gas odor, sparks or arcing, a hot or damaged electrical connection, water near electrical parts, or repeated breaker trips. Do not keep restarting or open the cabinet to investigate.
Read the exact guide
Official sources
- Dryer Not Heating: Troubleshooting GuideWhirlpool · Whirlpool electric and gas dryer heat, lint, airflow, and professional heating repair guidance
- All-in-One Washer and Dryer taking a Long Time to DryWhirlpool · Whirlpool all-in-one ventless condensing drying, load, condensate, and damp-feel expectations
- Using Auto Dry, Timed Dry and EcoBoostWhirlpool · Whirlpool automatic, timed, load, and energy-saving dryer cycle behavior
- AF or "Check Vent" - DryerWhirlpool · Whirlpool dryer restricted-airflow indication and vent-path checks
- Dryer is not Drying or Experiencing Long Dry TimesWhirlpool · Whirlpool dryer damp loads, long dry times, cycle, load, lint, airflow, supply, and service checks
- Not DryingWhirlpool · Whirlpool dryer lint screen, AF or Check Vent, airflow, leveling, dryness setting, and service guidance
Community feedback
Share a repair observation
Share a plain-text repair observation. Accepted observations are published automatically; this page may take a moment to update.