
On this page
Start here
Quick answer
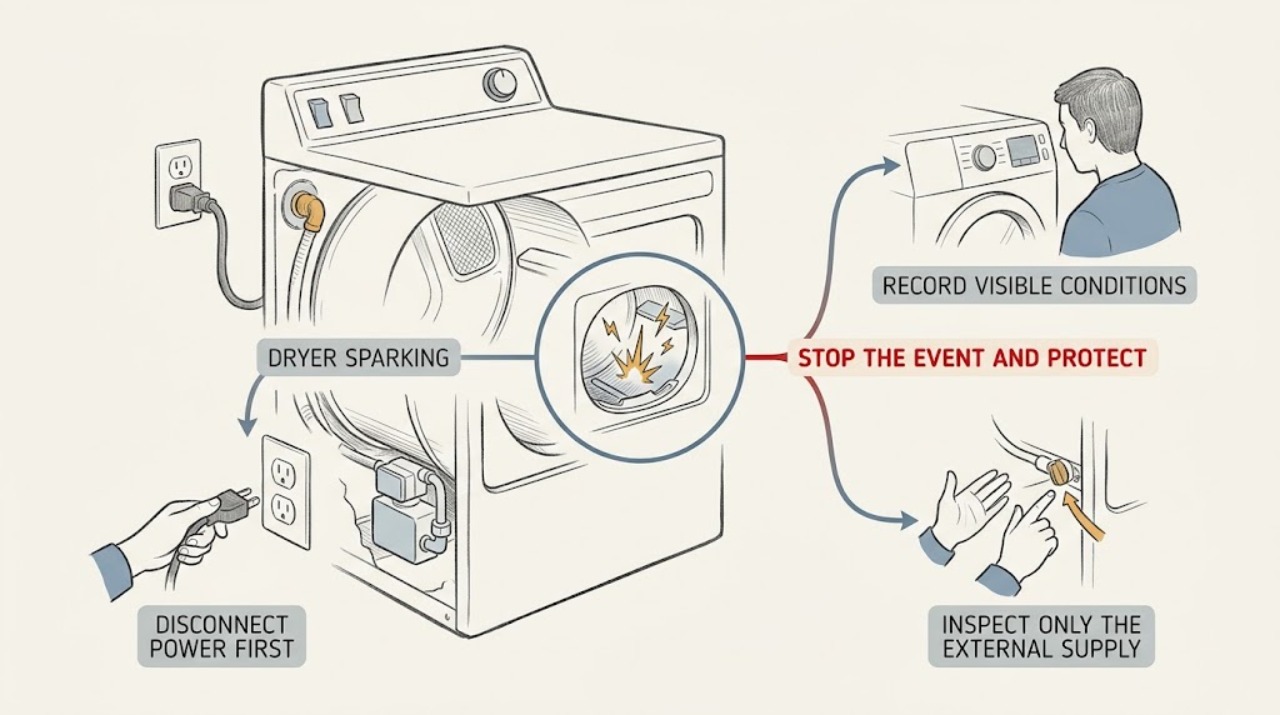
Treat any visible spark or arc from a Whirlpool dryer as abnormal. Stop the cycle immediately, keep clear of the drum and damaged connection, and only if it is dry and safe use the normal stop control or an accessible power disconnect; do not run another cycle to reproduce the event. Once the appliance is isolated, note where the flash occurred, inspect only visible cord, receptacle, drum, lint-screen area, and load conditions, and arrange qualified service. Smoke, a burning smell, gas odor, a hot or damaged plug, scorching, a repeated breaker trip, or a spark that continues after stopping requires an urgent safety response rather than troubleshooting.
Work through in order
Diagnostic checks
Use only checks that match the exact appliance or system and its official guide.
-
Stop the event and protect people first
At the first visible spark or arc, stop the dryer. Keep people away, do not reach into a moving drum, and do not touch a hot, wet, smoking, or damaged cord or receptacle. Only if the area is dry and there is no smoke, flame, gas odor, or active arc, use the normal stop control or an accessible disconnect without opening the appliance.
Expected result: A single flash that ends with the stop command is still an abnormal event. Continued arcing, smoke, flame, a burning smell, gas odor, or a connection that is hot, melted, or discolored indicates a higher-risk condition.
Next step: For smoke, flame, gas odor, or continuing electrical activity, leave the area and use the appropriate emergency or utility guidance from a safe location. Otherwise arrange qualified appliance or electrical service.
Why this matters
Why: The dryer must remain out of service after any visible spark. The immediate priority is isolation and safety, not identifying a replaceable component.
-
Record where and when the flash occurred
Without powering the dryer again, write down whether the flash was at the receptacle or plug, behind the cabinet, at the console, inside the drum, near the lint-screen opening, or near the vent. Record the cycle phase, whether the drum was turning, the load contents, and any sound, odor, mark, or display message.
Expected result: A flash at the supply connection points toward an external power or cord issue; a flash in the drum may involve a metal object or damaged drum area; a flash near the lint path or cabinet needs internal inspection; and a flash during heating or motor operation gives the technician a useful operating condition.
Next step: Give the written sequence and any photographs taken from a safe distance to the qualified technician; do not recreate the event.
Why this matters
Why: Location and timing narrow the service path without requiring a hazardous repeat. A missing location does not make another power-up safe.
-
Inspect only the external supply area
When the appliance is isolated and the area is dry, look at the accessible plug, receptacle face, cord jacket, and nearby wall area without removing covers or touching a damaged connection. For an electric dryer, note the breaker state without repeatedly resetting it; for a gas dryer, note the household supply condition. Do not attempt electrical measurements or work on energized wiring.
Expected result: Blackening, melting, a loose-fitting plug, heat damage, exposed conductor, or a breaker that trips again indicates a supply fault or overload. A normal-looking exterior does not clear an internal arc path.
Next step: Leave the dryer disconnected or switched off as safely possible and arrange inspection of the receptacle, cord, and appliance by a qualified person.
Why this matters
Why: A damaged connection needs qualified electrical or appliance service. A repeated trip is a stop condition, not evidence that the dryer should be tried again.
-
Check the load and drum opening without operating
With the dryer stopped and cool, remove only loose items that are clearly safe to handle from the door opening and check pockets in the stopped load. Look for coins, paper clips, pens, metal fasteners, foil, melted material, or a garment with a scorch mark. Keep the lint screen installed and do not reach past the opening or disassemble the lint chute.
Expected result: Whirlpool notes that loose coins, paper clips, pens, zippers, buckles, buttons, and rivets can create tumbling noises; a metal item, damaged drum surface, or scorched fabric can also help explain a flash seen inside the drum. A clean load does not rule out an internal electrical fault.
Next step: Keep the appliance off and report any metal mark, scorch, melted material, or suspected contact point to the technician.
Why this matters
Why: Removing a clearly loose item may prevent mechanical contact, but it does not make a visibly sparking dryer safe to run. Scorching or melted material requires service and load-safety review.
-
Check the lint and vent condition while cold
With the dryer isolated and cool, inspect the lint screen and the visible exhaust hood for heavy lint, blockage, or a crushed hose. Do not run the dryer to check airflow and do not open the cabinet to remove internal lint after a spark.
Expected result: Whirlpool warns not to operate with a loose, damaged, blocked, or missing lint screen and recommends qualified cleaning of lint inside the cabinet and periodic cleaning of the exhaust vent. Restriction can raise heat and stress a fault already present.
Next step: Arrange vent or appliance service when the path is blocked, the screen is damaged, the cabinet may contain lint, or the dryer has already sparked.
Why this matters
Why: A restricted airflow path may contribute to overheating or fabric damage, but cleaning the user-accessible screen cannot clear an arc or authorize a restart.
-
Check for an abnormal odor or contaminated load
Do not reuse the load until it is cool and inspected. Note whether the event involved a burning electrical odor, hot plastic, scorched textile, chemical smell, or gas odor, and whether clothing had been exposed to cooking oil, fuel, solvent, or another flammable substance before drying.
Expected result: Whirlpool safety guidance identifies oil- or solvent-contaminated items as a fire risk and instructs that gas odor requires immediate action. Burning odor, scorching, or smoke can indicate a fire or electrical hazard even if the dryer stopped.
Next step: Keep the dryer and affected load out of service, leave the area for smoke or gas concerns, and obtain qualified or emergency help as appropriate.
Why this matters
Why: An odor or contaminated load changes this from a troubleshooting question to a safety and service event. Do not use a fan, heat, or another cycle to clear the odor.
-
Preserve the code and model information
From a safe, powered-down state, record the full model number and any code or light pattern that was visible before shutdown. Do not clear a code by repeatedly powering the dryer or run a diagnostic cycle after a spark.
Expected result: A code or light pattern can identify a power, control, airflow, or other condition, but Whirlpool code meanings depend on the model. No code does not exclude an arc or heat-damage fault.
Next step: Include those details, the breaker result, cord condition, load condition, and any odor or mark in the service request.
Why this matters
Why: The model, code, phase, and flash location give service the information needed for the correct diagnostic procedure without exposing the user to a repeat event.
-
Use a qualified final decision, not a repeat test
After a visible spark, do not perform a final user test. Ask a qualified technician to inspect the supply connection, wiring, controls, motor, heater, drum area, lint path, and safety devices as applicable to the model before returning the dryer to service.
Expected result: A technician may find an external connection fault, internal electrical damage, a metal contact path, overheating from restricted airflow, or a component failure. The same symptom can have different causes across electric, gas, and model-specific designs.
Next step: Follow the technician's model-specific repair and safety result; do not bypass a fuse, interlock, thermal device, or grounding path.
Why this matters
Why: A passed visual check cannot certify insulation, grounding, interlocks, or internal clearances after arcing. The dryer remains unsafe to operate until the qualified inspection is complete.
Use your observations
Decision map
Find the observation that best matches what you see, then follow the next safe action.
-
PATH 01Next step
What you see
The spark was visible at the plug, receptacle, cord, or breaker area
Do this next
Keep the dryer off and have the supply connection and appliance inspected by a qualified electrical or appliance professional; do not touch damaged parts or reset a recurring trip.
-
PATH 02Next step
What you see
The spark occurred inside the drum or near the door or lint opening
Do this next
Leave the dryer off, remove only clearly loose safe items while it is cool, and arrange internal inspection; do not reach farther into the chute or repeat the cycle.
-
PATH 03Next step
What you see
A hot, scorched, smoking, melted, or odor-producing load or component is present
Do this next
Stop, keep clear, and use emergency or qualified-service guidance from a safe location. Do not cool the load with another cycle or handle a hot damaged component.
-
PATH 04Next step
What you see
The dryer has gas odor, an unusual flame, or a combustion concern
Do this next
Do not operate the dryer or electrical switches in the area. Leave and follow local gas-emergency guidance from a safe location; do not relight or repeat ignition.
-
PATH 05Next step
What you see
There is heavy lint, a blocked screen, a crushed vent, or an overheating indication
Do this next
Keep the dryer off and arrange qualified appliance or vent service. User-accessible lint cleaning does not clear an electrical-spark fault.
-
PATH 06Next step
What you see
The location and cause of the flash are unknown
Do this next
Treat the event as an unresolved electrical safety fault, preserve the model and event details, and arrange qualified inspection without a repeat test.
Helpful context
Understand the symptom
A spark is not a normal dryer sound
A brief static snap can be hard to distinguish from a visible electrical flash. Do not assume a flash is static when it repeats, appears at the plug or control area, leaves a mark, accompanies a pop or burning odor, or occurs inside the drum. A normal click or vibration from a loose pocket item is a different observation, but it still does not justify running a dryer that has visibly arced.
What this page can safely check
The steps below stop at dry, external observations and model-approved controls. Do not remove panels, probe wiring, defeat an interlock, handle a damaged cord, or open a gas system. The cabinet interior, motor circuit, heater, controls, and any suspected arc path require qualified diagnosis.
Only after diagnosis
Potential parts
- power cord or terminal connection
Consider only after qualified inspection confirms damage or an incorrect connection at the model-specific supply interface.
Confirm the complete dryer model and electrical installation requirements before selecting any component. - drive or drum-area component
Consider only when qualified inspection links a drum-area flash or metal-contact mark to a failed model-specific component.
Do not infer fit from appearance; use the model guide and qualified findings. - control or thermal safety component
Consider only after qualified testing identifies a failed control, sensor, fuse, thermostat, or related safety component.
Never bypass a safety component; confirm model-specific specification before replacement.
When checks do not resolve it
Need a professional?
Call qualified appliance or electrical service after any visible spark, even if the dryer still appears to work. Stop immediately and leave the area for smoke, flame, gas odor, continuing arcing, a burning smell, a scorching or melted load, a hot or damaged cord or receptacle, water near the appliance, or a repeated breaker trip. Do not run another cycle, remove panels, probe wiring, defeat an interlock, open a gas connection, or bypass a safety device.
Common questions
FAQ
Is a spark inside a Whirlpool dryer normal?
No. A visible spark or arc is an abnormal event. Stop the dryer, keep clear, do not repeat the cycle, and arrange qualified inspection even if the dryer still appears to run.
Can a coin or metal item cause a dryer spark?
A loose metal item can contact moving or metal areas and may explain a flash seen in the drum, but removing one item does not certify the dryer safe after visible arcing. Keep it off and have the event assessed.
What should I do if the dryer plug is hot or discolored?
Stop using the dryer and do not touch or repeatedly reset the connection. Keep clear of the damaged area and arrange qualified electrical or appliance service.
What if there is also a gas smell?
Do not operate the dryer or electrical switches in the area, do not try to relight anything, and leave. Follow local gas-emergency guidance from a safe location.
Read the exact guide
Official sources
- No Power - Electric DryerWhirlpool Product Help · Whirlpool electric dryers
- Buzzing Sound - DryerWhirlpool Product Help · Whirlpool dryer loose-item, lint-chute, and vibration guidance
- Not Starting or Not Operating - DryerWhirlpool Product Help · Whirlpool dryers
- Owner's ManualWhirlpool · Whirlpool dryer safety, installation, use, and care
- Error Codes in DryersWhirlpool Product Help · Whirlpool dryer error-code guidance
- Dryer is not Drying or Experiencing Long Dry TimesWhirlpool Product Help · Whirlpool dryer airflow, cycle, load, and service guidance
- Dryer Cleaning and CareWhirlpool Product Help · Whirlpool dryer lint and care guidance
- No Power - Gas DryerWhirlpool Product Help · Whirlpool gas dryers
- Removing Odors or Smells - DryerWhirlpool Product Help · Whirlpool dryer odor guidance
Community feedback
Share a repair observation
Share a plain-text repair observation. Accepted observations are published automatically; this page may take a moment to update.