
On this page
Start here
Quick answer
A leaking Whirlpool freezer can be receiving water from an ice-maker supply connection, releasing meltwater through a blocked defrost drain, losing water at a filter or door seal, or overflowing a drain pan. First protect food, stop the water source if the freezer has one, and keep water away from electrical parts. Dry the area and trace the first wet point: rear supply line, ice-maker or filter area, door and gasket, interior frost, or the lower drain-pan area. Check only visible fittings, the door seal, airflow, and an accessible drain hose or filter as the exact model manual allows. Do not chip ice, open sealed panels, move a built-in unit while connected, or keep operating when water reaches wiring, food is unsafe, or the leak recurs. Arrange Whirlpool or qualified refrigeration service when the source is concealed, the drain remains blocked, or the freezer cannot hold a safe temperature.
Before you begin
Safety first
- This article supports food protection, water isolation, dry-position observation, normal filter or gasket checks, and only model-approved accessible drainage checks. Do not open panels, chip ice, move a connected built-in freezer, handle refrigerant, work on pressurized tubing, or touch wet electrical equipment.
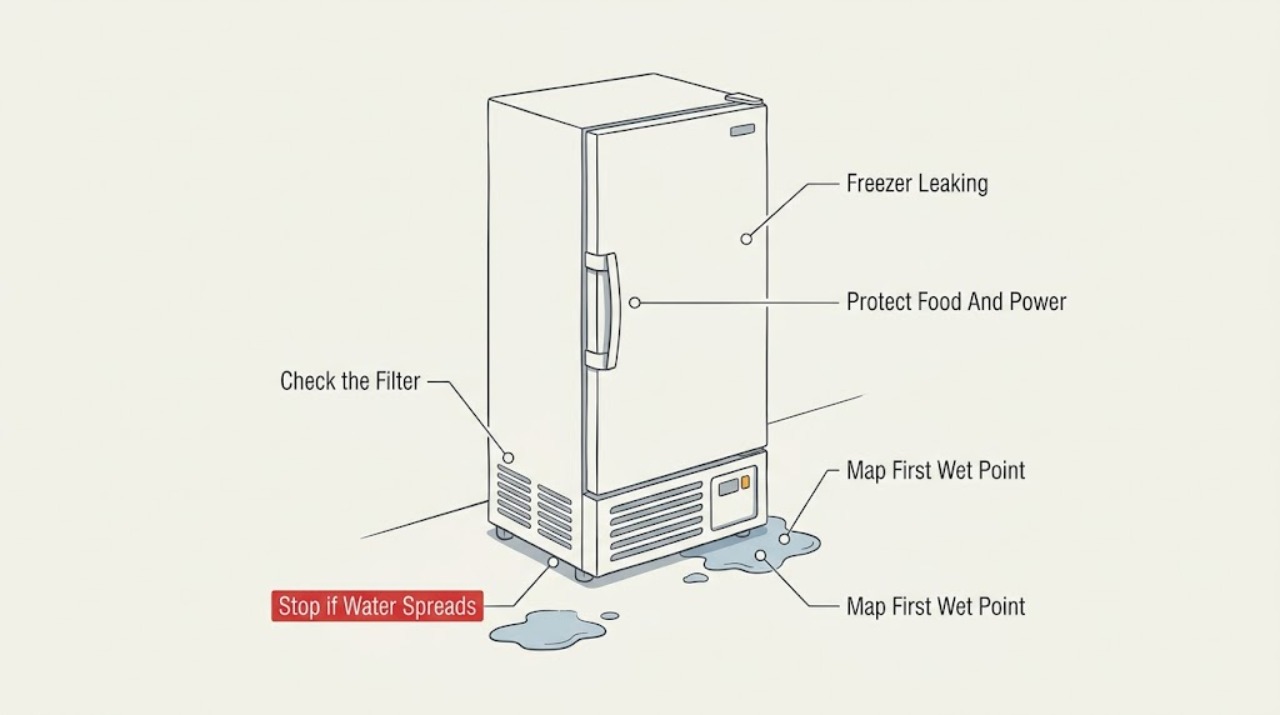
Work through in order
Diagnostic checks
Use only checks that match the exact appliance or system and its official guide.
-
Check 1
Keep the freezer door closed, place towels or a shallow container only where they cannot contact wiring, and from a dry safe position identify whether water is near the plug, outlet, controls, or a damaged cord; if it is, stop and isolate the appliance only if that can be done without touching water or damaged equipment.
Expected result: Water is confined to a dry floor area, or it is near electrical equipment, the cord is damaged, protection has tripped, or the freezer temperature is rising.
Next step: Use the food-safety guidance for thawing or warming food and arrange qualified electrical or Whirlpool service when water, heat, smoke, a damaged cord, or repeated protection trips are present.
Stop if: Do not touch wet electrical equipment, stand in water, move a built-in freezer while connected, or repeatedly reset a breaker.
Why this matters
Why: A dry, limited puddle permits low-risk source mapping. Water near electrical parts or an appliance that cannot maintain temperature makes electrical and food safety more urgent than leak diagnosis.
-
Check 2
With the freezer dry enough to observe, photograph and mark the first place moisture returns: rear water line or valve, filter or hinge area, ice maker, door gasket and threshold, interior wall or floor, or the lower area under the freezer; record whether it follows ice making, door opening, frost, or a defrost period.
Expected result: The leak begins at a water connection, at the ice maker or filter, around the door, inside after frost, or below the cabinet with no visible source.
Next step: Follow the matching branch and keep the photos; do not use a surface bead of sealant to cover a concealed drain, liner, or cabinet leak.
Stop if: Stop for a cracked liner, exposed tubing, water inside the wall or cabinet, mold, soft flooring, or any need to dismantle the freezer.
Why this matters
Why: A rear or filter location supports a supply connection or filter branch. Interior frost and under-cabinet water support defrost drainage or pan. A perimeter door pattern supports gasket or condensation, while an unseen source needs service rather than sealant.
-
Check 3
If the freezer or refrigerator-freezer has an ice maker or water connection, close the household water shutoff from a dry safe position, then visually inspect the rear tubing, fittings, valve area, filter housing, and accessible connections for a crack, loose connection, displaced filter, or drip; do not pull on tubing or open a pressurized fitting.
Expected result: A tube is cracked, a fitting or valve is wet, a filter is not seated or is damaged, or all visible supply connections are dry while the freezer still leaks.
Next step: Keep the water supply off, document the fitting or filter, and follow the exact model instructions or arrange qualified appliance or plumbing service; do not operate an ice maker with a cracked line.
Stop if: Do not tighten a damaged fitting, cut tubing, remove a filter under pressure, or use the ice maker while water is escaping into the cabinet or floor.
Why this matters
Why: Whirlpool associates rear leaks with damaged supply tubing or fittings and associates an incorrectly installed filter or loose connection with ice-maker or dispenser leakage. A dry visible supply path keeps an internal ice-maker, defrost, or drainage cause possible.
-
Check 4
When the supply is safely isolated, inspect the visible ice maker, filter area, ice chute or tray, hinge area, and nearby floor for an overfill pattern, a displaced filter, a cracked tray, frost, or water tracking from a connection; use only the normal user-access procedure in the model manual.
Expected result: Water appears only during or after ice production, the filter area is wet, ice is frozen around the maker, the tray or housing is damaged, or the ice-maker area is dry.
Next step: Leave the water supply off and arrange Whirlpool service for a damaged tray, fill component, internal valve, or persistent overflow; do not force frozen parts or remove panels.
Stop if: Do not chip ice with a sharp tool, operate with a cracked water path, bypass an ice-maker control, or place hands near moving or energized mechanisms.
Why this matters
Why: An ice-production or filter-area pattern points to a water connection, filter seating, fill or ice-maker component, or frost-related overflow. A dry ice-maker area shifts attention to the defrost drain, door seal, or drain pan.
-
Check 5
Inspect the entire visible door gasket and closure path for a fold, tear, dirt, ice, package obstruction, or uneven contact; note whether frost is concentrated at the door or freezer wall, and compare the gasket contact around the full perimeter without forcing the door.
Expected result: The door does not seal flat, frost is concentrated along the opening, the gasket is damaged, or the door and gasket look sound while water appears after defrosting.
Next step: Remove only an accessible package obstruction and follow the manual for cleaning or gasket care; arrange service for a torn gasket, misalignment, thick frost, or recurring water.
Stop if: Do not pry ice, pull the gasket from its channel, use a knife or heater, or keep operating with a visible door gap or water reaching electrical parts.
Why this matters
Why: Whirlpool identifies a gasket that does not keep warm air out as a contributor to frost and cooling problems; frost can then obstruct airflow and produce meltwater. A sound seal with a post-defrost leak keeps the drain or pan in scope.
-
Check 6
If the water follows frost or a defrost period, inspect only the drain opening, accessible drain hose, and drain-pan area named by the exact owner manual; look for a blocked outlet, kink, pan displacement, or ice, and do not remove interior panels or pour water into an unknown passage.
Expected result: The visible drain path is blocked or kinked, the pan is displaced or cracked, ice covers the opening, or the accessible path is clear but water still returns.
Next step: Clear only loose visible debris or correct an accessible hose position if the manual explicitly allows it; otherwise leave the freezer off and arrange refrigeration service.
Stop if: Do not chip ice, use a sharp tool, inject chemicals, remove panels, disconnect a drain line under the cabinet, or run with a cracked or overflowing pan.
Why this matters
Why: Whirlpool says a blocked drain line can cause a freezer leak and that drain access varies by model. A kinked or incorrectly aligned drain hose can also cause leaking or backup in applicable ice-maker systems. A clear visible path does not rule out an internal blockage or drain component fault.
-
Check 7
After one approved correction—water supply isolated, accessible filter or hose correctly seated, door obstruction removed, or manual-approved drainage care—dry the area and monitor one normal operating period while recording temperature, frost, and the first return of water.
Expected result: The leak stops and the freezer holds its normal temperature, water returns at the same point, frost rapidly returns, or the temperature remains unsafe.
Next step: Keep the water supply off when applicable and arrange Whirlpool or qualified refrigeration service with the photos, model, temperature history, and timing; use food-safety guidance for affected food.
Stop if: Stop immediately for smoke, burning odor, sparking, water near electrical parts, a damaged liner or cord, or a leak that increases while running.
Why this matters
Why: A stopped leak after a documented accessible correction supports that specific cause. Recurrence, rapid frost, or poor cooling indicates a continuing water, defrost, door-seal, airflow, or refrigeration fault.
Use your observations
Decision map
Find the observation that best matches what you see, then follow the next safe action.
-
PATH 01Safety boundary
What you see
Water starts at the rear supply tube, valve, filter connection, or household water fitting.
Do this next
Close the household water shutoff, keep the ice maker or water dispenser unused, and arrange qualified appliance or plumbing service with a photo of the fitting.
Why this path and its safety boundary
Why it matters: A cracked line, loose fitting, leaking shutoff valve, or incorrectly seated filter is more likely than a defrost drain problem.
Safety stop: Do not tighten or cut a damaged pressurized line, pull the appliance out while connected, or operate with water near electrical equipment.
-
PATH 02Safety boundary
What you see
Water is localized at the ice maker, filter area, hinge area, or appears during or after ice production.
Do this next
Keep the water supply off and follow only the normal model instructions for filter seating; arrange Whirlpool service for a damaged tray, valve, fill tube, or persistent overflow.
Why this path and its safety boundary
Why it matters: The applicable water filter, fill path, ice-maker tray, or connection may be leaking or overflowing.
Safety stop: Do not chip ice, bypass the ice maker, or keep making ice while water escapes.
-
PATH 03Safety boundary
What you see
Water appears inside or underneath after frost or defrosting, while the supply and ice-maker areas remain dry.
Do this next
Use the owner manual to identify any accessible drain check, otherwise arrange qualified refrigeration service to access and clear the drain safely.
Why this path and its safety boundary
Why it matters: A blocked defrost drain, drain hose, or displaced or damaged pan is more likely; a drain path cannot be assumed from the puddle location alone.
Safety stop: Do not remove interior panels, stab ice, use a heat gun, pour chemicals, or run with an overflowing or cracked pan.
-
PATH 04Safety boundary
What you see
The gasket has a gap or frost is concentrated around the door, and water follows melting ice.
Do this next
Remove an accessible obstruction, clean only as the manual allows, and arrange service for a torn gasket, misalignment, thick frost, or repeated leakage.
Why this path and its safety boundary
Why it matters: Warm air entering through the seal can promote frost and meltwater; the gasket or door alignment may need correction.
Safety stop: Do not force the door, pry ice, heat the gasket, or continue with a visible gap or water near electricity.
-
PATH 05Safety boundary
What you see
The visible supply, filter, ice-maker, gasket, and accessible drainage checks are normal, but the leak returns or the freezer temperature rises.
Do this next
Leave the water supply off when applicable, keep the door closed, and arrange Whirlpool or qualified refrigeration service with the model, photos, and food-temperature history.
Why this path and its safety boundary
Why it matters: An internal drain, pan, defrost, cooling, liner, or sealed-system fault remains possible and cannot be safely localized from outside.
Safety stop: Do not move a built-in unit, open panels, handle refrigerant, or keep running test cycles when water, overheating, or unsafe food conditions are present.
-
PATH 06Safety boundary
What you see
Water reaches an outlet or controls, protection trips, smoke or burning odor appears, or frozen food has warmed substantially.
Do this next
Keep clear, isolate power only from a dry safe position if possible, keep the freezer closed, and arrange qualified electrical or appliance service while applying current food-safety guidance.
Why this path and its safety boundary
Why it matters: Electrical and food safety take priority over finding the leak source.
Safety stop: Do not touch wet electrical parts, repeatedly reset protection, taste questionable food, or restart the freezer after a fire or electrical warning.
Helpful context
Understand the symptom
The first wet point is more useful than the size of the puddle
Water can travel along a cabinet floor, so the puddle may not be under the failed part. Note whether it appears at the rear supply line, filter or hinge area, ice maker, door gasket, interior floor, or underneath the appliance, and whether it follows ice production, defrosting, door opening, or rain-like room condensation. A standalone freezer without an ice maker or water connection cannot have an ice-maker supply leak; its likely paths are defrost drainage, frost, a door seal, or a drain pan.
Water supply and defrost water need different checks
A steady drip from a rear tube or filter connection requires the household water supply to be isolated before inspection. Water that appears after frost or defrosting, or collects under the freezer, can indicate a blocked drain or pan rather than a supply failure. Whirlpool recommends model-specific instructions or professional help to access and clear a freezer drain; do not assume that pouring water into an unknown opening or removing an interior panel is safe.
Protect food and electrical safety while tracing the leak
Keep the freezer door closed as much as possible and move food only if it can be done without contacting water or damaged wiring. If water is near the plug, outlet, controls, or floor-level electrical equipment, do not touch the wet area or repeatedly reset protection. Leave the freezer de-energized from a dry safe position when possible and arrange qualified service. A recurring leak, rapid frost, or rising internal temperature is not a reason to keep running test cycles.
Safety boundary
Stop conditions
- Stop and isolate the water supply for an ice maker or water connection when a tube, filter housing, valve, fitting, or tray is leaking; arrange qualified service for damaged or pressurized parts.
- Do not touch wet electrical parts, use a wet outlet, repeatedly reset a breaker, or operate with water near wiring, controls, smoke, burning odor, sparking, a hot plug, or a damaged cord.
- Do not remove interior panels, chip or stab ice, use a heat gun or sharp tool, inject chemicals, handle refrigerant, or access a concealed drain or pan without model-approved instructions and qualified skills.
- Do not seal over a drain opening, block a drain path, or move a built-in freezer while it is connected to power or water.
- Keep the door closed and use current food-safety guidance if food has warmed; do not taste questionable food to decide whether it is safe.
- Arrange prompt qualified help for mold, soft flooring or cabinetry, a cracked liner, a recurring or increasing leak, rapid frost, or a freezer that cannot hold a safe temperature.
Only after diagnosis
Potential parts
- Whirlpool freezer or refrigerator-freezer door gasket
Consider this category only when inspection confirms a torn, distorted, or non-sealing gasket and the door or cabinet alignment is sound.
Confirm the exact Whirlpool model and gasket profile before ordering; a gasket cannot repair a concealed drain or cabinet problem. - Whirlpool water filter or filter housing component
Consider this category only when a qualified or model-approved check confirms leakage at the filter or housing and correct seating does not resolve it.
Confirm the exact model, filter type, housing design, and water connection before replacement; isolate the supply first. - Whirlpool defrost drain or drain-pan component
Consider this category only when service confirms a blocked, cracked, displaced, or failed drain or pan after the visible checks.
Verify the exact model and drainage design; do not select a pan or drain part by puddle location alone.
When checks do not resolve it
Need a professional?
Arrange Whirlpool or qualified refrigeration service when the leak is not visible after safe external checks, a defrost drain or pan may be blocked, the ice maker or filter path continues to leak after the water is isolated, frost rapidly returns, the door or gasket is damaged, the freezer temperature rises, or the leak recurs. Use qualified plumbing help for a household supply or drain problem outside the appliance and qualified electrical help for water near electrical equipment, smoke, sparking, heat, damaged cords, or repeated protection trips.
Safety scope: This article supports food protection, water isolation, dry-position observation, normal filter or gasket checks, and only model-approved accessible drainage checks. Do not open panels, chip ice, move a connected built-in freezer, handle refrigerant, work on pressurized tubing, or touch wet electrical equipment.
Have this ready
- Provide the exact Whirlpool model, freezer type and whether it has an ice maker or water connection, photos of the first wet point and puddle path, when water appears, water-shutoff status, gasket and frost observations, drain or pan observations, internal temperature and food history, and any electrical or odor warning.
Common questions
FAQ
Why is my Whirlpool freezer leaking from the bottom?
Trace the first wet point rather than the puddle. Water under the unit after frost or defrosting can indicate a blocked drain or pan; water from the rear or ice-maker area points to a supply connection; a door-gap pattern points to the gasket and frost. Leave concealed drain work to qualified service.
Can a Whirlpool freezer leak if the ice maker is not being used?
A freezer with no water connection cannot have an ice-maker supply leak, but a connected ice maker can leak even when ice production is not obvious. Check whether water is present at the rear line, filter, or ice-maker area, isolate the household supply, and arrange service for a persistent leak.
Can I pour hot water into the freezer drain?
Do not pour water into an unknown opening or use heat, sharp tools, or chemicals to clear ice. Whirlpool says drain access varies by model and directs users to the owner manual or a professional for drain-line access and clearing.
Should I keep using a Whirlpool freezer that is leaking?
Only a small, fully contained leak with no electrical or food-safety warning should be observed while you follow the model-approved checks. Stop for water near wiring or controls, a rising temperature, a recurring or increasing leak, smoke, heat, a damaged cord, or a cracked liner, and arrange qualified help.
Does a bad freezer door seal cause water?
It can contribute indirectly: a poor seal admits warm air, which can create frost and later meltwater. Inspect the visible gasket and closure path without forcing the door; a torn gasket, thick frost, or recurring water needs model-specific service.
Read the exact guide
Official sources
- Leaking from Behind - Upright FreezerWhirlpool Product Help · Whirlpool upright freezers with a household water connection; not every freezer has an ice maker or supply line.
- Leaking from the Ice Maker - Bottom Freezer RefrigeratorWhirlpool Product Help · Whirlpool bottom-freezer refrigerator models with the described ice-maker and filter arrangement; model instructions control access.
- Installing the Drain HoseWhirlpool Product Help · Whirlpool ice-maker drain installations; exact freezer drainage is model-specific.
- Leaking from Behind - Freestanding Ice MakerWhirlpool Product Help · Whirlpool freestanding ice-maker water and drain installation; use the freezer or appliance model manual for a refrigerator-freezer.
- 7 Freezer Problems & How to Help Fix ThemWhirlpool · Whirlpool standalone and refrigerator-freezer products; exact access and controls vary by model.
- Not Draining - Ice MakerWhirlpool Product Help · Whirlpool ice-maker drain systems; do not apply the listed dimensions or pump arrangement to a different model without its manual.
Community feedback
Share a repair observation
Share a plain-text repair observation. Accepted observations are published automatically; this page may take a moment to update.