
On this page
Start here
Quick answer
Stop the cycle and find the first wet point before moving or opening the Whirlpool washer. Check the supply-hose connections, drain hose and household drain, dispenser, front-load door seal, and the load, suds, and level. A pump filter or trap is model-specific and should be accessed only as the exact manual allows after safe isolation. Shut off water when it is safe to do so and stop the home check for hot or uncontrolled water, water near electricity, smoke, burning odor, sparks, damaged parts, or a repeated protection trip.
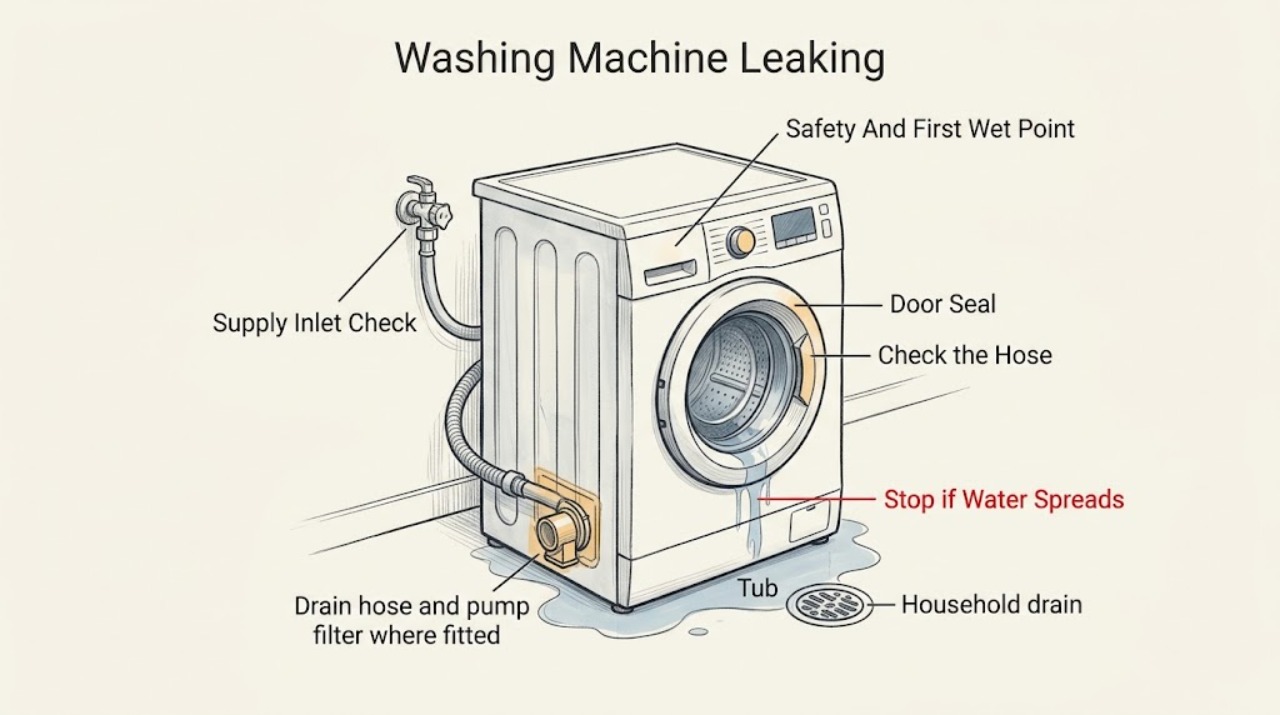
Work through in order
Diagnostic checks
Use only checks that match the exact appliance or system and its official guide.
-
Check 1
Stop the cycle and look from a dry, safe position at the floor, plug or receptacle, cord, controls, hoses, and washer base; record the cycle stage and trace only visible water back toward its first wet point without moving the appliance.
Expected result: Record whether the water is hot, whether a floor or electrical connection is wet, whether water is still flowing, and whether there is smoke, burning odor, sparking, unusual heat, damaged insulation, severe movement, or a tripped breaker or protection device.
Next step: If any hazard is present, close the water supply only if safely reachable, isolate power only from a dry safe position, keep clear, and arrange qualified appliance or electrical service. If the area is dry and safe, continue with the washer unplugged or stopped without opening it.
Stop if: Do not touch wet electrical parts, restore power, move the washer, or run another cycle when a safety symptom or uncontrolled leak is present.
Why this matters
Why: Hot or uncontrolled water, water near electricity, smoke, odor, sparks, heat, damage, or a protection trip is a safety fault rather than a routine leak check. A puddle location alone is not proof of the failed part.
-
Check 2
With the washer stopped and water safely isolated, inspect the visible hot and cold supply-hose ends, hose washers, valve connections, and the wall taps; do not disconnect a pressurized or wet hose.
Expected result: Water or a fresh mineral track at one threaded connection points to a loose connection, missing or damaged washer, cracked hose, or valve-side leak. A dry inlet path shifts attention to the dispenser, tub, or drain path and does not prove an internal valve is sound.
Next step: If a connection is visibly loose and dry access is safe, follow the exact Whirlpool model guidance for reseating or tightening it without tools that can damage the fitting; otherwise leave the water off and arrange service. Continue to the drain path only when the supply path is dry.
Stop if: Stop for a split hose, water that will not stop, corrosion at the valve, water near electricity, or any need to pull out, tilt, or open the washer.
Why this matters
Why: A supply leak normally begins at the water entry path and may run downward to look like a base leak. Hose damage or a valve/body leak is not safely repaired by tightening indefinitely or by opening the cabinet.
-
Check 3
Inspect the visible drain hose where it leaves the washer and enters the standpipe, sink, or drain, then inspect the household drain opening for a backup or overflow path; do not remove a hose full of water unless the manual and safe conditions allow it.
Expected result: A loose, kinked, cracked, or displaced hose, or water rising from the household standpipe during drain, identifies the external drain route. A dry hose and clear household drain move the diagnosis toward the washer's pump, filter, internal hose, or tub.
Next step: Secure only an externally accessible connection that the exact model instructions permit and have a plumber assess a household backup. If the external route is intact, do not infer a failed pump without the model-specific procedure; proceed to configuration-appropriate checks or service.
Stop if: Stop for sewage or contaminated water, a pressurized or uncontrolled discharge, a damaged hose, a wet electrical area, or any need to dismantle the drain system.
Why this matters
Why: A household drain backup can make a sound washer appear to leak. A hose that is too loose or damaged can release water during pumping even when the washer fills normally.
-
Check 4
If this is a front-load Whirlpool washer, with the door cool and the machine stopped, inspect the visible door seal folds and drainage openings for clothing, debris, tears, or a displaced seal; do not pry the door or remove the seal.
Expected result: Water at the front during fill or tumbling with debris in the seal, blocked drainage openings, a torn seal, or clothing caught across the gasket supports a door-seal or loading path. A clean, intact seal shifts attention to the dispenser, level, suds, or another first wet point.
Next step: Remove only loose visible debris from a dry, intact seal as the model guidance allows; keep the washer out of use for a tear, deformation, repeated front leak, or water behind the seal, and arrange service.
Stop if: Do not force a locked or hot door, reach into standing water, use sharp tools, or disassemble the door or gasket.
Why this matters
Why: A front-load door seal must close around the opening while still allowing designed drainage. A tear or displaced gasket is a service repair, not a reason to apply tape or run a test cycle.
-
Check 5
Inspect the detergent or bulk-dispenser area and its drawer or lid for overflow marks, residue, a drawer that was not fully closed, or a blockage visible without tools; identify whether the leak starts there during filling.
Expected result: Water or suds emerging from the dispenser, detergent residue, or a drawer not fully closed supports a dispenser-flow or detergent path. A dry dispenser with a leak first appearing at the back, door, or drain stage points elsewhere.
Next step: Use only the detergent type and amount specified for the exact Whirlpool model, close the drawer fully, and clean only accessible parts as the manual directs. Keep the washer out of use for a cracked dispenser, recurring overflow, or an internal leak.
Stop if: Do not insert objects, pour chemicals into the dispenser, open panels, or keep running cycles to flush a suspected blockage.
Why this matters
Why: A dispenser can overflow or send water along the cabinet when the drawer, product, or model-specific bulk system is not operating as intended. Whirlpool's front-load guidance specifically ties this path to proper drawer closure and excessive suds.
-
Check 6
Review the detergent label and recent load history: note whether non-HE or excess detergent was used, whether foam reached the drawer or door, and whether the leak followed a bulky, water-resistant, or unusually absorbent load.
Expected result: Persistent foam or suds escaping at the front, together with an incorrect or excessive detergent dose, supports an oversudsing path. A leak limited to a large, water-resistant, or uneven load supports splash, balance, or level effects rather than a confirmed broken part.
Next step: Stop adding detergent and follow the exact model's correction or cleaning guidance; on a future safe cycle use the specified HE product and load. Escalate a recurring leak with a normal load and correct detergent.
Stop if: Stop if suds accompany uncontrolled water, a wet electrical area, severe movement, hot water, or any burning or electrical symptom.
Why this matters
Why: Excess suds can increase or redirect water and make a washer leak; load shape and water retention can also cause splash or instability. These observations do not prove that the pump, seal, or tub is defective.
-
Check 7
Without moving the washer, observe whether it rocks, contacts a wall or cabinet, or leaked only with an oversized, uneven, or water-resistant load; check the visible level condition and feet only if the exact installation instructions permit a dry external check.
Expected result: A rocking cabinet, severe vibration, or a front/top splash during a bulky or uneven load supports leveling or load distribution. A leak at the same first point with a normal load and stable cabinet requires another path or service.
Next step: Stop and redistribute or reduce the load only when the floor and appliance are dry and safe; use the model installation instructions for any external leveling adjustment. Arrange service if the cabinet remains unstable, the floor is damaged, or leakage repeats.
Stop if: Do not tilt, lift, drag, or pull the washer out, and stop for severe walking, impact, structural damage, or water near electricity.
Why this matters
Why: Whirlpool identifies level and load behavior as possible contributors to splash and leakage. Leveling symptoms do not authorize tilting the machine or accessing internal parts.
-
Check 8
Determine from the exact Whirlpool manual whether this configuration has a user-accessible drain-pump filter or trap; only after safe isolation and cooling, inspect it exactly as the manual describes, without opening a panel or guessing the location.
Expected result: A model-approved filter or trap that is visibly blocked, not seated, or leaking can explain water beneath a front-load washer, while no applicable filter or a clean, correctly seated filter does not rule out an internal pump, hose, tub, or seal fault.
Next step: Follow the manual for controlled drainage and reseating only if the procedure is explicitly user-accessible; otherwise leave the washer isolated and provide the model number and first wet point to service.
Stop if: Do not open an unlisted access cover, reach into standing water, remove a pump, disconnect internal hoses, or restore power to test an exposed part.
Why this matters
Why: Pump-filter access is not universal across Whirlpool washers, and residual water may be present. A model-specific filter result is evidence for the drain path only; it is not permission to dismantle the pump or test live wiring.
-
Check 9
Use the exact Whirlpool model number to retrieve the matching manual, then compare the first wet point and cycle stage with its leak, installation, drain, dispenser, and safety guidance; do not substitute another model's procedure.
Expected result: A model-specific instruction that matches the observed path can identify a permitted external correction. If the manual does not cover the symptom, the first wet point is underneath the cabinet, or the leak recurs after the permitted check, the cause remains unresolved.
Next step: Keep water and power isolated as appropriate and arrange appliance service; have a plumber assess a household drain or an electrician assess a supply or protection fault when those paths are implicated.
Stop if: Stop all home troubleshooting for water on the floor, internal or uncontrolled leakage, damaged tub or hose, smoke, odor, sparks, heat, code with a safety symptom, or repeated protection trips.
Why this matters
Why: Whirlpool manuals are model-dependent, especially for drain filters, dispensers, doors, and access. Repeated leakage after safe external checks is evidence for a component or installation assessment, not for repeated trial cycles.
-
Check 10
Prepare a service handoff containing the model number, top-load or front-load configuration, cycle stage, water temperature, first wet point, inlet and drain observations, door or dispenser result, load and suds result, level behavior, and any safety symptom.
Expected result: A complete pattern distinguishes a supply leak, dispenser or door leak, drain or household backup, load/suds/level event, and an unresolved underneath or internal leak. Missing model or stage information leaves filter, valve, seal, and access claims conditional.
Next step: Leave the washer out of use until the relevant qualified professional assesses it, especially when any water reached electrical parts or the floor. Do not order a part from the symptom alone.
Stop if: Do not perform live voltage checks, bypass a lid or door lock, tilt the appliance, remove panels, or continue cycles after a safety or uncontrolled-leak symptom.
Why this matters
Why: The remaining internal possibilities may include a valve, tub, pump, internal hose, seal, sensor, or wiring fault; confirming them can require guarded appliance, plumbing, or electrical work.
Use your observations
Decision map
Find the observation that best matches what you see, then follow the next safe action.
-
PATH 01Safety boundary
What you see
Water is near the plug, receptacle, cord, controls, wet floor, or another electrical connection, or smoke, burning odor, sparks, unusual heat, damaged insulation, severe movement, or a protection trip occurred.
Do this next
Close the water supply only if safely accessible; isolate power only from a dry safe position, keep clear, and arrange qualified appliance or electrical service.
Why this path and its safety boundary
Why it matters: This is a water, shock, fire, or uncontrolled-appliance risk, not a routine leak diagnosis.
Safety stop: Do not touch wet electrical parts, move the washer, restore power, or run another cycle.
-
PATH 02Safety boundary
What you see
Water is hot, continues flowing, is spreading beyond safe control, or the supply cannot be stopped safely.
Do this next
Keep people away, close the supply from a dry safe position if possible, and arrange appropriate appliance or plumbing service.
Why this path and its safety boundary
Why it matters: There is a scald, flood, or electrical exposure risk.
Safety stop: Do not disconnect a pressurized hose, handle hot water, or keep testing the washer.
-
PATH 03Safety boundary
What you see
The first wet point is at an inlet-hose washer, threaded connection, supply hose, or valve area.
Do this next
Keep water off and use only the exact model-approved external connection check; arrange appliance service for a damaged hose or valve and do not open the cabinet.
Why this path and its safety boundary
Why it matters: The water-entry path is implicated, although water may have traveled down the cabinet.
Safety stop: Stop for a split hose, corroded valve, persistent leak, or unsafe access.
-
PATH 04Safety boundary
What you see
Water appears during draining and the drain hose is displaced or the household standpipe, sink, or drain backs up.
Do this next
Keep the washer stopped, have a plumber address a household backup, and follow the Whirlpool manual for any safe external hose correction.
Why this path and its safety boundary
Why it matters: The external drain route can be releasing or returning water; a washer pump fault is not established.
Safety stop: Stop for sewage, contaminated water, uncontrolled discharge, a damaged hose, or electrical exposure.
-
PATH 05Safety boundary
What you see
A front-load leak starts at the door seal or the leak and suds start at the dispenser during filling or tumbling.
Do this next
Remove only loose visible debris or correct detergent and drawer closure as the exact manual permits; arrange service for a torn seal, cracked dispenser, or recurring leak.
Why this path and its safety boundary
Why it matters: The door-seal drainage, clothing/debris, drawer closure, detergent, or bulk-dispenser path is implicated.
Safety stop: Do not pry the door, bypass a lock, use sharp tools, or disassemble the seal or dispenser.
-
PATH 06Safety boundary
What you see
The leak follows excess foam, an oversized or water-resistant load, severe imbalance, rocking, or a front/top splash, while external connections remain dry.
Do this next
Use the exact HE detergent guidance, reduce or redistribute the load, and perform only a dry external level check permitted by the installation instructions; escalate if it recurs.
Why this path and its safety boundary
Why it matters: Detergent, load distribution, water retention, or level can be contributing to the visible leak.
Safety stop: Stop for severe movement, cabinet impact, water near electricity, or any smoke, odor, heat, or spark.
-
PATH 07Safety boundary
What you see
The exact manual confirms a user-accessible drain-pump filter or trap and the leak pattern points to the lower drain path.
Do this next
Use only the manual's isolated, controlled procedure; if there is no listed filter or the result is inconclusive, arrange service rather than opening the pump area.
Why this path and its safety boundary
Why it matters: A blocked, leaking, or incorrectly seated filter may contribute, but filter access and residual water are model-specific.
Safety stop: Do not open unlisted covers, reach into standing water, dismantle the pump, or test exposed wiring.
-
PATH 08Safety boundary
What you see
The first wet point is underneath or inside the cabinet, a hose/tub/seal/valve is damaged, the leak recurs with a normal load, or all safe external checks are dry.
Do this next
Keep water and power isolated as appropriate and arrange qualified appliance service; use plumbing or electrical service when the evidence points to those systems.
Why this path and its safety boundary
Why it matters: An internal component, installation, or household-drain fault remains possible and cannot be safely identified by repeated cycles.
Safety stop: Do not tilt, drag, dismantle, perform live checks, bypass a lock, or order a part from the symptom alone.
-
PATH 09Safety boundary
What you see
The model number, top/front-load configuration, filter arrangement, or allowed access procedure is unknown.
Do this next
Record the complete model number, retrieve the matching Whirlpool manual, and use qualified service if the leak is active or the model-specific guidance is unavailable.
Why this path and its safety boundary
Why it matters: A procedure from another Whirlpool model could cause a flood, shock, damage, or an incorrect diagnosis.
Safety stop: Do not guess a filter location, part fit, wiring arrangement, or access method.
Helpful context
Understand the symptom
Use the first wet point to separate the leak paths
Do not start by pulling the washer out or replacing a pump. Stop the cycle, note whether the water appeared during filling, washing, spinning, draining, or after the cycle, and use a dry flashlight from a safe position to trace the highest or first wet point. Water can run along the cabinet or floor, so a puddle at the front or underneath does not by itself identify the failed component. Keep the complete model number and top-load or front-load configuration available.
Whirlpool configuration changes the check
Top-load and front-load washers do not have the same door, tub, dispenser, drain-filter, or access arrangement. Whirlpool's front-load guidance discusses the door seal, dispenser, excess suds, and the drain path; top-load guidance emphasizes inlet and drain connections, level, and load behavior. Use the matching Whirlpool manual before opening a filter or attempting any part-specific procedure.
Keep water and electricity separated
If water is near the plug, receptacle, cord, controls, or a wet floor around the appliance, do not touch the electrical connection or reach behind the washer. Close the water supply only if it is safely accessible from a dry position, and isolate power only by a safe means that does not require contact with wet parts. Do not tilt, move, dismantle, or run another cycle to see whether a leak returns.
A clean first check is enough evidence to escalate
If the external hoses, drain route, dispenser, door seal, load, suds, and level do not explain the first wet point, an internal hose, valve, tub, pump, filter, seal, or wiring fault remains possible. That boundary cannot be confirmed safely by a live inspection or by tilting the washer. Give the technician the stage, water location, configuration, model number, and safety symptoms rather than repeatedly testing it.
Safety boundary
Stop conditions
- Stop immediately for water near a plug, receptacle, cord, controls, or a wet floor around electricity; isolate power only from a dry safe position and do not touch wet electrical parts.
- Stop for hot water, an uncontrolled leak, a supply that cannot be safely shut off, smoke, burning odor, sparks, unusual heat, damaged wiring or hose, severe movement, or a repeated breaker or protection trip.
- Do not move, pull out, tilt, lift, or dismantle the washer to find a leak; do not open panels or access the pump, valve, tub, or wiring as a first check.
- Do not force, pry, tape, or bypass a door or lid lock, and do not open a hot or water-filled machine against its lock.
- Do not disconnect a wet or pressurized hose, run repeated cycles, add drain chemicals, or select a replacement part solely from the leak symptom.
Only after diagnosis
Potential parts
- inlet hose or hose washer
Consider this only when the first wet point is a visible supply-hose connection or the exact manual identifies a damaged inlet hose or washer.
Confirm the complete Whirlpool model, connection type, hose condition, and manufacturer fit information before ordering; do not replace a valve based on a puddle alone. - door seal or gasket
This is relevant only to a front-load configuration with a torn, displaced, or persistently leaking door seal after safe visible inspection.
Door-seal shape and installation vary by model; confirm the exact Whirlpool model and use a qualified technician when gasket access is not explicitly user-serviceable. - drain pump or model-specific filter
Consider this only when the exact model has the relevant drain-filter or pump arrangement and the leak pattern or manual diagnosis implicates that path.
Some Whirlpool washers have different or no user-accessible filter arrangements; verify the exact model and never infer fit or open the pump area from the symptom alone. - dispenser component
This is relevant only when water or suds first emerge from a cracked, warped, blocked, or recurring-overflow dispenser path after detergent and drawer checks.
Dispenser and bulk-system parts are model-specific; confirm the exact Whirlpool model and repair procedure before selecting any component.
When checks do not resolve it
Need a professional?
Arrange qualified service when water reaches the floor or electrical area, the leak is active or recurring, the first wet point is underneath or inside the cabinet, a hose, valve, door seal, dispenser, tub, pump, or wiring is damaged, the household drain backs up, the model-specific access procedure is unavailable, or any smoke, burning odor, sparks, unusual heat, severe movement, or protection trip occurred.
Common questions
FAQ
Why is my Whirlpool washer leaking from underneath?
Trace the first wet point without moving the washer. Check the visible inlet connections and drain hose or household drain, then use the exact model guidance for a pump filter only where fitted. A leak that begins inside or underneath the cabinet needs service rather than a guessed part.
Can too much detergent make a Whirlpool washer leak?
Yes. Whirlpool's front-load guidance identifies incorrect or excessive detergent and excessive suds as a possible leak path. Record the detergent type and dose, and follow the exact model's HE detergent guidance; a recurring leak with correct detergent still needs diagnosis.
What should I do if a front-load Whirlpool washer leaks from the door?
Stop the cycle and, when cool and safely isolated, look for clothing or debris in the visible seal folds and drainage openings. Do not pry the door or remove the gasket. A tear, displacement, or repeated leak requires qualified service.
Should I tilt my Whirlpool washer to find the leak?
No. Do not tilt, drag, pull out, or dismantle a leaking washer. Trace only visible water from a dry safe position and use the matching manual; internal or underneath leaks require service.
When should I stop using a leaking Whirlpool washer?
Stop immediately for water near electricity, hot or uncontrolled water, smoke, burning odor, sparks, unusual heat, damaged hoses or wiring, severe movement, or a repeated protection trip. Close the water supply only if safely accessible, isolate power only from a dry safe position, and arrange qualified service.
Read the exact guide
Official sources
- Leaking from Front or Top - WasherWhirlpool · Whirlpool top-load washers; the exact model manual controls leveling and load guidance
- Leaking Water Underneath - WasherWhirlpool · Whirlpool top-load washers; confirm the exact model and configuration
- How to Fix a Washing MachineWhirlpool · Whirlpool washing machines; use the exact model manual for any access, filter, or repair procedure
- Kitchen And Laundry Appliance ManualsWhirlpool · All Whirlpool washers; an exact model number is required
- Leaking from Front - Front Load WasherWhirlpool · Whirlpool front-load washers; exact model and door-seal design control access
- Leaking from Underneath or Bottom - Front Load WasherWhirlpool · Whirlpool front-load washers; model-specific filter and access rules apply
Community feedback
Share a repair observation
Share a plain-text repair observation. Accepted observations are published automatically; this page may take a moment to update.