
On this page
Start here
Quick answer
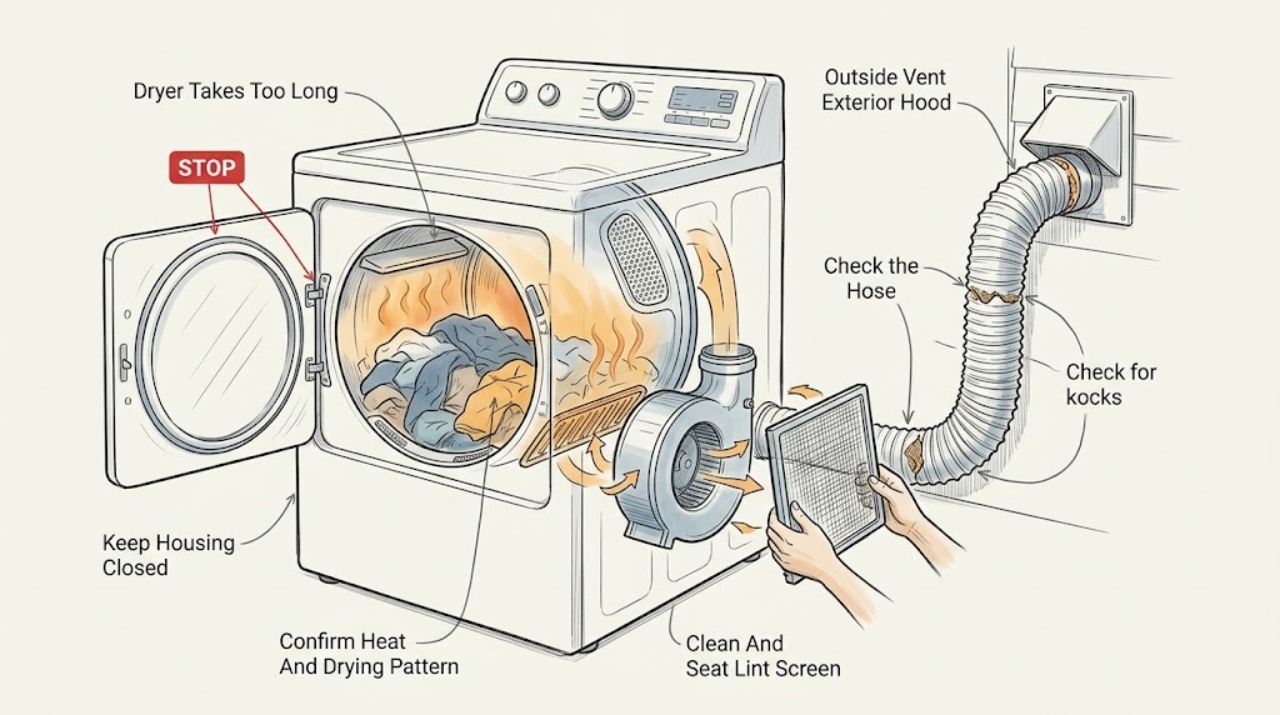
When a dryer produces heat but takes too long to dry, start with airflow rather than replacing a heater. Clean and correctly reinstall the lint screen, then inspect the visible exhaust hose for crushing or kinks and the outside hood for lint, debris, a nest, or a flap that cannot open. Whirlpool, GE, and Maytag guidance links warm-but-damp loads and long dry times to restricted venting, a loaded screen, poor load tumbling, or cycle and sensor conditions. Dry similar fabrics in a freely tumbling load, use the cycle intended for that load, and check that the washer is not leaving clothes wetter than usual. Do not run the dryer with a missing or damaged screen, operate through a burning smell or scorching, remove cabinet panels, or assume a clear screen proves the wall vent is clear. If long dry times persist, outside airflow is weak, a vent alert appears, or the dryer overheats or shuts down, keep it off and arrange qualified appliance or vent service.
Work through in order
Diagnostic checks
Use only checks that match the exact appliance or system and its official guide.
-
Check 1
After the dryer is cool, record the load type, cycle, approximate load size, whether clothes entered the dryer unusually wet, and whether the dryer is warm but the load remains damp. Do not run another heated cycle if there is a burning smell, scorching, smoke, or intense cabinet heat.
Expected result: Only heavy or mixed loads take longer; all loads are warm but damp; the load is barely warm; a sensor cycle ends early; or the symptom began after a move, installation, or cycle-setting change.
Next step: Record the pattern and proceed with the lint-screen and vent checks. Do not increase heat or combine loads to compensate for slow drying.
Stop if: Stop for smoke, scorching, a burning or gas odor, sparking, repeated shutdown, or a cabinet too hot to handle safely.
Why this matters
Why: Load and cycle selection can change normal drying time, but warm damp loads across different fabrics make restricted exhaust more likely. A move or installation change can leave the vent crushed, kinked, too long, or poorly connected. A barely warm load changes the diagnosis away from the assigned heat-present condition and toward heating or power service.
-
Check 2
With the dryer off and cool, remove the lint screen and inspect it for lint and fabric-softener residue. Clean and dry it only as the exact model manual directs, then push it fully into its holder. Inspect the accessible screen housing for loose lint without removing a cabinet panel.
Expected result: The screen is loaded, coated with residue, damaged, loose, or incorrectly seated; lint is packed around the housing; or the screen is clean and correctly seated.
Next step: Correct only the accessible screen condition, then inspect the hose and outside hood while the dryer remains off. Arrange service if screen access requires a panel or the problem continues.
Stop if: Do not operate with a missing, damaged, blocked, or loose screen; stop if lint is packed inside the cabinet or the housing is cracked or deformed.
Why this matters
Why: A loaded or poorly seated screen can reduce airflow and increase dry time. Lint around the housing or a clean screen with persistent symptoms shifts attention to the exhaust path, blower, or internal lint. The dryer must not be run without a correctly installed screen.
-
Check 3
Disconnect power when the exact inspection requires moving the dryer, then inspect the visible hose from the dryer to the wall for crushing, kinks, sagging, or lint. From outside, inspect the hood for lint, debris, a nest, or a flap that cannot move freely. Do not enter the wall duct or change the vent layout without model-specific installation guidance.
Expected result: The hose is crushed or kinked; the hood is blocked or its flap is stuck; outside airflow is weak when safely observed; the visible path is clear; or the vent cannot be reached without moving a gas dryer or using tools.
Next step: Keep the dryer off if any restriction is visible. Arrange professional vent cleaning or appliance service for a concealed restriction, damaged duct, inaccessible hood, or any gas or electrical disconnection.
Stop if: Stop for a damaged gas connection, a hot or wet duct, a lint cloud, a nest that cannot be safely removed, water behind the dryer, or any need to open the dryer cabinet.
Why this matters
Why: A restriction in the hose, wall run, or hood prevents moist air from leaving and is a leading cause of long dry times when heat is present. A clear visible section cannot rule out hidden lint, too many turns, improper material, or a blower problem.
-
Check 4
Use the exact model cycle guide to review the selected program. Dry similar fabrics together, avoid tightly packing the drum, and confirm clothes tumble freely. For sensor cycles, note whether the dryer is level and whether the cycle ends early; compare with a correctly sized, similar-fabric load only after airflow is known to be safe.
Expected result: The load was overloaded or mixed; a single bulky item did not tumble; an energy-saving or low-heat option was selected; the sensor cycle ends early; or every properly sized load remains warm and damp.
Next step: Correct the documented cycle or load issue and monitor one safe cycle. Do not select a higher heat setting to mask a vent or airflow problem; escalate if the result is unchanged.
Stop if: Stop for a dryer that overheats, shuts down repeatedly, smells burnt, produces smoke, or leaves clothing scorching hot.
Why this matters
Why: Load composition, tumbling, spin moisture, and cycle selection can lengthen drying without a vent failure. Persistent warm damp results across suitable loads make exhaust restriction, blower performance, moisture sensing, or an internal heating-control issue more likely.
-
Check 5
Record the make and complete model, electric or gas type, cycle and load, lint-screen condition, visible hose and hood findings, outside airflow if safely observed, alert text, recent relocation or vent work, and whether the dryer is hot, humid, noisy, or shutting down. Photograph only labels and cooled, visible conditions.
Expected result: Long dry times persist after safe screen, load, and visible vent checks; an AF or Check Vent alert returns; the blower is noisy or weak; the dryer overheats or shuts down; or the vent and cabinet require deeper access.
Next step: Keep the dryer off when overheating, alerts, or abnormal operation recur and arrange qualified appliance repair and/or professional vent cleaning. Provide the model and recorded findings for targeted diagnosis.
Stop if: Do not remove panels, vacuum inside the cabinet, test live wiring, bypass thermal protection, open a gas system, or repeatedly restart an overheating dryer.
Why this matters
Why: The remaining possibilities include hidden vent lint, improper vent design, blower or motor trouble, sensor or control failure, heating-system behavior, or internal cabinet lint. A heat-present symptom cannot identify a safe part replacement by itself.
Use your observations
Decision map
Find the observation that best matches what you see, then follow the next safe action.
-
PATH 01Next step
What you see
Do this next
Keep the dryer off, clean and seat the lint screen, inspect visible hose and hood conditions, and arrange professional vent cleaning when the full run is not clearly open.
Why this path and its safety boundary
Why it matters: Restricted exhaust is more likely than a failed heater. Lint, a crushed or kinked hose, a blocked hood, too many turns, improper vent material, or a hidden wall obstruction can trap moisture.
-
PATH 02Next step
What you see
Do this next
Use the exact cycle guide, separate heavy items, avoid overloading, and ensure the drum can tumble freely. Escalate if suitable loads also become slow or the cabinet gets unusually hot.
Why this path and its safety boundary
Why it matters: Load size, fabric water retention, tumbling, sensor behavior, or cycle selection is more likely than a constant appliance fault, provided the vent has normal airflow and no safety symptom is present.
-
PATH 03Next step
What you see
Do this next
Stop repeated heated testing and arrange professional vent testing and appliance diagnosis. Do not open the cabinet or choose a replacement part from the drying symptom alone.
Why this path and its safety boundary
Why it matters: A hidden wall restriction, improper vent length or turns, weak blower, moisture-sensor issue, or heating-control fault remains possible. Visible checks cannot certify the entire exhaust path.
-
PATH 04Next step
What you see
Do this next
Use a correctly sized, similar-fabric load and the exact cycle guidance; check the washer's spin result separately. If the dryer is hot, humid, or slow with normal loads, return to vent and service diagnosis.
Why this path and its safety boundary
Why it matters: Sensor-cycle contact, load distribution, or washer spin performance may be contributing to the result rather than a dryer exhaust fault alone.
-
PATH 05Next step
What you see
Do this next
Stop using the dryer, disconnect power only if safe, and arrange qualified appliance and vent service. Seek emergency help for fire, heavy smoke, sparking, or a gas odor.
Why this path and its safety boundary
Why it matters: A restricted exhaust, internal lint, blower or heating fault, electrical failure, or thermal-control problem may create a fire or equipment hazard.
Helpful context
Understand the symptom
Heat present does not mean airflow is adequate
A dryer can heat and still dry poorly when moist air cannot leave the drum. The result is warm but damp clothing, a hot or humid laundry area, lint collecting in unusual places, and a cycle that takes longer or repeats. A clear lint screen is only one point in the path; the hose, wall run, exterior hood, blower, and installation layout also affect airflow.
Separate a load or cycle issue from a vent restriction
Heavy fabrics, an overloaded or poorly tumbling load, low-spin laundry, sensor-cycle settings, or an energy-saving option can change dry time without a failed heater. If every load is slower and outside exhaust is weak, the vent path is more suspicious. Use the exact cycle guide for the model and do not select higher heat as a substitute for clearing restricted airflow.
The full vent and internal cabinet are separate service questions
The accessible screen and hose can be checked safely when the dryer is off and cool, but lint can remain inside the cabinet or farther along the wall vent. Whirlpool's manual guidance assigns cabinet-lint removal to a qualified servicer, and model instructions govern vent material, length, turns, and clearances. Persistent long drying after the visible checks needs appliance or vent diagnosis, not a guessed replacement part.
Safety boundary
Stop conditions
- Stop the dryer immediately for fire, heavy smoke, sparking, scorching, a burning or gas odor, or intense cabinet heat; leave the area and seek emergency help when appropriate.
- Do not run with a loose, damaged, blocked, or missing lint screen, and do not use a dryer with a visibly crushed, blocked, or disconnected exhaust path.
- Do not remove panels, vacuum internal cabinet lint, test live wiring, bypass a thermostat or thermal cutoff, open a gas system, or change venting beyond the exact installation instructions.
- Stop for weak or absent outside airflow, steam, water behind the dryer, a returning AF or Check Vent alert, repeated automatic shutdown, or clothing that is scorching hot.
- Arrange qualified appliance or vent service when appropriate loads remain warm and damp after safe screen and visible vent checks or when internal diagnosis is required.
Only after diagnosis
Potential parts
- Dryer lint screen, screen housing, or exhaust duct component
Consider this part class only when inspection or professional testing confirms a damaged screen, housing, crushed duct, failed hood, or other airflow component is restricting the exhaust path.
Screen fit, housing, duct material, routing, hood design, and installation limits vary by model and location; match the exact manual before selecting a part. - Dryer blower wheel or blower motor
Consider this part class only when qualified testing confirms weak airflow or abnormal noise is caused by a worn, obstructed, or failed blower assembly after the vent path is addressed.
Blower geometry, motor ratings, mounting, wiring, and airflow requirements vary by dryer model and gas or electric configuration. - Dryer moisture sensor, thermostat, thermal cutoff, or heating component
Consider this part class only when qualified diagnosis confirms a sensor, temperature-control, thermal-protection, or heating component fault after load and airflow causes are ruled out.
Sensor placement, temperature ratings, terminals, reset behavior, heating system, and control logic are model-specific; never bypass thermal protection.
When checks do not resolve it
Need a professional?
Call qualified service when long dry times persist after safe screen, load, and visible vent checks, outside airflow is weak, a vent alert returns, the dryer overheats or shuts down, the blower is noisy, or diagnosis requires moving the appliance, opening the cabinet, testing a sensor or heater, or cleaning hidden lint. Seek emergency help for fire, heavy smoke, sparking, or a strong gas odor.
Have this ready
- Complete dryer model and electric or gas configuration
- Cycle, load size and fabric mix, washer spin result, and change in dry time
- Lint-screen condition and whether it seats correctly
- Visible hose, wall connection, outside hood, airflow, moisture, and vent-alert observations
- Any overheating, shutdown, noise, vibration, scorching, burning or gas odor, smoke, or water behind the dryer
Common questions
FAQ
Why does my dryer take too long to dry if it is heating?
Restricted exhaust is the first suspect: a loaded screen, crushed or kinked hose, blocked hood, excessive vent turns, or hidden lint can leave hot moist air inside. Load size, fabric mix, cycle selection, sensor behavior, and clothes entering the dryer too wet can also add time.
Does a clean lint screen prove the dryer vent is clear?
No. The wall run, outside hood, vent length and turns, or internal blower can still restrict airflow. Inspect the visible hose and hood with the dryer off, and arrange professional vent testing or cleaning when long dry times persist.
Can an overloaded or mixed load cause long dry times?
Yes. GE and Whirlpool identify heavy or mixed loads, bulky items, and poor tumbling as causes of longer drying. Dry similar fabrics in a freely tumbling load, but do not use load changes to dismiss weak airflow, overheating, or a returning vent alert.
What does an AF or Check Vent alert mean?
On supported models, it indicates restricted airflow through the screen or vent system. Keep the dryer off while checking the screen, hose, and outside hood, and follow the exact model instructions or arrange vent service if the alert returns.
When should I stop using a dryer that takes too long to dry?
Stop for intense cabinet heat, scorching, a burning or gas smell, smoke, sparking, repeated shutdown, weak outside airflow, steam, or a returning vent alert. Arrange qualified appliance or vent service; seek emergency help for fire, heavy smoke, sparking, or a strong gas odor.
Read the exact guide
Official sources
- How Hot Does a Dryer Get? | MaytagMaytag · Official Maytag consumer guidance used for the safety interpretation of heat and long-dry symptoms; exact appliance manual controls.
- Dryer MaintenanceWhirlpool · Official Whirlpool owner manual for the documented dryer family; used narrowly for screen, vent, internal-lint, load, and model-manual safety boundaries, not as a universal manual.
- AF or "Check Vent" - Dryer - Product HelpWhirlpool · Official Whirlpool guidance for supported models with AF or Check Vent indications; apply only when the installed model has the corresponding alert and follow its manual.
- Dryer - Taking Too Long To Dry Clothes or Not Drying at AllGE Appliances · Official GE general dryer guidance used for cross-brand mechanisms and checks; exact dryer model, fuel type, cycle guide, and installation instructions control.
- Long Dry Times - DryerWhirlpool · Official Whirlpool dryer guidance used for the assigned heat-present, long-dry-time condition; exact dryer model instructions control cycle, vent, and service procedures.
Community feedback
Share a repair observation
Share a plain-text repair observation. Accepted observations are published automatically; this page may take a moment to update.