
On this page
Start here
Quick answer
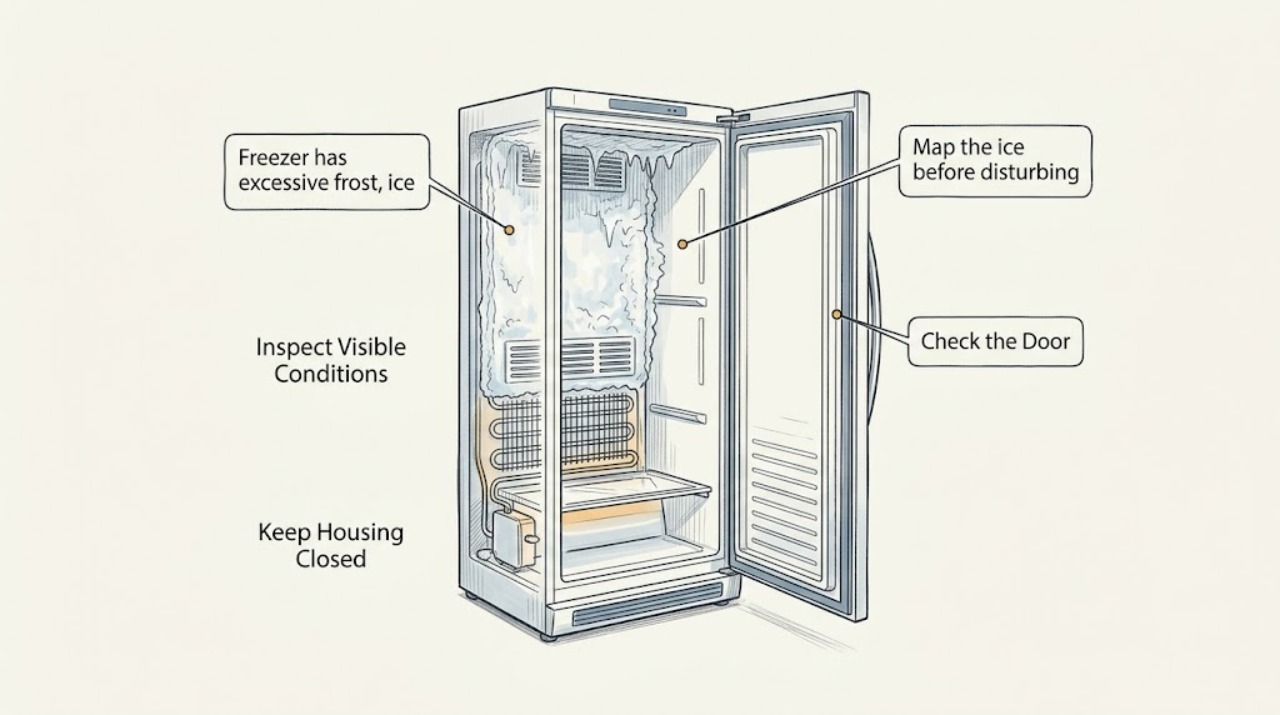
Ice covering the rear wall can block the freezer's air path and may point to packages touching the wall, a door that is not sealing, warm humid air entering, or a defrost problem. First move food away from the rear wall and vents, confirm the door closes fully, and clean and inspect the gasket. If the ice is heavy, protect the food and follow the appliance manual's defrost procedure; do not chip it with a sharp tool or use a hair dryer. If the rear wall ices over again quickly, airflow stays weak, the fan makes scraping noise, or the freezer stays warm, arrange qualified appliance service.
Before you begin
Safety first
- The homeowner scope is limited to moving packages, checking closure and the gasket, cleaning the seal, clearing accessible vents, performing a manual defrost exactly as the owner manual allows, and observing the result. Do not chip ice, use a hair dryer or flame, remove an evaporator cover, test live parts, handle refrigerant, or replace defrost or fan components without qualified diagnosis.
Work through in order
Diagnostic checks
Use only checks that match the exact appliance or system and its official guide.
-
Check 1
Map the ice before disturbing it. Note whether the ice is a thin coating or a solid sheet, whether it covers the entire rear wall or one section, whether vents or a fan opening are covered, and whether food is thawing or temperatures are uneven.
Expected result: Ice is localized where a package touched the wall; it surrounds a vent; it covers most of the rear wall; or the freezer is warm with weak or uneven airflow.
Next step: Photograph the pattern, then check storage and the door seal. Do not remove an evaporator cover just to identify the iced area.
Stop if: Stop for exposed wiring, a damaged liner or refrigerant tubing, water near electrical parts, smoke or burning odor, or food no longer staying safely frozen.
Why this matters
Why: A package contact or localized patch supports a storage or moisture-entry cause. Ice over a vent can directly reduce airflow. A broad rear-wall sheet, especially in a frost-free appliance, makes an underlying defrost or airflow problem more likely.
-
Check 2
Clear the accessible rear-wall and vent area of packages without forcing shelves or drawers. Leave room for air to circulate, check that no item can press against the door, and avoid adding warm or uncovered food while diagnosing the ice.
Expected result: A package was against the rear wall or vent, the freezer was overpacked, a package held the door open, or the storage path was already clear.
Next step: Close the door promptly after rearranging and proceed to the seal check. Do not scrape a narrow channel through the ice or block the fan to preserve food placement.
Stop if: Stop if a drawer, shelf, or door rail is frozen in place, the fan is scraping, food is thawing, or clearing the path would require prying ice.
Why this matters
Why: Contact with the rear wall and blocked vents can add moisture or restrict airflow. If storage was already clear, it is less likely to explain a thick wall-wide layer by itself.
-
Check 3
Check that the freezer door or drawer closes evenly. Inspect the gasket around its full perimeter, clean residue with warm soapy water, dry it, and look for a torn, split, permanently deformed, or pulled-away section. A paper or flashlight check can reveal a gap without disassembling the door.
Expected result: The gasket is dirty but intact; a package caused a gap; the gasket is damaged or will not seat; or the door appears to seal evenly all around.
Next step: Remove only the obstruction or clean and gently reseat a gasket that is merely out of its channel when the manual permits. Arrange service for a torn seal, misaligned door, or persistent gap.
Stop if: Stop for a warped door, broken hinge or rail, trapped wiring, a gasket that will not seat, or any need to remove the door or hinge.
Why this matters
Why: A closure obstruction or dirty seal can admit warm humid air and create wall frost. A damaged seal needs the correct replacement or service. A confirmed seal shifts attention to storage, defrost operation, or airflow.
-
Check 4
If the ice is light and accessible, wipe it with a damp cloth and dry the wall. If it is a heavy sheet or covers vents, protect the food and follow the exact owner manual for a full defrost, including any required drain and meltwater steps.
Expected result: The light frost clears; the rear wall needs a complete defrost; the manual does not provide a user-safe procedure; or ice is behind a cover or cannot be removed without force.
Next step: After the compartment is dry and clear, restore the model's normal setting and keep the rear wall and vents open while observing recurrence. Call qualified appliance service when safe defrosting is not possible or hidden access is required.
Stop if: Do not use a hair dryer, heat gun, open flame, knife, ice pick, screwdriver, or other sharp or heated tool; stop if water reaches electrical components or the liner is damaged.
Why this matters
Why: A complete safe defrost can restore airflow when ice itself is the obstruction. An inaccessible or recurring sheet is not a cue to pry the wall open; it may indicate a defrost-system, fan, or control fault.
-
Check 5
After a complete safe defrost, observe a normal cooling period without repeated door opening. Record whether airflow returns, the rear wall stays clear, temperatures even out, the fan sounds normal, and the compressor stops cycling normally once the freezer is cold.
Expected result: Airflow and temperature recover and the wall remains clear; airflow stays weak; ice returns quickly in the same area; the fan scrapes or stops; or the compressor runs continually while cooling is poor.
Next step: Protect food if temperatures rise and arrange qualified appliance service for persistent or recurring symptoms. Give the technician the frost map, seal result, defrost date, and sound pattern.
Stop if: Stop operating the freezer for smoke, burning odor, overheating, exposed wiring, water near electrical parts, a stalled or scraping fan, or food no longer staying safely frozen.
Why this matters
Why: Improvement after clearing the wall and correcting storage supports an air-entry or obstruction cause. Rapid repeat icing, persistent weak airflow, abnormal fan noise, or continuous operation suggests a gasket, defrost, fan, control, or sealed-system issue.
Use your observations
Decision map
Find the observation that best matches what you see, then follow the next safe action.
-
PATH 01Safety boundary
What you see
A package was touching the rear wall or a vent, the freezer was overpacked, or a package held the door open.
Do this next
Rearrange food with the rear wall and vents clear, close the door promptly, and observe after safely clearing existing ice.
Why this path and its safety boundary
Safety stop: Do not chip through the ice or force a frozen shelf, drawer, or fan opening.
-
PATH 02Safety boundary
What you see
Ice is concentrated near the door edge or the gasket is dirty, pulled away, torn, or split.
Do this next
Remove closure obstructions, clean and dry the seal, and reseat only a gasket that is merely out of its channel when the manual permits; arrange service for damage or misalignment.
Why this path and its safety boundary
Safety stop: Do not force the door, bend a torn gasket, or disassemble hinges or rails as a first response.
-
PATH 03Safety boundary
What you see
A heavy sheet covers most of the rear wall or a vent and airflow is reduced, but there is no immediate electrical or mechanical hazard.
Do this next
Protect the food and perform only the owner's manual's safe defrost procedure; use no sharp tools or heat.
Why this path and its safety boundary
Safety stop: Stop if the ice is behind a cover, the liner will not release it safely, the fan scrapes, or the manual does not describe a user defrost procedure.
-
PATH 04Safety boundary
What you see
The door seal and storage path are good, but the rear wall ices over again quickly after a complete safe defrost.
Do this next
Arrange qualified appliance service to evaluate the defrost system, fan, sensor, control, or other model-specific cause; provide the recurrence interval and frost location.
Why this path and its safety boundary
Safety stop: Do not repeatedly defrost as the only remedy or replace a heater, sensor, timer, or control from the frost pattern alone.
-
PATH 05Safety boundary
What you see
The rear wall is clear but airflow remains weak, the fan makes scraping or abnormal noise, or the freezer stays warm while the compressor runs continually.
Do this next
Protect food and arrange service for fan, defrost, temperature-control, or sealed-system diagnosis; keep the appliance accessible.
Why this path and its safety boundary
Safety stop: Stop operation for smoke, burning odor, overheating, exposed wiring, or food no longer staying safely frozen.
-
PATH 06Safety boundary
What you see
Water from defrosting reaches electrical parts, the liner or refrigerant tubing is damaged, or the ice cannot be cleared safely.
Do this next
Protect food and obtain qualified appliance service; disconnect power only when it can be done without contacting water or damaged wiring.
Why this path and its safety boundary
Safety stop: Do not use a hair dryer, heat gun, open flame, knife, ice pick, screwdriver, or force to remove concealed ice.
Helpful context
Understand the symptom
Rear-wall ice can explain weak airflow
The rear wall is often close to the cold-air outlet or evaporator area. A package touching the wall can add moisture and obstruct the air path, while a thick layer of ice can cover vents or coils and make circulation uneven. The location alone does not identify a failed heater, fan, or sensor, so begin with accessible causes before opening a panel.
Rule out a door gap and blocked storage
Check the whole door or drawer perimeter, not only the part beside the iced wall. A package can hold the door open, and a dirty, torn, split, or poorly seated gasket can let humid room air enter. Keep packages clear of the rear wall and vents, avoid overpacking, and limit the time the door remains open.
Defrost the ice without damaging hidden parts
Light accessible frost can be wiped away and dried. A solid sheet on the rear wall usually needs the exact owner-manual defrost process, with frozen food moved to suitable cold storage and meltwater contained. Do not use a hair dryer, open flame, knife, ice pick, screwdriver, or force against an interior liner or cover.
Fast recurrence changes the diagnosis
If the wall is clear, the door seals, and storage leaves the vents open but ice returns quickly, an automatic-defrost component, evaporator fan, control, or another model-specific fault may be involved. A fan that is stalled or scraping can also leave airflow weak. Hidden panels and electrical parts should be left to qualified service.
Only after diagnosis
Potential parts
- freezer door gasket
Consider a gasket only when a full-perimeter closure check finds a torn, split, permanently deformed, or unseated seal that cannot be corrected by cleaning or permitted reseating.
Confirm the exact appliance model, door or drawer orientation, gasket profile, and installation method before selecting a part. - defrost heater, sensor, timer, or control component
Consider these categories only after a qualified technician confirms rapid rear-wall frost recurrence with a sound gasket and clear storage path.
Defrost components are model-specific and usually require electrical access behind panels; do not choose one from the frost pattern alone. - evaporator fan or fan motor
Consider this category only when professional testing or an explicit model procedure confirms the fan is stalled, noisy, or not moving air after frost is safely cleared.
Match the exact model, fan blade, motor, connector, and voltage; do not reach through an iced cover or operate a scraping fan.
When checks do not resolve it
Need a professional?
Escalate for rapid recurrence, a damaged or misaligned gasket, persistent weak airflow, abnormal fan noise, continuous compressor operation, unsafe or inaccessible defrosting, or suspected defrost-system, control, sealed-system, or electrical faults.
Safety scope: The homeowner scope is limited to moving packages, checking closure and the gasket, cleaning the seal, clearing accessible vents, performing a manual defrost exactly as the owner manual allows, and observing the result. Do not chip ice, use a hair dryer or flame, remove an evaporator cover, test live parts, handle refrigerant, or replace defrost or fan components without qualified diagnosis.
Have this ready
- Provide the appliance model, freezer type, rear-wall ice pattern, door-seal and storage observations, vent clearance, date and method of the last safe defrost, temperature behavior, and fan or compressor sounds.
Common questions
FAQ
Why is ice covering the rear wall of my freezer?
Common contributors include packages touching the wall, blocked vents, frequent openings, warm or uncovered food, high humidity, and a door gasket that does not seal. If a thick sheet returns after a safe defrost, an underlying defrost or airflow fault may be involved.
Can food against the rear wall reduce freezer airflow?
Yes. Food can obstruct vents and add moisture where the cold rear surface freezes it. Move packages away from the wall and vents, but do not scrape a passage through existing ice; use the manual's safe defrost procedure if airflow remains blocked.
How do I remove a heavy sheet of freezer ice safely?
Protect the food, power down as the owner's manual directs, contain meltwater, and let the ice melt or follow the manual's approved procedure. Do not use a hair dryer, open flame, knife, ice pick, screwdriver, or force against the liner or an iced cover.
Why does the rear wall ice over again after defrosting?
A remaining door gap, damaged gasket, blocked storage path, humid-air entry, or a defrost, fan, sensor, or control fault may remain. Confirm the seal and rear-wall clearance, then arrange service if the ice rapidly covers the wall again.
When should I call appliance repair for rear-wall freezer ice?
Call when safe defrosting is not possible, the wall ices over rapidly again, the gasket will not seal, the freezer fan scrapes or stops, airflow or temperature remains poor, the compressor runs continually, or the next step would require removing an interior panel or testing electrical parts.
Read the exact guide
Official sources
- 7 Freezer Problems & How to Help Fix ThemWhirlpool · Whirlpool general freezer troubleshooting guidance; model manuals control access and exact repair steps.
- How to defrost a freezer quicklyWhirlpool · Whirlpool consumer defrost guidance used for general safe defrost planning; the owner's manual for the installed freezer controls exact steps.
- Refrigerator & Freezer - Ice on Freezer WallGE Appliances · GE Appliances support guidance used for general rear-wall ice patterns; model-specific controls and defrost procedures vary.
- Frost forms in the Samsung freezer, refrigerator, or ice bucketSamsung · Samsung consumer guidance used for general freezer frost and airflow patterns; the installed appliance manual controls exact defrost and service procedures.
- How to Avoid Frost Build UpWhirlpool · Whirlpool consumer guidance used for general freezer frost patterns; exact appliance features and service procedures vary by model.
Community feedback
Share a repair observation
Share a plain-text repair observation. Accepted observations are published automatically; this page may take a moment to update.