
On this page
Start here
Quick answer
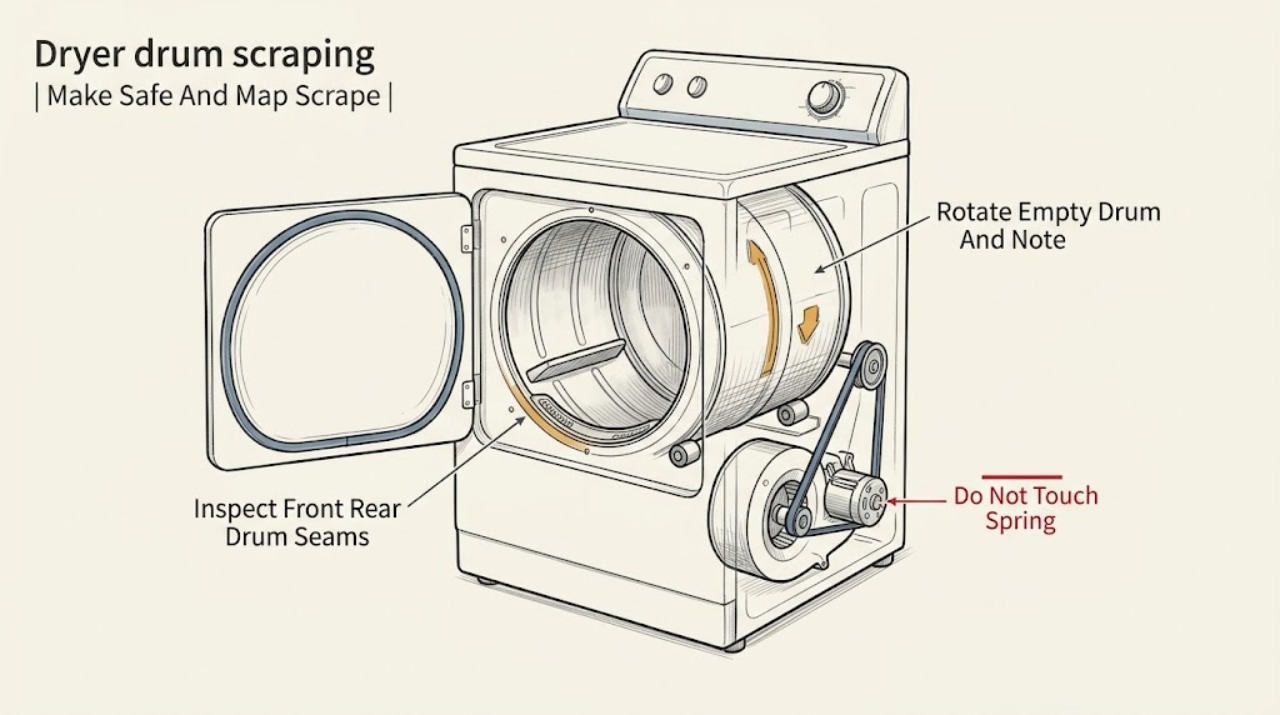
Stop the Kenmore dryer and remove the load. With power disconnected, inspect the front and rear drum seams for a coin, screw, zipper, or other small object, then gently turn the empty drum by hand. A scrape at one repeatable point or a visible object favors an obstruction; scraping that changes with drum position, feels rough, or comes with wobble favors a drum seal, glide, roller, idler, bearing, or alignment issue. A sound from the rear or blower area can involve the blower wheel, motor, or a loose object, while a frayed belt can add thumping or tracking noise. Do not keep running a dryer that scrapes metal, binds, overheats, smells of burning rubber, or has a gas odor. Cabinet, blower, belt, roller, bearing, motor, and electrical work requires the exact Kenmore manual or qualified service.
Before you begin
Safety first
- This article covers stopping the dryer, a powered-off visual seam check, gentle empty-drum rotation, sound classification, and exact manual lookup. It does not authorize opening panels, reaching into the blower or drive, handling gas or springs, bypassing safety devices, testing live circuits, or replacing internal parts.
Work through in order
Diagnostic checks
Use only checks that match the exact appliance or system and its official guide.
-
Check 1
Stop the dryer, remove the load, and disconnect power from a dry safe location. If it is a gas model and you smell gas, do not operate switches or relight anything; leave the area and follow local emergency guidance. Note whether scraping began suddenly, occurs only while tumbling, or is accompanied by heat, smoke, or a burning smell.
Expected result: The scrape is metallic, occurs at one point per rotation, changes with load, is accompanied by wobble or grinding, or the dryer has smoke, burning odor, gas odor, or abnormal heat.
Next step: Keep power off for a hazard and arrange prompt service. If no hazard is present, continue with a visible seam and hand-rotation check only while the dryer is disconnected.
Stop if: Stop immediately for smoke, sparks, gas odor, burning rubber, exposed wiring, or heat that is not normal and controlled.
Why this matters
Why: A repeatable scrape suggests a local object, seal, or alignment issue; load-dependent noise can add support or drive stress. Grinding, smoke, burning odor, gas odor, or heat is a stop condition rather than a clue to test further.
-
Check 2
With the dryer empty and power disconnected, use a flashlight to inspect the visible front and rear edges where the drum meets the cabinet. Look for a coin, screw, zipper, paper clip, loose metal, torn felt, or a gap; remove only a loose object that can be reached without tools or contact with hidden parts.
Expected result: An object is visible in the seam, the seal or felt is torn or displaced, a gap is uneven, or both edges look clear.
Next step: Remove only the loose visible object, then turn the drum gently by hand once more with power off. Arrange service for a torn seal, uneven gap, or any object that is trapped or inaccessible.
Stop if: Do not insert screwdrivers, picks, wire, or fingers into a narrow seam, and do not operate with a damaged seal or loose metal part.
Why this matters
Why: A visible object can scrape once per rotation and may damage the seal if ignored. A torn seal or uneven gap can let the drum rub the cabinet. Clear edges make a support, idler, bearing, belt, blower, or motor issue more likely.
-
Check 3
With power still disconnected, gently rotate the empty drum through several slow turns. Feel for smooth motion, a rough spot, binding, wobble, a scrape at one position, or a drum that sits visibly off-center; do not remove the belt or panels for this check.
Expected result: The drum turns smoothly, scrapes once per turn, feels rough or tight, wobbles, or cannot be turned safely.
Next step: Record exactly where and how resistance occurs. Use the model manual for any documented inspection; otherwise leave the dryer off for service rather than removing the drive system.
Stop if: Stop for heavy binding, sharp edges, a loose drum, scraping metal, or any need to reach behind the drum or into the blower area.
Why this matters
Why: Smooth rotation makes a hidden object, belt tracking, or powered motor-area source more likely than a seized support. A rough or tight rotation points toward a roller, glide, idler, bearing, seal, blower obstruction, or drum alignment issue; wobble raises concern for support or drum damage.
-
Check 4
Review what was in the pockets and whether the sound is a scrape, squeal, rumble, thump, or click. Note whether it is loudest at the front, rear, or lower rear, and whether it began after the dryer sat unused, was moved, or handled a bulky load.
Expected result: Small hardware or zippers were in the load, the noise is front-side squealing, rear rumbling, a periodic thump, or a lower-rear scrape, or the pattern is unchanged with an empty drum.
Next step: Remove only loose laundry objects and do not use the dryer if the empty-drum sound remains loud, metallic, or rough. Give the sound location and timing to a technician.
Stop if: Do not keep testing with heavy loads, use heat during a scraping condition, or lubricate an unknown support or bearing.
Why this matters
Why: Loose hardware can contact the drum; front squeal can fit an idler or seal, rear rumble can fit rollers, bearings, glides, belt, or blower, and a periodic thump after non-use can reflect temporarily flattened support rollers. A persistent empty-drum scrape is less likely to be clothing alone.
-
Check 5
Record the full Kenmore model number and whether the dryer is gas or electric. Use the matching Kenmore manual to identify the drum support, belt, idler, blower, motor, seal, and access instructions; do not assume another Kenmore series has the same layout.
Expected result: The manual documents a safe user inspection, the manual does not match, the suspected part is behind a panel, or gas, electrical, or spring-loaded access is involved.
Next step: Follow only the matching manual. If access is not clearly documented and safe, keep the dryer off and arrange appliance service with the recorded sound and hand-turn results.
Stop if: Do not remove cabinet panels, disconnect gas, handle springs, test live circuits, or open the blower or motor area without qualified procedure and equipment.
Why this matters
Why: Model identity controls the drum support design, belt path, gas or electrical hazards, and part fit. A scraping symptom alone cannot distinguish a roller from a seal, idler, bearing, blower, or motor fault.
-
Check 6
Only after a loose visible object is removed and no hazard exists, make one brief no-load observation from outside the closed dryer. Stop if scraping returns; record whether the sound is gone, repeats once per turn, changes with speed, or is joined by a stall, heat, or odor.
Expected result: The scrape is gone, returns at one drum position, changes to squeal or rumble, or the dryer stalls or overheats.
Next step: Keep the dryer off if the scrape returns or its source is unclear. Give the technician the model, gas or electric type, sound location, hand-turn resistance, and the exact event that changed the symptom.
Stop if: Do not run repeated cycles, use heat with a scraping or stalled drum, open panels, or test live components.
Why this matters
Why: A sound that disappears after removing an object supports that object as the cause. A repeated position points toward seam, seal, alignment, or support; a changing mechanical sound points toward drive or support wear. A stall or heat condition requires service rather than more testing.
Use your observations
Decision map
Find the observation that best matches what you see, then follow the next safe action.
-
PATH 01Safety boundary
What you see
A coin, screw, zipper, paper clip, or other loose hardware is visible at the front or rear drum seam and the scrape repeats at that spot.
Do this next
With power off, remove only the loose reachable object and inspect the visible seal. Arrange service if the object is trapped, the seal is damaged, or the sound remains.
Why this path and its safety boundary
Why it matters: The object is the leading cause, although a torn seal or gap may have been created by the contact.
Safety stop: Do not pry the seam, insert a sharp tool, or run the dryer with metal contact.
-
PATH 02Safety boundary
What you see
The empty drum is hard or rough to turn, wobbles, scrapes at a changing position, or shows a torn seal or uneven gap.
Do this next
Leave the dryer off and arrange qualified service for internal inspection. Provide the hand-turn resistance, sound position, and any visible gap or seal damage.
Why this path and its safety boundary
Why it matters: A drum roller, glide, bearing, idler, support, seal, or alignment fault is more likely than a loose pocket item.
Safety stop: Do not force the drum, remove the belt, lubricate unknown parts, or run a heated cycle.
-
PATH 03Safety boundary
What you see
The drum edge is clear, hand rotation is fairly smooth, but scraping or rumbling is loudest at the lower rear or occurs with a motor hum, squeal, or stall.
Do this next
Keep the dryer off and arrange appliance service. Do not open the blower or motor area simply because the sound appears to come from the rear.
Why this path and its safety boundary
Why it matters: A blower wheel obstruction, drive belt or idler problem, motor mount, or motor fault is more likely; the source is beyond a safe visual check.
Safety stop: Do not operate with a stalled motor, burning odor, abnormal heat, or gas odor, and do not test live parts.
-
PATH 04Safety boundary
What you see
The sound is light and temporary after installation or a long period unused, the drum turns smoothly, and no metal scrape, wobble, heat, or odor is present.
Do this next
Use the exact manual and monitor only if the sound remains light and fades as described. Stop and arrange service if it persists, becomes metallic, or returns with rough rotation.
Why this path and its safety boundary
Why it matters: Rollers can make a temporary sound while conforming to the drum or recovering from a flat spot, but a true scraping sound or persistent noise is not established as normal by this pattern.
Safety stop: Do not dismiss a repeatable metal scrape, visible gap, grinding, or worsening noise as break-in sound.
-
PATH 05Safety boundary
What you see
Smoke, gas odor, burning rubber, sparks, exposed wiring, abnormal heat, a damaged cord, or a source behind a panel is present.
Do this next
Leave the dryer off; from a dry safe location isolate power or gas only when it can be done without touching unsafe equipment, then arrange prompt qualified service.
Why this path and its safety boundary
Why it matters: The problem has crossed the owner-check boundary and continued operation can damage the dryer or create a fire, gas, or electrical hazard.
Safety stop: Do not operate switches during a gas odor, touch wet or damaged electrical equipment, open panels, or attempt internal repair.
Helpful context
Understand the symptom
The sound location and repeat pattern matter
A scrape that occurs at the same point on every hand rotation often means an object in the drum seam, a damaged seal, or a local alignment problem. A rough feel or changing scrape through a rotation points more toward a support roller, glide, bearing, idler, or drum edge. A rear or lower sound can come from the blower wheel or motor area, which is not visible through the drum opening.
Check simple objects before suspecting a drive part
Coins, paper clips, screws, nails, zippers, and other small hardware can sit between the drum and the front or rear bulkhead. Look along both visible drum edges with power off and remove only an object that is loose and safely reachable. Do not push a tool into the seam or lint opening, because sharp edges and hidden wiring may be present.
Kenmore dryer layouts vary by model
Kenmore dryers use different gas and electric designs, access panels, drum supports, belt routes, and safety devices. A symptom can narrow the part family but cannot prove the exact failed part. Use the model number in the Kenmore manual library and stop at the manual's access boundary before opening the cabinet.
Safety boundary
Stop conditions
- Stop and keep the dryer off for smoke, sparks, gas odor, burning rubber, abnormal heat, exposed wiring, a damaged cord, or a repeatedly tripping breaker.
- Disconnect power before hand rotation or inspection; do not touch a moving drum, live terminal, gas connection, blower wheel, or hidden wiring.
- Do not remove cabinet or blower panels, handle springs, disconnect gas, bypass a door switch or thermal device, or test live circuits.
- Do not run a heated cycle when the drum scrapes, binds, wobbles, stalls, or the motor hums without normal drum movement.
- Do not pry a drum seam, insert sharp tools into the lint opening, lubricate an unknown part, or force a damaged seal.
- Do not order a belt, roller, idler, seal, bearing, blower, motor, or control until the exact Kenmore model and qualified diagnosis identify the failed part and fit.
Only after diagnosis
Potential parts
- dryer drum seal or glide
Consider this category only when a qualified inspection finds a torn, displaced, worn, or non-clearance seal or glide that matches the scraping location and hand-rotation result.
Confirm the exact Kenmore model, seal or glide location, profile, adhesive or fitting method, and manufacturer fit information before ordering. - dryer drum roller, bearing, or idler
Consider this category only when the drum binds, wobbles, feels rough, or produces a support or tension noise and qualified inspection identifies the worn assembly.
Confirm the exact Kenmore model, support layout, shaft or pulley design, and technician diagnosis before ordering. - dryer drive belt, blower wheel, or motor
Consider this category only when the drum seam and supports are cleared and qualified diagnosis links the rear noise, motor hum, stalled rotation, or belt tracking to the failed assembly.
Confirm the exact Kenmore model, gas or electric design, belt route, blower and motor connectors, and technician diagnosis before ordering.
When checks do not resolve it
Need a professional?
Arrange qualified appliance service when scraping remains after a loose visible object is removed; when the drum is rough, bound, off-center, or wobbly; when a seal, roller, idler, bearing, belt, blower, motor, or alignment issue needs panel access; or when the sound is accompanied by stalling, heat, or an abnormal odor. Seek prompt help for gas odor, smoke, sparks, burning rubber, exposed wiring, a damaged cord, or repeated breaker trips.
Safety scope: This article covers stopping the dryer, a powered-off visual seam check, gentle empty-drum rotation, sound classification, and exact manual lookup. It does not authorize opening panels, reaching into the blower or drive, handling gas or springs, bypassing safety devices, testing live circuits, or replacing internal parts.
Common questions
FAQ
Why is my Kenmore dryer scraping when the drum turns?
A loose object at the front or rear drum seam is a simple possibility. If the seams are clear, a rough or changing scrape can involve a seal, glide, roller, idler, bearing, belt, blower, motor, or alignment issue. Disconnect power and stop before internal access.
Can a coin or screw cause a Kenmore dryer to scrape?
Yes. Small hardware can lodge where the drum meets the front or rear cabinet. Look with power disconnected and remove only a loose reachable object; do not pry the seam or run the dryer if the object is trapped.
What does a rough or wobbly Kenmore dryer drum mean?
Rough rotation or wobble makes a support roller, glide, bearing, idler, seal, drum edge, or alignment issue more likely. Keep the dryer off and arrange service rather than forcing the drum or removing the belt without the exact manual.
Can the blower wheel cause a scraping sound in a Kenmore dryer?
It can. A rear or lower-rear scrape may involve a loose object, lint, an unbalanced blower, or motor-area issue. Do not open the blower housing or reach through the lint opening; provide the sound location to a technician.
When should I stop using a Kenmore dryer that scrapes?
Stop for metal scraping, binding, wobble, grinding, burning rubber, smoke, sparks, gas odor, abnormal heat, or a stalled drum. Keep it off and arrange qualified appliance service.
Read the exact guide
Official sources
- Dryer Sounds and NoisesWhirlpool Corporation · Official manufacturer noise guidance used for general symptom interpretation only; Kenmore model layout and repair steps vary.
- Kenmore ManualsKenmore · Official Kenmore manual library used to require exact model matching before dryer access or a part decision; no universal Kenmore dryer layout is assumed.
- Customer Care & Support | Kenmore AppliancesKenmore · Official Kenmore support page used for the boundary between model documentation and qualified repair; it does not establish a shared internal dryer design.
- Oscillating scraping from dryer motor. Please help.Reddit r/appliancerepair · One exact Kenmore community report used as a symptom example only; it is not repair authority for another model.
- Scraping Sound - DryerWhirlpool Corporation · Official manufacturer dryer guidance used for the general seam-object check; Kenmore model manuals control the exact Kenmore procedure.
Community feedback
Share a repair observation
Share a plain-text repair observation. Accepted observations are published automatically; this page may take a moment to update.