
On this page
Start here
Quick answer
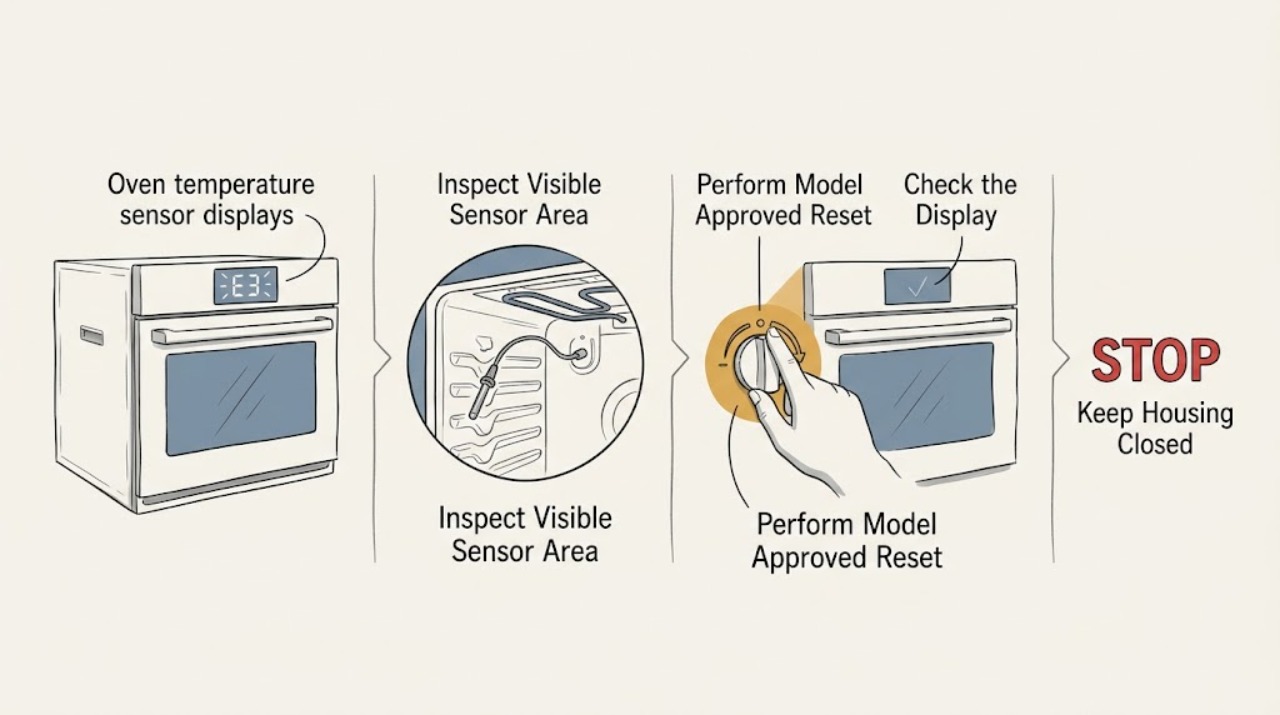
An oven temperature-sensor error code does not prove that the sensor alone has failed. Depending on the model and code, the cause can be the sensor, its wiring, the control, an abnormal temperature, or a communication fault. Photograph the exact code and record when it appears, then use the model's owner manual for the code meaning. If the manual allows a power reset, turn the oven off using the specified control or circuit procedure, let it return to a safe temperature, and see whether the code returns. Do not remove the rear panel, pull on the sensor, test live wiring, or continue heating when the code returns, the oven overheats, the display is erratic, or there is smoke, a burning odor, or a gas smell. A recurring sensor-related code needs appliance service to test the sensor circuit and control safely.
Before you begin
Safety first
- This article supports recording the code, consulting the exact manual, performing a model-approved power reset when the oven is cool and safe, observing visible sensor condition, and documenting heating behavior. It does not authorize panel removal, live electrical testing, sensor wiring work, thermal-limit bypass, self-clean testing, or unverified part replacement.
Work through in order
Diagnostic checks
Use only checks that match the exact appliance or system and its official guide.
-
Check 1
Read the display carefully and photograph the exact code, including letters, numbers, dashes, or a leading symbol. Record the oven brand and model, whether it is a wall oven or range, the cooking mode, and whether the code appears at startup, during heating, after a cycle, or only during self-diagnosis.
Expected result: Compare the photographed code with the exact model's owner manual or official support guide. Note whether it is described as a temperature-sensor, open or short circuit, over-temperature, communication, or other code.
Next step: Follow only the model-specific code guidance. If the code is not listed, appears during normal cooking rather than a documented diagnostic test, or is accompanied by abnormal heating, move to the stop-and-service branch.
Stop if: Do not guess a part from a code family, run self-clean to see whether the code clears, or continue operating an oven that is overheating, smoking, sparking, or showing damaged wiring.
Why this matters
Why: A code that looks similar across brands can have a different meaning on a particular model. The sensor may not be the only suspect; the control, wiring, power, ventilation, or an actual over-temperature condition may be involved.
-
Check 2
If the oven is cool, there is no smoke, gas odor, burning smell, visible damage, or active overheating, perform only the power-reset procedure stated in the exact model manual. Depending on the model, that may mean using the power control or switching the supplying circuit off for the specified interval; do not remove covers or touch wiring.
Expected result: After power is restored, observe whether the code stays away, returns immediately, or returns when a heating function is selected. Record the result without repeatedly starting heating cycles.
Next step: If the code returns, stop using the oven and arrange appliance service. If it stays cleared, follow the manual's operating check and stop at once if the code, abnormal temperature, or unsafe behavior returns.
Stop if: Do not cycle a breaker repeatedly, reset an oven that is hot or visibly damaged, or use a reset to bypass a recurring warning.
Why this matters
Why: A code that clears and does not return can have been a transient control state, but a single reset does not confirm the sensor circuit. A code that returns points to the sensor, wiring, control, or another model-specific fault and needs service.
-
Check 3
With power off and the oven completely cool, look only at the temperature-sensor probe area that is visible inside the cavity. Check for an obvious bent probe, loose-looking mounting, contact with a rack or liner, heavy baked-on residue, or a recently disturbed area. Do not pull the probe, remove screws, open a panel, or access the harness.
Expected result: Record whether the probe appears intact and undisturbed, or whether it is visibly damaged, loose, displaced, or contacting another part of the cavity. Also note any evidence that the oven recently overheated.
Next step: Leave a visibly damaged or displaced sensor untouched and arrange service with the photo and model information. If the probe looks normal but the code returns, service is still required for circuit and control testing.
Stop if: Do not straighten, push in, unplug, splice, measure, or replace the sensor, and do not remove the oven's rear or control panels.
Why this matters
Why: A visible physical problem can explain an inaccurate temperature reading or recurring code, but an intact-looking probe does not rule out its wiring or the control. A sensor code can involve the sensor, control, or associated wiring rather than the visible probe alone.
-
Check 4
Record what the oven actually does around the code without deliberately reproducing an unsafe condition: whether it never heats, heats too quickly, becomes much hotter than expected, stops heating, takes unusually long to preheat, or cooks normally while the code appears. Note whether the display, controls, cooling fan, door lock, or other safety behavior is abnormal.
Expected result: Classify the pattern as an over-temperature or rapid-rise warning, a no-heat or slow-heat condition, a display-only code with otherwise normal operation, or a code paired with smoke, burning odor, gas odor, or uncontrolled heat.
Next step: Keep the oven off for over-temperature or unsafe patterns and arrange prompt service. For a recurring display-only or no-heat code, provide the pattern and exact code to the technician instead of changing calibration or wiring.
Stop if: Do not use food or an unverified thermometer as a safety test, run self-clean, bypass a temperature limit, or continue cooking when heat is uncontrolled or there is smoke, a burning odor, or gas odor.
Why this matters
Why: A rapid temperature rise or uncontrolled heat may be an over-temperature or control problem rather than a simple sensor replacement. A no-heat or slow-heat pattern can involve power, heating components, or sensor feedback. A display-only code still needs the exact model guidance because normal-looking heating does not clear a recurring fault.
-
Check 5
Arrange appliance service when the temperature-sensor code returns after the model-approved reset, the exact code is not listed for the model, the visible probe is damaged or displaced, or the oven's heating behavior is abnormal. Keep the oven off for over-temperature, smoke, burning odor, gas odor, sparking, or damaged-wire conditions.
Expected result: Give the technician the exact code and model, the operating context, reset result, visible sensor observation, temperature or heating pattern, photos, and any recent installation, power, cleaning, spill, or repair event.
Next step: Use the confirmed model-specific repair and have the technician verify that the code stays cleared and the oven regulates temperature safely before returning it to normal cooking.
Stop if: Do not remove panels, test live circuits, bypass thermal protection, replace a sensor by appearance, or continue operation because a reset temporarily cleared the display.
Why this matters
Why: The technician can distinguish an open or short sensor circuit, harness problem, control fault, over-temperature event, power issue, or heating-system fault. A code alone is not enough to select a compatible sensor or prove the sensor is the failed part.
Use your observations
Decision map
Find the observation that best matches what you see, then follow the next safe action.
-
PATH 01Safety boundary
What you see
The exact temperature-sensor or related code returns immediately or returns when heating is selected after the model-approved power reset.
Do this next
Stop using the oven and arrange appliance service with the code, model, timing, and reset result.
Why this path and its safety boundary
Why it matters: A persistent sensor, wiring, control, or model-specific temperature fault is more likely than a transient display state; the sensor alone is not proven.
Safety stop: Do not repeatedly reset, remove the sensor, open panels, or continue heating to see whether the code disappears.
-
PATH 02Safety boundary
What you see
The code is accompanied by unusually rapid heating, uncontrolled temperature, smoke, a burning odor, sparking, damaged wiring, or a gas odor.
Do this next
Stop heating, keep the appliance off, and follow the appropriate electrical or gas-safety response before arranging prompt professional service.
Why this path and its safety boundary
Why it matters: An over-temperature, control, heating, power, or gas-safety problem may be present; this is not a routine sensor replacement decision.
Safety stop: Do not open the oven controls, bypass a limit, run self-clean, or attempt another test while the unsafe condition is present.
-
PATH 03Safety boundary
What you see
The oven is cool and unpowered, and the visible temperature-sensor probe is bent, loose, displaced, contacting the liner, or otherwise damaged.
Do this next
Leave the probe untouched and arrange service with a safe-distance photo and exact model information.
Why this path and its safety boundary
Why it matters: The sensor position or physical condition may be contributing to the code, but its wiring and control still require model-specific diagnosis.
Safety stop: Do not straighten, push, unplug, splice, measure, or replace the probe yourself.
-
PATH 04Safety boundary
What you see
The code clears after the model-approved reset, does not return during the manual's permitted operating check, and the oven has no abnormal heating or safety behavior.
Do this next
Keep the code photo and model manual available, monitor the next normal use without deliberately stressing the oven, and arrange service if the code returns or temperature control changes.
Why this path and its safety boundary
Why it matters: A transient control state is possible, but the reset does not prove the sensor circuit is healthy or guarantee the code will not return.
Safety stop: Do not treat one successful reset as permission to ignore a recurring code or use self-clean as a further test.
Helpful context
Understand the symptom
Start with the exact code, not a guessed sensor part
Temperature-sensor codes are not universal. One model may use a code for an open or short sensor circuit, while another uses a code for an over-temperature condition or an electronics communication fault. Photograph the display before resetting it and note whether the code appears at startup, while heating, after cooking, or during a cleaning cycle. The exact model manual controls the interpretation.
A reset is a diagnostic boundary, not a repair
A power reset can clear a transient control state, but it cannot prove that a sensor, wiring harness, or control is healthy. Use only the reset method and wait time specified for the oven. If the same code returns, stop treating the display as a nuisance and arrange service. Do not access the control compartment or sensor wiring to take a resistance reading unless you are a trained technician following the service manual.
Stop heating when the temperature or safety behavior is abnormal
An oven that reports an over-temperature condition, heats unexpectedly, fails to regulate, or shows a persistent code should not be repeatedly tested with food inside. Keep the oven off and arrange appliance service. Smoke, a burning smell, damaged wiring, or gas odor is an immediate stop condition; leave the appliance alone and follow the appropriate household or gas-safety response.
Safety boundary
Stop conditions
- Do not remove oven panels, access control wiring, test live circuits, or pull, unplug, splice, or replace the temperature sensor without trained service and the exact service documentation.
- Do not run self-clean, bypass a thermal limit, or keep heating when the code returns, temperature is uncontrolled, or the oven shows smoke, sparking, burning odor, gas odor, or damaged wiring.
- Do not guess the meaning of a code from another brand or select a sensor by appearance; codes, connectors, calibration, and parts are model-specific.
- Do not cycle the breaker repeatedly or rely on a reset that only temporarily clears the display.
- Arrange appliance service when the code persists or returns, the model manual does not identify it, the visible probe is damaged, or heating behavior is abnormal.
Only after diagnosis
Potential parts
- oven temperature sensor
Consider this part only when the exact model documentation and technician diagnosis confirm a failed or out-of-spec temperature sensor rather than wiring, control, power, or another fault.
Confirm the complete oven model, sensor connector, mounting arrangement, and service instructions before ordering; do not choose by appearance or a similar error code. - temperature-sensor wiring harness or connector
Consider this category only when a technician finds an open, short, loose connection, heat damage, or other harness fault in the sensor circuit.
Wiring and connectors are model-specific and may be near hot or energized components; confirm the exact model and have trained service perform the repair. - oven control or temperature-control component
Consider this category only after the technician rules out the sensor and harness and confirms the code or heating behavior originates in the control or related temperature circuit.
Do not infer control compatibility from the error code alone; confirm the model, revision, wiring, and manufacturer service information.
When checks do not resolve it
Need a professional?
Arrange appliance service when an oven temperature-sensor error code returns after the model-approved reset, is not listed for the exact model, or is paired with inaccurate or uncontrolled heating. Keep the oven off and seek prompt professional help for smoke, sparking, burning odor, gas odor, damaged wiring, or an over-temperature condition. A recurring code may involve the sensor, wiring, control, power, or another heating-system fault.
Safety scope: This article supports recording the code, consulting the exact manual, performing a model-approved power reset when the oven is cool and safe, observing visible sensor condition, and documenting heating behavior. It does not authorize panel removal, live electrical testing, sensor wiring work, thermal-limit bypass, self-clean testing, or unverified part replacement.
Common questions
FAQ
What does an oven temperature-sensor error code mean?
It means the oven has detected a condition associated with temperature sensing, but the sensor is not automatically proven to be the failed part. Depending on the model and code, the control, wiring, power, abnormal temperature, or another heating fault may be involved. Use the exact model manual and keep the code photo for service.
Can I clear the oven sensor code by turning off the breaker?
Some manufacturer guides allow one model-specific power reset, while others use a different procedure. Do it only when the oven is cool and safe and only for the interval stated in the exact manual. If the code returns, stop using the oven and arrange service; a reset does not repair a sensor, harness, or control fault.
Should I replace the temperature sensor when the code appears?
Not from the code alone. Official guidance identifies the sensor, associated wiring, and control as possible causes for at least some sensor-related codes. A technician should confirm the model-specific fault and part fit before a sensor is ordered or replaced.
What if the code appears but the oven still heats?
Normal-looking heating does not prove that the sensor circuit is healthy. Record whether the code appears during regular cooking or only during a documented diagnostic test, perform only the model-approved reset, and arrange service if the code returns or temperature regulation changes.
Can I test the oven sensor with a meter?
Do not test it by opening panels or probing wiring as a homeowner troubleshooting step. The oven may contain hot or energized components, and a resistance value, connector, and acceptable range are model-specific. Give the code and visible observations to a qualified appliance technician.
Read the exact guide
Official sources
- F3-1 - Error Code - Range - Product HelpWhirlpool Product Help · Whirlpool range guidance for the F3-1 code; code meanings, reset procedures, and service access vary by model and brand.
- Samsung oven temperature issuesSamsung Support · Samsung oven and range temperature guidance; exact controls, modes, and service procedures vary by model.
- Samsung range or wall oven error codesSamsung Support · Samsung range and wall-oven support; codes and permitted actions are model-specific and should be checked against the exact user manual.
Community feedback
Share a repair observation
Share a plain-text repair observation. Accepted observations are published automatically; this page may take a moment to update.