
On this page
Start here
Quick answer
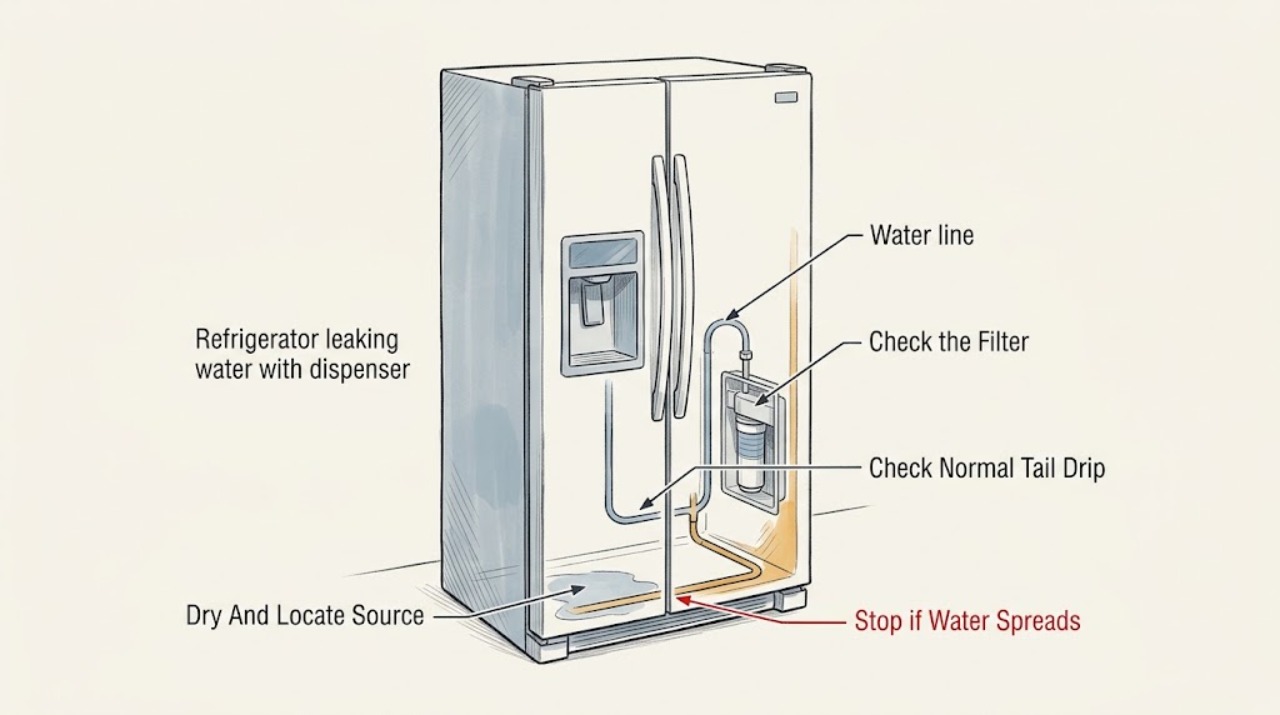
A refrigerator dispenser can leave a few drops immediately after dispensing, but water that continues when the dispenser is idle is a leak to isolate. Dry the area, identify whether water is coming from the dispenser outlet, filter area, door tubing, rear supply line, ice chute, or inside the cabinet, and check whether the leak began after a filter change, installation, door removal, or a stuck dispenser lever. Follow the exact model instructions for reseating a filter and purging air; clean a sticky lever only with the approved method. If water flows continuously, the line or housing is damaged, a filter remains leaky after correct installation, water reaches electrical parts, or the source is unclear, shut off the refrigerator's water supply when safely accessible, stop using the dispenser and ice maker, and arrange appliance service.
Before you begin
Safety first
- This article covers drying, locating the leak, ordinary-access observation, and model-directed filter, flushing, lever, or chute checks only. It does not authorize line disconnection, door-cover removal, valve or housing repair, electrical work, sharp-tool ice removal, or operation of a continuous leak.
Work through in order
Diagnostic checks
Use only checks that match the exact appliance or system and its official guide.
-
Check 1
Stop dispensing, dry the outlet, filter area, door edge, rear floor, and any visible shelf or drip tray, then observe from ordinary access without repeatedly pressing the dispenser lever.
Expected result: Water returns at the outlet, around the filter, behind or under the door, at the rear supply line, from the ice chute, or only as a few drops immediately after dispensing.
Next step: Record the source location and timing, then use the matching filter, lever, line, ice-chute, or service branch. If water is near electrical parts or the source cannot be localized, stop dispensing and arrange service.
Stop if: Do not reach through water, tilt the refrigerator, remove covers, or continue testing when water is near electrical connections or the floor is becoming slippery.
Why this matters
Why: The first wet location separates an outlet tail drop from a filter, line, door, ice-chute, or internal leak. A few immediate drops may be normal; water returning while idle is not established as normal dispenser behavior.
-
Check 2
After one normal glass of water, keep the glass under the outlet for the period specified by the exact manual and observe whether the drip stops; do not use the lever repeatedly to force a result.
Expected result: Only a few drops appear immediately after dispensing and then stop, or water continues to drip after the glass is removed or while the dispenser is idle.
Next step: If the drip stops, wipe the outlet and monitor it. If it continues, proceed to the filter and recent-work check, keep the dispenser unused, and arrange service if the exact model steps do not resolve it.
Stop if: Do not accept continuous dripping as normal, tape the lever open, or leave a container under the outlet as a permanent workaround.
Why this matters
Why: A short post-dispense tail can be normal on some models. Continued idle dripping makes trapped air, a filter or line issue, an ice-chute seal, a valve, or a stuck dispenser control more likely.
-
Check 3
If the filter was recently installed or replaced, identify the exact filter procedure, shut off the refrigerator water supply only if safely accessible, and inspect the filter and visible mount for a damaged seal, cross-threading, incomplete lock, or moisture; do not force the cartridge.
Expected result: The leak began after filter work, the filter is not fully seated, the filter or mount is damaged, the leak stops with correct reseating, or the leak continues with the filter correctly installed.
Next step: Follow the exact manual to reinstall or replace a damaged filter, then dry and observe. If the mount is damaged or the leak persists, keep the water supply off when safe, stop dispenser and ice-maker use, and request service.
Stop if: Do not use an unverified filter, force the cartridge, alter the filter mount, apply sealant, or operate the dispenser with a leaking filter area.
Why this matters
Why: A filter that is not seated or sealed can leak and may also disturb water flow. A leak that continues after correct model-directed installation points toward the housing, valve, line, or another path rather than permission to tighten harder.
-
Check 4
If the refrigerator was recently installed or the filter was recently changed and the model instructions call for flushing, dispense water into a suitable container using the exact model procedure, then stop and recheck the outlet for idle dripping.
Expected result: The stream sputters and the drip stops after the prescribed flush, or the stream is steady but dripping continues when the dispenser is not in use.
Next step: If the model-directed flush resolves the symptom, monitor it after the next use. If dripping continues, stop the water supply when safely accessible and arrange service; do not keep flushing indefinitely.
Stop if: Do not flush if water is already leaking from a line or housing, the water supply cannot be safely controlled, or the exact model procedure is unavailable.
Why this matters
Why: Sputtering followed by a dry idle outlet supports trapped air in the line or filter as a temporary cause. A steady stream with continued idle dripping makes a line, coupler, valve, filter housing, or dispenser-control issue more likely.
-
Check 5
With the dispenser unused, check whether the lever returns freely, residue is present around it, the control lock is available on the model, ice remains in the chute, or the chute and ice-bucket seal have a visible gap; clean only the lever or chute surfaces as the manual permits.
Expected result: The lever is stuck or slow to return, residue is present, the chute contains melting ice, the chute seal is gapped, or the dispenser still drips with a free lever and clear chute.
Next step: Use the model's lock or cleaning procedure, dry the chute, and recheck once. If the lever remains stuck, the seal is damaged, or the dispenser drips while idle, stop using the dispenser and request service.
Stop if: Do not pry the lever, pour liquid over the control panel, disassemble the chute, or use sharp tools to remove ice.
Why this matters
Why: A stuck lever can request water continuously, and melting ice or a poor chute seal can place water at the dispenser. Continued dripping with those conditions absent makes the water line, filter housing, valve, or internal dispenser path more likely.
-
Check 6
From safe visible access, inspect the rear water line and any door-side tubing or coupler that the exact manual identifies, looking for a kink, crack, moisture at a fitting, or a leak that began after the refrigerator was moved or a door was removed; do not disconnect a line or remove a door cover as a generic check.
Expected result: The line is kinked or damaged, a fitting is wet, the issue began after door or installation work, or visible tubing is dry but the dispenser still leaks.
Next step: Close the refrigerator water supply when safely accessible, stop dispenser and ice-maker use, and arrange appliance service for any damaged or hidden line. Give the technician the location and recent-work timeline.
Stop if: Do not cut, pull, bend sharply, disconnect, or reconnect tubing, and do not move the refrigerator through a wet area to inspect behind it.
Why this matters
Why: A damaged or poorly seated line or coupler can leak, while a dry visible line does not rule out a valve, filter mount, internal reservoir, or hidden door-line fault.
Use your observations
Decision map
Find the observation that best matches what you see, then follow the next safe action.
-
PATH 01Safety boundary
What you see
Only a few drops appear immediately after dispensing, then the outlet stays dry while idle and no water appears at the filter, line, chute, or floor.
Do this next
Keep the glass under the outlet for the model-specified interval and wipe the tray or outlet as needed; monitor for a change to idle dripping.
Why this path and its safety boundary
Why it matters: This pattern is consistent with residual water in the dispenser path on models where the manufacturer describes a short post-dispense drip as normal.
Safety stop: Arrange service if dripping continues while idle, becomes a stream, or appears elsewhere.
-
PATH 02Safety boundary
What you see
Dripping began after a filter change or installation, the filter is not fully locked or the stream sputters, and the leak is limited to the dispenser or filter area.
Do this next
Use the exact model procedure to reseat the filter and flush the line once as directed, then dry and observe. If the filter area remains wet or idle dripping continues, shut off water when safe and request service.
Why this path and its safety boundary
Why it matters: Trapped air or an incorrectly seated or damaged filter is more likely than a random floor leak.
Safety stop: Do not force the filter, use an unverified cartridge, or keep flushing a visibly leaking mount.
-
PATH 03Safety boundary
What you see
Water or ice continues from the dispenser, the lever does not return freely, residue is present, or melting ice and a gap at the chute seal are visible.
Do this next
Lock the dispenser if the model provides that control, clean only with the approved method, dry the chute, and stop using the dispenser if the lever or seal remains abnormal.
Why this path and its safety boundary
Why it matters: A stuck dispenser control or a melting-ice/chute-seal path is more likely than a filter-only issue.
Safety stop: Request service when the control stays actuated, the chute seal is damaged, or water continues while the dispenser is idle.
-
PATH 04Safety boundary
What you see
Water returns while the dispenser is idle, the filter is correctly installed, the lever is free, and a rear or door line is wet, damaged, or associated with recent installation or door work.
Do this next
Close the refrigerator water supply when safely accessible, stop the dispenser and ice maker, protect the floor, and arrange appliance service for de-energized line and component diagnosis.
Why this path and its safety boundary
Why it matters: A supply line, coupler, valve, filter housing, reservoir, or hidden door-line fault is more likely than normal tail dripping.
Safety stop: Do not disconnect tubing, remove door covers, or continue operating the water system to locate a hidden leak.
Helpful context
Understand the symptom
Separate normal tail drops from a real leak
A small amount of water at the outlet just after a glass is removed can be residual water in the dispenser path. The useful dividing line is whether dripping stops after the model's normal post-dispense interval and whether the dispenser is dry while idle. A steady drip, a puddle that returns with no dispensing, water around the filter, or water behind the door needs a different branch.
Start at the wettest point, not at the most visible part
Water can travel along a door, shelf, tube, or floor before appearing under the dispenser. Dry the area, then observe a short normal use cycle without repeatedly operating the lever. Check the outlet, filter area, door tubing, rear line, ice chute, and interior floor separately. The first place that becomes wet after drying is more useful than the final puddle location.
Filter and air checks are model-dependent
A recently installed filter or newly connected refrigerator can leave air in the water line and cause temporary sputtering or dripping. Use only the exact model's filter-removal, locking, and flushing instructions. Do not force a filter, use an unverified cartridge, alter the water valve, or remove a door cover or line fitting unless the model manual explicitly allows that access and the water supply is safely controlled.
Safety boundary
Stop conditions
- Do not reach through water, move the refrigerator across a wet floor, or continue dispensing when water is near electrical parts or the leak is rapidly spreading.
- Do not force, cut, glue, or seal a water filter, filter mount, dispenser lever, tubing, coupler, valve, or door assembly.
- Do not remove a door cover, disconnect a water line, or open a hidden dispenser path as a generic troubleshooting step; use the exact manual or qualified service.
- Stop using the dispenser and ice maker, and shut off the refrigerator water supply when safely accessible, for continuous dripping, a damaged line, a leaking filter mount, or an unlocalized leak.
- Do not use a sharp tool to remove ice, pour liquid over controls, or keep a container under the outlet as a permanent workaround.
Only after diagnosis
Potential parts
- refrigerator water filter
Consider this category only when the exact model procedure confirms a damaged, spent, or incompatible filter after correct seating and the leak is localized to the filter path.
Confirm the exact refrigerator model, filter location, locking method, seal, and manufacturer fit information; do not force a cartridge or substitute an unverified filter. - dispenser water line or coupler
Consider this category only when a qualified diagnosis finds a cracked, kinked, poorly seated, or damaged line or coupler causing an idle leak.
Confirm the exact model, tubing route, fitting type, and manufacturer repair procedure; line work may require service and safe water shutoff. - dispenser valve or lever assembly
Consider this category only when the lever remains actuated or a qualified diagnosis confirms a valve or dispenser-control failure after residue and lock checks.
Confirm the exact model and dispenser configuration before ordering; do not bypass the control or substitute a valve by appearance.
When checks do not resolve it
Need a professional?
Arrange appliance service when water drips while the dispenser is idle, a correct filter installation and model-directed flush do not stop the leak, the lever remains stuck, the filter housing or line is damaged, the ice-chute seal is abnormal, water appears behind a door or inside the cabinet, or the source cannot be localized. Shut off the refrigerator water supply when safely accessible and stop dispenser and ice-maker use for a continuous or hidden leak. Seek prompt help if water reaches electrical parts or threatens the floor.
Safety scope: This article covers drying, locating the leak, ordinary-access observation, and model-directed filter, flushing, lever, or chute checks only. It does not authorize line disconnection, door-cover removal, valve or housing repair, electrical work, sharp-tool ice removal, or operation of a continuous leak.
Common questions
FAQ
Is it normal for a refrigerator dispenser to drip after use?
A few drops immediately after dispensing can be normal on some models. The drip should stop within the interval in the exact manual. Water that returns while idle, forms a puddle, or appears around the filter, line, door, or floor needs diagnosis.
Why did the dispenser start leaking after I changed the filter?
The filter may not be fully seated or locked, its seal or mount may be damaged, or air may be trapped in the line. Follow the exact model filter and flushing instructions once; if the filter area stays wet or idle dripping continues, shut off water when safe and request service.
What if water leaks from the dispenser without pressing the lever?
Treat idle dripping as a real leak. Check only for a stuck lever, residue, filter issue, ice-chute problem, or recent line work from ordinary access. Stop using the dispenser and ice maker, shut off the refrigerator water supply when safely accessible, and arrange service if it continues.
Can I disconnect the refrigerator water line to stop the leak?
Do not disconnect a line as a generic check. If the supply shutoff is clearly accessible and can be closed without reaching through water or disturbing fittings, close it and stop dispenser and ice-maker use. Have qualified service inspect a wet, damaged, or hidden line.
Why is water leaking under the refrigerator when the dispenser seems to be the source?
Water can travel from a filter mount, door tube, rear supply fitting, ice chute, drain, or interior shelf before reaching the floor. Dry the visible areas and identify the first wet location; if the source is hidden, the line is damaged, or water reaches electrical parts, stop testing and arrange appliance service.
Read the exact guide
Official sources
- Water Inside of RefrigeratorWhirlpool Product Help · Manufacturer guidance used for filter seating, post-dispense observation, and model-specific service escalation.
- Refrigerator - Dripping or Leaking Water from DispenserGE Appliances · Manufacturer guidance used to distinguish a few post-dispense drops from dripping that continues after the glass is removed; exact model instructions control.
- Water leaks in a Samsung refrigeratorSamsung Support · Manufacturer guidance used for symptom branching and model-specific limits; exact installed-model instructions control.
- LG Refrigerator - Troubleshooting a Leaking RefrigeratorLG USA Support · Manufacturer guidance used for leak-location branches; the installed refrigerator's manual controls access and exact procedures.
Community feedback
Share a repair observation
Share a plain-text repair observation. Accepted observations are published automatically; this page may take a moment to update.