
On this page
Start here
Quick answer
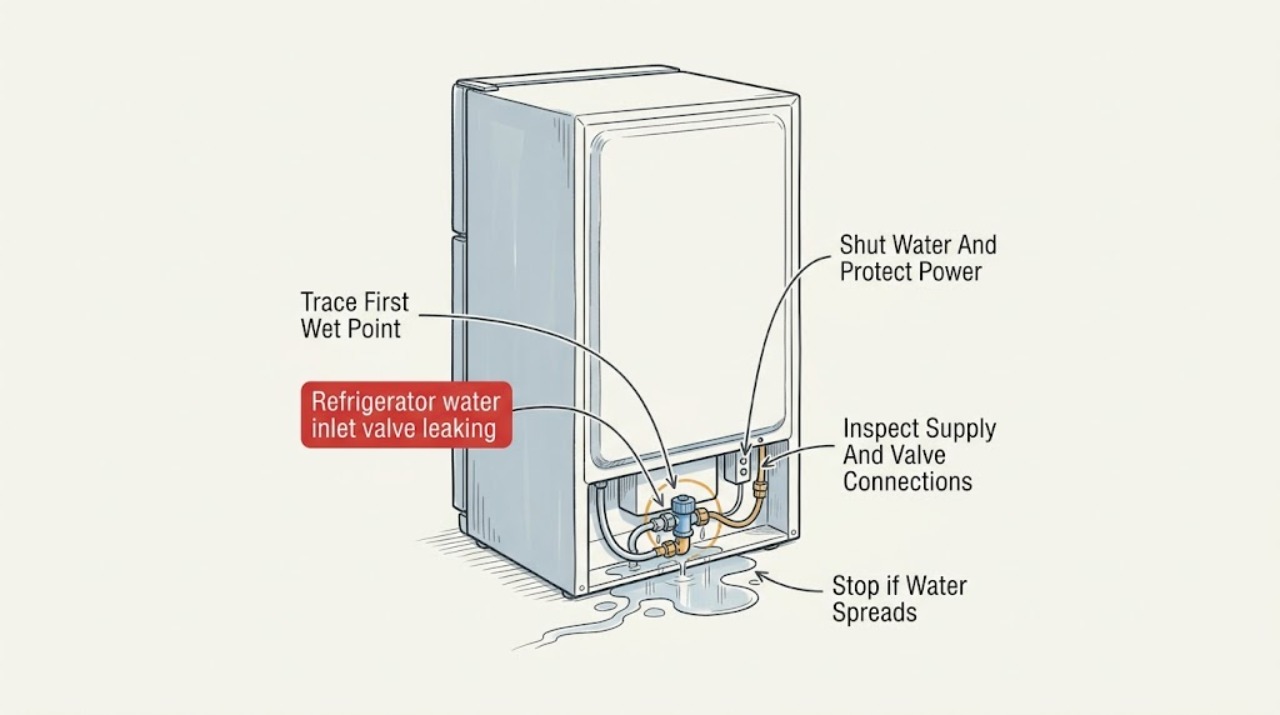
Turn off the refrigerator water shutoff valve first, then unplug the refrigerator if it is safe to do so and the floor or outlet is dry. Wipe the valve, fittings, and nearby tubing completely dry with a paper towel and trace the first point that becomes wet. A loose or cracked supply line, compression connection, filter or filter housing, and the inlet valve body or outlet ports can look like the same leak. If water returns at the valve body or a solenoid outlet while the supply is on, keep the water off and arrange appliance service; do not open the valve or replace it until the exact refrigerator model and leak point are confirmed. A leak only during dispensing or ice making can be downstream of the valve, while water inside the cabinet with a dry rear valve can be a filter or defrost-drain path. Stop for a spray, uncontrollable flow, water near electrical parts, a damaged cord or outlet, or an unknown leak path.
Before you begin
Safety first
- This article covers closing the water supply, safe drying and visual tracing, accessible connection observation, model-manual filter checks, and leak-timing records. It does not authorize valve disassembly, solenoid or electrical testing, panel removal, tubing cutting, pressurized repair, wet-outlet handling, or work in standing water.
Work through in order
Diagnostic checks
Use only checks that match the exact appliance or system and its official guide.
-
Check 1
Close the refrigerator's accessible water shutoff valve. If the floor, plug, and outlet are dry and reachable without moving the appliance through water, unplug the refrigerator; otherwise leave electrical isolation to a qualified person. Place a shallow container or towels under the drip without reaching behind wet electrical parts.
Expected result: Record whether water stops after the supply is closed, whether flow continues from stored water only, whether the cord or outlet is wet or damaged, and whether the leak is a drip or a spray.
Next step: Keep the water supply closed and arrange service for active flow, wet electrical parts, a damaged cord or outlet, or any uncertainty about safe isolation. If the area is dry and stable, continue with a dry-paper-towel trace.
Stop if: Do not move the refrigerator through standing water, touch a wet plug or outlet, keep running a spray, or repeatedly open the water supply to test it.
Why this matters
Why: A leak that stops when the supply is closed is in the pressurized water path, which can include the supply line, fittings, inlet valve, filter circuit, or internal tubing. Continued water may be residual or a different drain path; active flow, wet electrical parts, or an inaccessible shutoff is a service boundary.
-
Check 2
With water off and the accessible rear area dry, wipe the household shutoff, supply tubing, inlet fitting, valve body, valve outlet tubing, and nearby floor completely dry. Use separate dry paper towels at each connection so water cannot run from one part to another.
Expected result: Identify the first towel that becomes wet: the wall or household shutoff, the supply tube, the valve inlet connection, the valve body or seam, an outlet connection, or no rear component while water appears inside the cabinet.
Next step: Photograph the dry layout and first wet point, keep the water off, and use the matching branch below. Do not disconnect tubing or remove the valve to prove the source.
Stop if: Do not probe a fitting, loosen a pressurized connection, or use a heat source to dry water near the refrigerator.
Why this matters
Why: The first wet point is more useful than the puddle location. A cracked tube or loose fitting indicates a supply connection; a wet valve housing or outlet with adjacent fittings dry makes the valve or its internal connection more likely; a dry rear valve shifts attention to the filter, dispenser tubing, ice maker path, or defrost drain.
-
Check 3
Visually inspect the accessible supply tube for cracks, kinks, pinching, or a tube that is not fully inserted, and inspect the household shutoff and refrigerator inlet fitting for a loose nut or wet compression area. If the manufacturer manual permits a minor external tightening check, make only the small adjustment specified; never force or overtighten the fitting.
Expected result: Classify the supply path as visibly cracked or kinked, tube pulled from a fitting, connection wet at the nut, shutoff itself wet, or dry while the valve body becomes wet.
Next step: Keep the water off for a damaged tube, shutoff, or valve connection and arrange repair with the exact model and tubing information. If the connection is dry but the valve body leaks, proceed to the valve-specific timing check without disassembling it.
Stop if: Do not cut tubing, replace a household shutoff, use a piercing valve, overtighten a compression nut, or test a suspected crack under pressure.
Why this matters
Why: Whirlpool identifies cracked lines, kinked tubing, incorrectly inserted tubing, and leaking shutoff or supply connections as distinct sources. If those remain dry while water emerges through the valve housing or outlet, tightening the supply fitting will not repair the valve body.
-
Check 4
Without removing panels or touching valve terminals, note whether the dried valve area would leak continuously whenever the water supply is open, or only after a dispenser request or ice-maker fill. Do not repeatedly activate the dispenser; use the owner's manual to identify the normal water-consuming event if needed.
Expected result: Record continuous seepage at the valve body or outlet, a drip only during dispensing or ice filling, water at an internal tube, or no recurrence with the supply closed.
Next step: For a valve-body leak, leave the supply off and arrange appliance service. For event-linked or internal leakage, inspect only the accessible filter and cabinet water path in the next check and provide the timing to the technician.
Stop if: Do not energize a wet valve, remove the rear cover, disconnect a solenoid, bridge terminals, or run repeated fill cycles to reproduce the leak.
Why this matters
Why: Continuous leakage at the valve body or its outlet under supply pressure makes a valve or valve connection fault more likely. A leak only during a dispense or fill event can be downstream tubing, a filter circuit, or an outlet connection. No recurrence can mean residual water or a different source, not a confirmed valve repair.
-
Check 5
If the rear valve and supply connections stay dry, inspect only the user-accessible water filter and its housing according to the refrigerator manual. Look for a cracked filter, missing or displaced O-ring, filter not fully seated, water under drawers, or a wet dispenser tube; do not remove interior panels or clear a hidden drain.
Expected result: Record whether the filter was recently changed, cracked, incorrectly seated, missing an O-ring, or dry; note whether water appears only inside the cabinet, at the dispenser, or beneath drawers.
Next step: Reseat or replace the filter only as the exact manual permits, keeping the water supply off until the housing is secure. If the filter is sound or the leak persists, keep the appliance water supply closed and arrange diagnosis of the filter housing, internal tubing, dispenser, ice maker, or drain path.
Stop if: Do not force a filter, operate without a required filter or bypass, pour chemicals into a hidden drain, or remove an interior panel to chase water.
Why this matters
Why: Manufacturer guidance links filter damage or incorrect installation to cabinet leaks and dispenser symptoms. A dry valve with water inside can also indicate a defrost-drain path rather than the inlet valve, especially when the leak is unrelated to water use.
Use your observations
Decision map
Find the observation that best matches what you see, then follow the next safe action.
-
PATH 01Safety boundary
What you see
The first wet point is the household shutoff, supply tube, refrigerator inlet fitting, or a visibly cracked or kinked line, while the valve housing remains dry.
Do this next
Keep the refrigerator water supply closed. Have the damaged line, shutoff, or fitting repaired or replaced according to the appliance and local plumbing requirements; do not tighten a connection until it stops if that would crush the tubing or sleeve.
Why this path and its safety boundary
Why it matters: The leak is upstream of the inlet valve or at its external inlet connection. Water running along the tube can make the valve appear to be leaking.
Safety stop: Do not cut or pull tubing, replace a household shutoff, use a piercing valve, or pressurize a visibly damaged line.
-
PATH 02Safety boundary
What you see
The supply tube and inlet fitting remain dry, but the valve housing, seam, solenoid outlet, or tubing immediately leaving the valve becomes wet when the water supply is open or after a fill event.
Do this next
Close the water supply, keep it closed, and arrange appliance service with the model number and a photo of the first wet point. A technician should verify the valve and downstream tubing before selecting a replacement.
Why this path and its safety boundary
Why it matters: A failed water inlet valve, valve outlet connection, or model-specific internal seal is more likely than a household supply leak. The exact leak point still determines whether the valve or attached tubing is the failed part.
Safety stop: Do not open the valve, remove its terminals, bypass a solenoid, or run the refrigerator with a continuously leaking pressurized valve.
-
PATH 03Safety boundary
What you see
The valve and supply fittings stay dry, but water appears only when the dispenser is used or the ice maker requests water, or a downstream tube becomes wet.
Do this next
Stop using the water and ice functions, keep the supply closed until the accessible filter check is complete, and arrange model-specific appliance diagnosis if the leak returns or is behind a panel.
Why this path and its safety boundary
Why it matters: The inlet valve may be opening normally while a filter circuit, internal tube, dispenser connection, or ice-maker fill path leaks during flow. A valve replacement alone may not address the source.
Safety stop: Do not repeatedly activate the dispenser or ice maker, disconnect an internal tube, or remove a rear or door panel to follow the water path.
-
PATH 04Safety boundary
What you see
Water is inside the cabinet or under drawers, the filter was recently changed, or the filter is cracked, incorrectly seated, missing an O-ring, or wet while the rear inlet valve remains dry.
Do this next
With the water supply closed, inspect and reseat or replace the filter only according to the exact manual. If the housing, valve seat, or O-ring remains damaged or water returns, arrange appliance service.
Why this path and its safety boundary
Why it matters: The filter or filter housing is a stronger candidate than the water inlet valve. A filter leak can reduce or interrupt dispensing and can travel to the floor.
Safety stop: Do not force the filter, install an unverified substitute, leave a required filter improperly bypassed, or open the filter housing beyond the user procedure.
-
PATH 05Safety boundary
What you see
The valve, supply line, fittings, and filter are dry, but water accumulates inside or beneath the refrigerator without a clear connection to dispensing or ice filling.
Do this next
Keep the water supply closed until the source is known and arrange appliance diagnosis for water under the unit or behind interior panels. Record whether frost, an open-door event, or a recent move preceded the leak.
Why this path and its safety boundary
Why it matters: The leak may be from a defrost drain, drain pan, leveling condition, or another internal path rather than the pressurized inlet valve.
Safety stop: Do not pour chemicals into a hidden drain, remove freezer panels, scrape ice near tubing, or assume a new inlet valve will fix an unpressurized drain leak.
-
PATH 06Safety boundary
What you see
Water sprays or will not stop, the shutoff cannot be closed, water reaches the cord or outlet, the outlet is hot or damaged, or the leak source cannot be safely reached.
Do this next
Leave the area of wet electrical equipment, close the main water supply if that is the only safe way to stop flow, and arrange urgent plumbing or appliance service; use emergency help for active electrical or fire danger.
Why this path and its safety boundary
Why it matters: The priority is water-damage and electrical safety. Further valve testing could expose energized parts or worsen flooding.
Safety stop: Do not touch wet electrical equipment, move the refrigerator through water, reset a wet outlet, or continue troubleshooting to identify the valve.
Helpful context
Understand the symptom
Confirm the first wet point before condemning the valve
Water can run along the rear of a refrigerator and make a valve appear to be the source. Dry the visible line, fittings, valve body, and floor, then trace where water first returns. A leak at the household shutoff or tubing fitting is a supply-side problem; a wet valve seam or outlet after those connections stay dry points more strongly to the inlet valve itself.
Timing matters
A valve or connection that leaks continuously while the water supply is open differs from a downstream leak that appears only when the dispenser is used or the ice maker fills. Water inside the cabinet can also come from an incorrectly installed or cracked filter, filter housing, or a defrost-drain problem. Record when the drip starts rather than repeatedly running the dispenser.
Valve replacement is model-specific appliance work
The inlet valve is connected to the household water line and the refrigerator's internal water circuit, and its terminals or wiring may be near other electrical components. Manufacturer guidance emphasizes model-specific manuals and parts. Once the water is isolated, valve removal, electrical testing, tubing replacement, and any repair behind panels belong to a qualified appliance technician.
Safety boundary
Stop conditions
- Close the refrigerator water supply and arrange urgent help for a spray, uncontrollable flow, a shutoff that will not close, water near an outlet or electrical component, or a hot or damaged cord or outlet.
- Do not open the valve, disconnect solenoid terminals, bypass a valve, remove rear or interior panels, or perform electrical tests as part of a leak check.
- Do not pressurize visibly cracked tubing, cut a water line, overtighten compression fittings, or replace a household shutoff without appropriate plumbing knowledge and local-code consideration.
- Do not repeatedly run the dispenser or ice maker to reproduce a leak, and do not assume a wet puddle identifies the first leaking component.
- Keep the water supply closed and arrange appliance service when the valve body or outlet leaks, the leak persists after an exact filter check, or the source is behind a panel or otherwise inaccessible.
Only after diagnosis
Potential parts
- refrigerator water inlet valve
Consider this only when the supply line, inlet fitting, filter path, and accessible tubing are dry or ruled out, and qualified diagnosis confirms the valve body or solenoid outlet leaks or fails.
Match the exact refrigerator model, valve configuration, electrical connector, tubing ports, and water-pressure requirements; do not select by appearance alone. - refrigerator water supply line or fitting
Consider this only when the first wet point is a cracked, kinked, pulled-out, or damaged supply tube or its external fitting rather than the inlet valve body.
Confirm tubing material, outside diameter, fitting type, service-loop requirements, and local plumbing requirements before repair. - refrigerator water filter or filter seal
Consider this only when the filter is cracked, incorrectly seated, missing an O-ring, or the filter housing leaks while the rear inlet valve and supply connections stay dry.
Confirm the exact refrigerator model, filter design, seal arrangement, and manual-approved installation or bypass procedure. - refrigerator filter housing or internal water tubing
Consider this only after leak timing and a dry-paper-towel trace identify the housing or downstream tubing as the source and qualified diagnosis confirms the failed component.
Match the exact model, housing connections, tubing route, seals, and required access procedure; internal water-path repair may require appliance service.
When checks do not resolve it
Need a professional?
Arrange qualified appliance service when the water inlet valve body or outlet leaks, the leak returns after the exact external connection and filter checks, the source is behind a panel, or the refrigerator needs valve, tubing, filter-housing, or electrical diagnosis. Arrange urgent plumbing or electrical help for spray or uncontrolled flow, a shutoff that will not close, water near electrical parts, a hot or damaged outlet or cord, or any unsafe access condition.
Safety scope: This article covers closing the water supply, safe drying and visual tracing, accessible connection observation, model-manual filter checks, and leak-timing records. It does not authorize valve disassembly, solenoid or electrical testing, panel removal, tubing cutting, pressurized repair, wet-outlet handling, or work in standing water.
Common questions
FAQ
How do I tell whether the refrigerator water inlet valve is the part that is leaking?
Close the water supply, dry the supply line, fittings, valve body, and floor, then trace the first wet point. A wet household shutoff, tube, or inlet fitting points upstream; a valve body or outlet that becomes wet while adjacent connections stay dry makes the valve more likely. A puddle alone does not identify the failed part.
Should I leave the refrigerator water supply on when the inlet valve is leaking?
No. Close the refrigerator water shutoff and keep it closed until the source is confirmed and repaired. If there is active flow, water near electrical parts, or an inaccessible shutoff, stop handling the appliance and arrange urgent help.
Why does water leak only when I use the dispenser or make ice?
Event-linked leakage can come from downstream tubing, the filter circuit, dispenser connection, or ice-maker fill path rather than a continuously leaking inlet valve. Stop using water and ice, check only the accessible filter as the manual permits, and arrange service if the leak returns behind a panel.
Can a cracked refrigerator water filter look like an inlet-valve leak?
Yes. Manufacturer guidance links a cracked or incorrectly seated filter, missing seal, or filter-housing damage to cabinet and floor leaks. With the water supply closed, inspect and reseat or replace the filter only under the exact manual; a persistent housing leak needs service.
When should a leaking refrigerator water valve be serviced instead of repaired at home?
Arrange appliance service when the valve body or outlet leaks, the source is behind a panel, the leak persists after safe external connection and filter checks, or electrical testing or tubing disassembly would be needed. Treat spray, uncontrolled flow, water near an outlet, a hot or damaged cord, or an unclosable shutoff as urgent.
Read the exact guide
Official sources
- How to connect the water line to the Refrigerator?Samsung Support · Samsung installation guidance used for general water-line connection checks; exact connectors and repair method vary by model and region.
- Leaking at the Bottom - Side by Side RefrigeratorWhirlpool Product Help · Whirlpool side-by-side guidance; leak paths and filter locations vary by refrigerator model.
- How to Fix a Refrigerator That Is Leaking WaterWhirlpool · Whirlpool general refrigerator leak guidance; appliance-specific procedures vary by model.
- How to prevent and stop water leaks from your refrigeratorSamsung Support · Samsung Hong Kong product guidance; it is used for general connection and filter distinctions, while location and model procedures vary.
- Refrigerator Water LeaksFrigidaire Owner Support · Frigidaire refrigerator support guidance used for cross-brand leak-path distinctions; model instructions control a particular refrigerator.
- How to Check the Water Supply LineWhirlpool Product Help · Whirlpool refrigerator installation-support guidance used for general water-line tracing; the exact refrigerator manual controls model-specific fittings and repairs.
Community feedback
Share a repair observation
Share a plain-text repair observation. Accepted observations are published automatically; this page may take a moment to update.