
On this page
Start here
Quick answer
First decide whether the Samsung washer is truly receiving no water, is still in its normal weight-sensing delay, or is filling with less water than expected. Record any code or blinking lights. With the washer stopped and the floor dry, verify that the hot and cold supply valves are open, each hose is connected to the matching inlet, and neither hose is kinked, pinched, damaged, or a Flood Safe type. Check that the drain hose follows the exact model installation so siphoning is not defeating the fill. A front-load door or child lock can prevent a cycle from starting, and a blocked inlet screen can restrict flow; inspect or clean screens only if the model instructions permit and the water is safely shut off. Do not remove the rear drain-hose holder, open the cabinet, probe live wiring, or keep operating a washer that continuously fills, leaks, or has water near electrical parts. If the supply, hose routing, door or lid, and model-documented screen checks are correct but the washer still will not fill, request qualified service.
Before you begin
Safety first
- Keep the washer off for continuous filling, leaks near electrical parts, smoke, burning or electrical odor, a hot plug or outlet, a washer that will not turn off, or a tub that will not stop. Do not open the cabinet, bypass safety devices, or repeat fill tests.
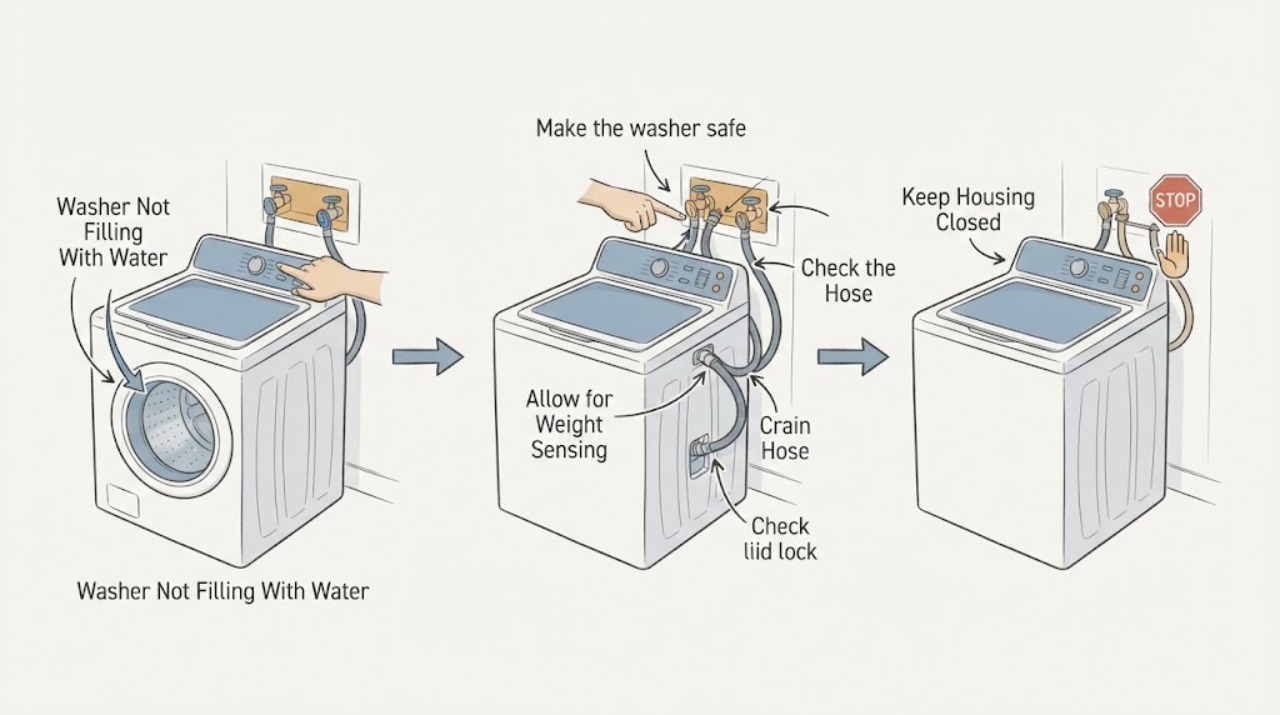
Work through in order
Diagnostic checks
Use only checks that match the exact appliance or system and its official guide.
-
Make the washer safe and classify the fill symptom
Press Pause or Power and wait until the tub or drum is completely still. Record the exact model, front-load or top-load style, selected cycle, whether any water enters, how long the display remains in sensing, and every code or blinking light. From a dry, safe position, look for water near the cord, outlet, controls, smoke, a hot connection, a leak, or a washer that continuously fills.
Expected result: Water is near electrical equipment, the washer continuously fills, a leak is spreading, smoke or a burning odor appears, the washer will not stop, or the tub does not stop moving.
Next step: Keep clear and isolate power only from a safe, dry location. Do not touch wet electrical equipment or pull a wet plug. Close the water valves only if safely reachable from a dry position, then arrange qualified appliance or electrical service; use emergency help for smoke or fire.
Stop if: Do not restart, open the cabinet, or reach into a moving tub.
Why this matters
Why: This is an electrical, fire, water-damage, or moving-equipment safety event rather than a routine supply check.
-
Allow for Weight Sensing and check for a true no-fill
If the display says Weight Sensing or shows rolling lines, leave the washer undisturbed while it performs the model's sensing step. Do not add or remove laundry during the check. If the display advances and water begins, note that it was a delay rather than a failed fill; if the cycle never advances and no water enters, continue with the supply checks.
Expected result: The washer rotates briefly and then fills, the sensing phase continues unusually long, or the cycle stops with no water and a water-supply code or blinking light.
Next step: Use the model-specific error and fill guidance for a stalled or no-fill result. Do not assume the washer is defective merely because the initial water delay is visible.
Stop if: Do not manually skip a model's sensing sequence or repeatedly restart a stalled washer.
Why this matters
Why: A short sensing period can be normal. A stalled sensing phase or true no-fill condition points toward supply, hose, drain-siphon, door or lid, inlet screen, or control diagnosis.
-
Verify both water valves and matching hose connections
With the washer off and the area dry, confirm that the household hot and cold valves are fully open and that the hot hose goes to the hot inlet and the cold hose to the cold inlet. Inspect the visible hose bodies and both ends for kinks, pinching, crushing, damage, or a hose type the Samsung guidance excludes. Do not loosen a pressurized connection or reach behind a wet appliance.
Expected result: A valve is closed, the lines are swapped, a hose is kinked or damaged, only one line is connected, or both lines are open, correctly matched, and undamaged.
Next step: Correct only a safe, visible valve or hose-routing issue and keep the washer off for a damaged hose. If a connection, valve, or inlet is damaged or cannot be safely accessed, request service.
Stop if: Do not use tape, glue, or a makeshift clamp on a pressurized supply hose.
Why this matters
Why: A closed, mismatched, restricted, or missing supply line can prevent water entry or cause a water-supply or hot-and-cold error. A correct visible supply side shifts suspicion toward inlet screens, drain siphoning, door or lid sensing, or the washer's inlet system.
-
Inspect drain-hose routing for siphoning
Check the visible drain hose against the exact Samsung installation instructions. For the general Samsung guidance, a standpipe insertion should be neither too shallow nor too deep, the hose should be secured without an airtight seal, and the drain should remain within the model's permitted height range. Look for a hose below the required height, pushed too far down, taped airtight, kinked, pinched, or missing its rear holder; do not remove that holder screw.
Expected result: The hose is inserted outside the model range, forms an airtight connection, slips down, is too low or high, is kinked, or is correctly routed and secured.
Next step: Make only the model-documented visible routing correction and secure the hose. If the holder is missing, the hose is damaged, or the no-fill condition remains, arrange service.
Stop if: Do not pull out or disconnect a wet hose, remove the rear retaining screw, or seal the standpipe airtight.
Why this matters
Why: Siphoning can remove water as the washer tries to fill, making a supply problem appear when the water is actually draining away. Correct routing with a continuing no-fill result makes a water inlet or control issue more likely.
-
Check the door, lid, and child-lock state
For a front-load washer, confirm that the door closes fully and the lock indicator behaves as the model manual describes. For a top-load washer, confirm that the lid is closed and not obstructed. Check whether Child Lock is active. Do not force a latch, pry the door, or bypass an interlock; keep hands out of the tub until it is completely still.
Expected result: The door or lid was open or obstructed, Child Lock is active, the lock indicator never engages, or the closure appears correct but no water enters.
Next step: Clear only a visible obstruction and use the exact model's Child Lock procedure. If the latch, lock light, or switch is damaged or the no-fill condition remains, request service.
Stop if: Do not bypass or defeat the door or lid interlock.
Why this matters
Why: Samsung uses door or lid and child-lock states to prevent a cycle or water from starting on applicable models. A damaged or unrecognized interlock can stop the fill sequence.
-
Check inlet screens only if the model allows safe access
If both valves and hoses are correct but no water enters, turn the water valves off and follow the exact model instructions before disconnecting a supply hose. Look only at the washer-side inlet connections for visible debris; clean a removable inlet screen only when the manual permits, the connection is depressurized, and the floor and electrical area are dry. Reconnect securely and reopen the valves before any test.
Expected result: Debris is visible at a documented removable inlet screen, a screen is damaged or inaccessible, no debris is visible, or water begins after the screen and hose check.
Next step: Clean and refit only as the model manual permits. Stop for a damaged seal, uncontrolled water, a stripped connection, or a returning no-fill code and request service.
Stop if: Do not probe an inlet screen with metal, work on a pressurized hose, or remove cabinet panels to reach an internal valve.
Why this matters
Why: Samsung explains that dirt or debris in the water supply can be filtered before entry and eventually block the inlet. A clean or inaccessible screen with continued no-fill points toward the inlet valve, wiring, sensor, or control system.
-
Distinguish low water from a no-fill fault
If some water enters but the load looks dry, compare the result with the exact cycle and load type rather than adding water manually. Samsung uses weight sensing and may use less water on high-efficiency cycles; bulky bedding, waterproof items, and some settings have their own documented cycle guidance. Check whether the washer displays a fill code, whether the water level increases normally, and whether laundry is overloaded.
Expected result: The washer fills a little and then washes normally, water is insufficient for a bulky load or selected cycle, no water enters at all, or a fill code or blinking light returns.
Next step: Use the cycle and settings documented for the load. Do not calibrate or change settings as a substitute for checking a true no-fill error; request service if the amount remains abnormal after the model guidance.
Stop if: Do not pour water into the washer or override a water-level control.
Why this matters
Why: A low but designed water level is different from a supply failure. A true no-fill or recurring code needs the supply and inlet path checked rather than calibration or a guessed part.
-
Perform one model-documented power cycle after visible checks
Only after the hoses, valves, drain routing, closure, and any permitted inlet-screen check are correct, cycle power once using the exact Samsung guidance. Disconnect power only from a safe, dry location, wait the model-specified interval, restore power, and run one supervised fill attempt. Do not cycle power while water is near electrical equipment or a leak is active.
Expected result: Water enters normally once, the same fill code returns, the washer fills and immediately drains, or no water enters after the reset.
Next step: If the no-fill condition or code returns, leave the washer off and arrange qualified service with the recorded model, code, hose state, and observations.
Stop if: Do not repeat resets or run cycles to force a washer that still will not fill.
Why this matters
Why: A single reset may clear a temporary control state, but it cannot repair a blocked supply, siphoning drain, failed inlet valve, sensor, wiring, or control fault.
Use your observations
Decision map
Find the observation that best matches what you see, then follow the next safe action.
-
PATH 01Next step
What you see
The washer displays Weight Sensing or rolling lines, rotates briefly, and then begins filling without a code or abnormal symptom.
Do this next
Let the cycle proceed and use the exact model's cycle guidance. Request service only if sensing never completes or the no-fill symptom returns.
Why this path and its safety boundary
Why it matters: The initial delay is likely Samsung's normal load-sensing phase rather than a failed water supply.
-
PATH 02Next step
What you see
No water enters, the valves are closed or hoses are kinked, swapped, damaged, or disconnected, or a matching water-supply code appears.
Do this next
Correct the visible valve and hose condition safely, then perform one model-documented fill attempt. Request service for a damaged connection, returning code, or inaccessible supply problem.
Why this path and its safety boundary
Why it matters: An external supply setup is more likely than an internal inlet-valve fault.
-
PATH 03Next step
What you see
Water appears to enter but disappears through a low, over-inserted, kinked, or airtight drain hose, or the hose is not secured.
Do this next
Correct only the exact model's visible drain routing and retain the rear holder. Stop and request service for a damaged hose, missing holder, or continuing no-fill condition.
Why this path and its safety boundary
Why it matters: Drain-hose siphoning or routing can imitate a no-fill symptom by removing water as it enters.
-
PATH 04Next step
What you see
The front-load door or top-load lid is open, obstructed, locked by Child Lock, or not recognized as closed.
Do this next
Clear only visible obstruction and use the model-specific Child Lock procedure. Do not bypass the interlock; request service for a damaged latch, lock, or recurring no-fill condition.
Why this path and its safety boundary
Why it matters: The interlock is likely preventing the fill sequence for safety.
-
PATH 05Next step
What you see
Both supply lines and drain routing are correct, the door or lid is recognized, and a documented inlet-screen check finds debris or an inaccessible or damaged screen.
Do this next
Clean and refit only as the exact model instructions allow. If water still does not enter or the screen cannot be safely serviced, leave the washer off and request appliance service.
Why this path and its safety boundary
Why it matters: Inlet debris or a model-specific inlet restriction is plausible; a damaged or inaccessible screen requires service.
-
PATH 06Next step
What you see
Some water enters and the cycle runs, but the level seems low only with a bulky load or a normal high-efficiency cycle, without a code.
Do this next
Use the cycle and options documented for the load. Do not add water manually or recalibrate solely from appearance; request service if the washer truly underfills across suitable cycles.
Why this path and its safety boundary
Why it matters: The result may reflect weight sensing or the selected cycle's intended water use rather than a no-fill fault.
-
PATH 07Next step
What you see
The washer still will not fill after the visible valves, hoses, drain routing, closure, inlet-screen, and single-reset checks, or the same code returns.
Do this next
Leave the washer off and arrange qualified Samsung appliance service. Provide the exact model, code, cycle stage, hose and valve state, screen result, and whether the washer tried to drain.
Why this path and its safety boundary
Why it matters: An inlet valve, sensor, wiring, control, or model-specific fault is possible and cannot be confirmed by safe external checks.
-
PATH 08Next step
What you see
The washer continuously fills, leaks, has water near electrical equipment, smokes, smells electrically, will not turn off, or the tub does not stop.
Do this next
Keep clear, isolate power only from a safe dry location, close water valves only if safely reachable, and arrange qualified appliance or electrical service. Do not restart.
Why this path and its safety boundary
Why it matters: The immediate risk is water damage, shock, fire, or injury; normal fill troubleshooting must stop.
Helpful context
Understand the symptom
No fill and low fill are different symptoms
A Samsung washer may rotate briefly during Weight Sensing before it adds water, and high-efficiency cycles intentionally use less water than older washers. If no water enters at all, the panel often shows a water-supply code or blinking lights. Treat a short delay, a low but normal level, and a true no-fill condition as separate investigations.
Check both water lines, not just the cold side
Samsung can use hot and cold water dynamically, and some cycles labeled Cold may still call for the hot line under certain conditions. A closed, kinked, swapped, or missing hot line can therefore look like a washer that will not fill. Match each hose to the labeled inlet and use the model manual for cycle-specific behavior.
Drain routing can imitate a fill problem
If the drain hose is too low, pushed too far into the standpipe, or sealed airtight, water can siphon away as the washer tries to fill. Correct only the visible routing allowed by the exact model instructions. Do not remove the rear retaining screw or disconnect a wet drain connection to experiment.
Safety boundary
Stop conditions
- Stop immediately for a continuous fill, a significant leak, water near an outlet, plug, cord, or controls, smoke, burning or electrical odor, a hot connection, a washer that will not turn off, or a tub that will not stop. Keep clear and isolate power only from a safe, dry location.
- Do not reach into a moving tub, bypass a lid or door interlock, open the cabinet, probe live wiring, or remove an internal water valve or control.
- Do not work on a pressurized or wet hose, remove the rear drain-hose retaining screw, or seal the standpipe airtight as a fill fix.
- Do not pour water into the washer, force a stuck inlet screen, repeat resets, or keep running cycles after a true no-fill code returns.
Only after diagnosis
Potential parts
- water inlet hose or sealing washer
Consider this only when inspection identifies a damaged external supply hose or sealing washer at the leaking or restricted connection and the exact model is confirmed.
Hose ends, seals, and connection requirements vary by model and installation. Confirm the exact model and diagnosis before selecting a replacement. - water inlet valve or inlet screen
Consider this only after both valves and hoses are correct and a qualified diagnosis confirms a failed inlet valve or damaged screen rather than a supply or routing issue.
Valve ports, screens, wiring, and fit are model-specific. Do not order or install an inlet component based on a code alone. - door or lid-lock assembly
Consider this only when the exact model fails to recognize a correctly closed door or lid and service diagnosis confirms the interlock is preventing filling.
Lock assemblies differ by Samsung washer style, model, and region. Confirm the exact model and diagnosis before selecting a part.
When checks do not resolve it
Need a professional?
Arrange service for a persistent no-fill condition, returning nF, 4C, 4E, or related fill code, a damaged or inaccessible inlet screen or valve, a failed door or lid interlock, continuous filling, a leak, or any electrical symptom.
Safety scope: Keep the washer off for continuous filling, leaks near electrical parts, smoke, burning or electrical odor, a hot plug or outlet, a washer that will not turn off, or a tub that will not stop. Do not open the cabinet, bypass safety devices, or repeat fill tests.
Common questions
FAQ
Why is my Samsung washer taking a long time before it fills?
Samsung washers may perform Weight Sensing first, rotating briefly before adding the amount of water calculated for the load. If sensing never completes, no water enters, or a water-supply code appears, check the supply and drain-routing branches instead of assuming the delay is normal.
What should I check if a Samsung washer does not fill at all?
Check that both hot and cold valves are open, the hoses match their labeled inlets and are not kinked, the drain hose is routed correctly, and the door or lid is recognized as closed. If the exact model permits, inspect the inlet screens with the water safely shut off. Request service if the washer still will not fill.
Can a drain hose cause a Samsung washer not to fill?
Yes. If the drain hose is too low, pushed too far into the standpipe, kinked, or sealed airtight, water can siphon away as it enters. Compare the visible routing with the exact model instructions and do not remove the rear retaining screw.
Why does my Samsung washer show 4C, 4E, or nF?
Samsung uses these and related displays for water-entry problems on applicable models. Check the matching hot and cold hoses, open valves, drain-hose routing, and inlet debris using the exact model guidance. If the code returns after one documented reset, request service.
Should I clean Samsung washer inlet screens myself?
Only if the exact model instructions permit it and the water supply is shut off, the connection is depressurized, the floor is dry, and the electrical area is safe. Do not probe the screen with metal or remove cabinet panels. Stop for a damaged seal, uncontrolled water, or an inaccessible screen and request service.
Is a Samsung washer supposed to use hot water on a Cold setting?
Samsung says some temperature settings labeled Cold can still call for the hot line under certain conditions, and a missing hot line can produce a supply error. Match hot to hot and cold to cold and follow the exact model's cycle guidance rather than disconnecting a line based on the label alone.
When should I stop troubleshooting a Samsung washer that will not fill?
Stop for continuous filling, a leak, water near the cord or outlet, smoke, burning or electrical odor, a hot connection, a washer that will not turn off, or a tub that will not stop. Keep clear and isolate power only from a safe, dry location. Leave the washer off and request qualified service.
Read the exact guide
Official sources
- Samsung washing machine will not drainSamsung · Samsung support guidance; model-specific drain height and filter access control.
- Samsung washing machine information and error codesSamsung · Samsung error-code overview; exact code display and applicable steps vary by model.
- Samsung washing machine will not start or fill with waterSamsung · Samsung support guidance; emergency-drain and lock access differ by model.
- Water fill issues with Samsung washing machinesSamsung · Samsung support guidance; exact controls, water use, and installation requirements vary by model and region.
Community feedback
Share a repair observation
Share a plain-text repair observation. Accepted observations are published automatically; this page may take a moment to update.