
On this page
Start here
Quick answer
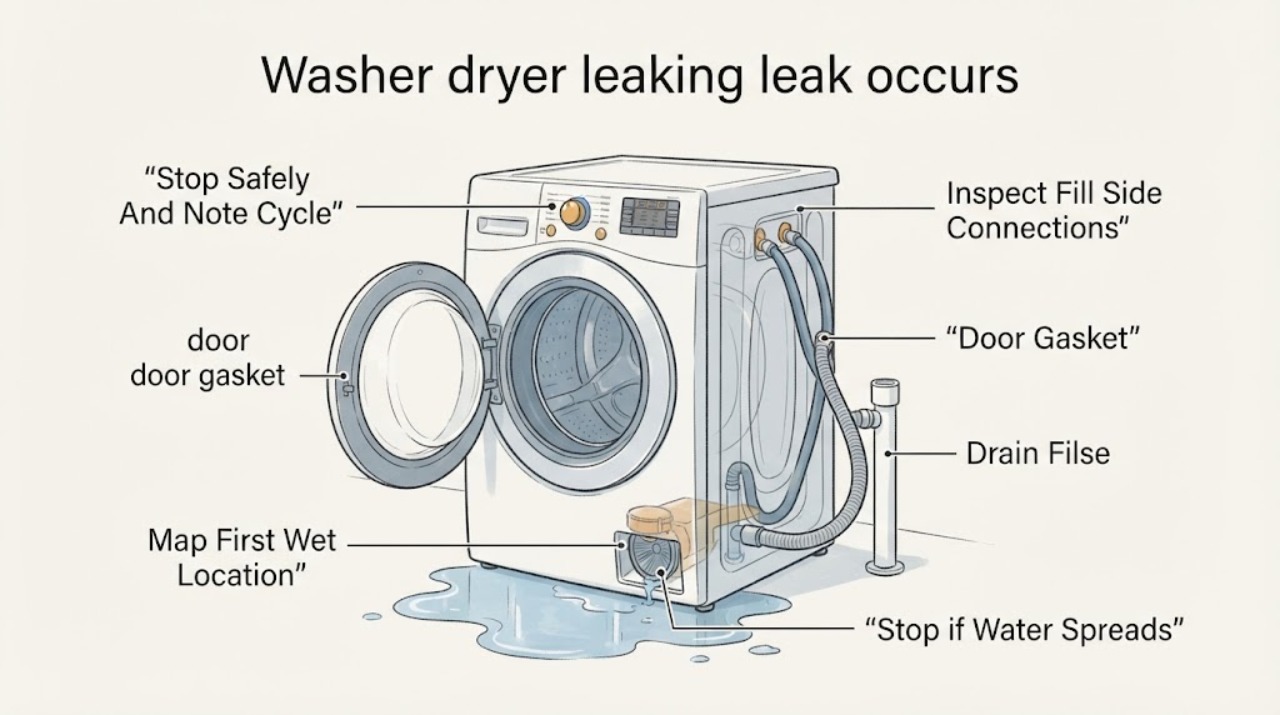
When a washer dryer leaks during filling or draining, first identify which part of the cycle starts the water and where the water first appears. A fill-time leak is more often associated with an inlet hose connection, hose damage, dispenser overflow, or door and gasket area; a drain-time leak is more often associated with a loose, cracked, or kinked drain hose, a drainpipe that backs up, a pump-filter area, or an internal drain path. From a dry, safe position, stop the cycle if the controls can be reached without contacting water, and close accessible supply valves only when it is safe to do so. Inspect visible hose connections, the drain hose and standpipe, the dispenser, and the door gasket without opening panels or reaching into wet areas. Use only the detergent type and amount specified for the appliance. If water is near electrical parts, the leak is heavy, a hose or gasket is split, the source is underneath or inside the cabinet, the household drain backs up, or the leak returns after these external checks, leave the appliance out of service and arrange qualified appliance repair.
Work through in order
Diagnostic checks
Use only checks that match the exact appliance or system and its official guide.
-
Check 1
From a dry standing position, stop the cycle with the normal controls only if the controls are dry and reachable; if safe to reach without stepping in water, close the accessible hot and cold supply valves, then note whether the leak began during fill, wash, rinse, or drain.
Expected result: Record whether water is still entering, whether the drum is pumping out, whether the leak is a small drip or active flow, and whether water is near the cord, outlet, control panel, or other electrical area.
Next step: Keep clear of wet electrical areas, do not reach through water, and arrange urgent qualified help if the source cannot be isolated safely. Otherwise continue only with dry, external observations after the appliance is no longer actively filling or draining.
Stop if: Do not touch wet electrical parts, reach into standing water, pull or move the appliance alone, or continue a cycle that is releasing water rapidly.
Why this matters
Why: Continuing water entry or a drain overflow can increase damage. Water near electrical parts, an active heavy leak, or an unsafe wet approach is a stop condition rather than a troubleshooting opportunity.
-
Check 2
With the appliance stopped and the floor safe, use a dry cloth or visual inspection from ordinary access to map where water first appears: front door or gasket, dispenser, rear hose connections, drain hose or standpipe, filter access area, or underneath the cabinet.
Expected result: Compare the first wet location with the recorded cycle timing and note whether the water is clear incoming water, sudsy water, or water that appears only when the drain pump runs.
Next step: Follow the matching fill-side, drain-side, or service branch instead of repeatedly running a leaking appliance to reproduce the puddle.
Stop if: Do not remove panels, tip the appliance, or place hands underneath it to find the source.
Why this matters
Why: A front or dispenser location during fill favors the fill path or suds; a rear or standpipe location during drain favors the drain hose or household drain; an underneath or inaccessible location makes an internal leak more likely.
-
Check 3
If water starts during filling, visually inspect both inlet hoses from the household valves to the washer dryer, both connection ends, their rubber washers, the visible hose surfaces, and the detergent dispenser for residue or an obstruction; do this with the supply valves closed when a connection needs to be approached.
Expected result: Look for a wet hose end, missing or worn washer, loose or cross-threaded connection, split or kinked hose, water tracking from the valve, or dispenser residue that makes the drawer or compartment overflow.
Next step: Only hand-correct an obviously loose, model-permitted external connection without forcing it, and replace a visibly damaged hose or washer with an exact compatible part. If the rear of the machine or an inlet valve body is leaking, leave the supply closed and arrange service.
Stop if: Do not over-tighten, open the cabinet, disturb an inlet valve, or keep the supply on when a hose is split or a connection continues to leak.
Why this matters
Why: A leak confined to a hose end or damaged washer points to that connection or hose. A cracked hose needs replacement. Water from the household valve is a plumbing issue, while dispenser overflow points to cleaning and model-specific dispenser service rather than the drain path.
-
Check 4
If water starts during draining, inspect the full visible drain hose for cracks, holes, kinks, or a loose end, then inspect where it enters the standpipe or laundry sink for secure placement and signs of overflow or backflow.
Expected result: Note whether the hose has pulled out, water escapes at the hose, water rises around the standpipe or sink, the household drain is slow, or the appliance-side connection leaks only while the pump runs.
Next step: Re-secure an accessible hose only as the model installation instructions allow and clear or have the household drain serviced when it backs up. Request appliance service for a damaged appliance-side connection or an inaccessible pump or filter leak.
Stop if: Do not seal the drain hose airtight into the standpipe, force it farther into the drain, open the cabinet, or use repeated drain cycles to test an active overflow.
Why this matters
Why: A displaced or damaged hose can release the pump-out water directly onto the floor. Overflow around the standpipe or sink points to a restricted or slow household drain rather than a washer dryer cabinet leak. A leak at the appliance-side connection or underneath leaves the internal drain path or pump area in question.
-
Check 5
After the supply and drain paths are dry and safe to inspect, check the dispenser drawer and cavity for detergent buildup, the door glass and gasket for hair, lint, residue, tears, or distortion, and the tub for unusually heavy suds; use only the appliance maker's approved cleaning method.
Expected result: Record whether the dispenser is obstructed or overfilled, the gasket is torn or cannot seal, or persistent suds are present after a cycle.
Next step: Clean only removable, ordinary-access residue as the model guide permits, use the specified detergent and amount on the next approved cycle, and stop using the appliance if the gasket is damaged or the leak repeats.
Stop if: Do not use straight bleach or unapproved chemicals on the gasket, force a damaged drawer, or run a full load to prove that a known leak has stopped.
Why this matters
Why: Dispenser buildup can cause the compartment to overflow, a damaged or dirty gasket can let water escape at the door, and non-HE or excessive detergent can produce suds-related leaks. A torn gasket or persistent leak after cleaning needs service.
-
Check 6
Document the appliance model, cycle stage, first wet location, photographs of visible hose and gasket conditions, whether the household drain backed up, the detergent used, and whether closing the supply stopped the leak before contacting the manufacturer or a qualified appliance technician.
Expected result: The leak persists with external hoses secure, returns from underneath or behind the cabinet, involves a pump-filter area that cannot be safely serviced, or occurs with water near electrical parts or a damaged cord or outlet.
Next step: Leave the washer dryer out of service, keep supply valves closed when appropriate, and give the technician the timing, location, photographs, and model information for a targeted diagnosis.
Stop if: Do not open the cabinet, disconnect wiring, test energized components, or keep operating the appliance while an internal or electrical leak is suspected.
Why this matters
Why: These patterns are not reliably distinguished by an external hose check and can involve an internal hose, pump, valve, seal, filter housing, or cabinet path. Continuing to run the machine can spread water damage and obscure the source.
Use your observations
Decision map
Find the observation that best matches what you see, then follow the next safe action.
-
PATH 01Safety boundary
What you see
Water appears as the machine fills and is wettest at an inlet hose end, household valve, rear inlet area, or detergent dispenser.
Do this next
Keep the supply closed while the connection is addressed safely, use only a model-compatible hose or washer if that is the confirmed external fault, and call appliance or plumbing service when the source is behind the cabinet or at the household valve.
Why this path and its safety boundary
Why it matters: A wet connection, worn washer, or split inlet hose makes the fill hose path more likely; residue or overflow confined to the dispenser makes the dispenser path more likely. Water from the household valve is outside the appliance.
Safety stop: Do not over-tighten a connection, open the cabinet, or run another fill with a split hose or continuing leak.
-
PATH 02Safety boundary
What you see
The leak begins when the pump drains and water is visible at a cracked hose, a hose that has come out of the standpipe, or an appliance-side drain connection.
Do this next
Secure the accessible hose only according to the model installation guidance; replace a visibly damaged hose with an exact compatible part, and request service for an appliance-side or inaccessible leak.
Why this path and its safety boundary
Why it matters: A hose defect or loose placement can release drain water before it reaches the household drain. An appliance-side connection that leaks only under pump flow may be an internal hose or pump-path problem.
Safety stop: Do not force the hose, seal the standpipe airtight, open panels, or repeat drain cycles while water is escaping.
-
PATH 03Safety boundary
What you see
Water rises around the standpipe, laundry sink, or drain opening during pump-out, while the washer dryer hose itself is not visibly split.
Do this next
Stop using the drain until the household drain is cleared or assessed by a plumber, then verify the hose is securely positioned without an airtight seal before returning the appliance to service.
Why this path and its safety boundary
Why it matters: The pattern makes a slow, restricted, or backing-up household drain more likely than a leak from the washer dryer cabinet. Water may eventually recede while still overflowing during the pump's discharge.
Safety stop: Do not keep running drain cycles into an overflowing standpipe or assume the appliance is fixed because the puddle later recedes.
-
PATH 04Safety boundary
What you see
The leak is at the dispenser, door, or rear vent area and there is detergent residue, a dirty or torn gasket, or unusually heavy suds.
Do this next
Use only the specified detergent and amount, clean ordinary-access residue as the model guide permits, and arrange service for a torn gasket, persistent suds, or a leak that remains after the external cause is corrected.
Why this path and its safety boundary
Why it matters: Buildup can obstruct a dispenser, a damaged gasket can prevent a door seal, and incorrect or excessive detergent can create suds that escape. The visible symptom does not prove that a pump or inlet valve is failed.
Safety stop: Do not use unapproved chemicals, force the door or dispenser, or run a normal load with a torn gasket or continuing leak.
-
PATH 05Safety boundary
What you see
The source is underneath or behind the cabinet, the leak continues with external paths secure, the filter or pump area cannot be safely managed, or water has reached electrical parts.
Do this next
Leave the appliance out of service, keep clear of wet electrical areas, close accessible supply valves only from a dry safe position, and arrange qualified appliance repair; use qualified plumbing help when the household drain or valve is the source.
Why this path and its safety boundary
Why it matters: An internal hose, pump, valve, seal, filter housing, or electrical-area leak cannot be safely classified from ordinary external checks. The risk of shock, further water damage, or cabinet damage outweighs repeated testing.
Safety stop: Do not open the cabinet, reach through water, move the appliance alone, disconnect wiring, or test live components.
Helpful context
Understand the symptom
Use the timing of the leak to narrow the path
Water that appears as the drum begins to fill points toward the inlet side, detergent dispenser, door opening, or an over-sudsing condition. Water that first appears when the machine pumps out points toward the drain hose, standpipe or sink, drain filter area, or a restriction that makes water back up. A puddle found only after the cycle may have traveled from the rear or underneath, so wipe the area dry only from a safe, dry position and note the first wet location rather than assuming the puddle marks the source.
Check external connections before considering internal parts
Look at both ends of the inlet hoses, the full visible drain hose, and the point where the drain hose enters the standpipe or laundry sink. Connections should be secure without being forced, and the drain hose should be held in place without being sealed airtight into the drain. A cracked hose, missing washer, loose connection, overflow at the standpipe, or water that appears only at the dispenser changes the next step; none of those findings requires opening the cabinet.
Suds, gasket damage, and an internal source need different decisions
Only use the detergent specified for a high-efficiency appliance and follow the appliance maker's amount guidance. Residue or an obstructed dispenser can make its compartment overflow, while hair, lint, or a torn door gasket can let water escape from the front. If the filter area or underside leaks, use its exact model instructions only when the appliance is safely empty and the area can be managed without exposing yourself to water or electrical hazards; otherwise have the source diagnosed.
Safety boundary
Stop conditions
- Do not touch wet electrical parts, reach through standing water, or continue a cycle when water is near the cord, outlet, controls, or other electrical areas.
- Do not open panels, disconnect wiring, tip or pull the appliance alone, or test an internal pump, valve, or hose as an ordinary-user repair.
- Do not over-tighten inlet connections, force a drain hose into the standpipe, or seal the drain hose airtight.
- Stop using the appliance for a split hose, torn door gasket, active heavy flow, repeated leak, inaccessible source, or household drain overflow until the appropriate appliance or plumbing professional evaluates it.
- If the leak cannot be isolated from a dry, ordinary-access position, preserve the model and cycle details and arrange qualified service instead of repeatedly running the washer dryer.
Only after diagnosis
Potential parts
- inlet hose or hose washer
Consider this only when a fill-time leak is localized to a cracked hose, worn washer, or a confirmed hose-end connection and the exact model or fitting is verified.
Confirm the appliance model, hose length, connection type, and manufacturer's fit information before ordering. - drain hose
Consider this only when draining produces a leak from a visibly split or damaged hose rather than from a backing-up household drain or the appliance-side connection.
Confirm the exact model, hose routing, connection ends, and installation requirements before ordering. - door gasket
Consider this only when water is localized to the door and the gasket is visibly torn, distorted, or unable to seal after ordinary-access cleaning.
Confirm the exact model and gasket revision with the manufacturer before ordering; do not assume a generic gasket fits. - drain pump filter or pump assembly
Consider this only after the drain hose and household drain are clear and a leak is confirmed at a model-user-serviceable filter or pump area; internal pump replacement needs qualified diagnosis.
Confirm the exact model and whether the component is user-serviceable before ordering or attempting any repair.
When checks do not resolve it
Need a professional?
Arrange qualified appliance repair when the leak comes from underneath or behind the cabinet, persists after visible hose and drain checks, involves a torn gasket, inlet valve, pump-filter area, or internal connection, or returns on the next safe approved cycle. Call a plumber when the household valve or standpipe backs up or leaks independently of the appliance. Treat water near electrical parts, an active heavy leak, a damaged cord or outlet, or any situation that requires reaching through water or moving the appliance as an immediate stop condition.
Common questions
FAQ
Why does my washer dryer leak only when it fills?
Start with the inlet hose ends, rubber washers, household valves, and dispenser. A wet hose connection or split hose points to the fill path; water from the dispenser can result from residue or an obstruction. Keep the supply closed for a continuing leak and arrange service if the source is behind the cabinet.
Why does the leak happen only when the washer dryer drains?
Inspect the visible drain hose and the standpipe or laundry sink. A hose that is loose, incompletely inserted, cracked, or kinked can release pump-out water; water rising around the drain opening points to household drain restriction or backflow.
Can too much detergent make a washer dryer leak?
Yes. Non-HE detergent or more detergent than the appliance maker specifies can create excessive suds, and residue can contribute to dispenser or vent-area leakage. Use the specified detergent and amount, and stop for service when suds-related leaking persists.
Should I run another cycle to find the leak?
Do not repeatedly run a known leaking appliance. If the floor and controls are dry, the model instructions permit it, and there is no active or electrical hazard, a qualified, closely observed empty check may help confirm timing; stop immediately for heavy flow, overflow, water near electrical parts, or an inaccessible source.
When does a washer dryer leak need a technician?
Arrange qualified appliance repair for a leak from underneath or behind the cabinet, a torn gasket, a pump or filter area that cannot be safely managed, a leak that persists with external hoses secure, or any repeated leak. Use plumbing service when the household valve or drain backs up independently of the appliance.
Read the exact guide
Official sources
- [LG front load washer leak] Water leaks from the drain outlet and drain hose during drainageLG USA Support · Manufacturer guidance for a loose drain hose, clogged drainpipe, backflow, and overflow observed during drainage.
- Leaking from Back - All-In-One Washer DryerWhirlpool Product Help · Manufacturer troubleshooting guidance for inlet hose connections, drain hose and household drain backup, and detergent-related suds.
- LG Washer – Why is My Front Load Washing Machine Leaking?LG USA Support · Manufacturer troubleshooting guidance for dispenser buildup, door gasket, drain filter, inlet hoses, drain hose, household drain overflow, and detergent or suds.
Community feedback
Share a repair observation
Share a plain-text repair observation. Accepted observations are published automatically; this page may take a moment to update.