
On this page
Start here
Quick answer
Clothes that remain wet in a washer-dryer may have entered the drying phase with too much water, exceeded the smaller drying capacity, used an unsuitable cycle, or encountered a blocked filter, heat exchanger, drain hose, water supply, airflow path, heater, or sensor. First check whether the load spun out, whether the dry cycle actually ran, and whether the load is within the model's drying limit and sorted by fabric thickness. For a condensing or ventless combo, the model may need a water supply and a clear drain path to remove moisture; a restricted inlet or a drain hose that holds water can reduce drying. Clean only user-accessible filters or heat-exchanger areas as the manual allows. Do not open a heater, remove panels, test live parts, or run repeated cycles with a burning smell, abnormal heat, smoke, or a fault.
Before you begin
Safety first
- This article covers cycle and load checks, external water and drain observations, model-accessible filter or heat-exchanger cleaning, and documented user controls. It does not authorize moving a stacked unit, opening panels or sealed components, testing live parts, bypassing safety devices, or replacing internal parts.
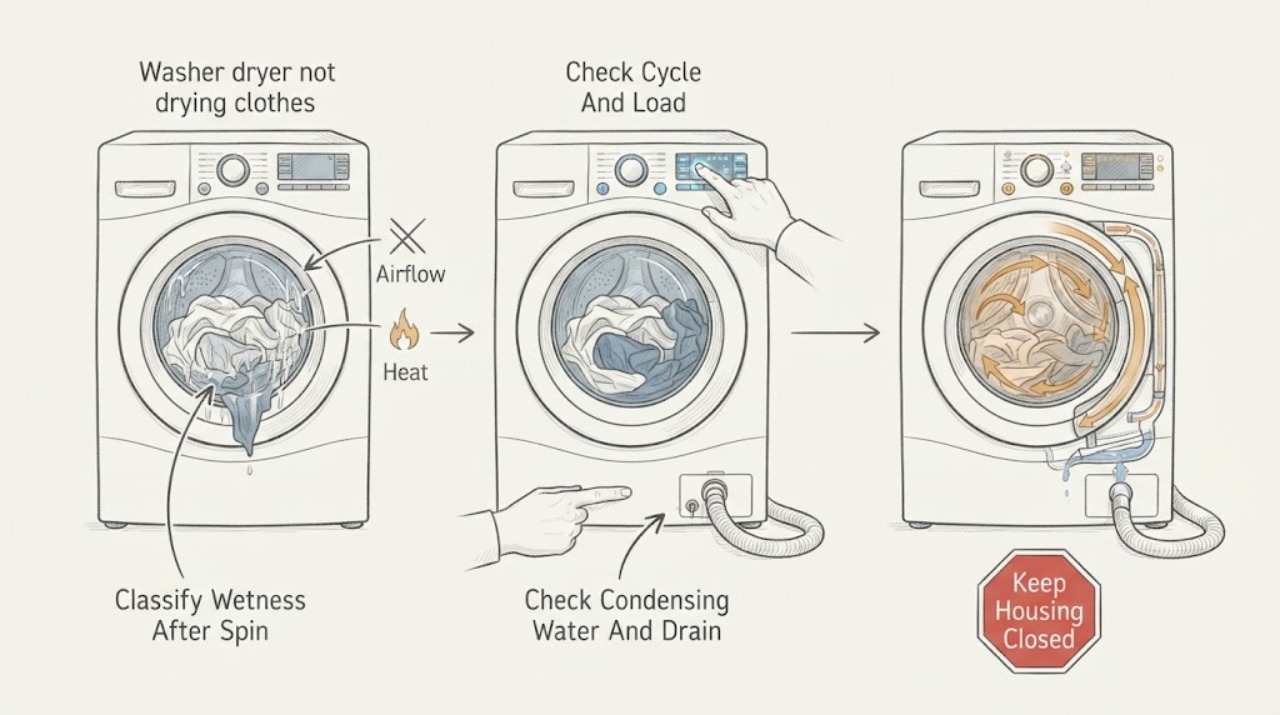
Work through in order
Diagnostic checks
Use only checks that match the exact appliance or system and its official guide.
-
Check 1
Remove a small representative load after the wash and spin portion, or select the model's documented spin-only cycle once; compare whether water is dripping, the drum still contains water, the load is merely damp, or the spin never reaches its normal result.
Expected result: Clothes are dripping wet before drying, water remains in the drum, the load is damp but not saturated, or spin completes normally.
Next step: Resolve a model-accessible drain or load issue before judging drying performance. If spin and drain are normal but the dry cycle leaves clothes wet, continue with the drying-specific checks.
Stop if: Do not open a pump, reach into a moving drum, or run repeated spin cycles when a fault, leak, burning smell, or abnormal noise is present.
Why this matters
Why: Dripping clothes or standing water point first to a drain restriction, pump filter, unbalanced load, drain hose, or spin problem rather than a heater. A normal spin with damp clothes moves attention toward the drying system, load, cycle, airflow, or condensing path.
-
Check 2
Confirm that a dry-only or appropriate drying cycle was selected, the garments are suitable for machine drying, the load is below the model's drying limit, and thick items are unfolded and separated from light items; do not add detergent or softener to a dry-only cycle.
Expected result: The cycle was damp or low-heat, the load is large or tightly packed, thick items are folded together, or the cycle and load match the manual.
Next step: Reduce and redistribute the load, select the model-approved dry setting, and use a spin before drying when the clothes entered very wet. If a correctly sized load still remains wet, continue diagnosis.
Stop if: Do not exceed the drying limit, dry a fabric against its care label, or compensate for poor drying by repeating a cycle indefinitely.
Why this matters
Why: A damp or low-heat program can intentionally leave moisture. A washer-dryer combo often dries less laundry than it washes, and packed or mixed-thickness items can retain wet spots. A correct cycle and load make a system restriction or component fault more likely.
-
Check 3
If the combo uses condensing or water-assisted drying, confirm the required water valve is open and inspect the external inlet hoses, inlet filters, and drain hose for a kink, U-shaped low spot, blockage, or water that remains trapped; follow only the exact manual's filter procedure.
Expected result: The water supply is closed or restricted, hot and cold hoses are reversed where the model distinguishes them, an inlet filter is dirty, the drain hose holds water, or the external path is clear.
Next step: Restore an obviously closed valve, straighten an accessible drain hose without moving the unit, or clean a model-accessible inlet filter as documented. If the path is damaged, inaccessible, or clear without improvement, arrange service.
Stop if: Do not disconnect pressurized hoses, force a filter, move a stacked unit, or use a drain chemical or improvised hose route.
Why this matters
Why: A condensing combo may need water to remove moisture, and a restricted inlet can reduce drying. A drain hose that holds water or cannot expel humid air can also reduce drying. A clear external path makes internal pump, valve, fan, heat-exchanger, or control trouble more likely.
-
Check 4
With the appliance cool and off, clean the user-accessible lint filter, heat exchanger, condenser or drain filter only where the exact manual provides that access; inspect the external vent or exhaust path if the model has one.
Expected result: A filter or heat exchanger is visibly loaded with lint or residue, an exhaust path is restricted, a water-tank alert is present, or all accessible air paths are clean.
Next step: Clean and refit only the documented user-accessible part, empty a user-accessible water tank if the manual directs it, and compare one correctly sized load. Request service if the alert returns or drying remains poor.
Stop if: Do not remove sealed covers, wash an electrical component, insert tools into the heater or fan, or operate with a missing filter or cover.
Why this matters
Why: Lint, residue, a full water tank, or restricted exhaust can reduce heat transfer and moisture removal. A clean accessible path does not rule out a hidden fan, heater, sensor, compressor, or control fault.
-
Check 5
During one model-approved dry cycle with a small, balanced load, observe only the external display and normal sounds: note whether the cycle starts, ends early, enters cooling, shows a clean-filter or water-tank alert, tumbles, and drains as expected.
Expected result: The cycle ends early, remains in cooling, displays a fault or filter alert, tumbles without drying, or never starts the dry function.
Next step: Record the display text, cycle, load type, and whether water enters and drains. Follow only a model-documented user reset; if the condition repeats, leave the appliance out of service and arrange repair.
Stop if: Do not defeat a fault, bypass a door or thermal safety, or open the control or heater area to inspect a code.
Why this matters
Why: Early termination can result from load sensing, a too-small or unsuitable load, airflow or sensor trouble, or a control fault. Cooling is not proof that heat failed. A persistent alert or no dry start after the documented setup points toward a system or control issue.
-
Check 6
After only a model-approved correction, compare one correctly spun, sorted, and sized load with the original result and record whether drying returns to normal, improves only with a smaller load, or remains wet.
Expected result: The smaller load dries, only one fabric type remains wet, the result is unchanged, or the unit develops abnormal heat, noise, odor, water, or a fault.
Next step: Keep the cycle, load, display, and cleaning notes for the technician. Stop using the unit for unchanged wet loads or any abnormal heat, odor, noise, water, smoke, or fault.
Stop if: Do not keep repeating cycles, run the unit unattended after a hazard sign, or replace an internal component without diagnosis.
Why this matters
Why: Improvement with less laundry supports capacity, load distribution, fabric thickness, or spin carryover. One fabric type may be a care or sensor-setting issue. No improvement or a new hazard points toward airflow, water or drain operation, heater, fan, sensor, compressor, or control service.
Use your observations
Decision map
Find the observation that best matches what you see, then follow the next safe action.
-
PATH 01Safety boundary
What you see
Clothes are dripping wet before drying, water remains in the drum, the spin is weak or unbalanced, or the drain path is restricted.
Do this next
Use the model's documented drain or filter check, redistribute the load, and run the appropriate spin only when safe. Persistent standing water, weak spin, or a blocked pump needs service.
Why this path and its safety boundary
Why it matters: The load is carrying too much water into drying, so a drain, pump filter, drain hose, balance, or spin issue is more likely than a heater fault.
Safety stop: Do not open the pump, reach into a moving drum, or repeat cycles with a leak, fault, or abnormal noise.
-
PATH 02Safety boundary
What you see
The dry program is damp or low-heat, the load exceeds the drying limit, thick fabrics are folded together, or drying improves with a smaller sorted load.
Do this next
Use the exact dry setting, reduce and sort the load, unfold thick items, and spin wet items before drying. Arrange service if a correctly sized load remains wet.
Why this path and its safety boundary
Why it matters: Cycle selection, fabric care, load size, load distribution, and the combo's lower drying capacity are more likely than an internal failure.
Safety stop: Do not overload, use a cycle unsuitable for the fabric, or repeat a dry cycle as a substitute for correcting load conditions.
-
PATH 03Safety boundary
What you see
A condensing or ventless combo has a closed or restricted water supply, reversed hoses where relevant, a dirty inlet filter, a drain hose holding water, or a water-tank or drain alert.
Do this next
Correct only an obvious valve, hose position, or model-accessible filter or tank issue. If the alert returns or the external path is clear without improvement, arrange appliance service.
Why this path and its safety boundary
Why it matters: Moisture removal is being limited by the water supply, drain routing, pump, filter, or condenser path rather than by load size alone.
Safety stop: Do not disconnect pressurized hoses, force filters, alter drain routing beyond the manual, or open the pump or condenser.
-
PATH 04Safety boundary
What you see
A correctly spun and sized load remains wet after accessible filters and paths are clear, the cycle tumbles without drying, an alert repeats, or drying is accompanied by abnormal heat, noise, odor, water, or a fault.
Do this next
Leave the appliance off when a hazard or fault is present and arrange qualified appliance service with the model, cycle, load, display, and observations.
Why this path and its safety boundary
Why it matters: A hidden airflow restriction, heater, fan, heat exchanger, compressor, water valve, sensor, control, or internal leak is more likely and needs diagnosis.
Safety stop: Do not open sealed covers, test live parts, bypass thermal or door protection, or keep operating an appliance with smoke, burning odor, scorching heat, or water near electrical parts.
Helpful context
Understand the symptom
Decide whether the water came from washing or drying
If clothes are dripping wet before drying begins, start with the spin speed, unbalanced load, drain hose, pump filter, and any remaining water in the drum. If the load is only damp but stays that way after a full dry cycle, inspect the selected cycle, load size, water supply and drain path for a condensing combo, and lint or heat-exchanger restrictions where the model has them. The same symptom can therefore have two different starting points.
Washer-dryer combos do not all dry the same way
Some all-in-one units use water to condense moisture, while others use a water-free or vented arrangement. A combo may also have a lower drying capacity than its wash capacity. Use the exact model manual for the dry-only controls, water requirement, filter access, and load limit; do not apply a stand-alone dryer vent or heater assumption to a ventless combo.
Temperature and airflow are not homeowner component tests
A warm drum does not prove that moisture is being removed, and a cool drum does not identify whether the cycle is low-heat, cooling, or failing to heat. Check the external filter, drain, and documented indicators first. Heater, sensor, fan, compressor, water valve, and control faults require a technician once the low-risk checks do not restore drying.
Safety boundary
Stop conditions
- Stop and disconnect power only from a dry, accessible point when safe if water reaches the plug, outlet, cord, controls, or other electrical parts; do not touch wet electrical equipment.
- Do not open heater, fan, compressor, condenser, pump, control, or sealed cabinet areas; do not test live parts or bypass thermal, door, or other safety devices.
- Do not tip or pull apart a stacked, integrated, or built-in washer-dryer to reach a filter, hose, or internal component.
- Stop for smoke, burning odor, scorching heat, sparks, abnormal grinding, a repeated fault, uncontrolled water, or a damaged cord, hose, filter, or cover.
- Do not order a heater, fan, sensor, pump, valve, heat exchanger, or control until the exact model and qualified diagnosis establish the failed component and fit.
Only after diagnosis
Potential parts
- lint filter or heat-exchanger filter
Consider this category only when the exact model identifies a damaged or missing user-replaceable filter and cleaning does not restore the documented airflow or drying result.
Confirm the exact model, filter location, drying-system design, and manufacturer fit information before ordering; do not substitute a filter by shape alone. - drain pump, drain hose, or water inlet valve
Consider this category only when qualified diagnosis confirms that a pump, hose, or valve is restricting spin drainage, condensing water flow, or moisture removal after external checks.
Confirm the exact model, pump or valve configuration, hose routing, electrical connections, and manufacturer procedure before ordering. - heater, fan, sensor, or drying control
Consider this category only when a correctly loaded cycle and accessible air, water, and drain paths are verified and qualified testing identifies an internal drying-system fault.
Confirm the exact model, drying technology, electrical design, and technician diagnosis; do not select a heater, fan, sensor, or control from a similar-looking unit.
When checks do not resolve it
Need a professional?
Arrange appliance service when a correctly spun and sized load remains wet after model-approved filter, water-supply, drain, and cycle checks; when a pump, heater, fan, sensor, water valve, heat exchanger, or control may be involved; or when an alert, fault, abnormal noise, odor, heat, or water returns. Arrange plumbing help for a household water-supply or drain problem. Seek prompt help for smoke, burning odor, scorching heat, sparks, water near electrical parts, or an uncontrolled leak.
Safety scope: This article covers cycle and load checks, external water and drain observations, model-accessible filter or heat-exchanger cleaning, and documented user controls. It does not authorize moving a stacked unit, opening panels or sealed components, testing live parts, bypassing safety devices, or replacing internal parts.
Common questions
FAQ
Why are my washer-dryer clothes still wet after drying?
First determine whether they were dripping wet after spin or only damp. Poor spin, standing water, an overloaded or thick load, the wrong dry cycle, a restricted drain or water supply, lint or heat exchanger buildup, airflow, heater, fan, sensor, or control trouble can each produce wet clothes.
Can an overloaded washer-dryer fail to dry clothes?
Yes. Combo units often have a smaller drying capacity than washing capacity, and thick or tightly packed items dry unevenly. Use the model's drying limit, sort by thickness, unfold bulky items, and spin wet items before drying.
Does a ventless washer-dryer need water to dry?
Some condensing combos use water to remove moisture, while other designs use a different process. If the model requires water, a closed valve, restricted inlet, reversed hoses where relevant, or poor drain flow can reduce drying. Check the exact manual rather than assuming every combo works the same way.
Why does the washer-dryer spin but leave clothes wet?
A normal spin can still be followed by poor drying when the load is too large, a dry-only or low-heat cycle was selected, a lint or heat-exchanger path is restricted, or a condensing water or drain path is limited. Compare one small, sorted load after the model-approved external checks.
When should I stop using a washer-dryer that will not dry?
Stop for smoke, burning odor, scorching heat, sparks, abnormal grinding, uncontrolled water, repeated faults, or water near electrical parts. Keep the appliance off and arrange qualified appliance service; use plumbing help when the household supply or drain is involved.
Read the exact guide
Official sources
- Clothes are not dry after Samsung ventless dryer cycleSamsung Electronics · Official Samsung support article used for ventless drying branches and user-accessible lint, heat-exchanger, load, drain, and cycle checks; it is not a universal model procedure.
- [LG Dryer] [Electric] Laundry is not drying wellLG Electronics USA · Official LG support article used for stand-alone electric drying-system clues that also help distinguish a washer-dryer combo load or airflow issue; combo manuals control design differences.
- LG Washer Dryer Combo - Troubleshooting Poor Drying PerformanceLG Electronics USA · Official LG support article used for drain-hose routing, water supply, hose order, load limit, and thick-fabric branches; actual model instructions control differences.
- Long Dry Time - Washer / Dryer Combo UnitLG Electronics USA · Official LG support article used for combo-specific condensing-dry mechanisms and load or spin branches; the exact appliance manual controls model-specific access and cycle behavior.
Community feedback
Share a repair observation
Share a plain-text repair observation. Accepted observations are published automatically; this page may take a moment to update.