
On this page
Start here
Quick answer
Visible slime, detergent film, lint, or mold-like residue together with a bad-smelling washer usually means moisture and soil are collecting in the door gasket, detergent dispenser, drain path, or tub. Remove laundry and obvious loose debris, clean only accessible surfaces using the washer manual, and run the machine’s Clean Washer or Tub Clean cycle with the one cleaner the manual allows. Never mix bleach, vinegar, tub cleaner, or other chemicals, and do not use undiluted bleach on a gasket unless the manual specifically permits it. For a front-loader, a model-approved drain-pump-filter check may be appropriate after unplugging and containing residual water. Leave the door or lid and dispenser open to dry afterward. If residue returns quickly, water remains, the drain path is blocked, the gasket is torn, the smell is sewage-like, or the washer leaks or overheats, stop using it and arrange appliance service.
Before you begin
Safety first
- Homeowner-safe checks are removing laundry, recording the residue location, cleaning reachable gasket or dispenser surfaces as the manual allows, running the approved empty clean cycle, and performing a documented drain-filter check only when the machine can be unplugged and water safely contained. Internal panels, pumps, hoses, wiring, sealed tubs, leaks, and chemical or electrical faults belong to a qualified professional.
Work through in order
Diagnostic checks
Use only checks that match the exact appliance or system and its official guide.
-
Check 1
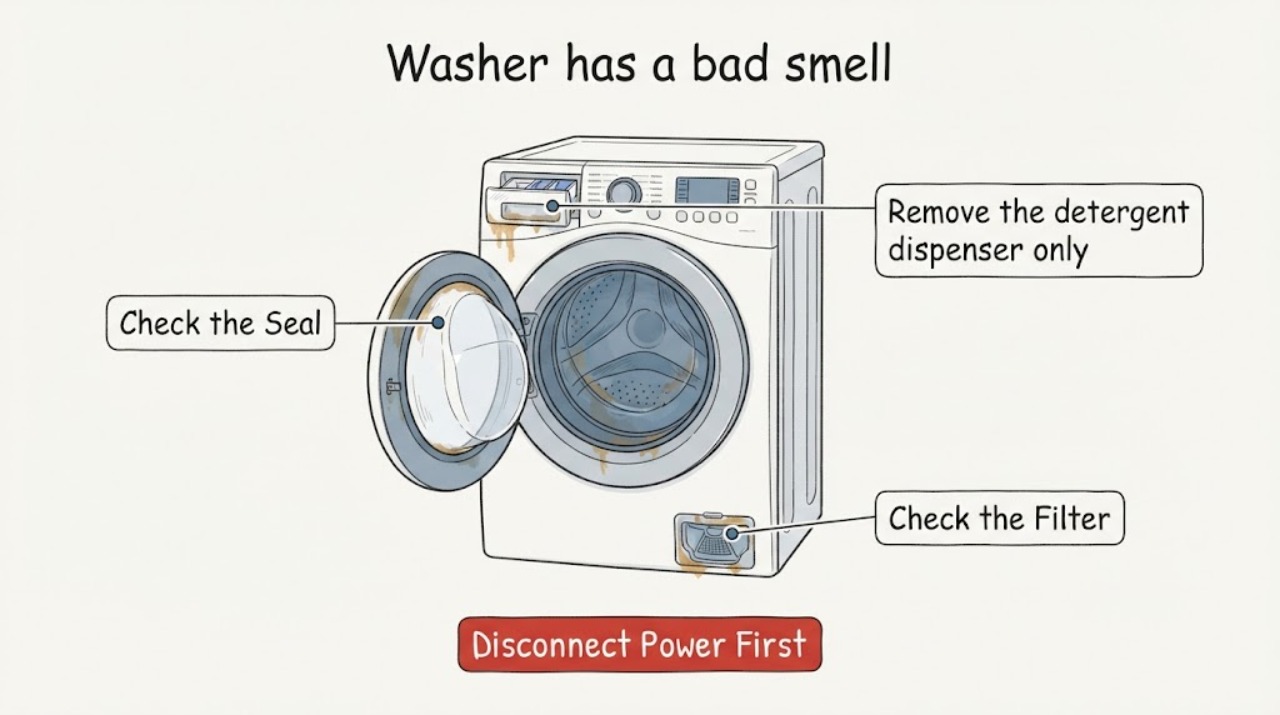
Remove laundry and inspect the washer with power off for the residue’s location: door gasket or lid rim, detergent/softener dispenser, drum openings, standing water, or the floor and drain area; pick out only loose foreign objects that are reachable without tools.
Expected result: Residue is concentrated in the gasket, dispenser, drum, or drain area, or water remains in the drum after the cycle.
Next step: Photograph or record the location, then follow the matching model-specific check below. Do not scrape deep inside the tub or remove panels based on smell alone.
Why this matters
Why: A gasket or dispenser deposit is an accessible surface-buildup path. Water left in the drum makes restricted drainage, a drain-pump filter, hose, or pump problem more likely than odor from detergent dosing alone. A floor puddle shifts concern toward a leak.
-
Check 2
For a front-load washer, unplug the machine and inspect the accessible door-gasket folds with a soft cloth for lint, hair, slime, and trapped objects; clean the surface only with the model-approved mild or diluted cleaner, and never pull or cut the seal.
Expected result: Debris or wet residue is lodged under the gasket lip, the gasket is torn or distorted, or the gasket is clean and dry.
Next step: Rinse or wipe away cleaner residue as the manual directs and dry the gasket. Stop and arrange service for a torn seal, water escaping from the door, or residue that cannot be reached safely.
Why this matters
Why: Foreign material under the gasket can retain water and support mold-like odor. A tear or deformation can cause leakage and may require a seal replacement. A clean gasket makes the dispenser, drain path, or tub more likely sources.
-
Check 3
Remove the detergent dispenser only as the manual permits, rinse the tray and inserts with warm water, and brush away visible film from the tray and its housing; do not force a release tab or pour cleaner into a compartment not designed for it.
Expected result: The dispenser has a sticky film, softener residue, blocked water passages, or no significant residue; the tray is cracked or will not reseat.
Next step: Rinse and dry the tray, clean reachable housing surfaces, and reinstall it securely. Use the manufacturer’s dosing guidance on future loads; stop for a cracked dispenser, a leak, or inaccessible buildup.
Why this matters
Why: Undissolved detergent or softener can accumulate in the dispenser and contribute to odor or poor dispensing. A blocked passage can leave product wet in the drawer. A cracked tray or one that cannot lock back in place can leak and needs model-specific parts or service.
-
Check 4
Check the drain-pump filter only if the washer’s manual provides an accessible procedure, the washer is unplugged, and you can safely contain residual water; open the service access, drain through the designed hose if present, and inspect the filter for lint, coins, hair, or sludge.
Expected result: The filter is blocked or foul, water drains poorly, the filter is clear, or the panel/hose cannot be accessed safely.
Next step: Clean and reseat the filter exactly as the manual directs, check for leaks after a rinse, and stop if the filter will not seal, the hose is cracked, or drainage remains poor. Do not remove a pump or hose to chase odor without service-level procedures.
Why this matters
Why: A clogged filter can leave dirty water in the drum and create odor over time. A clear filter makes a deeper hose, pump, or drain-standpipe problem more plausible. An inaccessible panel or unexpected water volume makes this a service task.
-
Check 5
Run the washer’s Clean Washer, Tub Clean, or equivalent maintenance cycle empty, using only one cleaner and the quantity, compartment, or drum placement specified in the exact manual; do not add detergent or another chemical.
Expected result: The machine has a dedicated clean cycle, only a regular cycle is available, the cycle completes, or it stops with an error, excess suds, or a drain problem.
Next step: Complete the cycle without interruption when possible, then follow the manual’s rinse step if it calls for one. Leave the washer open to ventilate; arrange service for repeated errors, overflow, or incomplete draining.
Why this matters
Why: A dedicated cycle uses the machine’s intended water and timing to flush residue from the interior. A regular cycle may not provide the same cleaning action. An error, suds event, or drain failure means the underlying issue is not safely resolved by repeating cleaner cycles.
-
Check 6
After cleaning, wipe reachable moisture from the gasket, lid or door, dispenser, and drum opening; remove wet laundry promptly and leave the door or lid and dispenser open between loads where the installation allows.
Expected result: The odor fades after drying, returns after the next damp load, or remains strong immediately after cleaning.
Next step: Use the manual’s detergent type and dose, keep the washer ventilated, and monitor one or two normal loads. If the smell persists or returns quickly, stop repeated chemical treatments and arrange service.
Why this matters
Why: Improvement with drying supports moisture-retained residue as the main contributor. A rapid return suggests persistent moisture, over-dosing, hidden residue, poor drainage, or a damaged seal. An unchanged strong odor needs a broader diagnosis rather than more chemicals.
-
Check 7
Classify the odor and inspect for related symptoms before using the washer again: musty/earthy smell, sour detergent smell, sewage-like odor, visible mold-like growth, leaking water, hot electrical smell, or a burning smell.
Expected result: The smell is musty and residue-related, sewage-like, chemical, electrical/burning, or accompanied by a leak, heat, smoke, or repeated error.
Next step: Stop using the washer for sewage, chemical, electrical, heat, smoke, leak, or error symptoms and arrange qualified appliance or plumbing service as appropriate. For active smoke or fire, leave the area and contact emergency services from a safe location.
Why this matters
Why: Musty odor with visible residue fits damp buildup, while sewage-like odor can involve the drain hose or standpipe. A chemical smell can mean incompatible or excessive cleaner. Burning odor, smoke, heat, leaks, and repeated errors are safety or mechanical faults, not routine cleaning issues.
Use your observations
Decision map
Find the observation that best matches what you see, then follow the next safe action.
-
PATH 01Next step
What you see
Residue is under a front-load gasket, the gasket remains wet, and there is no evidence of a drain or floor leak.
Do this next
Clean and dry only the reachable gasket surface using the model’s instructions, leave the door open afterward, and arrange service for a torn, distorted, leaking, or inaccessible seal.
Why this path and its safety boundary
Why it matters: The door seal is a likely local source of retained moisture and odor, especially when lint or foreign objects hold the lip open.
-
PATH 02Next step
What you see
The dispenser contains thick detergent or softener film, the load uses more product than the label or washer guidance calls for, and the drum drains normally.
Do this next
Clean the dispenser, run the approved empty tub-clean cycle, and correct detergent type and dosing. Do not combine cleaners or add detergent to the cleaning cycle.
Why this path and its safety boundary
Why it matters: Undissolved or excess laundry product is more likely to be feeding residue buildup than a failed pump or tub component.
-
PATH 03Next step
What you see
Water remains in the drum, the drain-pump filter is foul or blocked, or the washer drains slowly after residue cleaning.
Do this next
Perform only the manual-approved filter check with power isolated and water contained. If the filter is clear or drainage remains poor, leave the washer off and arrange appliance or plumbing service.
Why this path and its safety boundary
Why it matters: A restricted filter, hose, pump, or household drain path is more likely to be maintaining the odor than surface residue alone.
-
PATH 04Next step
What you see
A model-approved Clean Washer or Tub Clean cycle completes, the washer is dried and ventilated, and the odor improves but returns after damp loads.
Do this next
Keep the door or lid and dispenser open, unload promptly, follow detergent dosing guidance, and repeat cleaning only at the model’s recommended interval. Arrange service if return is rapid or visible residue reappears.
Why this path and its safety boundary
Why it matters: The odor is responding to moisture control but a recurring residue or usage pattern remains; persistent hidden buildup or drainage should not be ruled out.
-
PATH 05Next step
What you see
The odor is sewage-like or chemical, or there is a leak, hot electrical smell, smoke, sparking, unusual heat, or a repeated control/drain error.
Do this next
Stop using the washer, isolate power and water only if safe, ventilate without mixing products, and arrange qualified appliance or plumbing service. Leave immediately for active smoke, fire, or immediate danger.
Why this path and its safety boundary
Why it matters: This pattern points beyond ordinary residue maintenance and may involve a drain installation, incompatible chemical exposure, leak, electrical fault, or mechanical failure.
Helpful context
Understand the symptom
Visible residue tells you where to look first
Do not treat every bad smell as a hidden tub failure. A film in the dispenser points toward undissolved detergent or softener; debris under a front-load door gasket can hold water; residue in a drain filter can leave dirty water behind. The smell’s location and whether water remains after a cycle help choose the next check. Product names and cleaning steps vary by model, so the owner’s manual controls what may be used.
Clean one system at a time
Remove loose residue before running a cleaning cycle, then use only the cleaner and dispenser location specified for the washer. A tub-clean cycle is intended for an empty washer. Do not combine chlorine bleach with vinegar, acids, ammonia, or another washer cleaner, and do not add detergent to a cleaner cycle unless the manual explicitly says to.
Drying prevents the smell from returning
A clean cycle cannot compensate for a door seal, dispenser, or tub that stays wet between loads. Wipe reachable moisture, remove laundry promptly, and leave the door or lid and dispenser open where safe. If a washer continues to smell after model-approved cleaning and drying, the remaining residue may be in a concealed hose, drain, pump, or damaged seal and needs service.
Safety boundary
Stop conditions
- Never mix chlorine bleach, vinegar, acids, ammonia, tub cleaner, or other chemicals; use one model-approved cleaner at a time and follow its label and the washer manual.
- Stop a cleaning attempt for overflow, a drain error, excessive suds, a leaking filter or hose, a damaged gasket, or water entering the floor. Unplug and close water valves only when safe, then arrange service.
- Do not remove panels, the pump, hoses, wiring, or a sealed tub to reach hidden residue. Do not use undiluted bleach on a gasket or scrape plastic/rubber with metal tools unless the exact manual expressly permits it.
- For a sewage-like or chemical odor, burning smell, smoke, sparking, unusual heat, or repeated electrical fault, stop using the washer and obtain qualified appliance/plumbing help; leave the area for active smoke, fire, or immediate danger.
Only after diagnosis
Potential parts
- washer door gasket or seal
Only consider this part if the exact model’s gasket is torn, distorted, leaking, or confirmed by a technician as the source of retained residue and odor.
Seal shape, drain ports, clamps, and fit vary by model; confirm the appliance model and manufacturer fit information before ordering or installing. - washer drain-pump filter or drain component
Only consider a replacement after the model-approved filter check or service diagnosis finds a damaged filter, pump, hose, or persistent drainage fault rather than removable residue.
Filter threads, pump assemblies, hose routing, and access procedures are model-specific; do not substitute a generic component or open a pump without the exact manual and safe water/power isolation.
When checks do not resolve it
Need a professional?
Safety scope: Homeowner-safe checks are removing laundry, recording the residue location, cleaning reachable gasket or dispenser surfaces as the manual allows, running the approved empty clean cycle, and performing a documented drain-filter check only when the machine can be unplugged and water safely contained. Internal panels, pumps, hoses, wiring, sealed tubs, leaks, and chemical or electrical faults belong to a qualified professional.
Common questions
FAQ
Why does my washer smell bad when visible residue is present?
Detergent or softener film, lint, hair, and damp soil can collect in the door gasket, dispenser, drain filter, hoses, or tub. The location matters: gasket or dispenser residue is often accessible, while standing water or a sewage-like odor points toward drainage and may require service.
Should I run a washer-cleaning cycle if I can already see residue?
Yes, after removing laundry and reachable loose debris, if the washer’s manual provides a Clean Washer or Tub Clean cycle. Use only the one cleaner and placement the manual allows, never add detergent or another chemical, and leave the washer open to dry afterward. A cleaning cycle will not repair poor drainage or a leaking seal.
Can I use bleach and vinegar together to remove washer odor?
No. Do not mix bleach, vinegar, acids, ammonia, tub cleaner, or other chemicals. Follow the washer manual and the cleaner label, use one approved product at a time, and use a ventilated area. Do not use straight bleach on a rubber gasket unless the exact instructions permit it.
Does a dirty drain-pump filter cause a bad washer smell?
It can. A clogged filter can reduce drainage and leave water in the drum, allowing odor to develop. Check it only when the exact model provides an accessible procedure and you can unplug the machine and contain residual water; if drainage remains poor or the filter will not seal, arrange service.
When does washer odor with residue need a technician?
Arrange service when the smell persists after model-approved cleaning and drying, returns quickly, or comes with standing water, a sewage-like odor, a torn gasket, a leak, repeated errors, unusual heat, burning smell, smoke, or sparking. Stop using the machine for those hazards; leave for active smoke or fire.
Read the exact guide
Official sources
- LG Washer - How to Clean the Tub of Your LG Washing MachineLG USA Support · LG model-family maintenance guidance; use the specific owner’s manual for the washer’s access points and cleaner instructions.
- Removing Odors from the Interior of a WasherWhirlpool Product Help · Manufacturer guidance for Whirlpool washers; cycle names, cleaner placement, and any bleach procedure must be checked against the exact washer model.
- LG Washer - Troubleshooting Odor / BuildupLG USA Support · Manufacturer guidance for LG washers; component access and cleaning products differ by model and washer type.
- How to Remove Smells in a Front Load WasherWhirlpool · General Whirlpool front-load guidance; model instructions control cleaner compatibility, bleach use, and access to the drain system.
Community feedback
Share a repair observation
Share a plain-text repair observation. Accepted observations are published automatically; this page may take a moment to update.