
On this page
Start here
Quick answer
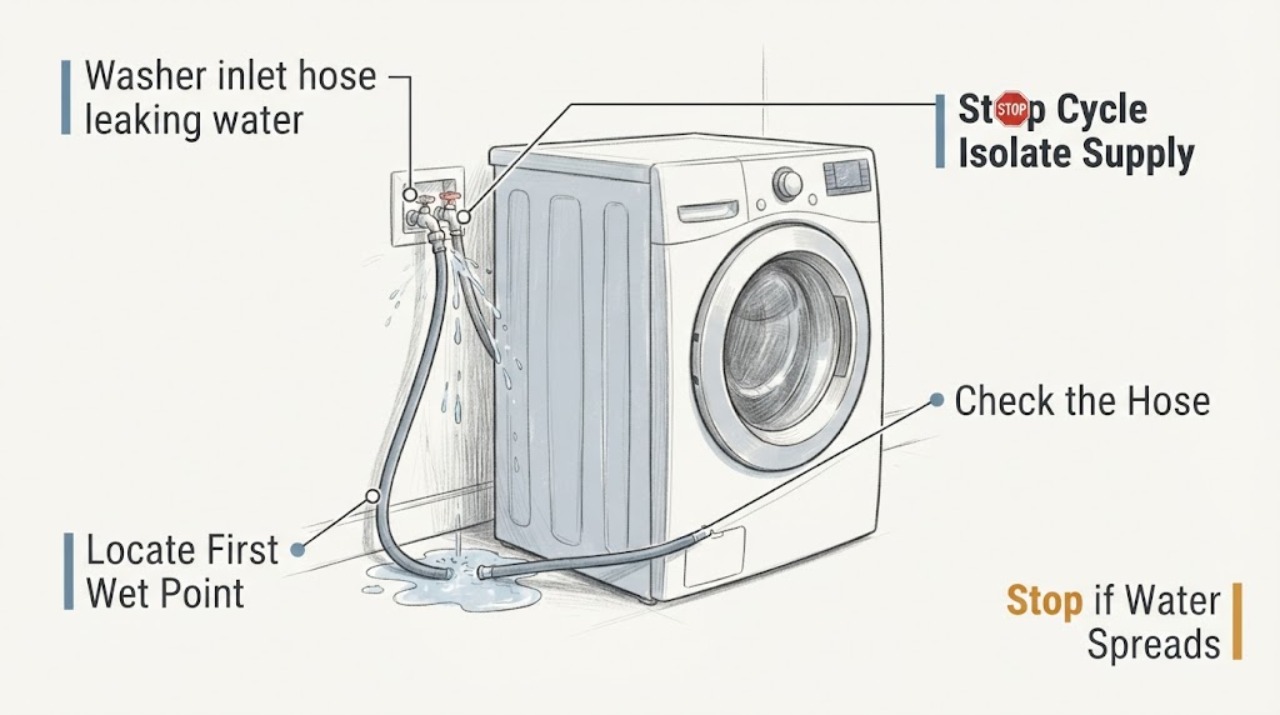
Stop the washer, close the hot and cold supply faucets, and keep water away from the plug, outlet, and controls. Then use a flashlight to locate the first wet point: the faucet connection, either inlet-hose coupling, the hose body, or the washer's inlet valve. Missing or damaged flat washers, cross-threaded or loose couplings, a kinked or cracked hose, and a cracked inlet valve are different repairs; a leak that continues with the supply faucets closed may be residual water or a separate plumbing leak. Do not keep running the washer to test it, overtighten a coupling, use tape or sealant on the washer valve, or reach behind a wet machine. Replace a visibly damaged hose with a model-appropriate high-pressure hose according to the installation instructions, or arrange appliance service if the source is at the inlet valve, the faucet, an anti-flood device, or an electrical area.
Before you begin
Safety first
- This article supports stopping the cycle, closing the supply faucets, making safe visual observations, documenting the first wet point, and following the exact installation instructions for a clearly identified hose or washer replacement when the area is dry. A qualified professional should open the cabinet, repair the inlet valve, work near wet electrical parts, correct plumbing or faucet defects, and diagnose concealed leaks.
Work through in order
Diagnostic checks
Use only checks that match the exact appliance or system and its official guide.
-
Check 1
Stop or pause the washer, close both hot and cold wall supply faucets, and keep hands and footwear dry; if water is near electrical equipment, disconnect power only from a safe, dry position without touching a wet plug or outlet.
Expected result: The leak may slow or stop after the supply faucets close, continue as residual water drains from a hose, or continue despite closed washer faucets.
Next step: Leave the washer unused, protect the floor, and proceed only with dry visual checks; arrange service if the source is unclear or water is near electrical parts.
Stop if: Do not pull a wet machine, handle a wet cord or outlet, step into standing water near power, or reopen the faucets just to reproduce a leak.
Why this matters
Why: Stopping with the supply closed limits flooding. A continuing leak can be trapped hose water, a separate household plumbing leak, or water from inside the machine rather than an actively pressurized inlet hose. Electrical danger is present when water reaches the cord, outlet, or controls.
-
Check 2
From behind or beside the washer, use a flashlight to trace the highest or first visible wet point without touching hot water or reaching behind a wet appliance: faucet outlet, hose coupling, hose body, washer inlet valve, or another hose or drain component.
Expected result: Water may start at the wall faucet, at either threaded coupling, along the hose jacket, around the washer's inlet valve, or below the machine with no wet inlet connection.
Next step: Take close photos of the source and label whether it is the hot or cold hose; do not move the machine or remove a rear panel to see more.
Stop if: Stop for spray, a flooded floor, a cracked machine fitting, water near electricity, or a source that cannot be safely viewed without moving the appliance.
Why this matters
Why: The first wet point identifies the decision path. A faucet or coupling leak is a connection or washer question; a wet hose body indicates hose damage; a cracked or wet inlet valve points inside the appliance; a dry inlet path shifts attention to the drain, door, tub, or household plumbing.
-
Check 3
With both supply faucets closed and the hose exterior dry enough to inspect, look at each coupling for a missing or displaced flat washer, cross-threading, corrosion, looseness, or damage; inspect the hose for bulges, kinks, cuts, cracks, wear, and leaks.
Expected result: A washer may be absent or damaged, a coupling may not seat squarely, the hose may be kinked or stretched, or the hose body may show a bulge, cut, crack, corrosion, or wet track.
Next step: Follow the exact model installation instructions for any washer or hose replacement; use a new, model-appropriate hose when the hose is damaged, and restore water slowly only after the connection is correctly installed and the area is dry.
Stop if: Do not tape or patch the hose, use sealant on the washer valve, force a misaligned coupling, or keep a damaged or bulging hose in service.
Why this matters
Why: A sealing washer and correctly seated coupling are required at both ends. A body defect is a hose-replacement condition, not a tightening problem. Kinks can restrict flow and strain the hose; cross-threading or overtightening can damage the faucet or washer valve.
-
Check 4
Record whether the leak occurs while the washer is off with the supply faucets open, only when the machine calls for water, or after vibration or movement; do not run a cycle solely to make the leak happen.
Expected result: The hose may seep continuously under supply pressure, leak only during fill, spray when the valve opens, or appear wet after the cabinet vibrates.
Next step: Give the timing and cycle stage to an appliance technician; keep the supply faucets closed until the connection or hose is repaired and inspected.
Stop if: Do not restart the washer with an active leak, hold a hose while it is pressurized, or open a rear panel to inspect the inlet valve.
Why this matters
Why: A continuous seep points toward a pressurized hose, washer, faucet, or inlet valve. A fill-only leak can reveal movement, a valve connection, or a flow-related defect. A vibration-related leak makes hose routing, strain, or an unsecured connection more likely, but does not authorize moving the machine while wet.
-
Check 5
Check from a safe visual position whether the washer-side inlet valve housing is cracked or wet, whether the wall faucet itself leaks, and whether water backs up from the standpipe or another household pipe; do not remove the valve, inlet screens, or cabinet panels.
Expected result: The connection may be dry but the plastic inlet valve housing may be cracked, the faucet may leak independently, or the puddle may coincide with drainpipe backup rather than fill water.
Next step: Keep both water faucets closed, photograph the valve or faucet and any drain backup, and arrange the appropriate appliance technician or plumber.
Stop if: Do not open the cabinet, remove screens from a wet valve, loosen a faucet under pressure, or operate the washer until a leak near the valve or drain is resolved.
Why this matters
Why: A cracked inlet valve or leaking faucet needs appliance or plumbing service, not a new hose alone. Drain backup and household pipe leakage are plumbing problems and can make a rear inlet leak appear to be elsewhere. Manufacturer guidance specifically warns to determine the actual source before selecting a repair.
Use your observations
Decision map
Find the observation that best matches what you see, then follow the next safe action.
-
PATH 01Safety boundary
What you see
The first wet point is the wall faucet or its threaded connection, while the hose body and washer-side coupling remain dry.
Do this next
Keep the faucet closed and have the faucet or hose connection inspected; follow the washer's installation instructions if the hose must be removed or its washer replaced.
Why this path and its safety boundary
Why it matters: A faucet outlet, thread, connection washer, or faucet-side alignment issue is more likely than a failed washer inlet valve.
Safety stop: Do not force the faucet, use tape or sealant on the washer valve, or reopen a connection that is cross-threaded or damaged.
-
PATH 02Safety boundary
What you see
Water begins at the coupling where an inlet hose attaches to the washer, and the hose jacket is not split or bulging.
Do this next
With water closed and the machine dry, use the exact model instructions to correct or replace the washer or hose; if the valve threads or housing are damaged, arrange appliance service.
Why this path and its safety boundary
Why it matters: A missing or damaged flat washer, a misaligned or cross-threaded coupling, overtightening damage, or a damaged inlet-valve connection is more likely than a hose-body rupture.
Safety stop: Do not keep tightening, add sealant to the valve, or remove a valve or panel as a homeowner test.
-
PATH 03Safety boundary
What you see
The hose jacket itself has a crack, cut, bulge, corrosion, wear mark, kink, or wet track away from both couplings.
Do this next
Keep the supply faucets closed and replace the hose with the correct high-pressure, model-compatible type under the installation instructions or have a technician do it; inspect the second hose as well.
Why this path and its safety boundary
Why it matters: The pressure hose is damaged or stressed and should not be patched or left in service; a kink may also indicate routing or length strain.
Safety stop: Do not tape, clamp, stretch, straighten under pressure, or continue using a damaged hose.
-
PATH 04Safety boundary
What you see
The hose connections remain dry, but water appears around the washer's inlet valve or only when the washer opens the fill valve.
Do this next
Leave both supply faucets closed, photograph the valve area and timing, and arrange appliance service; the cabinet and valve should remain closed to the homeowner.
Why this path and its safety boundary
Why it matters: A cracked inlet-valve housing, internal valve seal, screen or connection problem, or a fill-side appliance fault is more likely than a replaceable hose alone.
Safety stop: Do not remove the inlet valve or screens, energize a wet machine, or run another cycle to compare leaks.
-
PATH 05Safety boundary
What you see
The inlet hose and connections are dry after isolation, but water appears during drain or spin, backs up at the standpipe, or comes from a nearby household pipe.
Do this next
Leave the washer unused and have the standpipe or household plumbing checked; do not replace the inlet hose based on the puddle location alone.
Why this path and its safety boundary
Why it matters: The apparent rear leak is more likely a drain-hose installation, blocked standpipe, or household plumbing issue rather than an inlet hose.
Safety stop: Do not seal the drain hose into the standpipe, push it farther into a blocked drain, or run repeated cycles over a wet floor.
-
PATH 06Safety boundary
What you see
Water has reached the power cord, plug, outlet, control panel, floor-level electrical equipment, or the area cannot be made dry before inspection.
Do this next
Do not touch the wet electrical equipment; from a dry safe location disconnect power if possible without contact with water, keep the water supply closed, and arrange qualified appliance or electrical service.
Why this path and its safety boundary
Why it matters: The leak has become an electrical-shock and property-damage risk in addition to an appliance repair problem.
Safety stop: Do not reach through water, pull a wet plug, use an extension cord, or re-energize the washer until the area and appliance are assessed.
Helpful context
Understand the symptom
Isolate water before moving anything
Press pause or power off the cycle, close both wall supply faucets, and keep the washer where it is until the leak is mapped. A hose can retain water after the faucets are closed. If water is near the plug, outlet, power strip, or control panel, stay dry and disconnect power only from a safe position; never grab a wet cord or outlet.
The first wet point matters
A leak at the faucet threads, a hose coupling, the middle of the hose, or the washer inlet valve does not have the same cause. Water can run down the back of the cabinet and appear at the floor in a different place. Use a flashlight and photos rather than assuming the lowest puddle identifies the failed part.
Washer seals and hose condition are separate checks
Each inlet-hose end needs the correct flat washer, and the coupling must sit squarely without cross-threading. A missing washer cannot be fixed by adding more torque. Bulges, cuts, cracks, corrosion, kinks, or an old hose call for replacement; do not tape a damaged pressure hose or stretch it to fit.
A leak while the washer is off is useful evidence
If the washer is off but the supply faucets are open, a hose, connection, faucet, or inlet valve can still leak under household pressure. If water appears only when the washer fills, movement, vibration, a failing connection, or the inlet valve becomes more likely. If the inlet area is dry but water backs up from the drain, this is not an inlet-hose repair.
Safety boundary
Stop conditions
- Close both washer supply faucets immediately for an active inlet leak and do not run another cycle to test it. Protect the floor and keep the machine stationary until the leak source is safe to inspect.
- Do not handle a wet plug, outlet, power strip, cord, or control panel. Disconnect power only from a dry safe position; obtain qualified appliance or electrical help when water has reached electrical equipment.
- Do not patch, tape, clamp, stretch, or continue using a hose with a bulge, crack, cut, corrosion, wear, or leak. Do not reuse a missing or damaged hose washer.
- Do not overtighten inlet couplings, cross-thread them, or use tape or sealant on the washer's inlet valve. Do not remove the cabinet, inlet valve, or screens as a generic leak test.
- Arrange appliance service or plumbing help for a cracked inlet valve, leaking faucet, recurring leak after a hose or washer correction, water from inside the cabinet, drain backup, concealed leak, or any uncertain source.
Only after diagnosis
Potential parts
- washer inlet hose
Consider this only when the hose body has a bulge, cut, crack, corrosion, wear, kink-related damage, or a leak that is not corrected by the coupling washer and alignment.
Match the washer model, faucet connection, hose length, temperature side, pressure rating, and installation instructions; do not patch a pressure hose or use an old damaged hose. - flat inlet-hose washer or gasket
Consider this only when a coupling leak is traced to a missing, displaced, hardened, or damaged flat washer and the hose and threads remain sound.
Use the washer specified by the hose or appliance instructions and seat it squarely at the correct end; tightening force cannot compensate for a missing or misaligned seal. - washer water-inlet valve
Consider this only when the inlet valve housing, internal connection, or fill-side valve is confirmed to leak after the hose and faucet connections are dry.
Match the exact model, port arrangement, electrical connector, screens, seals, and water-temperature configuration; valve replacement requires power and water isolation. - washing-machine faucet or anti-flood connection component
Consider this only when the wall faucet, adapter, shutoff, or anti-flood connection is the first wet point or has been damaged.
A plumber or appliance technician should verify thread type, shutoff condition, flow, anti-flood compatibility, and local installation requirements before replacement.
When checks do not resolve it
Need a professional?
Arrange appliance service when the leak is at the washer inlet valve, continues after the correct hose and washer connection, appears only during fill, reaches the cabinet, or the source is unclear. Arrange plumbing help for a leaking wall faucet or household pipe and for standpipe backup. Close the supply faucets and obtain urgent qualified help when water reaches electrical equipment, the floor is flooding, the washer cannot be safely isolated, or a damaged hose cannot be replaced safely.
Safety scope: This article supports stopping the cycle, closing the supply faucets, making safe visual observations, documenting the first wet point, and following the exact installation instructions for a clearly identified hose or washer replacement when the area is dry. A qualified professional should open the cabinet, repair the inlet valve, work near wet electrical parts, correct plumbing or faucet defects, and diagnose concealed leaks.
Common questions
FAQ
Should I tighten the leaking washer hose more?
Only correct an obviously loose, correctly aligned connection according to the exact installation instructions. Do not overtighten, cross-thread, or use tape or sealant on the washer valve; a missing or damaged flat washer or a damaged hose needs the correct replacement.
Why is water leaking from the back of my washer if the hose looks fine?
Water can originate at a faucet, washer inlet valve, drain or standpipe, or nearby household plumbing and run to another location. Close both supply faucets, use a flashlight to find the first wet point, and arrange appliance or plumbing service if the inlet connections are dry or the source is inside the cabinet.
Can I keep using the washer with a small inlet-hose drip?
No. Close the water supply faucets and stop the washer. A pressurized hose leak can worsen and water near a cord, outlet, or control can create an electric-shock risk. Replace a damaged hose under the model instructions or arrange qualified service.
How do I know whether the inlet hose or the washer inlet valve is leaking?
After closing the supply faucets, inspect the hose body and both couplings. A wet hose jacket or coupling points toward the hose or its washer; a dry hose with water around a cracked or wet valve housing points toward the washer inlet valve. Do not remove the cabinet to confirm it—document the area and arrange service.
Read the exact guide
Official sources
- Connect Inlet Hoses — Washer Installation InstructionsWhirlpool · Opened Whirlpool installation manual used for general inlet-hose connection and safety principles; the user's exact washer manual controls hose type, connection, and service procedure.
- Washer — Leaking in RearGE Appliances · Opened GE Appliances support page used for general rear-leak diagnosis; it does not identify the user's washer model or repair part.
- How to install your Samsung washing machineSamsung · Opened Samsung installation guidance used for general hose and electrical safety; adapters and steps vary by model and region, so the exact manual takes precedence.
- Leaking Inside — Front Load WasherWhirlpool Product Help · Opened Whirlpool support guidance used for diagnostic patterns; the exact washer model may have different access and instructions.
Community feedback
Share a repair observation
Share a plain-text repair observation. Accepted observations are published automatically; this page may take a moment to update.