
On this page
Start here
Quick answer
A washer that is not filling has not necessarily proved that its inlet valve is bad. First check the displayed error or fill behavior, confirm both household water taps are open, and inspect the hot and cold inlet hoses for kinks, crushing, freezing, damage, or crossed connections. With the water supply closed and power disconnected, clean only the accessible inlet screens if the model manual permits it. If water reaches the washer with adequate flow but the machine still does not admit water, the inlet valve or its control circuit becomes more likely; that diagnosis generally requires model-specific service. Stop immediately for a burst hose, uncontrolled water, exposed wiring, a burning smell, or a valve that cannot be isolated. Do not remove a hose or inlet valve while pressurized and do not test live electrical parts as a homeowner.
Before you begin
Safety first
- This article covers observing the fill symptom, checking taps and hoses, isolating water and power for an allowed screen inspection, and performing one model-approved verification cycle. Do not test live parts, power a valve directly, bypass a lock, open the console, or remove pressurized fittings.
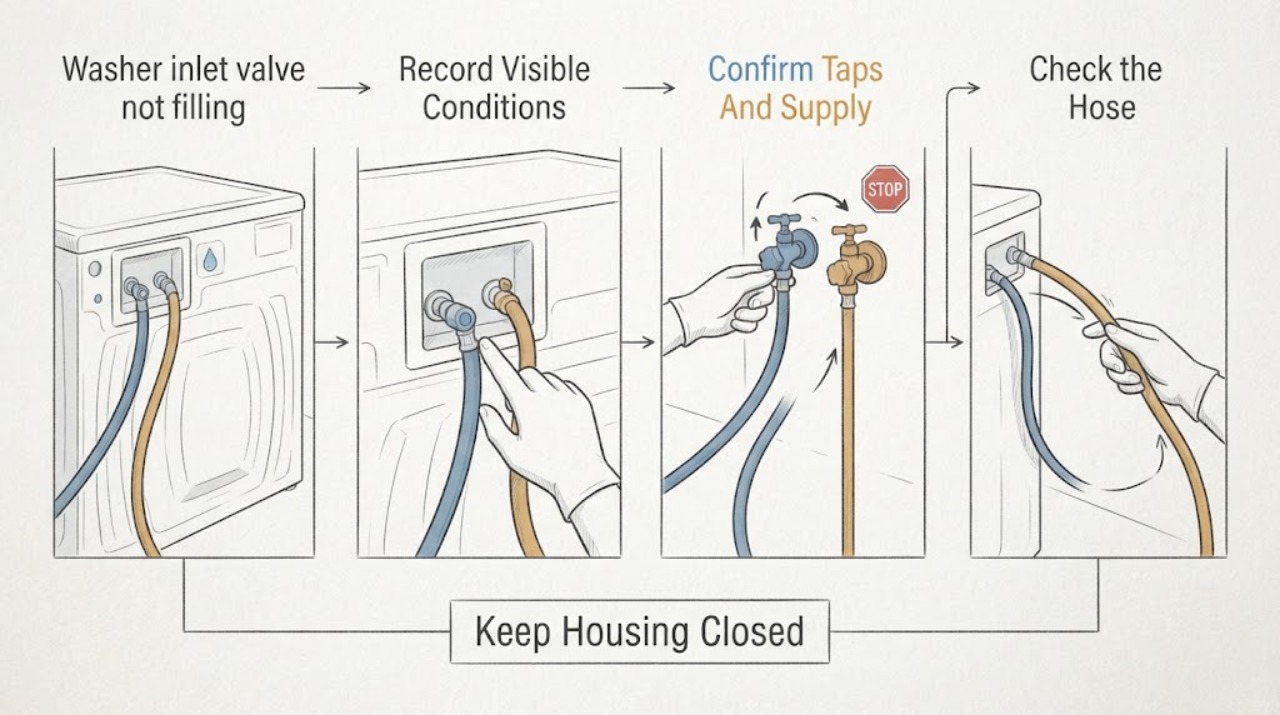
Work through in order
Diagnostic checks
Use only checks that match the exact appliance or system and its official guide.
-
Check 1
Select a normal fill-capable cycle and observe the control panel and first fill attempt from a dry, safe position; record any water-inlet error, whether the washer hums or clicks, and whether no water or only one temperature line enters.
Expected result: Note a no-fill condition, delayed fill during load sensing, low flow, hot-only or cold-only filling, a displayed error, or continuous filling that does not stop.
Next step: Continue with supply and hose checks for a no-fill or slow-fill symptom; if water will not stop, close both washer water valves and arrange service.
Stop if: Do not bypass the lid or door lock, reset a fault repeatedly, or continue a cycle with uncontrolled water.
Why this matters
Why: No fill, slow fill, wrong-temperature fill, and continuous fill have different causes. An error can indicate a supply or internal issue, while a washer that continuously fills requires the water valves to be closed and service rather than an inlet-valve cleaning attempt.
-
Check 2
Check that the hot and cold household taps serving the washer are fully open, that other fixtures have normal water flow, and that the hoses are attached to the intended hot and cold inlets without crossing or pinching.
Expected result: Record a closed or partially open tap, weak flow at the household tap, swapped hot/cold connections, a kinked or crushed hose, or normal supply at both connections.
Next step: Correct only an accessible open/closed or hose-routing issue described by the owner's manual, then retry the model-approved fill check; if the supply itself is weak or unavailable, address the plumbing before the washer valve.
Stop if: Do not loosen a hose under pressure, force a seized household tap, or move a stacked or tightly installed washer unsafely.
Why this matters
Why: A supply outage, weak pressure, partially closed tap, crossed connection, or hose restriction can prevent or delay filling even when the inlet valve is healthy. Normal flow at both taps and unpinched hoses move suspicion toward the inlet screen or valve/control path.
-
Check 3
If the problem began during freezing weather or after the washer moved, inspect the exposed inlet hoses and tap area for ice, flattening, kinks, bulges, cracks, or leaks without bending a pressurized hose sharply.
Expected result: Note ice at the tap or hose, a hose that is pinched behind the washer, visible hose damage, a wet connection, or no cold-weather or physical restriction.
Next step: Close the water tap for a damaged or leaking hose and arrange replacement or service; for suspected freezing, follow the model guidance for gentle warming and reconnect only after the path is fully clear.
Stop if: Do not use an open flame, boiling water, heat gun, or force to thaw a hose, and do not run the washer with a bulging or leaking hose.
Why this matters
Why: Frozen supply paths and crushed hoses can stop water before it reaches the inlet valve; a damaged or leaking hose is a supply-hose problem and should not be mistaken for a valve failure. If the external supply path is clear, inspect the inlet screen with power and water isolated.
-
Check 4
Turn off both washer water taps, disconnect the washer from power, place a towel or container under the hose ends, and clean the accessible inlet screens only as the exact model manual permits.
Expected result: Record rust, sand, scale, or other debris on a screen; a screen that is clear; a missing, damaged, or immovable screen; and whether the hoses and screen reseat without leaks.
Next step: Reinstall the screen and hoses exactly as directed, restore water slowly, check for leaks, and retry the fill check; if the washer still does not fill, stop at external checks and arrange diagnosis.
Stop if: Do not pry out a non-serviceable screen, insert tools into the valve body, or reconnect power while water is leaking.
Why this matters
Why: Sediment or foreign objects can restrict the water inlet and mimic a failed valve. A clear screen with normal external supply makes a valve, wiring, control, door/lid-lock, or pressure-sensing issue more likely, while a damaged or missing screen needs model-specific replacement or service.
-
Check 5
With the model manual in hand, compare a cycle that requests both temperatures with the washer's normal sensing behavior, and observe whether one inlet line fills while the other remains dry; do not open the cabinet or test the valve electrically.
Expected result: Note both lines filling, only hot or only cold filling, neither line filling, a delayed fill during sensing, or an inlet error after the external supply and screen checks.
Next step: Use only the exact model's temperature and error guidance; keep the washer off and request service when one valve section or both valve sections fail despite normal supply and clear screens.
Stop if: Do not swap hoses to force a test, apply power directly to the inlet valve, or open the control console.
Why this matters
Why: A single-temperature failure narrows the problem to one supply path, hose, screen, valve section, or connection. A delay can be normal load sensing on some models, while no fill after a normal start and good supplies makes an inlet valve or related control fault more likely.
-
Check 6
After an external correction, run one model-approved fill check while observing from a dry position for normal entry, hose or valve-connection leaks, correct temperature routing, and the return of any error.
Expected result: Record restored filling, weak flow, no flow, water at a hose connection, continuous filling, or the same inlet error despite normal household supply.
Next step: Close the water taps and arrange appliance service for persistent no-fill, an inlet valve suspected after the external checks, continuous filling, leaks, or an error that returns; provide the model, line affected, and test observations.
Stop if: Stop immediately for flooding, a burst hose, exposed wiring, burning smell, or water near electrical equipment.
Why this matters
Why: Restored flow after opening a tap, straightening a hose, thawing safely, or clearing a screen supports an external restriction. No flow with normal supply and clear screens supports a valve or related internal/control diagnosis; water that will not stop points to a different urgent fault.
Use your observations
Decision map
Find the observation that best matches what you see, then follow the next safe action.
-
PATH 01Safety boundary
What you see
One or both taps are closed or weak, a hose is kinked/crushed/frozen, or hot and cold connections are crossed.
Do this next
Restore the supply or correct the accessible hose arrangement using the model manual, then perform one fill check; replace a damaged hose or involve plumbing service when the tap supply is abnormal.
Why this path and its safety boundary
Why it matters: The water path before the inlet valve is the leading cause; the valve has not been meaningfully tested yet.
Safety stop: Do not run the washer with a leaking hose or use force or flame to thaw a frozen supply.
-
PATH 02Safety boundary
What you see
Household supply and hoses are normal, but an accessible inlet screen contains rust, sand, scale, or other foreign material.
Do this next
Clean and reseat the screen and hoses only as the exact manual allows, restore water slowly, check for leaks, and retry once.
Why this path and its safety boundary
Why it matters: Restricted flow at the screen can prevent the inlet valve from receiving sufficient water and can mimic a failed valve.
Safety stop: Arrange service for a missing, damaged, immovable, or non-serviceable screen rather than pushing debris into the valve.
-
PATH 03Safety boundary
What you see
The washer fills through one temperature line but not the other, with correct tap connections, unpinched hoses, and a clear screen.
Do this next
Use the exact model's hot/cold and error guidance and arrange service if the affected line still will not fill; do not swap connections as a workaround.
Why this path and its safety boundary
Why it matters: A single supply path, hose, screen, connection, valve section, or model-specific temperature-control issue is more likely than a total washer fill failure.
Safety stop: Do not open the valve or console or apply live electrical tests to isolate the valve section.
-
PATH 04Safety boundary
What you see
Both taps provide normal flow, hoses and screens are clear and correctly connected, but neither line fills after a normal cycle start and any inlet error returns.
Do this next
Keep the washer off and arrange model-specific appliance service for an internal diagnosis; provide the error, affected lines, model, and external-check results.
Why this path and its safety boundary
Why it matters: An inlet valve/solenoid, wiring, control, door/lid-lock, pressure-sensing, or related internal fault is more likely; the symptom does not identify which component failed.
Safety stop: Do not bypass the lock, power the valve directly, open the console, or order a valve without exact model confirmation.
-
PATH 05Safety boundary
What you see
Water continues entering after the cycle should stop, a hose or connection sprays or leaks, a supply cannot be shut off, or water is near electrical equipment.
Do this next
Close the washer water valves or the main water supply if the local valves cannot stop the flow and it is safe to access, disconnect power only from a dry safe position, and arrange urgent service.
Why this path and its safety boundary
Why it matters: This is an uncontrolled-water or electrical hazard and is not a routine inlet-screen or valve replacement check.
Safety stop: Do not restart the washer, touch wet electrical parts, loosen pressurized fittings, or attempt to contain a spray with towels while powered.
Helpful context
Understand the symptom
Check the water path before condemning the inlet valve
The inlet valve can only admit water that reaches it. A closed tap, weak building supply, kinked hose, frozen line, blocked screen, crossed hot/cold connection, or a cycle that is still sensing the load can look like a failed valve. Record whether neither line fills or only one temperature line fails, and note any error code before changing a part.
Screens are not the valve
Small inlet screens at the washer hose connections catch rust, sand, and other debris. Cleaning an accessible screen with the water off and power disconnected can restore flow, but a screen that is clear does not prove the valve solenoid or control circuit works. Do not pry out a screen that the model manual says to leave in place, and do not apply live electrical tests.
Know when the inlet valve needs service
If both supplies have usable flow, the hoses and screens are clear, the washer is correctly connected, and it still never admits water, the valve or a related control, door/lid-lock, pressure-sensing, or wiring fault needs model-specific diagnosis. A valve replacement also requires water isolation and leak verification, so record the model and observations for the technician instead of ordering a visually similar part.
Safety boundary
Stop conditions
- Close the washer water valves and arrange appliance service for continuous filling, a burst or leaking hose, uncontrolled water, exposed wiring, burning smell, or water near electrical equipment.
- Do not remove an inlet hose, screen, or valve while the supply is pressurized; disconnect power before model-approved screen inspection and keep connections dry.
- Do not apply live electrical tests, power an inlet valve directly, bypass a door or lid lock, open the control console, or infer a failed valve from a no-fill symptom alone.
- Use the exact owner's manual for hot/cold routing, screen access, freezing guidance, error codes, and part fit; do not copy a pressure or compatibility claim from another washer.
Only after diagnosis
Potential parts
- washer water inlet valve assembly
Consider this class only when normal water reaches the washer, accessible screens are clear, no hose restriction remains, and a model-specific diagnosis confirms the valve or solenoid is not admitting water.
Match the exact washer model, hot/cold port arrangement, electrical connector, mounting, and manufacturer's parts diagram; do not select by appearance. - washer inlet screen or filter
Consider this class only when the exact model treats the inlet screen as serviceable and inspection finds it missing, damaged, or permanently restricted after approved cleaning.
Confirm whether the screen is a replaceable model-specific part or part of the valve assembly; do not remove a screen the manual says to leave in place. - washer water inlet hose
Consider this class only when the hose is cracked, bulged, leaking, frozen-damaged, or cannot provide a safe unrestricted connection after the supply is isolated.
Match the exact hose length, end fittings, hot/cold labeling, and installation requirements; replace a damaged hose rather than straightening it into service. - washer water-inlet control or wiring repair
Consider this diagnostic category only when supply, hoses, screens, and valve operation have been evaluated by a qualified technician and the machine still reports a no-fill condition.
Electrical and control parts are model-specific; a technician must identify the failed circuit and compatible assembly before ordering.
When checks do not resolve it
Need a professional?
Arrange appliance service when both water supplies are normal, hoses and accessible screens are clear, and the washer still does not fill; when one inlet line repeatedly fails; when an inlet error returns; or when the valve, wiring, lock, control, or pressure-sensing circuit may require internal diagnosis. Call urgently for continuous filling, flooding, a burst hose, exposed wiring, burning smell, or water near electrical equipment.
Safety scope: This article covers observing the fill symptom, checking taps and hoses, isolating water and power for an allowed screen inspection, and performing one model-approved verification cycle. Do not test live parts, power a valve directly, bypass a lock, open the console, or remove pressurized fittings.
Common questions
FAQ
How do I know if the washer inlet valve is bad?
A no-fill symptom alone is not enough. If both household taps provide normal flow, hoses are correctly routed and undamaged, accessible inlet screens are clear, and the washer still does not admit water or repeatedly shows an inlet error, the inlet valve or a related control, lock, sensor, or wiring fault becomes more likely. Arrange model-specific service before ordering a valve.
Why does my washer fill with cold water but not hot water?
Check the hot tap, hot hose, hot inlet connection, freezing, and the accessible screen first. Samsung notes that cycles may use hot and cold lines differently, so confirm the selected cycle and model instructions. If only one line still fails with normal supply, service is needed to distinguish that valve section from wiring or control problems.
Can I clean the washer inlet valve filter myself?
You may clean an accessible inlet screen only when the exact manual permits it: close the water tap, disconnect power, protect the area from residual water, and reinstall the screen and hose correctly. Do not pry a non-serviceable screen, open the valve, or perform electrical tests. Persistent no-fill after a clear screen needs service.
What should I do if the washer keeps filling and will not stop?
Close the washer water valves immediately if they can be reached safely, stop the cycle, and arrange service. Continuous filling is a different and potentially damaging fault from a washer that will not fill; do not leave the machine powered while water is uncontrolled.
Read the exact guide
Official sources
- LG Washer - Troubleshooting Fills Too Slow / Does Not FillLG USA Support · LG washer support article; exact access and procedures vary by model.
- [LG top load washing machine - water supply] Water supply is insufficient. Water is supplied little by little.LG USA Support · LG top-load washer guidance; images and content can differ by model.
- LG Washer - Why is There No Water in My Front Load Washing Machine?LG USA Support · LG front-load guidance; model-specific error behavior and component access vary.
- Inlet Hose Installation - Washing MachineLG USA Support · LG inlet-hose installation guidance; other washer brands and models may use different connection layouts.
- Water fill issues with Samsung washing machinesSamsung Support · Samsung support guidance; exact fill sensing, hose routing, and error codes depend on model.
Community feedback
Share a repair observation
Share a plain-text repair observation. Accepted observations are published automatically; this page may take a moment to update.