
On this page
Start here
Quick answer
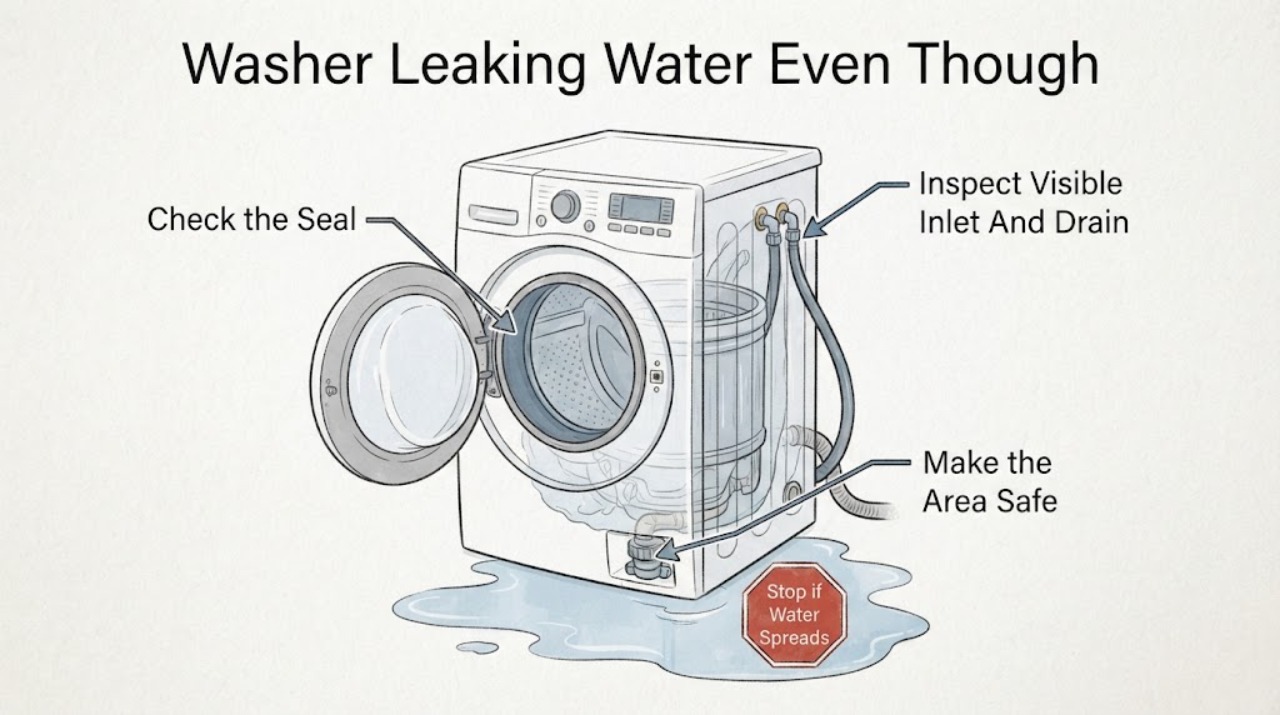
A washer can leak even when its door or lid closes because the latch does not prove that the seal, tub, hoses, or drain path is intact. Stop the cycle, keep away from pooled water, and turn the washer off from a dry position; do not touch a plug or breaker if water is near electrical parts. Note where water first appears and whether it starts while filling, washing, draining, or spinning. On a front-load washer, inspect the cool door glass and gasket for lint, hair, trapped fabric, tears, or deformation. On a top-load washer, inspect the closed lid, tub rim, load size, level, and visible hoses without reaching into the moving basket. Check visible inlet and drain connections and any user-accessible filter only as the exact manual allows. Do not move the washer, open panels, use drain chemicals, or keep running cycles to find the source. A damaged seal, hose, tub, pump, persistent leak, or water from underneath needs qualified appliance service.
Before you begin
Safety first
- This article supports dry floor-level observation and exact-manual cleaning or load checks only. Do not move the washer, open panels, loosen pressurized hoses, reach beneath the cabinet, bypass a lock, or operate a damaged or persistent-leaking unit.
Work through in order
Diagnostic checks
Use only checks that match the exact appliance or system and its official guide.
-
Check 1
Stop the cycle and turn the washer off from a dry position; look from outside the cabinet for water, smoke, arcing, burning odor, or water near the power connection without stepping into a puddle or touching the appliance.
Expected result: Record whether water is at the front door or lid, dispenser, rear connections, drain or standpipe, lower access area, floor beneath the machine, or not visible; note whether the leak is rapid or only a few drops.
Next step: For urgent symptoms, leave the area and obtain appropriate emergency or qualified help without touching switches, plugs, or breakers. Otherwise keep the washer off and continue only with dry, ordinary-access observations.
Stop if: Do not step into pooled water to unplug the washer, pull it forward, or reach beneath it.
Why this matters
Why: The first wet location narrows the path more reliably than the final puddle. Smoke, arcing, burning odor, rapidly spreading water, or electrical contact is an urgent hazard; a quiet leak still requires the washer to remain out of service until its source is known.
-
Check 2
When the washer is cool, off, empty, and safe to open, inspect the front door glass and gasket or the top lid, rim, and visible tub-cover area according to the model design; do not bypass a lock or reach into standing water.
Expected result: For a front-loader, look for hair, lint, thread, trapped fabric, detergent residue, tears, cuts, folds, hardening, or displaced gasket material. For a top-loader, look for a cracked lid, damaged rim or seal, water splashing over the basket, an unlevel cabinet, or an oversized or water-resistant load.
Next step: Remove only loose surface debris with the model-approved soft-cloth method and correct only an obviously unsuitable load on a future cycle. Request service for a torn, cracked, deformed, or persistently leaking seal, door, lid, or tub cover.
Stop if: Do not glue, cut, stretch, pry, or replace a seal, lid, glass, or latch as a generic repair, and do not operate with cracked glass or a damaged closure.
Why this matters
Why: A front-door leak with debris or gasket damage points to a compromised door seal. A top leak during agitation or spin can instead reflect load, level, lid, tub-cover, or splash conditions. A clean intact closure with continued water shifts attention to hoses, dispenser, drain, pump, or an internal tub path.
-
Check 3
From ordinary safe access, inspect both visible inlet-hose connections, their sealing washers if visible, the drain hose, and the household drain or standpipe; do not move the washer or loosen a pressurized connection.
Expected result: Look for a wet fitting, missing or displaced washer, split, bulge, kink, crushed hose, loose drain hose, or water backing up at a sink or standpipe; note whether the connections are dry while the cabinet leaks elsewhere.
Next step: Photograph the path and arrange appliance service for a damaged hose or hidden leak; involve plumbing service when the household drain backs up. Only restore visible routing that can be corrected without moving the appliance and that matches the manual.
Stop if: Do not disconnect a water-filled hose, reach behind a tight or stacked washer, use drain chemicals, or overtighten a fitting to stop a leak.
Why this matters
Why: A wet inlet fitting favors a supply hose or washer issue; a cracked or kinked drain hose or backing-up standpipe favors the drain path; dry visible connections with water from below indicate a concealed hose, pump, outer-tub, or seal problem.
-
Check 4
Inspect the visible detergent dispenser and the load history without starting another cycle; confirm whether the drawer or insert was fully seated and whether a top-load basket was overfilled, unlevel, or loaded with bulky or water-resistant material.
Expected result: Record residue or overflow marks at the dispenser, excess suds, a drawer or insert out of position, water splashed over the top-load basket, a large or uneven load, or none of these conditions.
Next step: Clean and reseat only user-removable dispenser parts as the manual permits, use the specified detergent amount on a future load, and keep the washer off until a damaged or persistent leak is assessed.
Stop if: Do not dismantle the dispenser, mix cleaners, pour water into the machine to flush it, or run a full load to see whether the leak returns.
Why this matters
Why: A dispenser overflow or excess suds can route water out of the front or rear. A large, uneven, or water-resistant top-load load can splash over the basket, and an unlevel washer can worsen that path. These observations do not explain a torn seal or water from underneath.
-
Check 5
Use the event history and the exact manual to classify whether water appears while the washer is idle, filling, agitating, draining, or spinning; do not repeatedly run the appliance to recreate a leak.
Expected result: Record whether water is present before a cycle, starts as water enters, appears during agitation or basket movement, begins when draining, or occurs only with a particular load or spin condition.
Next step: Give the timing and location to a qualified technician and keep the washer out of service when the source is unclear, water reaches the floor, or the leak returns after a simple manual-approved maintenance step.
Stop if: Do not run an unattended or full-load test, bypass a lid or door lock, or place hands below the basket or cabinet.
Why this matters
Why: Water at rest can implicate an inlet valve, supply, or tub-side fault; filling-time water favors the dispenser, inlet, water-level, or door path; agitation or spin water favors splash, level, load, tub-cover, or seal issues; drain-time water favors the hose, pump, filter, or household drain.
-
Check 6
Record the model and serial from an ordinary-access label, washer configuration, closure type, first wet location, cycle phase, load and detergent details, hose and seal observations, and any recent installation or maintenance without moving the machine.
Expected result: Classify the result as a front-door leak, top or lid splash, dispenser overflow, rear hose leak, drain or standpipe backup, lower-panel leak, underneath leak, idle filling, or uncertain source.
Next step: Request qualified appliance service for any damaged closure, persistent leak, water from underneath, leak with an empty suitable load, or source that cannot be safely isolated; request plumbing service for a backed-up household drain.
Stop if: Do not order a part from a generic symptom, open the cabinet, remove the lid or door, or continue using the washer while substantial water escapes.
Why this matters
Why: This classification helps service distinguish a door or lid seal from supply, drain, pump, outer-tub, water-level, or load-related causes. A model number is necessary for the correct door, lid, gasket, hose, pump, or control assembly; a visual match is not enough.
Use your observations
Decision map
Find the observation that best matches what you see, then follow the next safe action.
-
PATH 01Safety boundary
What you see
A front-load washer leaks from the closed door and inspection finds debris, trapped fabric, a fold, tear, deformation, or damage to the door glass or gasket.
Do this next
Remove only loose debris with the exact manual-approved method if safe, then request service for any damage or continued leaking; leave the washer off.
Why this path and its safety boundary
Why it matters: The latch can be functioning while the gasket-to-glass seal is interrupted; the door seal or glass is more likely than a rear hose.
Safety stop: Do not glue, cut, stretch, or force the gasket, and do not operate with cracked glass or a torn seal.
-
PATH 02Safety boundary
What you see
A top-load washer leaks over or near the closed lid during agitation or spin, especially with an oversized, uneven, water-resistant load or an unlevel machine.
Do this next
Keep the machine off, document the load and level condition, and request service if the lid, tub-cover seal, or cabinet is damaged or the leak recurs with a suitable load.
Why this path and its safety boundary
Why it matters: Splash over the basket, load distribution, level, lid, or tub-cover seal is more likely than a supply connection; a closed lid does not prevent water from rising or splashing over the tub.
Safety stop: Do not reach into a moving basket, bypass the lid lock, or treat a damaged lid or seal as a load problem.
-
PATH 03Safety boundary
What you see
Water appears while filling, near the dispenser, or at a visible inlet connection, with residue, an incompletely seated drawer, excess suds, or a wet hose fitting.
Do this next
Stop use, clean and reseat only accessible dispenser parts as directed, photograph the hose or fitting, and request appliance or plumbing service if the path remains wet.
Why this path and its safety boundary
Why it matters: A dispenser channel, supply hose, washer, valve, or oversudsing path is more likely than the closure itself; water can travel down the cabinet and look like a door or lid leak.
Safety stop: Do not loosen pressurized fittings, dismantle the dispenser, mix cleaners, or keep filling the washer to test it.
-
PATH 04Safety boundary
What you see
Water appears during draining or at the rear, drain hose, standpipe, sink, or lower pump area, while the door or lid area remains dry.
Do this next
Keep the washer off, do not move it, and arrange appliance service or plumbing service based on whether the machine path or household drain is the wet point.
Why this path and its safety boundary
Why it matters: A loose or damaged drain hose, pump, filter, or blocked household drain is more likely than a door or lid seal. A backup can spread water to the front of the floor.
Safety stop: Do not use drain chemicals, reach behind the washer, or open a pump or filter with uncontained water.
-
PATH 05Safety boundary
What you see
Water comes from underneath, the outer tub area, or enters the washer while it is idle, or the visible door, lid, dispenser, and hoses are dry.
Do this next
Close the water supply only when the exact manual and conditions make that safe, keep the washer out of service, and request qualified diagnosis without opening the cabinet.
Why this path and its safety boundary
Why it matters: An outer-tub seal, internal hose, pump, water-level or inlet valve fault, or concealed leak remains possible and cannot be identified by floor-level checks.
Safety stop: Do not tilt the washer, reach underneath, open panels, or leave a machine connected while it continues filling or leaking.
Helpful context
Understand the symptom
A closed door or lid is only one part of the water barrier
The latch keeps the door or lid in its operating position, but the gasket, glass, tub rim, and load arrangement keep water inside. On a front-loader, hair, lint, thread, or a torn gasket can create a gap even when the latch clicks. On a top-loader, an unlevel cabinet, oversized or water-resistant load, or water splashing over the basket can look like a lid leak. Do not press, bend, or bypass the closure to test it.
Trace the first wet spot, not the biggest puddle
Water can run from a rear hose, dispenser, lid, or drain onto the floor and make the apparent source misleading. Filling-time leaks favor the supply, dispenser, water-level, or door path; draining-time leaks favor the drain hose, pump, filter, or household drain; a leak from underneath may involve the outer tub, tub seal, pump, or internal hose. Record the cycle phase and location without moving the appliance or repeatedly recreating the leak.
Front-load and top-load checks are not interchangeable
A front-load washer has a door glass and flexible gasket that need a clean, undamaged contact surface. A top-load model may instead have a lid, tub-cover seal, basket, and load or level condition that can allow splashing. Read the exact owner's manual before opening a filter or adjusting anything; a generic lid or door procedure can damage a model-specific seal or lock.
Safety boundary
Stop conditions
- Do not touch a plug, breaker, or washer while standing in water or when water is near electrical parts; leave for smoke, arcing, burning odor, or rapidly spreading flooding.
- Do not move, tilt, pull forward, or open cabinet or rear panels on a washer to find a hidden leak; do not reach beneath a basket or cabinet.
- Do not bypass a door or lid lock, run an unattended or full-load test, or continue operating with cracked glass, a damaged lid, torn gasket, or water from underneath.
- Do not loosen pressurized inlet hoses, use drain chemicals, mix cleaners, or force a dispenser, filter, pump cap, hose, seal, lid, or door part.
- Do not order or install a gasket, lid, hose, pump, tub seal, valve, or control from appearance alone; exact model diagnosis and safe testing belong to qualified service.
Only after diagnosis
Potential parts
- door gasket, lid seal, or tub-cover seal
Consider only when the leak location and inspection confirm a torn, cut, hardened, deformed, displaced, or otherwise damaged seal at the front door or top-load tub cover.
Confirm the exact model, closure design, retaining arrangement, and manufacturer fit information; do not substitute or modify a seal by appearance. - washer door glass or top lid assembly
Consider only when qualified diagnosis finds cracked or damaged front glass, lid, hinge, alignment, or closure hardware that prevents the specified seal.
Match the exact model and configuration through qualified service; do not operate with cracked glass or a damaged lid. - inlet hose, drain hose, pump, filter seal, or internal tub seal
Consider the relevant category only when the visible leak location and cycle timing identify a supply, drain, pump, or tub-side fault and service confirms the diagnosis.
Confirm exact model, connection, seal, and pressure or drain requirements before ordering; do not improvise fittings or internal repairs.
When checks do not resolve it
Need a professional?
Arrange qualified appliance service for a torn or deformed door gasket, cracked lid or glass, water from underneath, a persistent leak after approved cleaning or load correction, a wet pump or internal area, idle filling, or any source that cannot be safely isolated. A plumber may be needed when the household drain or standpipe backs up. Provide the exact model and serial if safely visible, front- or top-load configuration, door or lid condition, first wet location, cycle phase, load and detergent history, visible hose or dispenser condition, and photos. Keep the washer out of service until the leak is repaired.
Safety scope: This article supports dry floor-level observation and exact-manual cleaning or load checks only. Do not move the washer, open panels, loosen pressurized hoses, reach beneath the cabinet, bypass a lock, or operate a damaged or persistent-leaking unit.
Common questions
FAQ
Why does my washer leak if the door or lid closes?
The closure can latch while the gasket, lid seal, tub rim, hose, dispenser, drain, pump, or outer tub still leaks. Front-load debris or a torn gasket can interrupt the door seal; top-load level, load, and splash conditions can send water over the basket. Find the first wet location without moving or repeatedly running the washer.
Can I use a washer with a small leak from the closed door?
Do not continue normal use until the source is identified. A small leak can reach the floor or electrical parts, worsen during spin, and damage the seal or cabinet. Keep the washer off and request service for a torn or deformed gasket, continued leaking, or water from underneath.
What should I check on a front-load washer that leaks from the door?
When the machine is cool, off, empty, and safe to open, inspect the glass and gasket for hair, lint, thread, trapped fabric, residue, tears, folds, or deformation. Remove only loose debris with the exact manual-approved method. Do not cut, glue, stretch, or operate with damaged glass or a torn seal.
Why does a top-load washer leak over the closed lid?
An unlevel washer, oversized or uneven load, water-resistant material, excessive water level, damaged lid, or tub-cover seal can allow water to splash over the basket. Keep the washer off, document the load and level condition, and request service if the leak recurs with a suitable load or any lid or seal is damaged.
What if the door and lid area are dry but water is under the washer?
Check only visible inlet and drain connections from a safe position. A wet inlet fitting, split or kinked drain hose, household drain backup, pump, outer tub, or internal hose can be involved. Do not move or tilt the washer; arrange appliance or plumbing service based on the first wet location.
Read the exact guide
Official sources
- How to Fix a Leaking Washing MachineMaytag · Maytag consumer guidance for washing-machine leaks; exact model manual and qualified service control a particular washer.
- Leaking Water Underneath - WasherMaytag · Maytag top-load washer support guidance for water under the appliance; exact model and installation instructions control.
- Leaking from Front or Top - WasherMaytag · Maytag top-load washer support guidance; model-specific operating and lid procedures control.
- Leaking Inside the Tub - WasherMaytag · Maytag washer support guidance for water entering while not in use; exact model instructions and qualified service apply.
Community feedback
Share a repair observation
Share a plain-text repair observation. Accepted observations are published automatically; this page may take a moment to update.