
On this page
Start here
Quick answer
When a washer starts its cycle but no water enters, first decide whether it is in a normal sensing or lock step, actually calling for water, or filling and immediately losing water. Keep the lid or door closed and allow the model's initial sensing period to finish; some high-efficiency top-load cycles briefly sense before adding water. Then check that the washer has power, the required hot and cold supply valves are fully open, the inlet hoses are not kinked, the inlet screens are not blocked, and the drain hose is installed so water cannot siphon out. If the lid or door does not latch, the control may not authorize filling. If supply and hose checks are good but the inlet valve never opens, or the washer shows a fill error, the valve, pressure-sensing path, lid/door lock, wiring, or control needs model-specific service. Turn off power and water before hose or screen access; do not work on live wiring, defeat a lid lock, or leave a leaking hose unattended.
Before you begin
Safety first
- This article supports observing the start sequence, checking external valves and power, inspecting hoses and accessible screens with water/power isolated, and comparing drain routing with the manual. Qualified appliance service handles live tests, cabinet access, valve/pressure-sensor/control diagnosis, lock bypass prevention, and internal repairs.
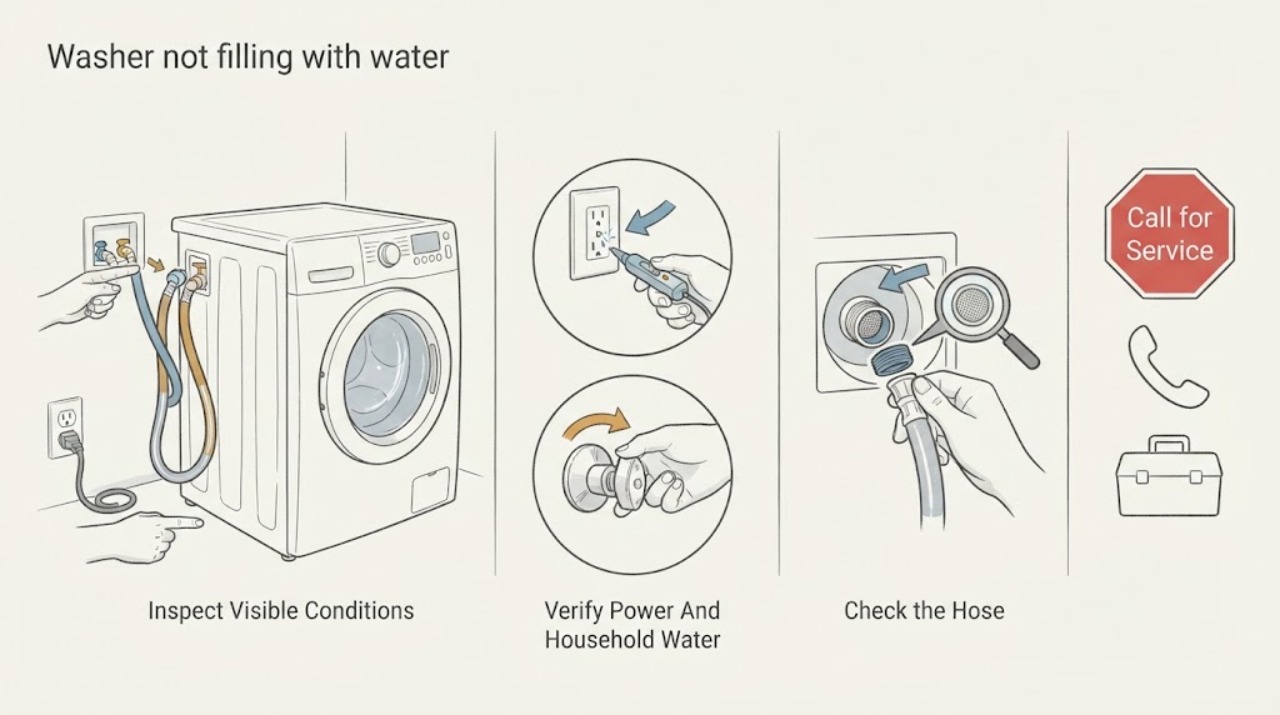
Work through in order
Diagnostic checks
Use only checks that match the exact appliance or system and its official guide.
-
Check 1
Start the selected cycle once with the lid or door fully closed, then observe from outside without opening the machine or reaching into the tub.
Expected result: Record whether the machine locks or latches, shows a sensing/fill indicator, makes a brief sensing movement, hums for a valve call, adds any water, pauses, cancels, or displays a code.
Next step: Wait only through the normal start interval stated in the exact manual, then use the observed pattern to choose the lock, supply, drain, or service branch. Do not repeatedly start and cancel the cycle.
Stop if: Stop for leaking water, burning odor, smoke, sparking, a hot cord or control, a drum that moves unexpectedly with an open door/lid, or a repeated breaker trip.
Why this matters
Why: A short sensing period or pause can be normal on some high-efficiency machines. A lid/door that never latches, a cycle that cancels, or a fill error points to the lock/control path. A valve hum with no water shifts attention to supply, hose, screen, or valve flow; no command sound after the normal start sequence keeps the control and lock authorization in contention.
-
Check 2
Check the washer plug and known breaker from a dry, safe position, and confirm every required household water valve at the wall is fully open.
Expected result: Record an unpowered outlet, tripped breaker, loose plug, closed hot or cold valve, weak household flow, a leak at the wall connection, or normal power and open valves.
Next step: Restore only an obviously off valve or a single tripped breaker when there is no leak, heat, damage, or other hazard. If supply remains absent or the breaker trips again, leave the washer off and obtain qualified electrical or plumbing service.
Stop if: Do not use an extension cord, reset a tripping breaker repeatedly, touch a wet plug, or repair a leaking supply valve as part of this check.
Why this matters
Why: No power or a closed valve can make a cycle appear to start without allowing filling. Some washer designs require both hot and cold supply lines even when a cool cycle is selected; a weak or absent household supply is upstream of the washer. A breaker that trips again, a damaged cord, or a leaking wall valve is an electrical or plumbing service issue.
-
Check 3
With the washer unplugged or otherwise safely isolated and both water valves closed, inspect the inlet hoses for kinks, bulges, cuts, crushed sections, or anti-flood devices; if the model instructions permit, remove the hoses with pliers and a bucket to view the washer inlet screens.
Expected result: Record a free-flowing hose, a kink or damaged hose, restricted flow, mineral/debris buildup at an inlet screen, a screen that is intact and clear, or water that continues to flow after the wall valves are closed.
Next step: Restore only the model-approved hose arrangement after cleaning an accessible screen gently without removing it or forcing it. Replace a visibly damaged hose and arrange service for a damaged valve, persistent restriction, or any uncertainty about access.
Stop if: Do not remove or pry out the inlet screen, use a sharp tool, disconnect pressurized hoses, work with power connected, or leave the hose connection leaking.
Why this matters
Why: A kink, clogged hose, anti-flood restriction, or blocked inlet screen can prevent or slow the valve from receiving water. A clear screen and unrestricted hoses make the supply path less likely and shift attention to the valve, lock authorization, pressure sensing, wiring, or control. A valve that will not shut off at the wall is a plumbing stop condition.
-
Check 4
Inspect the drain hose installation against the exact washer manual without pulling the machine into an unsafe position; look for a hose that is too low, pushed too far into the standpipe, or sealed airtight.
Expected result: Record water entering and immediately disappearing, a drain hose below the model's required height, a hose sealed into the pipe, a loose hose, or no evidence that water is reaching the tub.
Next step: Correct only the hose routing specified by the owner's manual, preserving the required air gap and support. If the machine leaks, the standpipe is unsuitable, or the correct height is unknown, stop and arrange appliance or plumbing service.
Stop if: Do not tape the drain hose airtight, push it into an unknown depth, run a leaking washer, or reach behind a heavy appliance without safe clearance and assistance.
Why this matters
Why: Water that enters and immediately leaves points to siphoning or drain-hose installation rather than a closed inlet valve. A sealed drain connection can interfere with airflow, while a loose hose can leak or discharge onto the floor. If no water ever enters, drain installation is not the primary cause.
-
Check 5
Check the lid or door contact area for an obvious clothing item, packing material, or soil that prevents closure, then close it fully and use the manual's Start/Pause or resume behavior once.
Expected result: Record a firm latch and normal lock indication, a latch blocked by an item or buildup, repeated clicking without a lock, a lid/door that reopens, or a cycle that pauses and drains after the lid/door is opened.
Next step: Remove only an obvious obstruction and clean the contact area as directed by the manual. If the lock still fails, leave the washer off and arrange model-specific service; never bypass or hold a lock closed.
Stop if: Do not defeat the lid/door lock, insert tools into the latch, force the door, or reach into a moving or energized washer.
Why this matters
Why: Some washers will not fill or advance until the lid or door is closed and the lock signal is accepted. A failed self-test or repeated clicking keeps the latch/lock, harness, or control in contention even when water supply is good. Opening the lid during sensing can restart or pause the sequence on some top-load models.
-
Check 6
If the cycle has completed its normal start step, power and water supply are present, hoses/screens and drain routing are correct, and the lock is accepted, document the result for model-specific service instead of opening the cabinet.
Expected result: Record whether the inlet valve clicks or hums, whether water enters at all, whether a fill-time code appears, whether the washer fills only on one temperature inlet, and whether the problem repeats on every cycle.
Next step: Provide the model, cycle, code, supply results, inlet-screen condition, lid/door-lock result, drain observation, and valve sound to qualified appliance service. Have internal live testing, cabinet access, valve replacement, and control diagnosis performed by a trained technician.
Stop if: Do not test live valve terminals, bypass the lock or pressure sensor, open the cabinet with power connected, or keep running a washer that leaks or repeatedly times out.
Why this matters
Why: A valve call with no flow can indicate a failed inlet valve, blocked internal path, or pressure/supply issue. No valve call after a valid lock and supply can indicate the lid/door switch, wiring, pressure sensor, control, or program path. One-temperature-only filling can isolate one inlet path but does not identify a replacement part by itself.
Use your observations
Decision map
Find the observation that best matches what you see, then follow the next safe action.
-
PATH 01Safety boundary
What you see
The washer powers on, accepts the closed lid/door, shows sensing or fill, makes normal brief sensing movements, and the manual describes a delay before additional water.
Do this next
Keep the lid/door closed and allow the documented sensing period to finish. If no water appears after that period, return to the supply and inlet-path checks.
Why this path and its safety boundary
Why it matters: A low or temporarily absent water level may be normal for the selected cycle and sensing phase rather than a failed inlet system.
Safety stop: Do not add water manually, repeatedly cancel the cycle, or continue if the washer leaks, overheats, or displays a fault.
-
PATH 02Safety boundary
What you see
The washer calls for fill or shows a fill indication, but a required wall valve is closed, a hose is kinked, household flow is weak, an anti-flood device restricts flow, or an inlet screen is blocked.
Do this next
Correct the external valve/hose/screen condition using the model instructions with water and power isolated, then run one supervised test. Arrange plumbing or appliance service for a damaged valve, persistent restriction, or leak.
Why this path and its safety boundary
Why it matters: The restriction is upstream of or at the washer's inlet valve; a control-board replacement is not supported by this pattern.
Safety stop: Do not remove a screen, disconnect a pressurized hose, or continue testing while water is escaping.
-
PATH 03Safety boundary
What you see
Water can be heard or briefly seen entering, but the tub remains empty or the level falls immediately, and the drain hose is low, overinserted, or sealed.
Do this next
Restore the drain hose's manual-specified height, insertion, support, and air gap, then run one supervised fill. Use plumbing service if the standpipe or drain connection cannot meet the manual requirements.
Why this path and its safety boundary
Why it matters: Drain-hose siphoning or incorrect routing is more likely than a failed inlet valve because water is reaching the washer.
Safety stop: Do not tape the drain hose airtight, leave the hose loose over a floor drain, or run a cycle that discharges water onto the floor.
-
PATH 04Safety boundary
What you see
The cycle starts but the lid/door never latches, repeatedly clicks, reopens, shows a lock error, or pauses/cancels when the lid/door is opened; water supply checks are normal.
Do this next
Remove only an obvious obstruction and follow the model's close/resume instruction once. If the lock still fails, leave power off and obtain model-specific appliance service.
Why this path and its safety boundary
Why it matters: The lock or door/lid signal may be preventing the control from authorizing the inlet valve. A new inlet valve would not correct a failed lock path.
Safety stop: Do not bypass, tape, hold, or mechanically defeat the lid/door lock.
-
PATH 05Safety boundary
What you see
The lid/door is accepted, power and required water supplies are present, inlet hoses/screens and drain routing are correct, but no valve click/hum or water appears and the cycle times out or reports a fill fault.
Do this next
Leave cabinet and wiring access to qualified appliance service and provide the complete observation record, model, cycle, and any code.
Why this path and its safety boundary
Why it matters: The control may not be commanding the valve, or the pressure-sensing, wiring, valve, or internal harness path may be open. This pattern needs model-specific diagnosis rather than more external resets.
Safety stop: Do not open the cabinet, probe live terminals, bridge the valve, or defeat the pressure or lock circuit.
-
PATH 06Safety boundary
What you see
Only one temperature inlet fills, the external hoses and screens are clear, or the washer repeatedly fills slowly/no-fill despite normal supply and lock behavior.
Do this next
Stop repeated cycles and arrange qualified appliance diagnosis. Use the exact model parts list only after the failed component and connector arrangement are confirmed.
Why this path and its safety boundary
Why it matters: One inlet valve path, internal screen, harness, pressure-sensing input, or control output may be faulty; the symptom does not identify which part without model-specific testing.
Safety stop: Do not swap hose positions to mask the symptom, apply voltage directly to a valve, or order a valve by appearance.
Helpful context
Understand the symptom
A cycle that starts is not always a failed fill
A washer may light the console, lock the lid or door, and perform sensing before it opens the water valve. High-efficiency top-load models can make short, slow sensing movements and pause before adding more water. If the fill or sensing indicator is active and the machine is otherwise behaving normally, wait through the period described in the owner's manual without repeatedly opening the lid or canceling the cycle. No water after the model's normal start sequence is different from a deliberately low-water cycle.
Follow the water from the wall to the valve
For a real no-fill symptom, check the complete external inlet path: the household valves, both required hoses or the single hose on a compact model, kinks, anti-flood devices, and the small screens where the hoses connect to the washer. Mineral debris can restrict a screen even when the wall valve is open. Turn the water off before removing any hose, catch residual water, and do not pry out or damage an inlet screen.
Separate no water entering from water leaving
If you hear water briefly but the tub remains empty, inspect the drain hose arrangement as well as the inlet. A drain hose that is too low or sealed incorrectly can let water flow out by gravity while the washer is trying to fill. If there is no valve sound or water movement after the lid/door, supply, and hose checks are correct, the washer may not be sending the fill command or its inlet valve may be faulty. Those internal electrical and control checks belong to qualified service.
Safety boundary
Stop conditions
- Unplug or safely isolate the washer and close the water valves before removing an inlet hose, inspecting a screen, or accessing any cabinet or wiring; a Start/Pause command is not electrical isolation.
- Do not bypass a lid/door lock, pressure sensor, or control; do not apply power directly to a water valve or probe live terminals.
- Do not run the washer with a leaking hose, damaged cord, exposed wire, standing water near electrical parts, burning odor, smoke, sparking, repeated breaker trip, or an unsecured drain hose.
- Do not add water manually to force a cycle, remove inlet screens with sharp tools, or seal a drain hose airtight to stop siphoning.
- If the model's normal sensing period, hose arrangement, required inlet connections, or safe isolation method is unknown, stop and use the owner's manual or qualified appliance service.
Only after diagnosis
Potential parts
- Washer water inlet valve
Consider this category only after qualified testing confirms that the required water supply, hoses, screens, lock authorization, and control command are present but the inlet valve does not pass water correctly.
Match the exact washer model, number of inlet paths, connector arrangement, water-temperature routing, and approved service information; do not substitute by appearance. - Washer inlet hose and screen assembly
Consider this category only when a hose is damaged or a qualified diagnosis identifies a restricted or failed hose/screen path after the household supply is confirmed.
Match the connection size, hose rating, length, temperature routing, and model instructions; shut off water and power before replacement. - Washer lid or door lock
Consider this category only when the lid/door will not latch or the lock signal is confirmed to prevent fill authorization after obstructions and closure checks are resolved.
Confirm the exact washer model and lock/harness configuration; never bypass the lock and use qualified service for cabinet access. - Washer pressure-sensing or control component
Consider this category only when qualified testing rules out supply, hoses, screens, drain siphoning, lock, and inlet valve causes and identifies a sensing or control fault.
Use the exact model's diagnostic procedure, connector layout, and approved part information; internal electrical work is not a trial-and-error replacement.
When checks do not resolve it
Need a professional?
Arrange qualified appliance service when a washer still does not fill after the normal sensing period, closed-lid/door check, power and water-supply check, inlet-hose and screen inspection, and drain-hose review. Service is especially appropriate for a fill error, no valve command, one-temperature-only filling, a failed lid/door lock, suspected inlet valve or pressure-sensor fault, internal wiring, or any need to open the cabinet. Use plumbing or electrical service for a leaking wall valve, damaged cord, absent household supply, or repeated breaker trip. Stop immediately for flooding, smoke, sparking, burning odor, exposed wiring, or unsafe isolation.
Safety scope: This article supports observing the start sequence, checking external valves and power, inspecting hoses and accessible screens with water/power isolated, and comparing drain routing with the manual. Qualified appliance service handles live tests, cabinet access, valve/pressure-sensor/control diagnosis, lock bypass prevention, and internal repairs.
Common questions
FAQ
Why does my washer start the cycle but not fill with water?
It may still be sensing, waiting for the lid/door lock, or the selected cycle may use a low initial fill. If the normal start sequence has passed, check power, required water valves, inlet hoses/screens, and drain-hose routing before suspecting the inlet valve or control.
How long should a washer wait before filling?
There is no universal wait time. Some high-efficiency top-load washers make sensing movements and pause before adding water. Use the exact model manual; if the documented sensing period ends with no water or a fill error, treat it as a no-fill symptom.
Do both hot and cold water valves need to be open?
Many washer designs require both connected supply lines to be open even when a cool cycle is selected, while compact or model-specific machines may differ. Check the manual and confirm every required valve and hose rather than assuming one inlet is enough.
Can a kinked hose or clogged inlet screen stop a washer from filling?
Yes. Kinks, restricted hoses, anti-flood devices, and mineral or debris buildup at the washer's inlet screen can reduce or stop flow. Turn off water and power before hose access, catch residual water, and do not pry out the screen.
Could the drain hose make it look like the washer is not filling?
Yes. If water enters and immediately leaves through a drain hose that is too low, overinserted, or sealed incorrectly, the tub can remain empty. Compare routing with the exact manual and preserve its required height and air gap.
When should I call for washer no-fill service?
Call when supply, hose, screen, drain, and lid/door-lock checks are normal but the inlet valve never opens, only one inlet works, a fill code repeats, or internal wiring, pressure sensing, or control is suspected. Stop immediately for flooding, damaged electrical parts, smoke, sparking, or a breaker that trips again.
Read the exact guide
Official sources
- Front Load Washer - No FillGE Appliances · Official GE Appliances guidance used for general washer no-fill decision points; the installed washer's manufacturer manual controls.
- Checking the Fill Hoses if the Washer is not FillingWhirlpool Product Help · Official Whirlpool washer guidance used for general fill-path distinctions; exact washer model instructions control the installed appliance.
- Water Levels by Cycle - WasherWhirlpool Product Help · Official Whirlpool top-load guidance; not every washer uses the same sensing sequence or water level.
- Lid Not Latching - Washer - Product HelpWhirlpool Product Help · Official Whirlpool top-load guidance; front-load doors and other models use different lock designs and instructions.
- Not Filling or Filling Slowly - Front Load WasherWhirlpool Product Help · Official Whirlpool front-load guidance; hose heights, inlet requirements, and access procedures vary by model and manual.
Community feedback
Share a repair observation
Share a plain-text repair observation. Accepted observations are published automatically; this page may take a moment to update.