
On this page
Start here
Quick answer
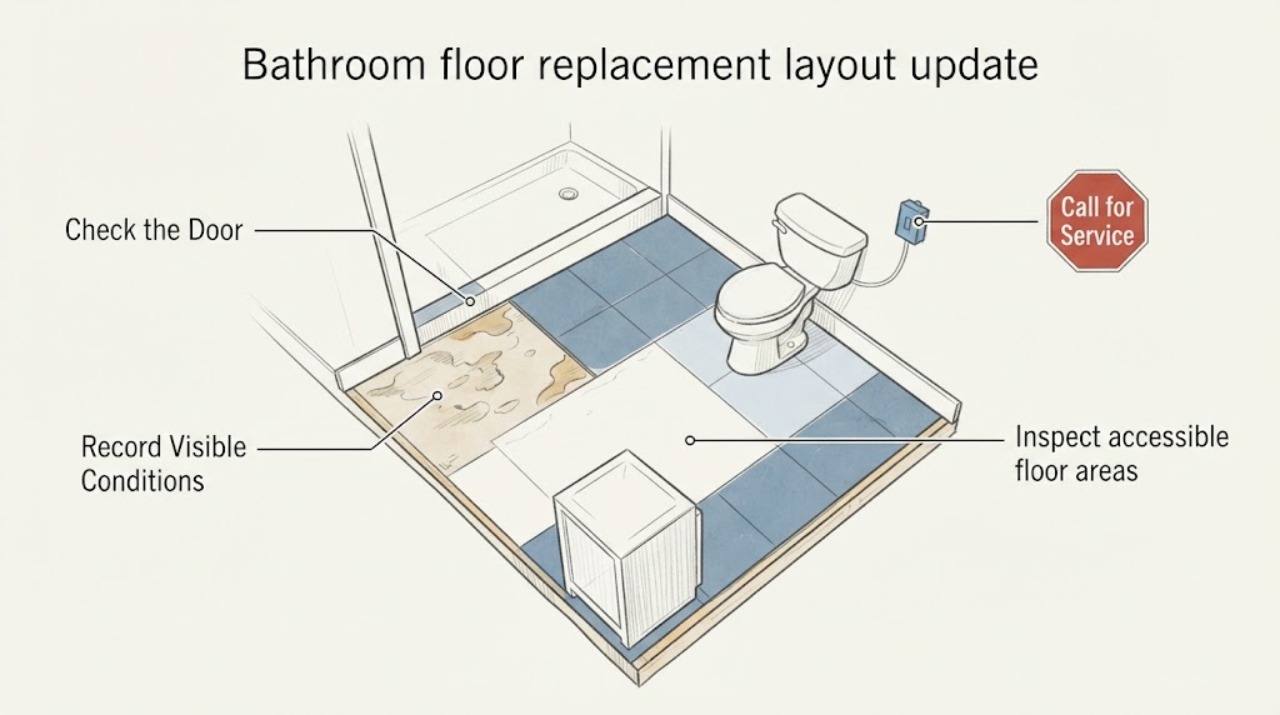
Plan a bathroom-floor replacement layout around the finished room and every fixed element, not just the tile pattern. Document the room shape, door swing, toilet/vanity/tub or shower footprints, drain and supply locations, existing transitions, finished-floor height, and substrate condition before any removal. Dry-lay a paper or digital grid to see where joints and perimeter cuts land, but do not demolish the floor or alter structural or plumbing elements to make the layout fit. A good layout also depends on a sound, dry, level substrate, movement at restrained edges, waterproofing where required, and transitions that leave doors and fixtures operating. Have a qualified remodeler verify hidden conditions and produce the final layout and installation scope.
Work through in order
Diagnostic checks
Use only checks that match the exact appliance or system and its official guide.
-
Check 1
Measure and sketch the existing bathroom from a standing position without removing flooring, fixtures, trim, or doors.
Expected result: Record wall lengths, room corners that appear out of square, door swing and clear opening, toilet/vanity/tub/shower footprints, floor penetrations, and the locations of transitions to adjacent rooms.
Next step: Mark confirmed dimensions separately from estimates and send the sketch and photos to the remodeler for a measured layout plan.
Stop if: Do not remove a toilet, vanity, baseboard, door, or floor finish just to obtain a measurement.
Why this matters
Why: The fixed geometry determines usable layout control lines, perimeter cuts, fixture interfaces, and whether the desired update is cosmetic or likely to affect plumbing, clearances, or framing.
-
Check 2
Create a dry paper, cardboard, or digital tile grid over the recorded room outline and compare the proposed pattern from the main doorway and fixture sightlines.
Expected result: Note where control lines, full tiles, perimeter cuts, corners, and threshold transitions would land; flag narrow slivers, misaligned joints, or a pattern that conflicts with a drain or fixture footprint.
Next step: Ask the remodeler to approve the control lines, pattern orientation, joint treatment, and planned perimeter cuts in the written scope.
Stop if: Do not cut tile, adhesive, mortar, or the existing floor to force a preferred layout.
Why this matters
Why: A dry layout exposes visual and cutting tradeoffs before installation. If cuts are unbalanced or too narrow, the control line or pattern may need to move; this does not authorize cutting the existing floor or tile.
-
Check 3
Inspect accessible floor areas for signs of substrate trouble without lifting tiles, drilling, prying, or opening the floor.
Expected result: Record loose or rocking tiles, cracked grout, soft or swollen areas, staining, musty odor, previous patching, visible moisture, and any level change that can be felt or seen at a transition.
Next step: Photograph each condition and ask the remodeler to define substrate inspection, repair, moisture control, and leveling before the final layout is accepted.
Stop if: Do not pry up tile, cut into the subfloor, or cover a wet, soft, or moving area.
Why this matters
Why: Softness, movement, moisture, or widespread cracking can make a pattern or grout choice irrelevant until the base and water source are addressed. A firm-looking surface does not prove that the hidden substrate is sound.
-
Check 4
Compare the planned finished-floor thickness with visible door clearance, baseboard/trim, toilet connection area, fixture edges, and adjacent flooring without moving or disconnecting anything.
Expected result: Note doors that already scrape, tight gaps at fixtures, uneven adjacent floors, raised thresholds, and whether the proposed material or underlayment thickness is confirmed or unknown.
Next step: Have the remodeler document the planned assembly thickness, transition treatment, door clearance, and fixture interface before ordering materials.
Stop if: Do not undercut doors, trim fixtures, move a toilet, or remove a threshold as a layout experiment.
Why this matters
Why: A new tile assembly can change door operation, fixture interfaces, and transition height. An unknown finished elevation must be resolved in the design rather than discovered after installation.
-
Check 5
List every plumbing, waterproofing, and structural constraint visible in records or from normal access, without opening walls or floors.
Expected result: Record known drain and supply locations, toilet flange history, shower or tub waterproofing records, floor type, joist or slab information if documented, prior leaks, and any unknown concealed condition.
Next step: Give the constraint list to the remodeler and request a written scope that identifies any planned opening, plumbing adjustment, reinforcement, waterproofing, and inspection responsibilities.
Stop if: Do not perform floor demolition, move plumbing, cut joists, or disturb waterproofing or structural elements yourself.
Why this matters
Why: A layout update near a toilet, shower, tub, or drain can require coordinated plumbing and waterproofing work. Missing records or suspected structural constraints make a professional site assessment necessary.
Use your observations
Decision map
Find the observation that best matches what you see, then follow the next safe action.
-
PATH 01Safety boundary
What you see
The dry layout leaves narrow or visually unbalanced perimeter cuts.
Do this next
Compare a centered/squared layout and alternate pattern with the remodeler, prioritizing balanced cuts and fixture alignment.
Why this path and its safety boundary
Why it matters: The control line, tile orientation, pattern, or joint choice may need adjustment before installation.
Safety stop: Do not force the pattern by cutting the existing room or accepting an unreviewed structural change.
-
PATH 02Safety boundary
What you see
The room is visibly out of square or walls are not parallel.
Do this next
Have the installer establish a square control layout and explain how the irregular perimeter will be distributed.
Why this path and its safety boundary
Why it matters: Following a wall blindly can magnify the distortion across the floor and produce noticeable tapered cuts.
Safety stop: Do not treat the wall as a reliable square reference without checking the room.
-
PATH 03Safety boundary
What you see
Tiles, grout, or substrate feel loose, soft, wet, or repeatedly crack.
Do this next
Pause the layout decision and obtain a substrate, moisture, and movement assessment from the remodeler.
Why this path and its safety boundary
Why it matters: The base, moisture source, or movement condition needs attention before a replacement pattern can be trusted.
Safety stop: Do not tile over a wet, soft, or moving floor or conceal the condition with grout.
-
PATH 04Safety boundary
What you see
The proposed assembly changes door clearance, fixture height, or an adjacent-floor transition.
Do this next
Require a written elevation and transition plan before materials are ordered or installation starts.
Why this path and its safety boundary
Why it matters: Finished elevation is a functional constraint, not only an appearance choice.
Safety stop: Do not trim doors, disconnect fixtures, or alter thresholds as an informal test.
-
PATH 05Safety boundary
What you see
The layout crosses a toilet flange, shower/tub edge, drain, or known waterproofing area.
Do this next
Have the remodeler and relevant trade confirm the fixture interface, waterproofing, and access sequence.
Why this path and its safety boundary
Why it matters: The tile plan must be coordinated with plumbing connections, seals, and water-management details.
Safety stop: Do not remove fixtures, open the floor, or disturb waterproofing to make the grid fit.
-
PATH 06Safety boundary
What you see
The subfloor, slab, joists, underlayment, or concealed plumbing is unknown.
Do this next
Request an on-site assessment and a scope covering substrate preparation, structural constraints, plumbing, waterproofing, and finished elevations.
Why this path and its safety boundary
Why it matters: A cosmetic layout cannot establish whether the floor can support the proposed tile assembly or fixture changes.
Safety stop: Do not perform structural repair, floor demolition, or manual plumbing changes.
Helpful context
Understand the symptom
An updated layout starts with the room's fixed geometry
Bathrooms rarely have four perfectly square, empty walls. Door swings, cabinets, toilet flanges, shower or tub edges, thresholds, and floor penetrations determine where full tiles and cuts can go. Daltile's layout guidance recommends establishing a centered, square control layout rather than assuming the room is square. Use a dry paper or digital plan to compare options before anything is removed.
The substrate and movement details control the result
Tile needs a sound, clean, dry, and sufficiently level base. Soft, loose, uneven, or moisture-damaged areas need a professional repair plan before a pattern is finalized. Movement at walls and other restrained edges also needs a designed joint or perimeter treatment; grout cannot be expected to absorb every building movement. Do not cover a questionable floor just to preserve a preferred pattern.
Layout changes can affect plumbing, clearance, and transitions
Changing finished-floor thickness or fixture positions can affect door clearance, baseboards, toilet connection height, shower or tub interfaces, and adjacent-room transitions. A layout that looks balanced on paper may require concealed plumbing or structural changes. Keep this article's checks observational and have the remodeler confirm those interfaces before demolition or installation.
Only after diagnosis
Potential parts
- tile-spacer
Consider this only after the tile, pattern, joint width, and installer-approved layout are selected.
Match the spacer to the actual tile geometry and approved joint plan; a spacer cannot correct an out-of-square room or unsound substrate. - grout-repair
Consider this only for a confirmed localized grout repair after the substrate is sound and the remodeler rules out movement, moisture, and loose tile.
Match the grout type, joint condition, tile material, and wet-area requirements; do not use grout to hide floor movement or water damage. - flooring-transition
Consider this only after the finished elevations of both floors, door clearance, and transition location are measured and approved.
Confirm the profile material, height range, edge support, moisture exposure, and adjacent-floor type for the actual installation.
When checks do not resolve it
Need a professional?
Call a professional bathroom remodeler or tile professional for the replacement layout, especially when the floor is soft, wet, uneven, out of square, cracked repeatedly, near a toilet/shower/tub, or affected by unknown plumbing, waterproofing, or structural conditions. Normal planning urgency is appropriate, but active water entry or a dangerous floor should be addressed promptly.
Have this ready
- Provide the measured room sketch, doorway and fixture clearances, dry-layout photos, proposed material and assembly thickness if known, transition observations, substrate symptoms, plumbing/waterproofing records, prior leak history, and clearly marked unknowns.
Common questions
FAQ
How do I update a bathroom floor tile layout before replacement?
Measure the room and fixed fixtures, record door and transition clearances, assess visible substrate condition, then compare dry paper or digital grids from the main doorway and fixture sightlines. Have the installer approve the control lines, pattern, joints, perimeter cuts, finished thickness, and plumbing/waterproofing interfaces before removal.
Should bathroom floor tile be centered in the room?
Often a centered, squared control layout gives more balanced cuts, but the best origin depends on the room shape, doorway, fixtures, and pattern. Do not assume the walls are square; compare the control layout with the visible fixture and transition geometry.
What if the existing bathroom floor is uneven or soft?
Pause the replacement layout and have the substrate, moisture, and movement condition assessed. Tile and grout can fail again if the base is soft, wet, loose, or moving. Do not cover the condition or use grout as a structural repair.
Can changing floor tile affect the toilet, door, or adjacent room?
Yes. The new tile and underlayment thickness can change door clearance, toilet connection height, baseboard fit, shower or tub edges, and transition height. Have the remodeler verify the finished elevations and fixture interfaces before ordering or installing materials.
Read the exact guide
Official sources
- Floor Tile Installation InstructionsDaltile · General Daltile floor-tile guidance; the exact tile, substrate, wet-area, and local installation requirements must be confirmed for the project.
- Step-by-Step Floor Tile InstallationMarazzi · Manufacturer guidance for Marazzi tile products; follow the selected product and setting-material instructions for the actual bathroom.
- Find the Right Tile Pattern for Any RoomDaltile · Design and layout reference; it does not inspect the project's substrate, plumbing, waterproofing, or structural conditions.
Community feedback
Share a repair observation
Share a plain-text repair observation. Accepted observations are published automatically; this page may take a moment to update.