
On this page
Start here
Quick answer
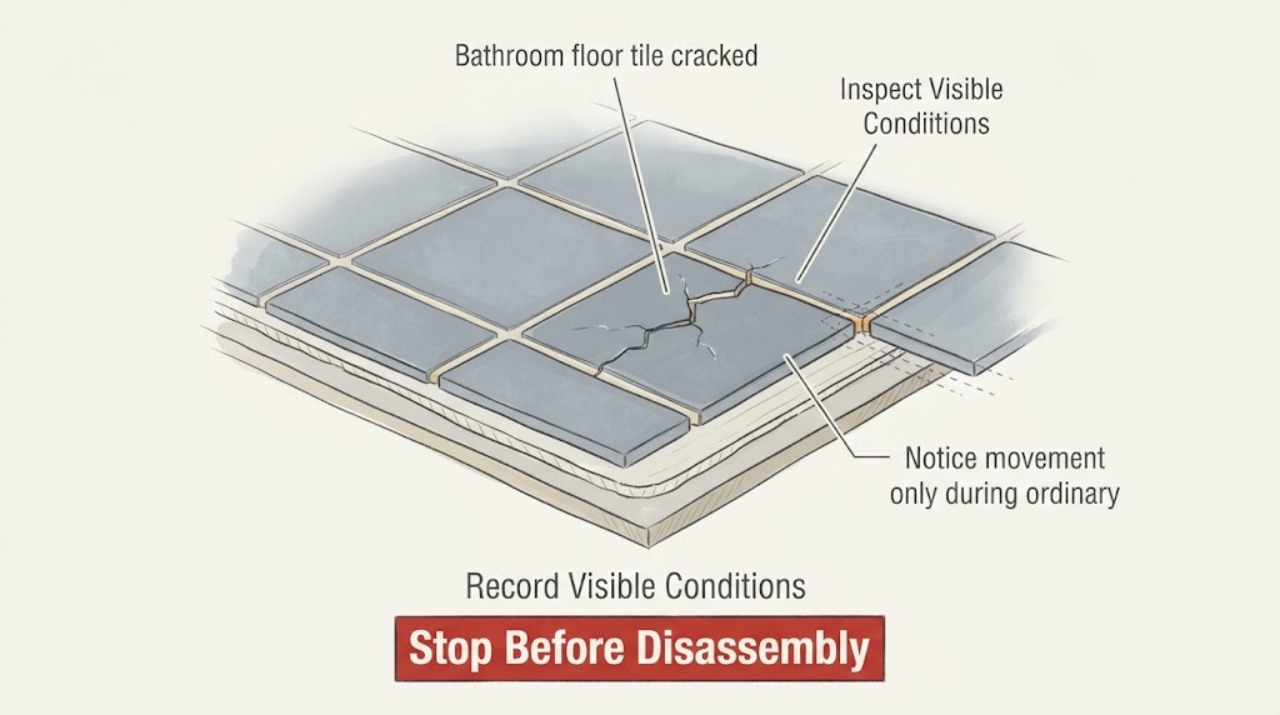
Treat a cracked bathroom floor tile as an observation and moisture-triage issue first. From a safe standing position, document the crack pattern, notice whether the tile feels loose during ordinary use, and look for dampness, staining, odor, or recurring wet grout near the shower, tub, toilet, or sink. Do not remove the tile, probe the crack, scrape grout, drill, or attempt structural repair. Keep water off the area when practical and arrange a tile or bathroom-remodeling professional if the tile moves, the crack spreads, moisture is present, or the cause is unclear.
Work through in order
Diagnostic checks
Use only checks that match the exact appliance or system and its official guide.
-
Record the crack and surrounding pattern
From above, photograph the crack with a nearby fixed reference and note whether it is within one tile, follows a grout joint, reaches an edge, forms a line across multiple tiles, or is accompanied by chipped edges or missing grout.
Expected result: The mark may be an isolated hairline, a diagonal or edge-to-edge fracture, a joint crack, a widening pattern, or part of a larger area of damaged tile and grout.
Next step: Save the photographs and note when the crack first appeared or changed. Keep water and heavy loads off the area where practical and arrange professional assessment if the pattern is widening or crosses several tiles.
Stop if: Stop if documenting the crack would require scraping, probing, lifting trim, removing grout, or using a tool on the floor.
Why this matters
Why: The pattern helps a tile professional distinguish a localized surface problem from movement, impact, or moisture-related concerns to investigate. It does not prove the condition beneath the tile.
-
Notice movement only during ordinary safe use
If the floor is dry and safe, notice whether the tile already feels loose, rocks, clicks, or feels different from adjacent tiles during a normal light step; do not press repeatedly, jump, place a heavy load, or deliberately stress it.
Expected result: The tile may feel stable, may have a hollow or different feel without visible movement, or may visibly shift, rock, or sound loose.
Next step: If any movement is noticed, keep people off the tile and contact a tile or bathroom professional. If it feels stable, continue only with visual and moisture observations rather than testing it further.
Stop if: Stop walking on the area if it shifts, cracks audibly, has a sharp edge, feels unsupported, or is wet or slippery.
Why this matters
Why: Movement or a loose sound can indicate that the issue extends beyond the surface glaze and should be assessed before continued use. A stable feel does not rule out a hidden moisture or substrate problem.
-
Look for visible moisture or water-damage clues
Without lifting fixtures or opening walls, inspect the visible floor and nearby baseboards around the shower, tub, toilet, and sink for dampness, darkening grout, staining, peeling finish, musty odor, standing water, or water appearing below the room.
Expected result: The area may be dry with no odor, may show recurring dampness or discoloration, or may have active water or a visible leak.
Next step: Keep water away from the area where practical, document the location and timing, and contact a plumber or water-damage professional for active or recurring moisture. Do not caulk over a wet or damaged assembly as a diagnostic fix.
Stop if: Stop immediately for active leaking, sewage-contaminated water, electrical hazards, extensive dampness, or a floor that feels unsafe.
Why this matters
Why: Recurring moisture can be more important than the tile's appearance because water problems can damage the floor assembly and support mold growth. An active leak needs prompt source control, not a surface patch.
-
Compare adjacent tiles and the event context
From the same standing position, compare the cracked tile with adjacent tiles and note whether they share the same line, grout change, height difference, room transition, or moisture exposure; also record any recent impact, fixture work, remodeling, or unusual water event.
Expected result: The crack may be isolated, repeat along a line or transition, appear near a wet fixture, or have followed an impact or recent work.
Next step: Provide the pattern and timeline to a tile professional or bathroom remodeler. Do not remove trim, fixtures, grout, or tile to follow the pattern yourself.
Stop if: Stop if the comparison would require moving a toilet, tub, vanity, appliance, or other fixture, or entering a wet, unstable, or damaged area.
Why this matters
Why: A repeated line, transition, or post-work pattern gives the professional context for movement or installation review, while an isolated impact pattern may have a narrower scope. The comparison cannot confirm a structural condition without inspection.
Use your observations
Decision map
Find the observation that best matches what you see, then follow the next safe action.
-
PATH 01Next step
What you see
There is active water, recurring dampness, a leak, sewage-contaminated water, or water damage below or around the bathroom floor.
Do this next
Limit water use in the affected area when practical and contact a plumber or water-damage professional promptly. Do not cover the wet area or begin cosmetic repair before the source is addressed.
-
PATH 02Next step
What you see
The tile moves, rocks, clicks, has a sharp broken edge, or the floor feels unsupported.
Do this next
Keep people off the area and arrange tile or bathroom-remodeling service for a controlled inspection; do not test it with weight or remove it yourself.
-
PATH 03Next step
What you see
The crack widens, crosses adjacent tiles or grout, repeats along a line, or appeared after recent work or a significant event.
Do this next
Schedule professional assessment and provide dated photographs and the timeline. Do not scrape, drill, or patch over the pattern before inspection.
-
PATH 04Next step
What you see
The crack appears isolated, the tile is stable during ordinary use, and no moisture or safety concern is visible.
Do this next
Keep the area dry and monitor with photographs, then arrange a tile professional for a repair recommendation rather than attempting a structural or cosmetic repair without identifying the tile and substrate condition.
-
PATH 05Next step
What you see
The surface is difficult to inspect, the crack may be hidden under a fixture, or the cause cannot be isolated visually.
Do this next
Stop investigating and request an in-person tile, remodeling, or plumbing assessment as indicated.
Helpful context
Understand the symptom
A crack is a symptom, not a diagnosis
A hairline surface mark, a crack that follows a grout joint, a tile that rocks, and a pattern across several tiles can point to different repair scopes. Visual documentation helps a professional decide what to inspect, but a homeowner should not pry up the tile or probe below it.
Moisture changes the priority
Bathroom floors are exposed to water from showers, tubs, toilets, sinks, cleaning, and condensation. A damp or musty area, recurring dark grout, staining, or water appearing below the room means the moisture source needs attention before cosmetic patching. Keep the area dry and arrange plumbing or water-damage assessment when appropriate.
Avoid turning an observation into demolition
Do not remove tile or grout, drill the floor, lift a toilet, open a wall, or perform structural or plumbing work to find the cause. If a professional needs to expose the assembly, they can select a controlled method after checking for moisture and utilities.
Only after diagnosis
Potential parts
- tile-repair-kit
Consider a surface repair kit only if a tile professional confirms the damage is cosmetic, the tile is stable, and there is no moisture or substrate concern.
Tile finish, color, material, crack size, and wet-area suitability must be confirmed; a kit cannot correct movement or water damage. - grout-repair
Grout repair is conditional on the joint itself being the affected surface and the surrounding tile and floor assembly being stable and dry.
Match grout type, joint width, tile material, and wet-area requirements; do not use grout to bridge movement or conceal a leak. - silicone-caulk
A compatible sealant may be relevant only after a professional confirms a sound, dry perimeter joint rather than a cracked tile, failed waterproofing, or active leak.
Confirm substrate, joint location, existing sealant, and wet-area compatibility; caulk is not a substitute for structural or plumbing repair.
When checks do not resolve it
Need a professional?
Call promptly for active leaks, sewage-contaminated water, recurring dampness, unstable or sharp tile, extensive cracking, or water appearing below the bathroom. For a stable isolated crack with no moisture, schedule a normal assessment before choosing a repair material.
Common questions
FAQ
Is a cracked bathroom floor tile always a structural problem?
No. It may be isolated surface damage, but movement, repeated patterns, recent work, or moisture can indicate a broader issue. Document it without probing or removing the tile and have a professional assess the cause.
Can I walk on a cracked floor tile?
Do not walk on it if it moves, feels unsupported, has a sharp edge, is wet, or cracks audibly. If it is stable and dry, limit use and arrange assessment rather than deliberately testing it with weight.
Should I caulk or grout over the crack?
Not until the tile and floor are confirmed stable and dry. A patch can hide movement or moisture and will not correct a plumbing or structural problem.
When does a cracked bathroom tile need a plumber?
Contact a plumber when there is active or recurring dampness, a nearby fixture leak, staining, musty odor, water below the bathroom, or any sign that moisture may be contributing to the damage.
Read the exact guide
Official sources
- Remodeling Your Home and Indoor Air QualityU.S. Environmental Protection Agency · Cracked bathroom floor tile near wet fixtures or suspected subfloor moisture
- A Brief Guide to Mold, Moisture and Your HomeU.S. Environmental Protection Agency · Bathroom floor crack accompanied by dampness, odor, staining, or suspected water damage
- Ceramic Tile Care InstructionsMarazzi · Bathroom tile and grout condition observations and safe maintenance boundaries
Community feedback
Share a repair observation
Share a plain-text repair observation. Accepted observations are published automatically; this page may take a moment to update.