
On this page
Start here
Quick answer
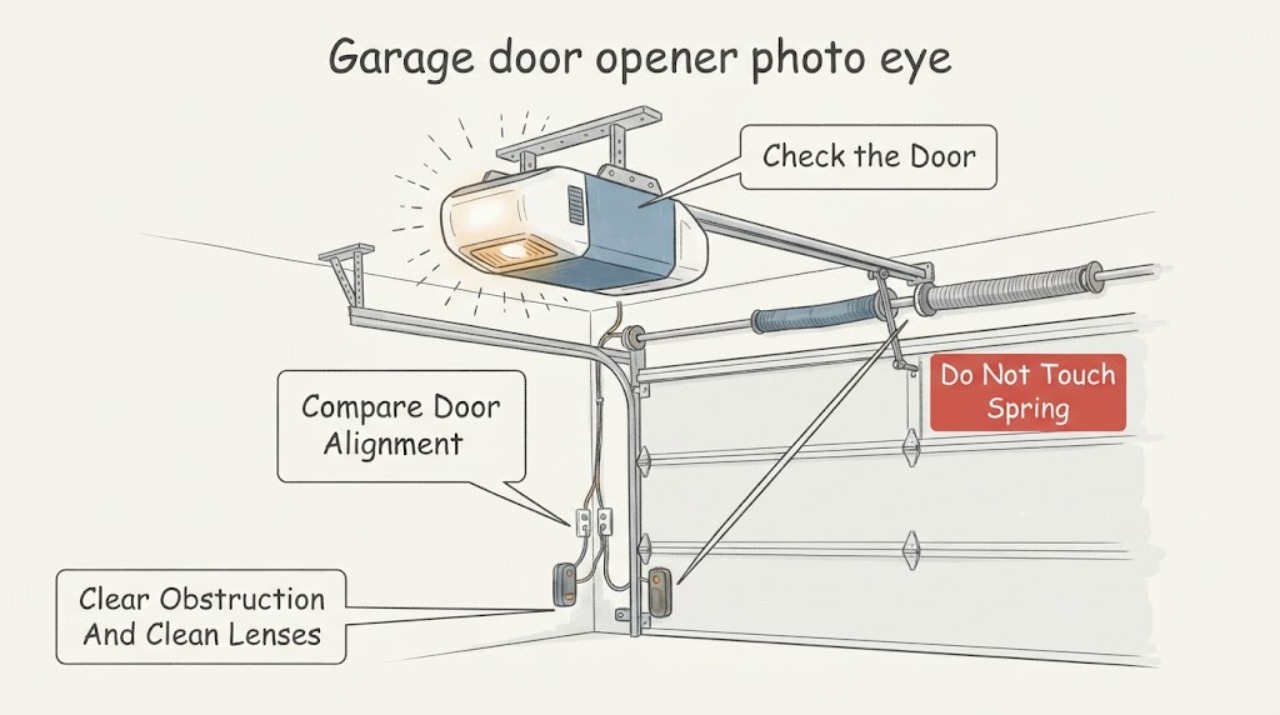
Blinking photo-eye sensor lights usually mean the safety beam is weak, blocked, misaligned, affected by sunlight, or interrupted by a wire or sensor fault. First distinguish the small LEDs on the two sensors from the opener's overhead light: Chamberlain documentation says the opener lights can flash when the safety reversing sensors are not connected or aligned, while sensor LEDs show the condition at the beam. Keep people and vehicles clear of the door, remove only an obvious obstruction, and gently clean the lenses. Check that both sensors face each other, their brackets are stable, and the visible wires are intact. A steady indicator on both sensors is the usual sign of a connected and aligned pair on the documented model. Do not bypass or jumper the sensors, hold the door closed as a workaround, loosen spring or cable hardware, or work on powered wiring. If an LED remains off or flickers, sunlight affects the receiver, wiring is damaged, or the opener will not pass its safety-reversal test, stop automatic closing and call a trained garage-door technician.
Work through in order
Diagnostic checks
Use only checks that match the exact appliance or system and its official guide.
-
Check 1
Keep the garage-door opening clear and identify whether the blinking light is on one low photo-eye sensor, the opener's diagnostic area, or only in the overhead opener lamps; note whether the door opens, refuses to close, or reverses.
Expected result: Record the sending and receiving LED states, the opener-light behavior, and whether the symptom occurs only during closing or during both directions of travel.
Next step: Photograph the indicators and consult the exact model manual's diagnostic chart before adjustments; do not repeatedly activate the door while the safety state is unknown.
Stop if: Stop if the door moves unexpectedly, hangs unevenly, falls, the cable or spring appears damaged, or a person or vehicle could enter the travel path.
Why this matters
Why: A close-only failure with sensor LEDs off or flickering points toward the safety beam, alignment, wiring, sunlight, or sensor hardware. A lamp pattern without a sensor change may indicate another opener diagnostic or lock condition.
-
Check 2
With the door stopped and the area clear, remove only obvious objects from between the sensors and gently clean the exposed sensor lenses with a soft, dry material; do not move the housings or cover the beam.
Expected result: Record whether a stored object, dirt, cobweb, moisture, snow, or physical damage was present and whether the blinking changes after the path and lenses are clear.
Next step: Leave the opening clear and continue to the bracket check only if the sensors remain intact; arrange service for cracked housings, water intrusion, or persistent flicker.
Stop if: Do not spray cleaner into the sensor, use a ladder in the door path, remove a housing cover, or reach near a moving door.
Why this matters
Why: A restored steady indicator after clearing the beam supports a temporary obstruction or dirty lens. No change keeps alignment, bracket movement, sunlight, wiring, or failed-sensor causes in consideration.
-
Check 3
From safe standing access, check that both photo-eye housings are at the same general height, face one another across the opening, and are firmly held by their brackets; use only the small alignment adjustment documented for the exact opener.
Expected result: Record steady LEDs, one LED off, one LED flickering, indicators that change when a bracket is nudged, or a bracket that is loose, bent, rusted, or unable to hold alignment.
Next step: If the manual authorizes it, align the housings until the model's indicators are steady and secure the bracket; call a trained technician for damaged hardware or alignment that will not hold.
Stop if: Do not loosen door tracks, alter spring or cable hardware, remove sensor brackets entirely, or work from an unstable ladder.
Why this matters
Why: One off or flickering receiver with a steady sender is consistent with misalignment or obstruction. An indicator that changes with bracket movement suggests unstable mounting. Damaged hardware cannot be made safe by forcing it into position.
-
Check 4
Visually follow the exposed sensor wires to the opener and inspect for cuts, staples through the wire, pulled terminals, crushed sections, or a receiving eye facing direct sunlight; do not disconnect terminals or perform electrical tests.
Expected result: Record intact wiring and no direct glare, a wire visibly damaged or loose, a flicker tied to vibration or sunlight, or both LEDs remaining off.
Next step: Keep automatic closing disabled and arrange service for damaged wiring, terminal work, both-off indicators, or persistent sunlight interference; use only the manual's approved shading or sensor-orientation guidance.
Stop if: Do not jumper, reverse, strip, splice, or probe the sensor wires, and do not leave damaged wiring exposed.
Why this matters
Why: Visible wire damage or a flicker tied to movement points toward the sensor circuit rather than simple alignment. Direct sunlight can make the receiving eye appear misaligned. Both LEDs off can involve opener power, wiring, or sensor supply and needs model-specific diagnosis.
-
Check 5
Only after the model manual indicates both sensors are connected and aligned, perform its approved safety-reversal test with the travel path empty and people clear; do not use a person, vehicle, hand, or improvised object as the test target.
Expected result: Record whether the door reverses as required, refuses to close, closes while the beam is interrupted, reverses without an obstruction, or the sensor/opener lights continue blinking.
Next step: Stop automatic operation and call a trained door-systems technician for any failed or ambiguous test; never bypass the photo eyes to obtain a closing cycle.
Stop if: Stop immediately if the door binds, falls, slams, reverses unpredictably, or the safety test does not produce the documented response.
Why this matters
Why: A correct reversal with steady sensor indicators supports a restored safety circuit, though normal operation should still follow the manual. Closing through an interrupted beam or persistent abnormal reversal means the system is not safe to use automatically and may have a sensor, wiring, control, force, or door-balance issue.
Use your observations
Decision map
Find the observation that best matches what you see, then follow the next safe action.
-
PATH 01Next step
What you see
One sensor LED is off or flickering, the other is steady, and clearing the beam or making the documented small alignment adjustment restores steady indicators.
Do this next
An obstruction or alignment issue is more likely than a failed sensor. Secure the brackets, keep the path clear, and complete the model's safety-reversal test before automatic closing.
-
PATH 02Next step
What you see
The LEDs are steady in shade or at another time but flicker in direct sunlight, or they change when a bracket or wire moves.
Do this next
Sunlight interference or unstable mounting/wiring becomes more likely. Follow only the manual's approved sensor-orientation guidance and have damaged brackets or wires repaired by a trained technician.
-
PATH 03Next step
What you see
Both sensor LEDs remain off, one stays flickering after the beam and alignment checks, or the opener continues its close-fault light pattern.
Do this next
A wiring, power, incompatible sensor, failed sensor, or control issue is more likely than a simple obstruction. Keep automatic closing disabled and request model-specific service.
-
PATH 04Next step
What you see
The door closes through an interrupted beam, reverses unpredictably, binds, falls, or fails the exact safety-reversal test despite steady LEDs.
Do this next
The opener or door system is unsafe to operate automatically. Stop using it and call a trained door-systems technician; do not adjust force, travel limits, springs, cables, or sensor bypasses.
Helpful context
Understand the symptom
Identify which light is blinking
A Chamberlain opener can have small indicator LEDs on the sending and receiving photo eyes, a diagnostic LED on the opener, and overhead opener lamps. They do not all mean the same thing. The safety sensors sit low on each side of the opening and send an invisible beam across the door path. If the door will not close and the opener light flashes, read the sensor LEDs as well as the opener's diagnostic pattern. Do not infer a sensor fault from the overhead light alone.
Treat the sensor pair as a safety system
The sending eye transmits the beam and the receiving eye detects it. The pair must be connected, facing each other, and firmly held in position before automatic closing is considered safe. An obstruction can be a stored object, debris, cobweb, snow, or a damaged bracket; it does not have to touch the door. Keep the opening clear while inspecting and never disable the beam to make the door close.
Alignment is a mechanical check, not an electrical repair
A sensor that is almost aligned may flicker or change as the bracket moves. Check that both housings point directly at each other, the brackets have not shifted, and the lenses are clean and undamaged. On models with adjustable brackets, make only the small alignment adjustment described in the owner's manual and secure the hardware afterward. Do not open the sensor housing, strip wires, or probe terminals. If the LED changes when a wire or bracket is touched, treat that as a wiring or mounting fault and call service.
Sunlight and wiring can mimic misalignment
Direct sunlight into the receiving eye can interfere with the beam even when the housings appear aligned. Compare the symptom at another time of day and check that the wire is not cut, pinched, pulled from its terminal, or fastened where a moving door can catch it. Do not change terminals or polarity by trial. Persistent flicker after alignment and lens cleaning points toward wiring, sensor, power, or control diagnosis.
Verify safety before automatic closing
After both sensor indicators are steady and the manual's alignment procedure is complete, perform only the exact safety-reversal test in the owner's manual, with people and vehicles clear. The door must respond correctly to the approved test. If it closes when the beam is interrupted, reverses unexpectedly, or the lights continue flashing, stop automatic operation and call a trained door-systems technician. A photo-eye fault is not a reason to adjust force, travel limits, springs, or cables.
Safety boundary
Stop conditions
- The door falls, binds, slams, reverses unpredictably, or cables, springs, tracks, or brackets appear damaged.
- The door closes while the photo-eye beam is interrupted or the documented safety-reversal test fails.
- A sensor LED remains off or flickers after safe obstruction and alignment checks, or both LEDs are off.
- Sensor wires are cut, pinched, pulled loose, stapled through, exposed, or require terminal work.
- Any step would bypass or jumper the safety sensors, adjust springs/cables/force/travel, open powered wiring, or require an unstable ladder.
Only after diagnosis
Potential parts
- Use the complete sensor pair listed for the exact Chamberlain opener; do not mix generations or substitute one eye.
- Match the opener's sensor style and mounting arrangement; do not loosen door-track or spring hardware to mount it.
- Use the exact manual's wiring method and approved parts; do not splice or jumper the safety circuit as a workaround.
- Control diagnosis is model-specific and should be performed by a trained technician before replacement.
When checks do not resolve it
Need a professional?
Call a trained garage-door technician when a photo-eye LED remains off or flickering after clearing the beam and following the model's alignment procedure, when wiring or brackets are damaged, when sunlight interference persists, when the sensor pair or opener model is uncertain, or when the door fails its safety-reversal test. Keep automatic closing disabled for a failed or ambiguous safety test. Use appropriate urgent help if the door is falling, trapped, or has damaged spring or cable hardware.
Common questions
FAQ
Why is one Chamberlain photo-eye sensor light blinking?
One blinking or off indicator commonly points to an obstruction, misalignment, unstable bracket, direct sunlight, wiring issue, or sensor fault. Clear the beam and inspect alignment from safe access; do not bypass the sensor or work on its wiring.
What do steady photo-eye lights mean?
On the documented Chamberlain Group/LiftMaster systems, steady indicators are associated with a correctly connected and aligned sending and receiving pair. Still complete the exact model's safety-reversal test before relying on automatic closing.
Why do the garage-door opener lights flash when the door will not close?
A Chamberlain opener may flash its overhead lights when the safety-reversing sensors are blocked, misaligned, or not connected, but the flash pattern is model-specific. Check the low sensor LEDs and the manual's diagnostic chart rather than assuming the overhead lamp is the sensor itself.
Can I bypass the photo eyes to close the garage door?
No. The photo-eye pair is an entrapment-protection system. Do not jumper, disconnect, or defeat it; keep automatic closing disabled and call a trained garage-door technician when the beam or safety test is unreliable.
Read the exact guide
Official sources
- Wall Mount Garage Door Opener Model 8500 Installation ManualLiftMaster, Chamberlain Group · Chamberlain Group/LiftMaster safety reversing sensor installation and troubleshooting
- 8500W Wall Mount Wi-Fi Garage Door Opener Installation ManualLiftMaster, Chamberlain Group · Chamberlain Group/LiftMaster Wi-Fi opener safety-sensor alignment and sunlight guidance
- Secure View Camera Ultra-Quiet Wi-Fi Garage Door OpenerChamberlain · Chamberlain garage door opener safety sensors and model-specific parts compatibility
Community feedback
Share a repair observation
Share a plain-text repair observation. Accepted observations are published automatically; this page may take a moment to update.