
On this page
Start here
Quick answer
A blinking opener light usually means the opener is reporting a condition rather than simply illuminating the garage. First distinguish the opener's main lamp from the small LEDs on the safety sensors, then check for an obstruction, dirty or misaligned photo eyes, visible sensor-wire damage, or a door that is binding. Do not bypass or disable the safety sensors. If the light keeps blinking after safe external checks, the door reverses, the opener cannot move the door, or the door hardware looks damaged, leave the system out of service and call a garage-door technician.
Before you begin
Safety first
- Do not bypass or disable the photo eyes, adjust springs or cables, work under a supported door, or change force/travel settings as a guess. Keep people and vehicles clear while the system is unreliable.
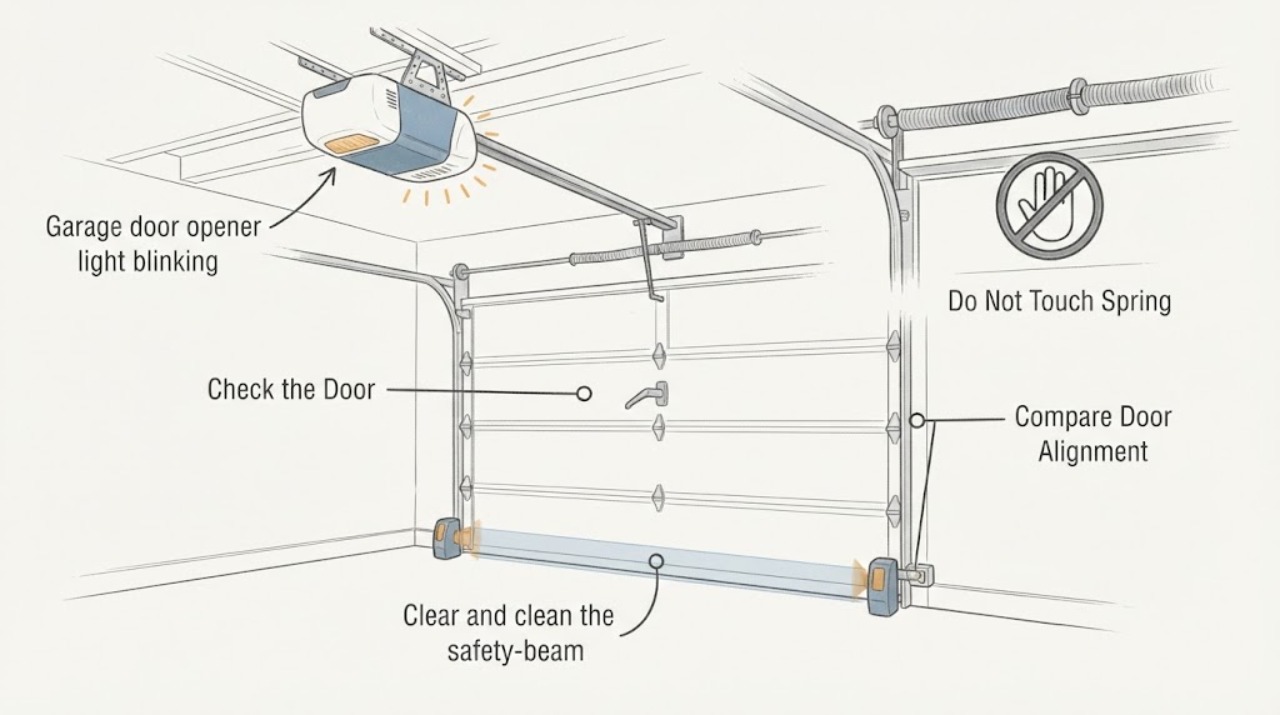
Work through in order
Diagnostic checks
Use only checks that match the exact appliance or system and its official guide.
-
1. Identify which light is blinking and what the door does
Watch one activation from a safe position with the doorway clear. Note whether the blinking is from the opener's main lamp, a small sensor LED near the floor, or a status LED on the powerhead; count the flashes before the pause if there is a repeating pattern, and record whether the door opens, starts down and reverses, or does not move.
Expected result: A sensor LED that is off or blinking points toward the safety-beam path, sensor alignment, wiring, or sensor power. A repeating powerhead pattern is model-specific and may indicate a limit, wiring, motor, or safety condition; a door that reverses while closing is not clearing its close-safety check.
Stop if: Stop operating the door if it jerks, falls, binds, makes a grinding sound, or the spring, cable, track, or other hardware appears damaged.
Why this matters
Why: Use the opener's exact model and the recorded pattern when consulting its owner manual or speaking with a technician. Do not interpret a generic flash count as a universal code, and do not keep cycling the door while it is reversing.
-
2. Clear and clean the safety-beam path
With the door stationary, inspect the space between the two photo eyes and remove only ordinary objects, cobwebs, or dirt that are safely reachable. Wipe each lens gently with a dry, soft cloth; do not move the brackets or put a hand under a moving door.
Expected result: If an object or dirty lens was interrupting the beam and both sensor indicators become steady, test one close cycle while watching the door. If an LED remains off or blinking, or the opener still reverses, continue to alignment and wiring checks rather than forcing a close.
Stop if: Do not reach between the door sections or under the door, and stop if the door moves unexpectedly or any hardware is loose or damaged.
Why this matters
Why: The safety beam must remain clear for the opener to close. A clear path that does not restore steady indicators means the fault may be alignment, sensor wiring, interference, a failed sensor, or another model-specific condition.
-
3. Check sensor alignment and visible wiring
From outside the mechanism, look at both sensor faces and their brackets. They should face one another across the opening; inspect only the visible low-voltage wires for a loose connection, cut insulation, a staple through the wire, or a wire pulled from a sensor. Do not open the opener housing or splice wiring as a first step.
Expected result: Steady indicators after gently correcting an obviously shifted bracket suggest alignment was the issue. An LED that stays off, flickers when the visible wire is disturbed, or differs from the other sensor suggests wiring, power, interference, or a failed sensor; the exact LED meaning varies by system.
Stop if: Stop if correcting the bracket would require standing under an open door, climbing, exposing conductors, or touching a damaged wire.
Why this matters
Why: If alignment is not obvious or the wiring is damaged, stop and give the technician the LED states and what changed. Replace sensors or wiring only after the opener model and compatible parts are confirmed; never jumper the sensor terminals or bypass the beam.
-
4. Check whether the door and opener move freely
Only if the door is closed and the owner manual identifies the manual-release procedure, disconnect the opener as instructed and lift the door a small amount from the handles. Keep people clear and do not release or adjust springs, cables, or other counterbalance hardware.
Expected result: If the door is difficult to lift, drops, binds in the tracks, or will not stay in position, the blinking light may be a symptom of a door or counterbalance problem rather than a sensor-only problem. If it moves normally, reconnect it as directed and return to the sensor/status-code result.
Next step: If the door moves normally, continue with the model-specific diagnostic information and arrange service if the light persists.
Stop if: Stop immediately for a heavy, falling, crooked, jammed, or visibly damaged door or counterbalance hardware.
Why this matters
Why: A mechanically unsafe or unbalanced door needs a garage-door professional before further opener troubleshooting. A freely moving door with a persistent blink points back to sensors, wiring, settings, or the opener electronics; use the model-specific manual rather than changing force or travel settings at random.
Helpful context
Understand the symptom
What the blinking light is telling you
The meaning depends on which indicator is blinking and on the opener model. Safety sensors send an invisible beam across the doorway; when the beam is blocked, misaligned, interrupted by interference, or not powered, the opener may refuse to close or reverse the door. A powerhead diagnostic light can also report a different condition, such as incomplete limits, a wiring fault, or a motor/control problem. The light is a clue, not a universal code.
Do not bypass the safety system
Do not tape a sensor in place, join or short its wires, hold a wall button to defeat the normal safety sequence, or alter force and travel settings just to make the light stop. These systems are intended to prevent entrapment. If a sensor, door, spring, cable, or opener control appears faulty, leave the door secured and have the system inspected.
When to call a professional
Call a garage-door technician when the blinking continues after the safe checks, when the exact model-specific code points to wiring, limits, the motor, or the control board, or when the door reverses or will not move. Call urgently if the door is falling, the spring or cable is broken, the track is bent, the opener pulls against a jam, or anyone could be trapped. Provide the opener brand and model, flash count and pause pattern, which sensor LEDs are on or blinking, the door's behavior, and any recent impact, weather, installation, or wiring change.
Only after diagnosis
Potential parts
- garage door photo eye sensorSensor appearance is not enough to establish compatibility. Confirm the exact opener model and approved sensor type with the manual or technician; do not bypass the existing pair.
- garage door wall buttonWall controls are not universal. Match the opener family and wired or wireless interface before ordering, and do not use a replacement to defeat a safety feature.
- garage door opener control boardA control board must match the opener model and revision; board replacement can require setup and safety testing. It is not a first-line fix for a blocked or misaligned beam.
When checks do not resolve it
Need a professional?
Call when the light continues blinking after the safe external checks, the door reverses or will not move, the exact diagnostic code points to wiring or electronics, or the door hardware appears damaged. Treat a falling door, broken spring or cable, bent track, or entrapment risk as urgent.
Safety scope: Do not bypass or disable the photo eyes, adjust springs or cables, work under a supported door, or change force/travel settings as a guess. Keep people and vehicles clear while the system is unreliable.
Have this ready
- Provide the opener brand and model, which light blinks, the number of flashes before a pause, sensor LED states, whether the door opens or reverses, visible wire or bracket damage, and recent changes or impacts.
Common questions
FAQ
Why does my garage door opener light blink but the door will not close?
The opener may be reporting a blocked, dirty, misaligned, unpowered, or failed safety sensor, but the exact meaning depends on the model and which light is blinking. Check the beam path, sensor lenses, alignment, and visible wiring without bypassing the sensors; then use the model manual for the flash pattern.
Can I hold the wall button to force the door closed?
Do not use a forced-close method to work around a blinking safety indicator. It can conceal a failed entrapment-protection system. Keep the doorway clear and have the sensor or opener fault diagnosed.
What should the garage door sensor lights look like?
The expected steady or blinking state varies by manufacturer and model. Compare both indicators with the owner's manual rather than assuming a color or flash count is universal. A sensor that is off, flickering, or different from its paired indicator is a useful clue for the technician.
Is a blinking opener light always a bad sensor?
No. A powerhead diagnostic light can also report limits, wiring, motor, control, or door problems. Identify the indicator and record the pattern before ordering parts.
Read the exact guide
Official sources
- Genie Safe-T-Beam System Self Diagnostic TroubleshootingThe Genie Company · Supports model-specific interpretation of sensor LED patterns, possible alignment/obstruction/wiring/interference causes, and the rule that the opener will not close without a working safety beam.
- Garage Door Opener Safety Beams OSTBOverhead Door · Supports the general mechanism of an infrared beam across the doorway, automatic reversal when interrupted, and LED-based self-diagnostic alerts; product-specific behavior still requires the model manual.
- Non-Reversing Garage Door Openers are a HazardU.S. Consumer Product Safety Commission · Supports treating a failed reversing or entrapment-protection system as hazardous and keeping safety operation intact; the page links the Commission's garage-door safety material.
- Why is the red Safe-T-Beam light blinking?The Genie Company · Supports cleaning lenses, checking obstructions and loose wires, aligning the two sensors, and treating a flashing red sensor LED as a malfunction indication.
Community feedback
Share a repair observation
Share a plain-text repair observation. Accepted observations are published automatically; this page may take a moment to update.