
On this page
Start here
Quick answer
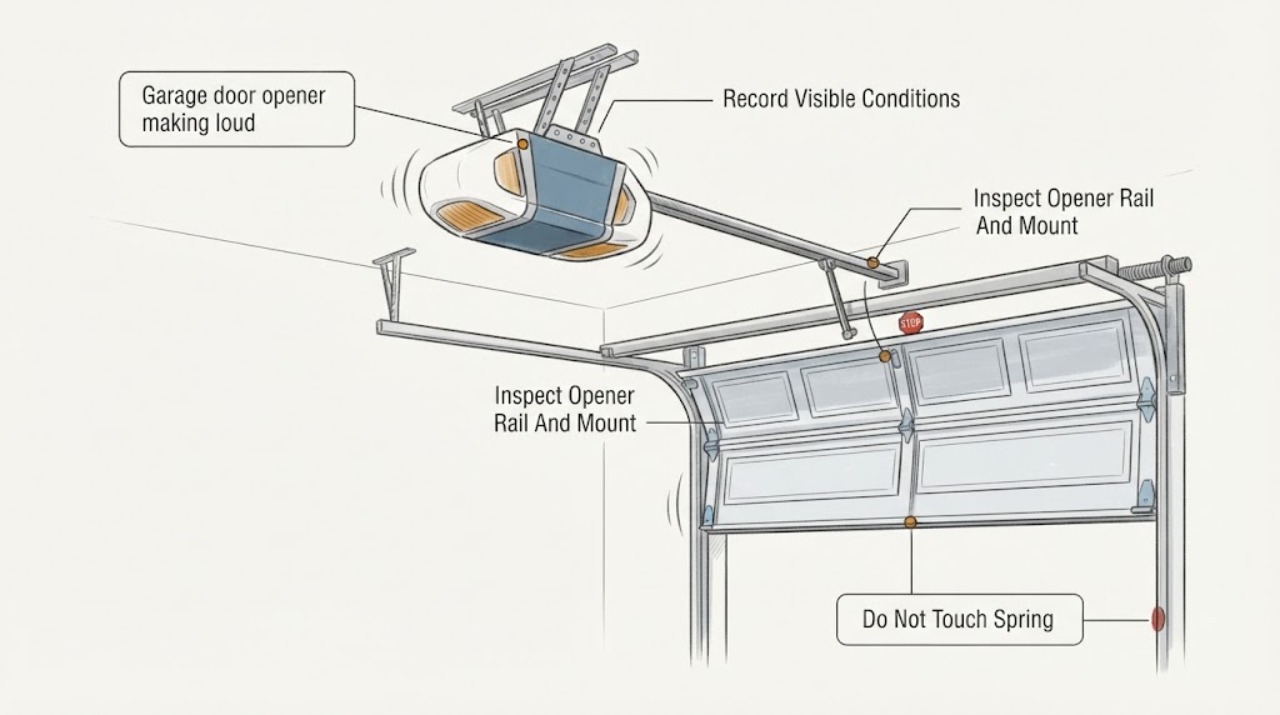
A loud garage-door opener that moves the door only partway, stalls, or reverses can be reacting to a door-path or hardware problem, an opener-drive problem, or a safety-sensor/control issue. From a standing position, make one safe observation of the sound and movement, inspect the visible path and opener mounting without touching moving hardware, and note both photo-eye indicators and which control was used. Stop using the opener for grinding, a bang or snap, a crooked or dropping door, visible spring or cable damage, exposed wiring, or any unbalanced or binding behavior. Do not adjust springs, cables, tracks, force settings, or other high-tension parts; give the observations and the exact model to a trained garage-door technician.
Work through in order
Diagnostic checks
Use only checks that match the exact appliance or system and its official guide.
-
Check 1
From a clear standing position outside the door's travel path, make one normal opener command only if the doorway is clear and the door is not visibly damaged; listen for the sound and note whether the door starts, moves smoothly, stalls, reverses, or does not move. Do not repeat the command to chase the noise.
Expected result: The sound may be a scrape or grind that follows door travel, a slap or rattle near the rail, a motor hum with no travel, a click, or a sudden bang; the door may stop at the same point, move partway, reverse, or remain still.
Next step: Write down the sound, travel direction, stopping point, and whether the command came from the wall control, remote, or both; use that record in the next checks and with the technician.
Stop if: Stop immediately for a bang or snap, grinding that worsens, a door that drops or slams, people or objects entering the path, visible damage, or any need to repeat the test.
Why this matters
Why: A sound tied to one location or to door travel makes door-path binding or hardware more likely, while a hum or click without travel makes an opener-drive or control fault more likely. A sudden bang, drop, or unexpected movement is a stop-use condition.
-
Check 2
With the door stationary, inspect from the floor and from outside the travel path for loose objects, a bent or obstructed track, a roller out of place, a sagging panel, or visibly damaged hinges, brackets, springs, or cables; do not touch, loosen, lift, or reposition any door hardware.
Expected result: The path may be clear and hardware appear intact, or there may be an obstruction, a visibly crooked panel, a damaged roller or track, a loose-looking bracket, or a spring or cable that is frayed, separated, or displaced.
Next step: Remove only a small, loose object that is safely reachable without entering the path or touching the door. Photograph fixed damage from a safe distance and keep the opener out of use if the path or hardware is not clearly safe.
Stop if: Stop for any spring or cable damage, a door off track or hanging unevenly, a loose bottom bracket, a heavy or unstable obstruction, or any need to reach under, lift, loosen, or move the door.
Why this matters
Why: A fixed obstruction or visible door-side damage can make the opener work against resistance and explain both noise and stalling. Spring and cable findings indicate stored-energy hardware, not a homeowner repair; a door that looks crooked or binds needs professional assessment.
-
Check 3
From the garage floor, visually inspect the opener housing, wall or ceiling mounting, rail, trolley, and the visible chain, belt, or screw drive; do not climb, remove the cover, put hands near the rail, or adjust a fastener or drive component.
Expected result: The opener and rail may stay still while operating, or the housing may shake, the rail connection may move, the drive may look damaged or unusually slack, or the motor may hum while the trolley does not travel.
Next step: Record what moves and where the sound originates, then stop testing if the opener shakes, overheats, smells burnt, or repeatedly hums without moving. Leave drive adjustment and electrical diagnosis to a qualified technician.
Stop if: Stop for an unstable mount, exposed conductors, a hot or sparking housing, a broken drive, a loose rail, or any instruction that would require climbing, opening the housing, or working near moving parts.
Why this matters
Why: Vibration or rail movement can account for rattling and points to mounting or connection service. A damaged-looking drive or hum without trolley movement points to opener service, but the exact failed gear, belt, chain, screw, motor, or control cannot be identified safely by sound alone.
-
Check 4
With the door stationary, look from a standing position at both photo-eye sensors near the lower sides of the opening; note whether each lens and bracket is present, the beam path is visibly clear, and each indicator is steady, off, or flickering. Do not rotate, cover, disconnect, rewire, or bypass a sensor.
Expected result: Both indicators may be steady, one may be off or flickering, a bracket may be displaced, or the beam may be interrupted by a loose object or another visible obstruction.
Next step: Clear only an obvious loose object that can be moved without entering the path or touching the sensors, record the indicator states, and use the exact model manual for any model-specific interpretation. Call for service if the indicators remain abnormal or wiring or alignment work is needed.
Stop if: Stop for exposed or damaged wiring, a cracked or moving sensor, water near electrical parts, an active door cycle, or any request to disable the safety beam.
Why this matters
Why: On openers that use this safety system, an abnormal indicator or interrupted beam can explain a failed close or reversal. Steady indicators do not clear a mechanical bind, so a loud noise or stall still needs the door and opener observations above.
-
Check 5
From a clear position, note whether the wall control, remote, and any keypad produce the same start, stall, reversal, and light response; use at most one normal command per control and do not hold a button to force movement.
Expected result: Every control may produce the same failure, the wall control may work while the remote does not, or the opener may open but refuse the down direction with a warning or blinking light.
Next step: Record the control used and the exact response rather than repeatedly cycling the door. Follow only the model manual's low-risk control guidance; request service if the failure is shared or the safety response remains uncertain.
Stop if: Stop for any unexpected movement, a door that cannot remain safely stationary, a warning that would require an override, or any need to hold a control or enter the doorway.
Why this matters
Why: A control-specific failure points toward that input, its battery, lock feature, receiver, or wiring, while the same stall from every control keeps a door-side or opener-side fault in focus. A down-direction failure with abnormal photo-eye indicators keeps the safety circuit unresolved.
-
Check 6
Read the opener model and manufacturer from the exterior label without opening the housing, and assemble the time of failure, sound description, stopping position, indicator states, control used, and photos taken from a safe distance.
Expected result: The label may be legible and the symptom may be repeatable in one location or direction, or the model may be unknown and the symptom may vary.
Next step: Give the model, observations, and photos to a trained garage-door technician and ask them to assess the door, opener drive, mounting, sensors, and controls as a system.
Stop if: Stop all troubleshooting if the model label requires opening the housing, if the symptom escalates, or if any repair would involve springs, cables, lifting, electrical access, or high-tension hardware.
Why this matters
Why: The exact model determines the meaning of diagnostic lights and the correct replacement compatibility. A variable or unidentified fault is not a reason to guess at a setting or part; it lowers the value of further testing.
Use your observations
Decision map
Find the observation that best matches what you see, then follow the next safe action.
-
PATH 01Safety boundary
What you see
Did you hear grinding, a bang or snap, or see a crooked, dropping, off-track, or visibly damaged door or loaded hardware?
Do this next
Stop using the opener, keep people and vehicles clear, and call a trained garage-door technician for door and counterbalance inspection.
Why this path and its safety boundary
Safety stop: Do not lift the door, release it from the opener, adjust springs or cables, or loosen tracks or brackets.
-
PATH 02Safety boundary
What you see
Does the door make the noise or stall at the same location, or is a fixed obstruction, binding track, damaged roller, or panel fault visible?
Do this next
Keep the opener out of use and arrange door-side inspection; a repeated location-specific bind can overload the opener.
Why this path and its safety boundary
Safety stop: Do not force the door past the stopping point or attempt track, roller, spring, cable, or bracket repair.
-
PATH 03Safety boundary
What you see
Does the motor hum or click while the door or trolley does not move, with no obvious door obstruction?
Do this next
Treat the opener drive, motor, or control as a service issue and stop repeated commands; provide the model and sound record to a technician.
Why this path and its safety boundary
Safety stop: Do not open the opener housing, touch the drive, or guess at a gear, belt, chain, or force-setting repair.
-
PATH 04Safety boundary
What you see
Are a photo-eye indicator off or flickering, the beam visibly interrupted, or the door reversing or refusing to close?
Do this next
Remove only a plainly movable obstruction from outside the path, record the indicator state, and call for service if the condition remains; never bypass the sensors.
Why this path and its safety boundary
Safety stop: Do not tape, disconnect, short, relocate, or hold a control to defeat the photo-eye safety response.
-
PATH 05Safety boundary
What you see
Does only one wall control, remote, or keypad fail while another produces a different response?
Do this next
Record the working and failing inputs and follow the exact model manual's external control checks; arrange service if wiring, receiver, or lock behavior is suspected.
Why this path and its safety boundary
Safety stop: Do not force operation with a held button or bypass a safety feature.
Helpful context
Understand the symptom
What the combination of noise and stalling suggests
The sound and the point where the door stops are more useful than the word loud by itself. Scraping or grinding that follows the door can indicate binding, worn rollers, track trouble, or another door-side fault. A motor hum with little or no movement can instead point toward an opener drive or motor fault. A door that reverses or refuses the down direction while the photo-eye indicators look abnormal keeps the safety path in the decision. These clues overlap, so use the checks below to separate them without opening the opener or disturbing loaded hardware.
Use visual checks only when the door is safe to observe
Genie identifies unusual grinding, scraping, slow movement, catching, or going off track as reasons to investigate maintenance or repair, and notes that a significantly unbalanced door is a safety hazard. Its maintenance guidance also says spring components are under extreme tension and should be handled by a professional. That is why this sequence stays at floor level: record the symptom, look for obvious obstruction or damage, and leave adjustments, electrical access, lifting, and loaded door hardware to a trained technician.
Do not force a close or quiet the symptom with a guessed part
LiftMaster's owner documentation treats the photo-eye beam as required for the down direction and uses diagnostic patterns for sensor, binding, obstruction, and opener faults. A blinking light or a stalled door is not permission to bypass a sensor, hold a control to override it, remove a cover, or keep retrying. Parts such as a drive gear or a vibration isolator are only possibilities after the model and failed component are identified; a professional should confirm fit and cause first.
Safety boundary
Stop conditions
- Stop using the opener and keep the area clear for grinding, a bang or snap, a door that drops, slams, hangs crooked, binds, or goes off track.
- Do not adjust, wind, replace, loosen, or disconnect springs, cables, bottom brackets, tracks, force settings, or other high-tension or loaded components.
- Do not climb, open the opener housing, touch moving drive parts, work on wiring, bypass photo eyes, or hold a control to force a close.
- Call a trained garage-door technician when the door or opener needs lifting, release, alignment, electrical diagnosis, drive adjustment, or any repair beyond a safe visual check.
Only after diagnosis
Potential parts
- garage door opener gear
Consider this category only if a technician or model-specific diagnosis identifies a worn or failed opener gear rather than a door bind, sensor fault, or control issue.
Confirm the opener manufacturer and exact model and follow the manufacturer's fit information before ordering; do not infer compatibility from appearance. - garage door rail lubricant
Consider a model-approved lubricant only when the exact manual or technician identifies lubrication as appropriate; lubricant will not correct a damaged, misaligned, or high-tension component.
Check the exact opener and drive type first. Do not apply a guessed product to springs, cables, belts, sensors, or electrical parts. - garage door vibration isolator
Consider this category only if a technician confirms that transmitted vibration or an approved mounting solution is the cause after the door and opener are otherwise sound.
Verify the opener mounting arrangement and manufacturer's compatibility; do not substitute hardware for a loose or damaged structural mount.
When checks do not resolve it
Need a professional?
Call now if the door is crooked, drops, binds, goes off track, makes a grinding or bang sound, shows spring or cable damage, or the opener hums without moving. Call after the visual checks if the symptom persists, the sensors remain abnormal, or any electrical, lifting, alignment, or drive work is needed.
Common questions
FAQ
Can a loud garage door opener still be safe to use if the door moves?
Not necessarily. A door that moves while grinding, scraping, stalling, reversing, or shaking may be loading a door or opener component. Stop for a worsening sound, a bang, crooked movement, binding, or visible damage and have the system assessed.
What does a motor hum with no door movement mean?
It can indicate an opener drive, motor, coupling, control, or door-resistance problem, but the sound alone cannot identify the failed part. Make no repeated commands, record the model and observation, and call for opener and door-system service.
Should I lubricate the opener or adjust the chain when it is loud?
Only use a product or adjustment that the exact manufacturer manual explicitly supports, and do not work near springs, cables, moving drive parts, or electrical components. Lubrication cannot correct a bind, damaged hardware, or an unsafe door; a technician should confirm the cause first.
Why does the opener move the door and then stall or reverse?
The door may be binding or damaged, the opener may be sensing abnormal resistance, the photo-eye path may be unresolved, or the drive or control may be failing. Note where the stall occurs, inspect only from a safe standing position, and stop if the door is crooked, drops, grinds, or needs hardware work.
Read the exact guide
Official sources
- 8164W Wi-Fi Garage Door Opener Contractor Series Chain Drive Owner's ManualLiftMaster · Manufacturer owner manual for the LiftMaster 8164W model; use its diagnostic details as an example of model-specific behavior, not as a claim about every opener.
- Signs It Is Time to Replace Your Garage Door OpenerThe Genie Company · Manufacturer guidance describing symptom patterns; it does not identify the failed component for an unbranded opener.
- Maintaining Your Garage DoorThe Genie Company · Manufacturer general maintenance guidance for garage-door systems; use visual observations and the explicit professional-safety warnings without assuming a model-specific repair procedure.
Community feedback
Share a repair observation
Share a plain-text repair observation. Accepted observations are published automatically; this page may take a moment to update.