
On this page
Start here
Quick answer
For a LiftMaster opener that suddenly makes loud noise, first decide whether the sound comes from the moving door hardware, the opener rail and trolley, or the opener motor and drive. From the ground, record the sound, door position, visible movement, drive type, model number, and any myQ health report. LiftMaster distinguishes chain-drive, belt-drive, and wall-mount designs, so a chain rattle is not diagnosed or replaced the same way as a belt or motor noise. Stop using the opener for grinding, jerking, an unbalanced door, a loose cable, a broken spring, or unexpected movement; do not touch springs or cables, climb, remove covers, or work on energized equipment.
Before you begin
Safety first
- This article covers floor-level observation and existing control-status review only. A qualified professional must handle spring, cable, track, mount, rail, cover, wiring, energized equipment, elevated access, and permanent repair work.
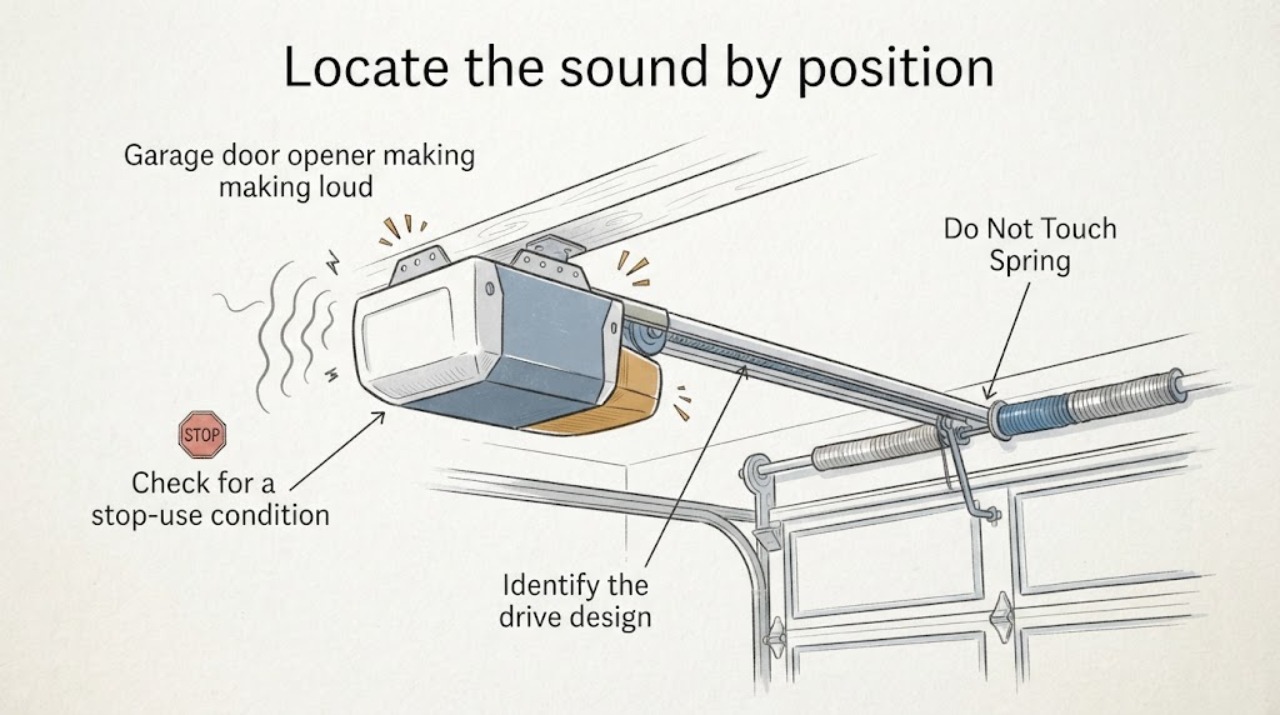
Work through in order
Diagnostic checks
Use only checks that match the exact appliance or system and its official guide.
-
Check for a stop-use condition
Stand clear of the door and opener and look for grinding, jerking, a crooked or visibly unbalanced door, a loose or damaged cable, a broken spring, smoke, burning odor, exposed wiring, or unexpected movement.
Expected result: Any of these signs makes continued cycling unsafe. A smooth-looking door and no visible hazard only permit limited observation; they do not clear the springs, cables, motor, or drive.
Next step: If no stop-use sign is visible, record where the sound is loudest and continue without touching the mechanism.
Stop if: Do not touch springs or cables, pull the emergency release, climb, hold the door, or remove any cover.
Why this matters
Why: Leave the opener unused and request qualified garage-door service when a stop-use sign is present.
-
Locate the sound by position and timing
From floor level, listen during an already-occurring normal cycle only if the door is behaving safely. Note whether the sound starts at the motor, follows the ceiling rail or trolley, comes from the chain or belt, or occurs at the door rollers, hinges, or track.
Expected result: Noise that follows the operator or rail points toward the drive or mounting area. Noise that follows the door edge or track points toward door hardware. Noise only at startup, stopping, or reversal is a useful timing clue but is not a part diagnosis.
Next step: Stop cycling and provide the location and timing to a technician; use the drive-type check to add LiftMaster-specific context.
Stop if: Do not repeat cycles to reproduce the sound, put hands near moving parts, or continue if the door hesitates, jerks, or changes balance.
Why this matters
Why: The location prevents treating every loud LiftMaster symptom as a failed opener motor or gear.
-
Identify the LiftMaster drive design
Read the LiftMaster model from a label visible from the floor or from existing paperwork, then note whether the unit is a chain-drive opener, belt-drive DC opener, or wall-mount operator. Do not remove a light lens or cover to reach a hidden label.
Expected result: LiftMaster's official quiet-opener information says chain-drive and belt-drive designs have different sound and vibration characteristics, while wall-mount designs reduce ceiling-transmitted vibration. An unknown design or model is still useful information for the service handoff.
Next step: Record the model, design, noise location, and whether the noise is new or gradually increasing before considering any part.
Stop if: Do not infer the drive type from noise alone or open the operator to identify it.
Why this matters
Why: Drive design changes which components a technician checks and which replacement parts can fit; the LiftMaster brand alone does not establish a compatible chain, belt, gear, or motor.
-
Check an existing myQ health report when available
If this LiftMaster opener is already connected to the myQ app, view the existing device status or health report and record any alert, error, or service prompt without changing settings or repeatedly operating the door.
Expected result: A myQ health alert gives the dealer a LiftMaster-specific control and service clue. No alert does not rule out mechanical noise, door hardware, or a model-specific drive problem, and a non-connected opener has no report to inspect.
Next step: Save the report or note that none was available and include it with the service request.
Stop if: Do not pair an unknown accessory, reset the opener, remove wiring, or use the app to keep cycling a noisy or unsafe door.
Why this matters
Why: The report can supplement the sound location and model number, but it is not a substitute for an in-person inspection of springs, cables, rails, or the door.
-
Observe the door path and safety area
From the floor, look for an obstruction, rubbing edge, visibly misaligned track, loose hinge, damaged roller, or safety-sensor area that appears blocked or disturbed. Do not adjust hardware or touch the sensor wiring.
Expected result: A door that scrapes, shakes, binds, or looks crooked can transmit noise to a healthy operator. A smooth door with noise concentrated at the LiftMaster rail or motor shifts attention toward the opener drive or mount.
Next step: Photograph the visible condition and report whether the noise follows the door or the operator.
Stop if: Do not adjust tracks, lubricate springs or cables, move the door by force, or climb to inspect the rail.
Why this matters
Why: LiftMaster lists door lubrication, sensor alignment, track alignment, blocked paths, and broken springs among reasons an opener may not work properly; these observations help a professional choose the correct inspection.
-
Prepare a model-specific service handoff
Write down the LiftMaster model, chain, belt, or wall-mount design, noise location and timing, door behavior, visible safety observations, myQ status, and any recent work. Include a short recording only if it can be made from a safe standing position.
Expected result: A complete record distinguishes operator-drive noise from door-hardware noise and tells the technician whether the unit has a brand-specific control report or an unknown compatibility state.
Next step: Request a qualified LiftMaster dealer or garage-door technician to diagnose the cause before parts are selected.
Stop if: Do not remove the opener cover, disconnect power or wires, adjust springs or cables, or attempt elevated or energized repair.
Why this matters
Why: LiftMaster's parts guidance is organized by model and includes separate gear, belt, chain, motor, logic-board, and sensor categories; the record prevents ordering a visually similar but incompatible part.
Use your observations
Decision map
Find the observation that best matches what you see, then follow the next safe action.
-
PATH 01Safety boundary
What you see
The noise follows a rubbing, shaking, crooked, or visibly binding door path rather than the LiftMaster operator.
Do this next
Leave the door and opener for qualified garage-door inspection and report the exact location and visible movement.
Why this path and its safety boundary
Why it matters: The opener may be loading or transmitting noise from rollers, hinges, track, or door balance rather than failing internally.
Safety stop: Stop use for an unbalanced door, broken spring, loose cable, jerking, or unexpected movement; do not adjust the door hardware.
-
PATH 02Safety boundary
What you see
A LiftMaster chain-drive unit makes a new rattle or vibration concentrated at the rail or trolley, with no visible door hazard.
Do this next
Give the exact LiftMaster model and sound recording to a dealer for a drive-specific inspection.
Why this path and its safety boundary
Why it matters: The chain-drive design is a brand-specific clue, but it does not identify whether the chain, trolley, rail, mount, or another part is responsible.
Safety stop: Do not tighten a chain, grease the track, open the operator, or order a chain kit from the symptom alone.
-
PATH 03Safety boundary
What you see
A LiftMaster belt-drive or wall-mount unit develops a new squeal, rumble, or vibration where it was previously quiet.
Do this next
Record model, drive design, noise timing, and whether the door moves smoothly; request a qualified inspection.
Why this path and its safety boundary
Why it matters: The brand's quiet-drive design makes a new drive or mount noise worth documenting, but a door or mounting issue can still be the source.
Safety stop: Do not apply unapproved lubricant, alter belt tension, remove covers, or substitute a chain or motor part.
-
PATH 04Safety boundary
What you see
An existing myQ-connected LiftMaster opener shows a health alert, device-status change, or service prompt.
Do this next
Save or share the report with the dealer and include the sound location and model number.
Why this path and its safety boundary
Why it matters: The alert is a LiftMaster-specific diagnostic clue that can accompany, but not replace, mechanical inspection.
Safety stop: Do not reset the device or keep cycling the door to clear the alert.
-
PATH 05Safety boundary
What you see
The door is unbalanced or jerking, a spring or cable is broken or loose, grinding worsens, or the opener moves unexpectedly.
Do this next
Keep people and vehicles clear, leave the system unused, and arrange urgent qualified garage-door service.
Why this path and its safety boundary
Why it matters: The stored energy and moving-door hazard exceed safe user observation.
Safety stop: Do not touch springs or cables, pull the release, climb, force the door, or attempt electrical or elevated work.
Helpful context
Understand the symptom
Locate the noise from the ground
Listen from a safe standing position while noting whether the sound occurs at startup, during travel, near the ceiling rail, at a wall-mounted operator, or only when the door itself moves. A rattle or vibration from a chain or rail, a high-pitched belt or motor sound, and a scraping door or roller sound point to different inspection paths. Do not place a hand on the moving door, rail, trolley, springs, or cables.
Use LiftMaster drive and control clues
LiftMaster's own quiet-opener guidance distinguishes chain-drive units from belt-drive DC units and wall-mount designs. Record which design you have and the exact model from a visible label or existing paperwork. If the opener is myQ-enabled and already appears in the myQ app, review its existing health report or device status and save any alert; do not open the operator or change settings just to create a diagnosis.
Separate door movement from opener movement
From the floor, observe the door path, rollers, hinges, track, and safety-sensor area without touching them. If the door is visibly binding, shaking, crooked, or unbalanced, the opener may only be reacting to a door problem. If the door looks smooth but the operator or rail produces the noise, report that distinction to a LiftMaster dealer rather than ordering a motor, gear, chain, or belt by symptom.
Match any part to the exact LiftMaster model
LiftMaster's parts catalog separates gear kits, belt kits, chain kits, motors, logic boards, and safety sensors by model. The brand and noise description are not enough to establish compatibility. Give the dealer the model number, drive type, noise location, timing, myQ status, and safe observations before selecting a part or repair.
Safety boundary
Stop conditions
- Stop using the opener for grinding, jerking, an unbalanced door, a broken or loose spring or cable, smoke, burning odor, exposed wiring, or unexpected movement.
- Keep all checks at floor level and use only normal controls or an already available myQ status screen; do not climb, remove covers, or open the operator.
- Do not adjust springs, cables, tracks, chain or belt tension, safety wiring, or mounts, and do not work on energized equipment.
- Choose a LiftMaster part only after the exact model, drive design, and failed component are confirmed by the appropriate professional.
Only after diagnosis
Potential parts
- garage door opener gear
Consider only after a qualified inspection identifies the gear or drive as the cause.
Match the exact LiftMaster model and parts diagram; a loud-noise symptom does not establish that the gear is failed. - garage door rail lubricant
Some LiftMaster manuals distinguish rail maintenance from door-track lubrication; do not apply a product just because the opener is noisy.
Follow the exact LiftMaster manual and keep any lubricant off door tracks, springs, cables, and surfaces not named by that manual. - garage door vibration isolator
A vibration isolator is relevant only when the technician confirms transmitted mounting vibration rather than a failing drive or unsafe door.
Confirm the opener model, mounting arrangement, fastener requirements, and structural suitability with a qualified technician.
When checks do not resolve it
Need a professional?
Call a qualified garage-door technician or authorized LiftMaster dealer when loud noise persists, worsens, affects door travel, or comes from the opener drive, rail, mount, springs, cables, or an unbalanced door. Use urgent service for broken or loose springs or cables, jerking, grinding, or unexpected movement.
Safety scope: This article covers floor-level observation and existing control-status review only. A qualified professional must handle spring, cable, track, mount, rail, cover, wiring, energized equipment, elevated access, and permanent repair work.
Common questions
FAQ
Is a loud LiftMaster opener always a bad motor?
No. The sound may come from the door rollers, hinges, track, rail, trolley, chain, belt, mount, or an unbalanced door. Locate the sound from the ground and record the drive type before selecting a part.
Does LiftMaster drive type matter for noise diagnosis?
Yes. LiftMaster distinguishes chain-drive, belt-drive DC, and wall-mount designs, which have different sound and vibration characteristics. A chain kit, belt component, or motor cannot be chosen by brand and symptom alone.
Can myQ help diagnose a noisy LiftMaster opener?
If the opener is already connected and supports the feature, an existing myQ health report or device alert can give a LiftMaster-specific clue to share with a dealer. No alert does not clear a mechanical problem, and the app should not be used for repeated test cycles.
Can I tighten the chain or adjust the springs myself?
Do not adjust springs, cables, chain or belt tension, tracks, mounts, or energized parts as a user check. Stop use for grinding, jerking, an unbalanced door, or damaged springs or cables and arrange qualified service.
Read the exact guide
Official sources
- Garage Door Opener Repair & MaintenanceLiftMaster · The opened LiftMaster guidance lists door lubrication, sensor alignment, track alignment, blocked paths, and broken springs among conditions requiring attention and directs unresolved issues to an authorized LiftMaster dealer.
- Quiet Garage Door OpenersLiftMaster · The opened LiftMaster page distinguishes chain-drive, belt-drive DC, and wall-mount opener designs and describes their relative noise and vibration characteristics.
- Automatic Residential Garage Door OperatorsU.S. Consumer Product Safety Commission · The prior opened CPSC source provides general automatic garage-door operator safety context for keeping the article within observation and professional-service boundaries.
- Next Gen Garage Door OpenersLiftMaster · The opened LiftMaster Canada page describes myQ health reports, device status, alerts, and sharing a diagnostics report with a dealer for supported Next Gen LiftMaster openers; it is not treated as universal across every LiftMaster model.
- LiftMaster Replacement PartsLiftMaster · The opened LiftMaster parts catalog separates logic boards, gear kits, safety sensors, belt kits, chain kits, motors, and limit-switch kits and asks users to locate the exact model.
Community feedback
Share a repair observation
Share a plain-text repair observation. Accepted observations are published automatically; this page may take a moment to update.