
On this page
Start here
Quick answer
A new loud noise from a garage door opener is a safety clue, not just an annoyance. From the floor, note whether the sound is grinding, scraping, rattling, squeaking, or a low hum, and whether the door moves smoothly. If the door is jerky, unbalanced, off track, jammed, or the sound is grinding or scraping, stop using the opener and arrange professional service. If the door still moves smoothly, you can make a safe visual check of the opener mount, rail, chain or belt, fasteners, and door path without climbing, touching moving parts, or opening the motor housing.
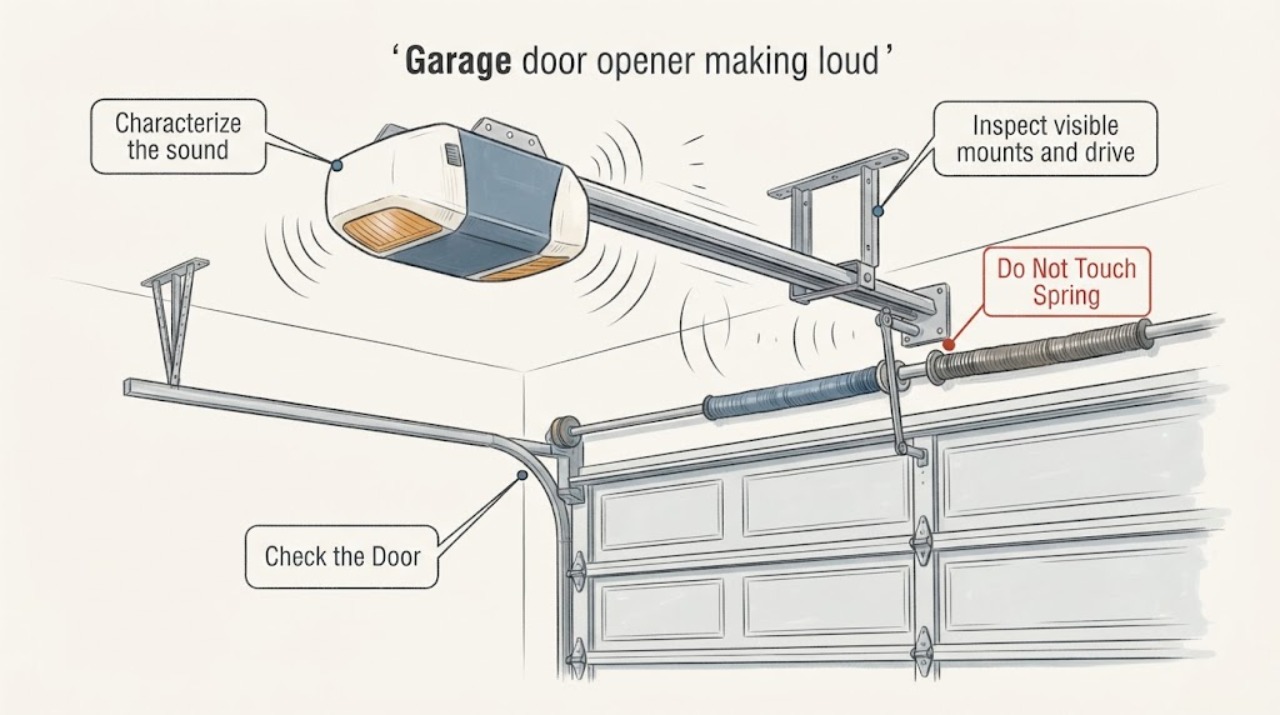
Work through in order
Diagnostic checks
Use only checks that match the exact appliance or system and its official guide.
-
1. Characterize the sound from a safe position
Stand clear of the door, rails, springs, cables, and opener path. If the door is not visibly damaged or unbalanced, use the wall control for one brief cycle while watching from the floor. Note whether the sound occurs at start, during travel, at the fully open or closed position, or only while the motor runs.
Expected result: The noise is grinding or scraping; a rattle or vibration follows door travel; a squeak comes from the hinges, rollers, or track; or a hum occurs without normal door movement.
Next step: Use the matching branch below, document the sound with a short recording from a safe location, and do not repeat cycles to see whether the noise gets worse.
Stop if: Stop immediately if the door jerks, stalls, reverses unexpectedly, hangs open, moves off track, or the noise is grinding, scraping, or accompanied by a visible spring or cable problem.
Why this matters
Why: Grinding, scraping, jerky motion, or a motor that runs without normal movement can indicate a drive, door-hardware, or balance problem. A rattle that follows travel points toward mounting or door hardware. A squeak from the door path is different from noise at the opener head, but both need attention if new or worsening.
-
2. Inspect visible mounts and drive parts without climbing
From the floor and with the opener idle, look at the ceiling or wall mount, rail connection, trolley or carriage, chain or belt, visible fasteners, and the opener housing. Look for a visibly loose bracket, rail movement, excessive sag, damaged hardware, or a belt or chain that is not tracking normally. Do not climb a ladder, reach toward the rail, tighten hardware overhead, or remove the opener cover.
Expected result: The opener or rail visibly shakes, a bracket or fastener appears loose, the chain or belt appears damaged or displaced, or the visible assembly looks stable.
Next step: Photograph the visible condition and give it to a trained garage-door technician. Keep the opener off if the drive is damaged or the door cannot travel normally.
Stop if: Stop if any inspection requires a ladder, contact with the rail, chain, belt, spring, cable, or moving carriage, or opening the motor housing.
Why this matters
Why: A loose mount or rail can transmit vibration and create rattling. A damaged or displaced drive component can create grinding or prevent the door from moving. A stable appearance does not rule out an internal gear or motor problem.
-
3. Compare the door path with the motor sound
With the system idle, inspect the visible door edges, hinges, rollers, and tracks from the floor for obvious debris, a bent track, a loose hinge, a roller out of position, or a door that is rubbing. Do not touch the hardware or manually lift the door. If the opener is safe to operate, watch whether the sound follows the door's travel or comes only from the opener head.
Expected result: The door rubs or catches at one location, the noise follows the moving door, the opener head vibrates while the door path looks smooth, or the door does not move normally.
Next step: Record the location and sound pattern. Ask a professional to inspect the door balance, springs, cables, tracks, rollers, and opener as one system rather than replacing a noise-related part blindly.
Stop if: Stop all operation if the door is off track, visibly unbalanced, jammed, sagging, or supported by damaged cables or springs.
Why this matters
Why: A localized rub or travel-related noise suggests door hardware or track friction. Vibration at the opener head with a smooth door suggests the mount or drive. Abnormal movement means the opener may be compensating for a door problem and should not be repeatedly cycled.
-
4. Identify the opener before considering a part
From a safe standing position, photograph the opener's model label if visible and note whether the drive is a chain, belt, screw, or wall-mount style. Record the door type, approximate age if known, and any recent installation, lubrication, storm, impact, or repair event. Do not infer a replacement gear or lubricant from the appearance alone.
Expected result: The model and drive type are clear; only the brand is visible; or no label can be safely read.
Next step: Use the model-specific owner information or give the photos to a technician. Keep any part search conditional on a confirmed diagnosis and fitment.
Stop if: Stop if reading the label would require a ladder, moving the door, opening the housing, or reaching near high-tension hardware.
Why this matters
Why: Drive and model determine which maintenance guidance and parts apply. A chain, belt, screw, or wall-mount system does not share the same service assumptions, and a generic part may be unsafe or incompatible.
Use your observations
Decision map
Find the observation that best matches what you see, then follow the next safe action.
-
PATH 01Safety boundary
What you see
The opener grinds or scrapes, the door is jerky, off track, jammed, unbalanced, or the spring or cable looks damaged.
Do this next
Stop using the opener, keep people clear of the opening, and arrange a trained garage-door technician to inspect the door and opener together.
Why this path and its safety boundary
Safety stop: Do not test the balance, release the carriage, adjust a spring or cable, or force the door by hand.
-
PATH 02Safety boundary
What you see
The sound follows door travel or comes from a hinge, roller, or track area.
Do this next
Document the location and ask for a door-hardware inspection; a door that binds can overload the opener.
Why this path and its safety boundary
Safety stop: Stop if the track is bent, a roller is out of position, the door rubs severely, or any repair would require reaching into moving hardware.
-
PATH 03Safety boundary
What you see
A mount, rail, chain, belt, fastener, or housing appears loose or damaged from the floor.
Do this next
Leave the system idle and arrange service; do not tighten overhead hardware or open the motor housing as a homeowner noise fix.
Why this path and its safety boundary
Safety stop: Do not climb, touch high-tension parts, or operate the opener repeatedly to confirm the fault.
Helpful context
Understand the symptom
Why a garage opener gets loud
Noise can come from the door hardware, its track and rollers, the opener's mounting, or the chain, belt, screw, motor, and gear system. A drive type that is naturally louder is different from a new grinding or scraping sound. The useful distinction is whether the sound follows door travel, comes from the opener head, or appears with abnormal movement. Safety comes first because an opener is attached to a heavy moving door and the door's springs and cables can be under high tension.
What not to adjust
Do not remove the opener cover, adjust force or travel settings, release the carriage to lift the door, tighten overhead brackets from a ladder, or handle springs, cables, drums, or other high-tension hardware as a noise experiment. Do not keep cycling a door that grinds, scrapes, stalls, or appears unbalanced. A technician can isolate door hardware from opener drive problems with the correct tools and procedures.
What to give the technician
Provide the noise recording, the point in the cycle when it occurs, whether the door moves smoothly, the visible mount and rail condition, the drive type and model label if safely readable, and any recent impact, weather, lubrication, installation, or repair. These observations are more useful than guessing at a gear or lubricant from a generic photo.
Only after diagnosis
Potential parts
- garage door opener drive gear
Consider only if a technician confirms internal drive wear or damage and identifies the opener model and drive assembly.
Confirm the exact model, drive type, revision, and manufacturer fit information; do not substitute a visually similar gear. - garage door rail lubricant
Relevant only when model-specific maintenance calls for lubrication and the door hardware and opener are otherwise safe and in good repair.
Use only the lubricant and locations permitted by the opener and door manufacturer's instructions; belt drives and some components have different requirements. - garage door opener vibration isolator
Relevant only when a professional confirms that transmitted vibration from the mounting system is the source and the structure can support the solution.
Confirm the opener mounting pattern, load, ceiling or wall structure, and manufacturer requirements before selecting any isolator.
When checks do not resolve it
Need a professional?
Arrange a trained garage-door technician when a new loud noise persists, the source is unclear, the door moves abnormally, or any inspection would involve a ladder, opener cover, spring, cable, rail, or adjustment.
Have this ready
- A short recording and the exact point in the open or close cycle where the sound occurs
- Whether the noise is grinding, scraping, rattling, squeaking, or a hum
- Whether the door is smooth, jerky, slow, stuck, off track, or unbalanced
- The model label and drive type if safely visible from the floor
- Photos of the opener mount, rail, door path, and any visible damage without touching the system
Common questions
FAQ
Is a loud garage door opener always failing?
Not always. Drive type and normal door hardware noise vary, but a new grinding, scraping, rattling, or worsening sound can indicate a mount, track, balance, or internal drive problem. Observe the sound from the floor and stop if movement is abnormal.
Can I lubricate the opener to make it quieter?
Only follow the exact maintenance instructions for the identified opener and door. Some components and drive types have different lubrication rules, and lubrication cannot make an unbalanced door, damaged spring, loose mount, or failing drive safe.
Why does the opener grind but the door does not move?
The carriage, chain, belt, screw, pulley, coupler, or other drive component may not be transferring motion normally. Stop repeated operation and have a technician identify the model and inspect the drive and door system.
When should I stop using the garage opener?
Stop for grinding or scraping, jerky or stalled movement, an off-track or unbalanced door, a broken or displaced spring or cable, visible mount or rail damage, or any need to climb, open the housing, or handle high-tension hardware.
Read the exact guide
Official sources
- Genie Garage Door Opener TroubleshootingThe Genie Company · Supports distinguishing carriage, chain, belt, screw, pulley, and grinding-noise symptoms and using model-specific instructions rather than generic parts.
- Maintaining Your Garage DoorThe Genie Company · Supports listening for grinding, scraping, squeaking, or slapping sounds; checking visible mounts, rail, door movement, and balance; and escalating unbalanced doors.
- Maintenance and Safety TipsThe Genie Company · Supports stopping use for broken springs or unbalanced doors and not adjusting high-tension springs, cables, or related hardware without trained service.
Community feedback
Share a repair observation
Share a plain-text repair observation. Accepted observations are published automatically; this page may take a moment to update.