
On this page
Start here
Quick answer
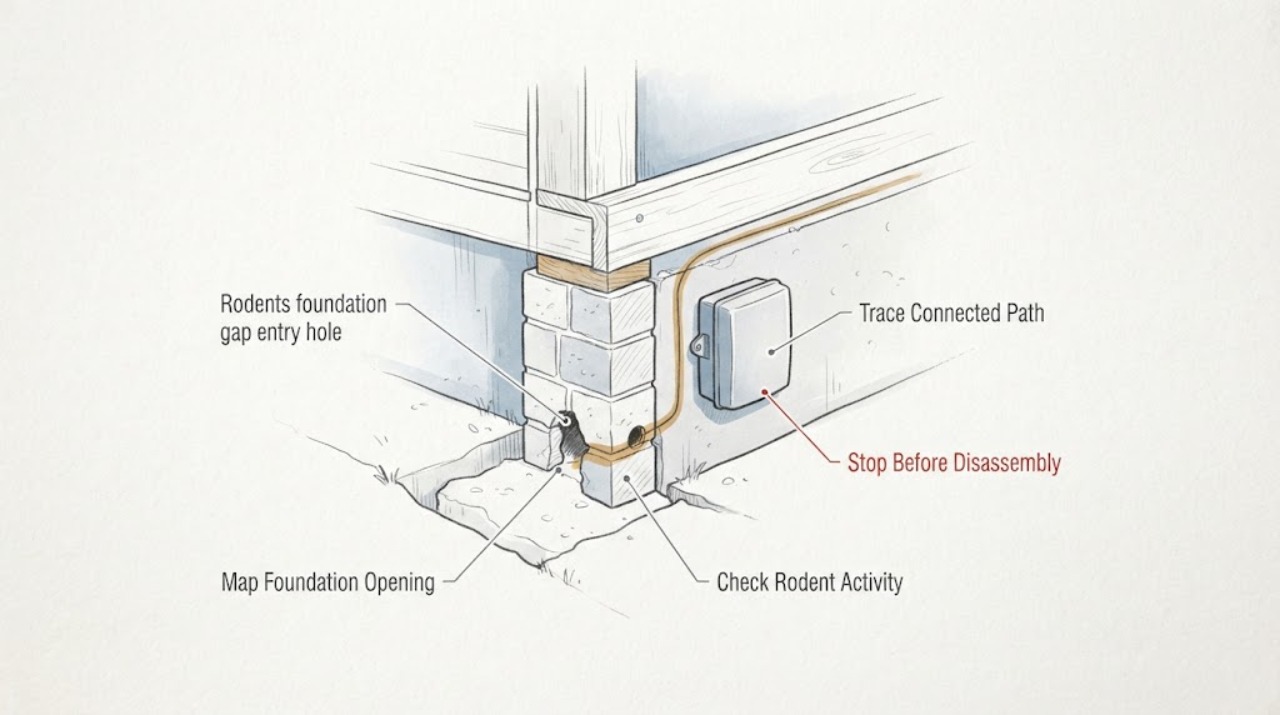
Inspect the foundation-to-ground seam and nearby utility or vent penetrations from a dry, stable position. Treat an opening about the width of a pencil (1/4 inch or 6 mm) as a possible mouse route, then look for fresh droppings, gnaw marks, nesting material, scratching, moisture, erosion, or a widening crack. A larger exterior opening normally needs a rodent-resistant barrier such as metal screening, hardware cloth, sheet metal, or cement before any weather-sealing layer; caulk or foam alone is not a dependable barrier for a larger hole. If rodents may already be inside, the gap is inaccessible, contamination is heavy, or the foundation is moving or wet, coordinate exclusion with a qualified pest-control or building professional rather than sealing blindly.
Work through in order
Diagnostic checks
Use only checks that match the exact appliance or system and its official guide.
-
Check 1
From a dry, stable exterior position, photograph the foundation-to-ground seam, footing, siding or skirting joint, nearby vents, and utility penetrations. Compare the opening with the width of a standard pencil without inserting a tool, enlarging the gap, or touching debris.
Expected result: The opening is about 1/4 inch (6 mm) or larger, a narrow crack, an irregular void under the sill or skirting, or only a surface stain is visible.
Next step: Mark the location and continue to the activity and route checks. If the gap is growing, the footing or wall is shifting, or the area is unsafe to approach, stop and arrange a building and pest assessment.
Stop if: Stop if the ground is unstable, the foundation is moving, there is active water, exposed wiring, a gas odor, a fall hazard, or the location cannot be viewed without climbing or entering a confined space.
Why this matters
Why: CDC identifies a pencil-width opening as large enough for a mouse. A foundation crack or void can be a route, but a stain alone does not establish current rodent entry.
-
Check 2
Look for fresh droppings, urine staining, gnaw marks, rub marks, nesting material, or repeated scratching near the opening and at the nearest accessible basement or crawl-space edge. Observe without touching, sweeping, vacuuming, or disturbing the material.
Expected result: New waste or gnawing appears over time, scratching is concentrated near the opening, nesting material is present, or no current signs are visible.
Next step: If signs are active or the route cannot be reached safely, contact pest control to coordinate removal and exclusion. If light contamination is safely accessible, use the CDC wet-disinfection procedure; otherwise leave it for a trained professional.
Stop if: Stop for heavy droppings, a nest, dead rodents, strong odor, respiratory symptoms, an occupied wall or duct, or any need to enter an inaccessible or contaminated area.
Why this matters
Why: Recurring waste or fresh gnawing makes active rodent use more likely. Gnaw marks can be old, and no visible sign does not rule out an intermittent route.
-
Check 3
Trace the gap laterally and inward from a safe, well-lit position. Check the visible sides of plumbing, cable, gas, and electrical penetrations, foundation vents, door thresholds, and crawl-space access without removing covers or entering an occupied wall, duct, confined space, or unstable crawl space.
Expected result: The opening lines up with a utility penetration or vent, daylight or air movement continues into an occupied area, or the route is blocked or unknown.
Next step: Photograph the visible connection and ask a qualified pest-control professional to coordinate with the appropriate building or utility professional. Do not seal over a required vent or force a cover.
Stop if: Stop for exposed conductors, gas or chemical odor, sharp metal, active leakage, moving structural material, or any need to remove a protective cover.
Why this matters
Why: Alignment with a penetration or an interior opening makes a connected entry path more likely. An unknown route cannot be cleared by a surface patch alone, and a vent or utility detail may have a required function.
-
Check 4
Inspect the ground and wall around the gap for standing water, downspout discharge, eroded soil, loose mortar, displaced skirting, vegetation or mulch pressed against the wall, and signs that the opening changes after rain. Compare only from a safe position; do not excavate beside the foundation.
Expected result: The seam stays dry and intact, or moisture, erosion, settlement, loose masonry, or repeated reopening is present.
Next step: Document the pattern and coordinate drainage or building assessment with pest exclusion when the gap is wet, moving, or repeatedly reopening. Do not dig near a foundation or utility to chase the route.
Stop if: Stop for flooding, undermined soil, a widening structural crack, leaning material, or any condition that could affect the foundation or a buried utility.
Why this matters
Why: A stable dry seam supports a focused exclusion assessment. Moisture, soil movement, or a widening crack can reopen a patch and may indicate a drainage or building problem that pest treatment alone will not solve.
-
Check 5
Choose a repair category only after the opening size, substrate, and connected feature are identified: discuss rodent-resistant metal screening, hardware cloth, sheet metal, or cement for a larger exterior hole, and use sealant only as a compatible weather seal or around a suitable insert.
Expected result: A qualified assessment identifies a small non-structural gap, a larger opening, a masonry or concrete defect, a vent, or a utility chase.
Next step: Use a qualified pest-control or building professional for larger, structural, vent, or utility openings. If active rodents may be inside, coordinate trapping or removal before final closure rather than sealing blindly.
Stop if: Stop if the proposed work requires drilling, cutting, structural alteration, gas or electrical access, elevated work, chemical use, or handling an unknown material.
Why this matters
Why: The barrier must match the opening and substrate. CDC and EPA guidance describe metal or cement-type materials for larger rodent openings and caution that weatherization materials alone may be susceptible to gnawing.
-
Check 6
After an appropriate exclusion intervention, recheck the same viewpoint for new droppings or gnaw marks, daylight, a loosened barrier, renewed moisture, and indoor signs during ordinary weather. Do not pry, probe, or disturb the patch.
Expected result: The barrier remains intact with no new signs at that location, or signs persist and the opening loosens or reappears.
Next step: Map other likely entry points and arrange follow-up pest service when signs persist. Escalate to building or utility support if movement, water, or a connected penetration is involved.
Stop if: Stop all DIY work for heavy infestation, contamination, inaccessible spaces, structural movement, active water, or any safety-critical system affected by the repair.
Why this matters
Why: An intact barrier with no new local signs supports successful exclusion at that point, but one quiet inspection does not prove the building is rodent-free. Persistent signs point to another route, an active infestation, or a failed repair.
Use your observations
Decision map
Find the observation that best matches what you see, then follow the next safe action.
-
PATH 01Next step
What you see
A pencil-width or larger opening at the foundation-to-ground seam is accompanied by fresh gnawing, new droppings, nesting material, or scratching from inside.
Do this next
Arrange pest-control assessment and coordinate trapping or removal with exclusion. Do not seal the only visible route blindly if rodents may already be inside.
Why this path and its safety boundary
Why it matters: An active entry route is more likely than an old surface defect, especially when the signs cluster at the same opening.
-
PATH 02Next step
What you see
The gap is stable and dry, no current rodent signs are visible, and there is no visible utility, vent, structural, or interior connection.
Do this next
Obtain a verified exclusion repair appropriate to the substrate and monitor nearby routes for new signs.
Why this path and its safety boundary
Why it matters: A localized exterior opening is more likely, so the decision is mainly to document it and match the exclusion barrier to the material rather than treat it as an appliance or control fault.
-
PATH 03Next step
What you see
The gap returns after rain, has standing water or eroded soil, shows a widening crack or displaced masonry, or sits beside a utility penetration or required vent.
Do this next
Stop self-repair and arrange coordinated pest-control plus building, drainage, or utility assessment as appropriate.
Why this path and its safety boundary
Why it matters: Drainage, settlement, building-envelope movement, or a utility detail may be contributing; a surface-only pest patch is less likely to last or may interfere with a required function.
-
PATH 04Next step
What you see
There is heavy droppings or nesting material, a dead rodent, an inaccessible crawl space or duct, an occupied wall route, or a concern about contamination exposure.
Do this next
Leave the area, do not sweep or vacuum, and contact a trained pest-control professional or the local health department for cleanup and exclusion guidance.
Why this path and its safety boundary
Why it matters: The health and access boundary now matters more than a surface repair. Dry disturbance can put contaminated particles into the air, and hidden routes require trained access.
Helpful context
Understand the symptom
Read the gap as both an entry route and a building clue
A foundation gap can be a simple opening at the wall-to-ground seam, but it can also be connected to a pipe chase, crawl-space vent, door threshold, eroded soil edge, or a moving masonry joint. A pencil-width opening is enough for a mouse, while the location, substrate, and evidence around it determine what should happen next. A stain or an old gnaw mark is not proof that rodents are currently using the route.
Match the exclusion method to the opening
For a larger exterior opening, rodent-resistant metal, hardware cloth, sheet metal, or cement is the barrier category to discuss with a qualified professional. A sealant may help weather-seal around a suitable barrier or a small non-structural gap, but a surface-only foam or caulk repair can be chewed through or fail when the substrate moves. Do not cover a required vent or alter a utility penetration without confirming the correct detail.
Treat rodent waste as a health boundary
Do not sweep or vacuum dry droppings, urine, or nesting material. If contamination is light and safely accessible, follow the CDC wet-disinfection procedure and the disinfectant label; heavy infestation, an occupied wall or duct, an inaccessible crawl space, or uncertainty about exposure is a reason to stop and use a trained professional or contact the local health department.
Safety boundary
Stop conditions
- Do not sweep or vacuum dry rodent droppings, urine, or nesting material.
- Do not enter a confined, unstable, elevated, heavily contaminated, or inaccessible crawl space, wall, or duct to chase the route.
- Do not drill, cut, excavate, pry, or alter a foundation, utility penetration, gas line, electrical component, or required vent without qualified assessment.
- Stop for gas odor, exposed conductors, active flooding, structural movement, falling material, severe contamination, or symptoms after rodent exposure.
- Do not seal the only visible opening blindly when rodents may be inside; coordinate removal and exclusion with a qualified professional.
Only after diagnosis
Potential parts
- rodent-resistant metal screening or hardware cloth
Consider this category only when the opening is larger than a small crack and a qualified assessment confirms that metal screening is appropriate for the substrate and any nearby vent or utility feature.
Confirm opening dimensions, corrosion resistance, mesh geometry, attachment method, local building requirements, and compatibility with the existing foundation or enclosure before ordering. - sheet metal or flashing
Consider this category only when a professional identifies a larger edge, skirting, or foundation opening that needs a gnaw-resistant barrier rather than sealant alone.
Confirm the material, dimensions, weather exposure, fastener method, drainage path, and any utility or vent clearance with the professional doing the repair. - compatible exterior sealant
Consider sealant only as a compatible weather-sealing layer or for a confirmed small non-structural gap; it is not a substitute for a rodent-resistant barrier in a larger gnawable opening.
Verify compatibility with the foundation material, existing patch, moisture conditions, and the manufacturer's application instructions; do not use it to conceal movement or a required vent.
When checks do not resolve it
Need a professional?
Arrange qualified pest-control service when fresh rodent signs cluster at the gap, the route is inaccessible, the opening is larger or connected to a vent or utility, the patch reopens, or contamination is present. Add building, drainage, or utility support when the foundation moves, soil erodes, water enters, or a required penetration is involved. Escalate promptly for heavy infestation or illness concerns.
Common questions
FAQ
How large can a foundation gap be before mice can use it?
Treat an opening about the width of a pencil—1/4 inch or 6 mm—as a possible mouse route. The gap size does not identify the rodent species or prove that the route is active, so pair the measurement with fresh signs and a route check.
Can I fill a foundation rodent hole with foam or caulk?
Do not rely on foam or caulk alone for a larger, gnawable exterior opening. CDC and EPA guidance describe rodent-resistant metal, hardware cloth, sheet metal, or cement-type barriers for larger openings; sealant may be appropriate only as a compatible weather seal or for a confirmed small non-structural gap.
Should I seal the hole immediately if I hear rodents inside?
Not blindly. If rodents may already be inside, a pest-control professional should coordinate removal or trapping with exclusion so the visible gap is not closed while another route or an occupied interior space is overlooked.
What should I do if droppings or nesting material are next to the gap?
Do not sweep or vacuum it dry. For light, safely accessible contamination, follow the CDC wet-disinfection steps and the disinfectant label. Leave heavy, inaccessible, or duct or wall contamination for a trained professional or contact the local health department.
What should I give the pest-control professional?
Provide wide and close photos, the approximate opening size, dates and locations of fresh signs, whether activity changes after rain, visible utility or vent connections, prior patches or pest treatment, and any contamination or access concern.
Read the exact guide
Official sources
- Energy Savings Plus Health: Indoor Air Quality Guidelines for Multifamily BuildingsU.S. Environmental Protection Agency · EPA building guidance on pest entry points, moisture around foundations, and patching rodent pathways before weatherization.
- How to Clean Up After RodentsCenters for Disease Control and Prevention · CDC health and cleanup boundary for rodent-contaminated areas encountered near an entry hole.
- Controlling Wild Rodent InfestationsCenters for Disease Control and Prevention · CDC overview of signs of rodent presence and the relationship between repeated waste or gnawing and active rodent activity.
- How to Seal Up to Prevent RodentsCenters for Disease Control and Prevention · CDC guidance for inspecting inside and outside the home, including the foundation-to-ground seam, and choosing sealing materials for small and larger holes.
Community feedback
Share a repair observation
Share a plain-text repair observation. Accepted observations are published automatically; this page may take a moment to update.