
On this page
Start here
Quick answer
A leak at an American Standard faucet handle is not automatically proof that the cartridge is bad. First dry the faucet and identify whether water starts at the handle base only when the faucet is pressurized, drips from the spout with the handle off, or comes from a supply connection below the deck. The first pattern can involve the cartridge, stem seal, retaining arrangement, or handle-area O-ring; the second points to the valve's shutoff path; the third is a supply or mounting leak. Record the exact faucet model, shut off the fixture water before any disassembly, and follow that model's installation or repair guide. American Standard documents ceramic-disc cartridge designs and model-specific parts, but a generic cartridge is not a safe fit assumption. Stop and call a qualified plumber if the fixture stops cannot isolate the water, a fast leak could damage the cabinet, a fitting is seized or corroded, the faucet body is cracked, or the leak remains after a compatible repair.
Before you begin
Safety first
- This article supports drying and tracing the leak, identifying the model, closing and verifying fixture stop valves, and making ordinary-access observations. A qualified plumber should handle failed isolation valves, seized or corroded fittings, cracked bodies, supply-line work, concealed leaks, forceful disassembly, and diagnosis when the compatible cartridge or seal is uncertain.
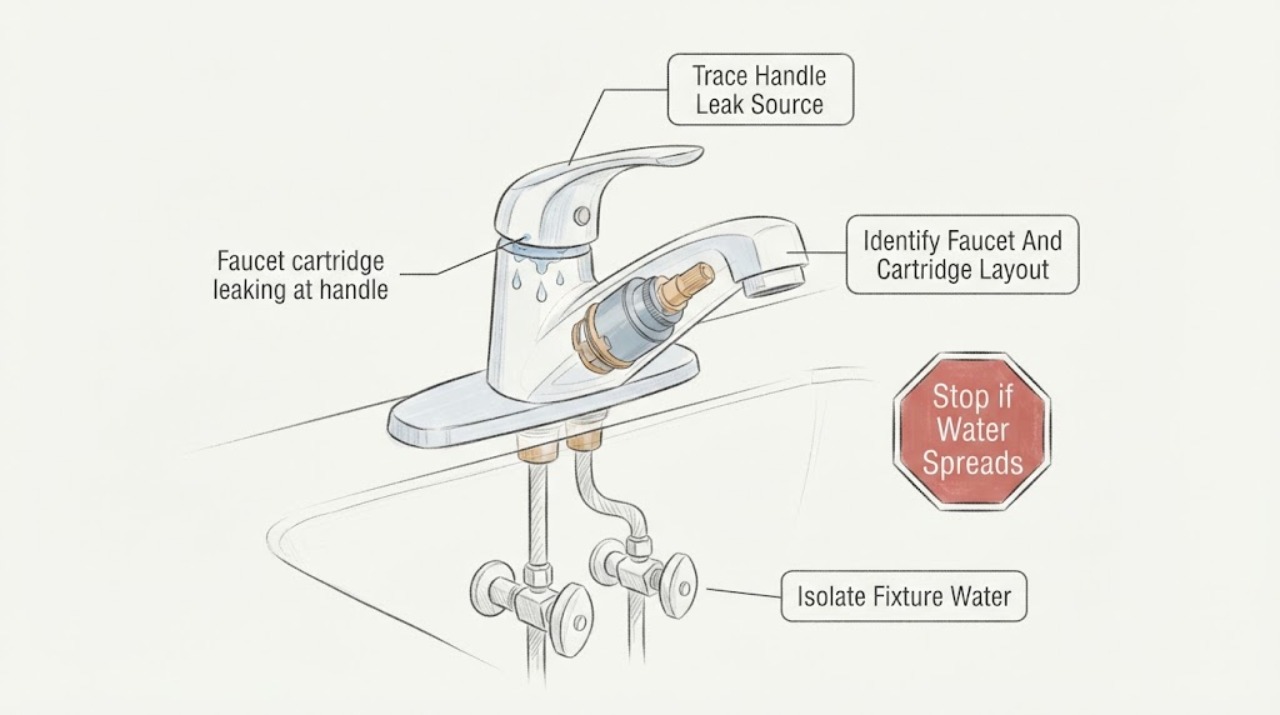
Work through in order
Diagnostic checks
Use only checks that match the exact appliance or system and its official guide.
-
Check 1
Dry the handle, faucet body, deck, and visible supply connections with a clean towel. Run the American Standard faucet briefly, turn it off, and watch with a dry tissue held near—not inside—the handle base, spout, deck opening, and under-sink connections.
Expected result: Record whether water first appears around the handle stem or cap, only while the faucet is on, from the spout after shutoff, at the deck or mounting area, or at a supply hose/valve below the sink.
Next step: Photograph the first wet point and keep the faucet off if the flow is more than a slow bead. Continue only with the matching diagnostic path and the exact model information.
Stop if: Stop immediately for a spray, fast flow, water entering the cabinet or wall, a cracked faucet body, or an electrical appliance near the water; close the fixture stops if they work and arrange qualified plumbing service.
Why this matters
Why: A handle-area bead that follows pressurization makes the cartridge/stem seal or retaining area plausible, but does not prove which part failed. A spout drip with the handle off points to the valve's shutoff path. Water below the deck points toward a hose, supply, mounting, or body leak rather than a handle cartridge diagnosis.
-
Check 2
From the faucet body, rating label, paperwork, or installation record, record the American Standard model and whether the faucet has one lever or separate hot and cold handles; do not infer the cartridge from appearance alone.
Expected result: Note the model number, handle side or temperature side involved, whether the faucet is a single-handle or two-handle design, and whether the model diagram identifies a cartridge, stem valve, O-ring, or retaining component at the handle area.
Next step: Use the exact model's American Standard installation or repair-parts diagram before loosening anything, and save a photo of the model information for a plumber or parts check.
Stop if: Do not order a cartridge solely because it is labeled American Standard, and do not continue if the model number is missing and the existing part cannot be identified without disassembly.
Why this matters
Why: American Standard has model-specific faucet assemblies: its Reliant 3 page describes a single-handle ceramic-disc cartridge, while its separate cartridge page covers many two-handle kitchen and bath faucets. The model and handle layout determine whether a cartridge, stem valve, or seal is even the right category.
-
Check 3
Before removing a handle, cap, retainer, cartridge, or seal, close the hot and cold fixture stop valves under the sink, open the faucet briefly to relieve trapped pressure, and verify that flow has stopped.
Expected result: Check whether both stops close fully, the faucet only releases a short residual flow, the supply continues to run, or a stop valve or connection is seized, corroded, or inaccessible.
Next step: Proceed only when the model instructions permit the work and the fixture is isolated. If either stop fails, keep the faucet closed and arrange a plumber to isolate or repair the supply.
Stop if: Do not remove the handle or cartridge with pressurized water, do not force a corroded stop valve, and do not substitute the faucet handle as a shutoff.
Why this matters
Why: A fully isolated fixture creates the required boundary for low-risk model-directed disassembly. Continued flow means the fixture is not isolated; forcing a stop or opening the cartridge can turn a slow handle leak into an uncontrolled water release.
-
Check 4
With water isolated and the exact model instructions at hand, inspect the accessible handle cap, screw, handle base, retaining nut, and visible sealing surfaces; remove only the parts the model guide identifies and keep them in order.
Expected result: Look for a loose handle or retainer, a displaced or cut O-ring, mineral debris, a scratched sealing surface, a cartridge that is not seated, or a part that will not move without excessive force. Do not scrape or enlarge a sealing surface.
Next step: Follow the exact model procedure for cleaning or reseating an accessible seal or retainer. If the guide calls for cartridge removal, document orientation before removal and use only the model-compatible part category.
Stop if: Stop for stripped screws, a seized cartridge, a cracked body, corroded valve threads, damaged supply lines, or any need to twist the faucet body or pry against the deck.
Why this matters
Why: A loose handle or retainer can let water travel through the handle area without proving cartridge failure. A damaged seal, debris, or visibly mis-seated cartridge supports a seal or seating check. A seized fastener, damaged body, or uncertain assembly requires professional handling rather than leverage.
-
Check 5
If the model guide and isolated water supply permit cartridge work, compare the removed cartridge, stem valve, or handle-area O-ring with the model diagram and inspect for cuts, flattening, scale, cracks, or an incorrect orientation; do not test the open valve under pressure.
Expected result: Record whether the identified seal or cartridge is visibly damaged, the part number and orientation match the model documentation, the valve body is clean and intact, or the leak source remains uncertain.
Next step: Use the exact model's approved replacement and installation sequence only when fit and diagnosis are confirmed. Otherwise reassemble the safe parts, keep the stops closed, and arrange qualified plumbing diagnosis.
Stop if: Do not substitute a generic cartridge, stretch an O-ring, reuse a cut seal, alter the valve body, or open the faucet with parts missing or the cartridge retainer unsecured.
Why this matters
Why: A matching damaged seal or cartridge makes that category a conditional repair candidate. An intact part, wrong-looking part, damaged valve body, or uncertain source means the leak may be in another seal, the body, the hose, or the installation; replacing the cartridge by guesswork is not justified.
-
Check 6
After a model-approved repair is fully reassembled, reopen the fixture stops slowly, keep the cabinet accessible, and test the faucet through off, cold, hot, and normal flow positions while checking the previously identified handle area and all disturbed connections.
Expected result: Record whether the handle area stays dry with the faucet on and off, the spout shuts off, the handle moves normally, water appears below the deck, or the same leak returns immediately or only at a particular temperature or handle position.
Next step: Close the stops again for any returning leak, preserve the old and new part information, and arrange service with the model, leak location, and test pattern rather than repeatedly tightening the handle or retainer.
Stop if: Do not keep testing a spray, fast leak, cabinet leak, loose supply connection, cracked body, or fitting that twists the faucet or supply line; isolate the water and call a qualified plumber.
Why this matters
Why: A dry handle area and normal shutoff support a successful seal or cartridge installation, but a leak at a different point indicates another path was disturbed or misidentified. A returning handle leak can indicate wrong fit, incomplete seating, body damage, or an unresolved upstream cause.
Use your observations
Decision map
Find the observation that best matches what you see, then follow the next safe action.
-
PATH 01Safety boundary
What you see
The faucet body and supply connections are dry, but water begins at the handle base or stem only when the faucet is pressurized; the model identifies a cartridge, stem valve, or handle-area seal there.
Do this next
Isolate the fixture water and use the exact model procedure to inspect or service the identified cartridge, stem valve, or seal. Confirm the model and fit before replacing anything.
Why this path and its safety boundary
Why it matters: The cartridge/stem sealing or retaining path is more likely than a spout-only drip, but the visible handle leak still does not distinguish a damaged cartridge from an O-ring, retainer, seating, or body problem.
Safety stop: Stop for a seized retainer, cracked body, damaged supply, uncontrolled flow, or any need to force the valve body or work with water still pressurized.
-
PATH 02Safety boundary
What you see
The handle area stays dry, but water continues from the spout after the handle is fully off and the supply connections remain dry.
Do this next
Record the model and handle type, isolate the fixture, and follow the model-specific cartridge or stem-valve diagnosis. Do not tighten the handle to cure an internal shutoff leak.
Why this path and its safety boundary
Why it matters: The faucet's shutoff element is not sealing completely; on a cartridge faucet, the cartridge or its seating is a plausible path, but this pattern is not the same as water leaking externally from the handle.
Safety stop: Do not open the valve under pressure or continue using it if the drip becomes a stream, the handle is loose, or water reaches the cabinet or wall.
-
PATH 03Safety boundary
What you see
The handle and spout are dry, but water first appears at a flexible supply hose, stop-valve connection, mounting area, or faucet body beneath the deck.
Do this next
Close the affected fixture stop, protect the cabinet from water, and arrange plumbing service if the connection cannot be safely isolated and identified from ordinary access.
Why this path and its safety boundary
Why it matters: The leak is not established as a handle cartridge leak. A supply connection, mounting seal, hose, or cracked body can continue to leak regardless of a cartridge replacement.
Safety stop: Do not tighten a connection while it twists the faucet or supply line, and do not remove the faucet with the water supply active or a stop valve that does not close.
-
PATH 04Safety boundary
What you see
The model number is missing or the inspected cartridge/seal does not match the model diagram, the old part was altered, or the leak source changes after the handle is moved.
Do this next
Reassemble only what can be safely secured, keep the fixture stops closed, and obtain the exact model information or qualified plumbing diagnosis before ordering a part.
Why this path and its safety boundary
Why it matters: Fit and diagnosis are unresolved. A visually similar American Standard cartridge or O-ring may differ by faucet family, handle side, dimensions, or retaining method, and replacing it could create a new leak or damage the valve.
Safety stop: Do not sand, stretch, cut, drill, or substitute a cartridge or seal to make it fit, and do not pressurize a faucet with an uncertain or incomplete assembly.
-
PATH 05Safety boundary
What you see
A model-compatible repair was completed with the water isolated, but the handle-area leak returns during the verification test or the valve body, deck, or connections remain wet.
Do this next
Close the fixture stops, document the exact wet point and test position, and arrange qualified service with the model and parts information.
Why this path and its safety boundary
Why it matters: The original diagnosis may be incomplete, the cartridge or seal may not be seated, or the faucet body, hose, mounting, or supply path may be damaged. Repeated tightening is unlikely to establish the cause.
Safety stop: Do not continue operating a returning leak into the cabinet, force the handle or retainer, or expose the plumbing to repeated pressure tests when water damage is possible.
Helpful context
Understand the symptom
Prove where the water starts before blaming the cartridge
Water can travel along a handle, escutcheon, or faucet body, so the wettest point is not always the leak source. With the faucet dry, run it briefly and then turn it off while watching from above and below the deck. A bead that begins around the handle stem while water is flowing is a different decision from a spout that continues to drip with the handle off, or a supply hose that wets the cabinet. American Standard uses both single-handle and two-handle cartridge arrangements, so the handle style and model number matter.
Shut off the fixture water before opening the handle area
If the leak requires removing a cap, screw, handle, retaining nut, or cartridge, close the hot and cold fixture stop valves under the sink, open the faucet briefly to relieve pressure, and verify that water has stopped. American Standard's published faucet procedure likewise begins by turning off water before handle and cartridge work. If a stop valve will not close, the supply keeps flowing, or the connection is corroded, leave the faucet alone and have a plumber isolate it. Do not use the handle screw or cartridge retainer as a water shutoff.
A cartridge is a diagnostic possibility, not a universal replacement
American Standard lists ceramic-disc cartridges for particular faucet families and sells separate cartridge categories for some two-handle designs. That does not make every American Standard cartridge interchangeable. A handle leak can also come from a stem seal, O-ring, retaining arrangement, hose, or a cracked body. Use the exact model's parts diagram or installation guide, preserve the orientation of parts, and replace only a component that the model information and inspection support. If a retaining part will not release without force, stop rather than twisting the valve body or stressing the supply lines.
Safety boundary
Stop conditions
- Identify the first wet point before selecting a cartridge; water at a hose, mounting area, or faucet body is not established as a handle leak.
- Close and verify the hot and cold fixture stop valves before removing a handle, retainer, cartridge, stem valve, or seal; do not rely on the faucet handle as a shutoff.
- Do not force corroded stops, seized retainers, cartridges, screws, or supply connections, and do not twist the faucet body or flexible hoses.
- Do not substitute a generic American Standard cartridge or O-ring without the exact model and a matching diagram or qualified diagnosis.
- Keep the fixture off for a spray, fast leak, cracked body, damaged supply, water entering the wall or cabinet, or a stop valve that cannot isolate the water.
- If the leak returns after a compatible repair or appears at a different location during testing, close the stops and arrange qualified plumbing service instead of repeatedly tightening parts.
Only after diagnosis
Potential parts
- faucet cartridge
Consider this category only when the exact model diagram and leak pattern support the cartridge or its seating as the failed shutoff or handle-area sealing path.
Confirm the exact faucet model, handle configuration, cartridge dimensions, orientation, and retaining method before ordering or installing. - faucet stem valve
Consider this category only for a model that uses a separate stem valve rather than the cartridge arrangement, after the handle-area leak or shutoff symptom is confirmed.
Confirm the exact American Standard model, hot or cold side, stem profile, seal arrangement, and model-specific installation procedure before ordering. - faucet o-ring kit
Consider this category only when the model diagram identifies an O-ring or handle-area seal and inspection finds damage, displacement, or loss of sealing at the observed wet point.
Confirm the exact model, seal location, material, dimensions, lubrication guidance, and seating method; do not stretch or substitute a generic ring to force a fit.
When checks do not resolve it
Need a professional?
Arrange qualified plumbing service when the fixture stop valves will not isolate the faucet, the leak is fast or reaches the cabinet or wall, the faucet body or supply connection is cracked or corroded, the exact model or part fit cannot be confirmed, disassembly requires force, or a compatible cartridge or seal repair does not hold. A slow handle-area leak still warrants prompt attention because water can travel into the deck or cabinet.
Safety scope: This article supports drying and tracing the leak, identifying the model, closing and verifying fixture stop valves, and making ordinary-access observations. A qualified plumber should handle failed isolation valves, seized or corroded fittings, cracked bodies, supply-line work, concealed leaks, forceful disassembly, and diagnosis when the compatible cartridge or seal is uncertain.
Common questions
FAQ
Why is my American Standard faucet leaking around the handle?
A handle-area leak can come from a cartridge or stem seal, a handle-area O-ring, a retaining arrangement, or a crack; water can also travel from the spout, deck, or supply connection. Dry the faucet and identify the first wet point before selecting a part.
Does a leak at the faucet handle always mean I need a cartridge?
No. A cartridge is only one possibility. A loose retainer, damaged O-ring, stem seal, supply hose, mounting seal, or faucet body can produce water near the handle. The model and leak pattern must support the cartridge diagnosis.
How do I safely prepare to inspect an American Standard faucet cartridge?
Close the hot and cold fixture stop valves, open the faucet briefly to release residual pressure, and verify that flow has stopped before removing a cap, handle, retainer, cartridge, or seal. If a stop will not close, have a plumber isolate the water.
Can I use any American Standard cartridge that looks similar?
No. American Standard lists different cartridge arrangements for different faucet families. Confirm the exact model, handle configuration, hot or cold side, dimensions, orientation, and retaining method against the model documentation before ordering.
What if the faucet drips from the spout after the handle is off?
That pattern points to the faucet's internal shutoff path rather than proving an external handle leak. Record the model, isolate the fixture water, and follow the model-specific cartridge or stem-valve diagnosis; do not tighten the handle as a substitute.
What if the leak is under the sink instead of at the handle?
Water at a supply hose, stop-valve connection, mounting area, or faucet body is not established as a cartridge leak. Close the fixture stop if it works, protect the cabinet, and arrange plumbing service if the source or isolation cannot be handled safely.
When should I call a plumber for an American Standard faucet handle leak?
Call when the stops cannot isolate the fixture, water is fast or reaching the cabinet or wall, the body or connections are cracked or corroded, a fitting is seized, the model or part fit is uncertain, or the leak returns after a compatible repair. Keep the faucet off for any water-damage risk.
Read the exact guide
Official sources
- American Standard Parts StoreAmerican Standard · American Standard parts-store and support index; model-specific diagrams and instructions determine the applicable part.
- Faucet Replacement Valve Cartridge for 2-Handle FaucetsAmerican Standard · American Standard's specific two-handle cartridge product page; it does not establish compatibility with every American Standard faucet.
- How to Replace the Spout Seal Kit for Your Reliant FaucetAmerican Standard · American Standard Reliant faucet guide; the exact model manual controls whether the same accessible sequence applies to another faucet.
- Reliant 3® 4-Inch Centerset Single-Handle Bathroom Faucet 1.2 gpm/4.5 L/min With Lever HandleAmerican Standard · A specific American Standard Reliant 3 single-handle faucet family; it demonstrates model-specific construction and is not a universal fit guide.
Community feedback
Share a repair observation
Share a plain-text repair observation. Accepted observations are published automatically; this page may take a moment to update.