
On this page
Start here
Quick answer
An American Standard faucet that drips after the handle is off may have debris at the valve seat, a worn or damaged cartridge or seal, a handle that is not fully closing the valve, or a different leak at the spout, handle, supply connection, or hose. First dry the faucet and identify whether water exits the spout, gathers around the handle, or appears underneath. Confirm the handle reaches its normal OFF position, clean the aerator if flow is distorted, and operate the handle gently only as American Standard's instructions allow. If the spout still drips with the handle fully off, the cartridge or its seals become more likely, but cartridge styles vary by faucet and handle configuration. Shut off the water before any model-approved cartridge work; do not force a stuck handle, pry trim, loosen a pressurized connection, or order a cartridge by appearance alone. A leak under the cabinet, a shutoff that will not close, water near electrical equipment, or a persistent drip after accessible checks requires qualified plumbing service.
Before you begin
Safety first
- This article supports identifying the first wet point, normal handle and aerator checks, model identification, and water isolation before any model-approved cartridge work. Do not work on pressurized connections, seized trim, hidden plumbing, supply valves, or wet electrical surroundings.
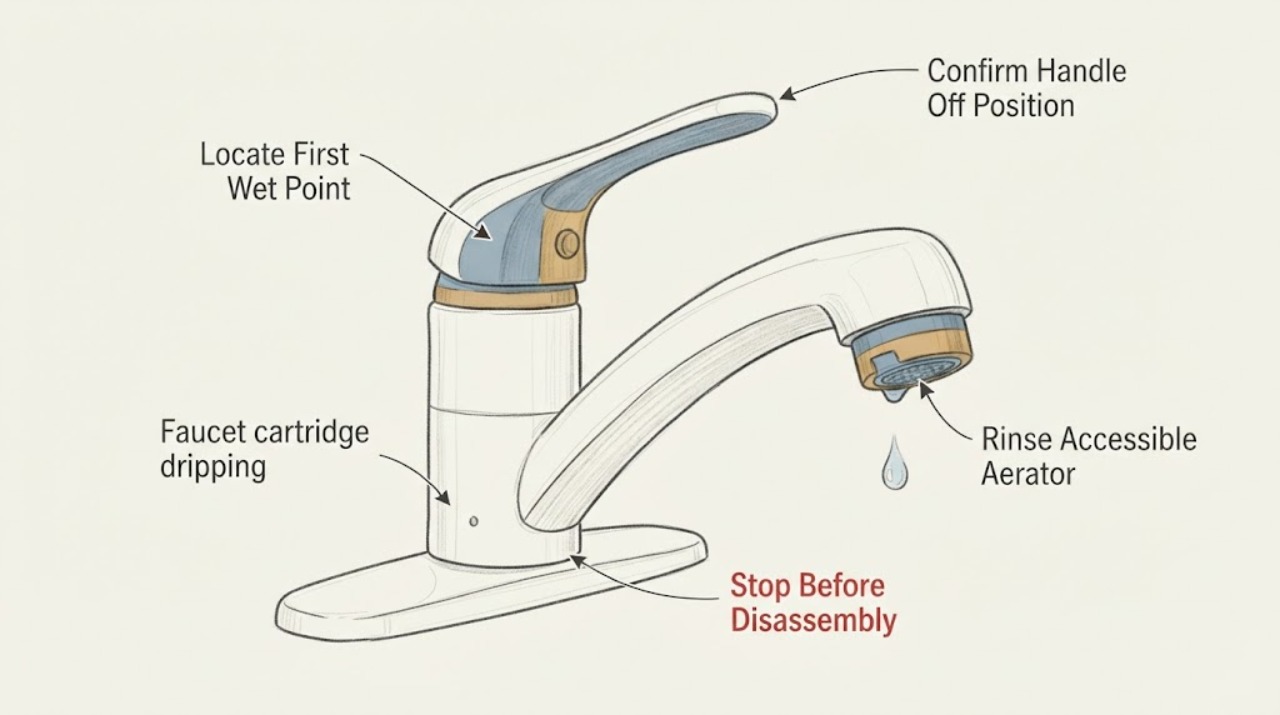
Work through in order
Diagnostic checks
Use only checks that match the exact appliance or system and its official guide.
-
Check 1
Dry the faucet, handles, spout, deck, supply lines, and cabinet area. With the faucet handles in their normal OFF position, watch for the first new droplet and identify whether it leaves the spout, appears around the handle or body, starts at a hose or supply connection, or falls from underneath.
Expected result: Water continues from the spout, gathers at the handle or faucet body, appears only below the sink, or is found at a supply or spray-hose connection.
Next step: Record the first wet point and keep the cabinet dry. Continue only with the matching handle, aerator, or cartridge assessment; arrange service for an inaccessible or pressurized connection leak.
Stop if: Do not touch a wet electrical outlet, disconnect a hose, or loosen a supply fitting while water remains pressurized.
Why this matters
Why: A spout drip keeps the valve cartridge or its seals in consideration. A handle or body leak may involve a stem seal or body connection, while an underside leak points toward supplies, mounting, hose, or another plumbing connection rather than the cartridge alone.
-
Check 2
Move the handle or handles gently through their normal range and return them fully to OFF as the faucet instructions describe; do not force a stiff stop, remove the handle, or operate a loose handle repeatedly.
Expected result: The drip stops when the handle reaches OFF, the handle feels loose or will not reach its stop, the handle is stiff or stuck, or the spout continues dripping with the handle fully off.
Next step: If the drip stops normally, monitor the handle and do not overtighten it. If it continues, or the handle is damaged or stuck, isolate water only if the shutoffs operate normally and arrange model-specific service.
Stop if: Do not use pliers on the handle, force a cartridge stem, or apply penetrating chemicals inside the faucet.
Why this matters
Why: A handle position or loose handle can leave the valve partly open without proving cartridge damage. A continuous spout drip with the valve fully off makes cartridge, seal, or debris at the shutoff more likely; a stiff handle can indicate internal corrosion or a damaged cartridge.
-
Check 3
If the drip is from the spout and water flow is distorted or reduced, clean or rinse the accessible aerator only as the American Standard faucet instructions allow; keep removed pieces together and do not use sharp tools against the faucet finish.
Expected result: The aerator contains debris, flow returns to normal and the drip stops, flow improves but the spout still drips, or the aerator is difficult to remove.
Next step: Reassemble the aerator correctly and recheck the faucet. If the spout still drips, continue to exact-model cartridge diagnosis; if the aerator will not move normally, stop and arrange service.
Stop if: Do not drill, pry, scratch, or use excessive force to remove an aerator or screen.
Why this matters
Why: Aerator debris can distort flow and may be mistaken for a valve problem, but a persistent drip with the handle off remains a valve or seal issue. A stuck aerator can damage the finish or spout if forced.
-
Check 4
Record the American Standard faucet model if visible on the faucet, rating label, paperwork, or manual, and note whether it has one control or two separate handles, a pull-down or side spray, and a bathroom or kitchen configuration; do not dismantle the faucet to find a number.
Expected result: The exact model and handle arrangement are known, only the brand is known, or the visible model information conflicts with the faucet's configuration.
Next step: Use the exact model manual or manufacturer parts diagram before purchasing or disassembling anything. If the model cannot be identified or the faucet has been modified, arrange qualified service for identification.
Stop if: Do not guess compatibility from a photograph, generic dimensions, color, or a similar-looking cartridge.
Why this matters
Why: American Standard's cartridge pages cover different single-control and two-handle cartridge families. The same drip symptom can therefore require different parts, seals, retainers, or procedures; brand-only identification is not enough.
-
Check 5
Only when the exact model instructions support user cartridge service, close the accessible hot and cold supply stops, open the faucet briefly to relieve pressure, and verify that water has stopped before removing any model-approved handle or retainer; otherwise leave the faucet assembled.
Expected result: Both supplies close and pressure releases normally, a stop valve will not close, water continues under pressure, the retainer or handle is seized, or the model instructions do not authorize this access.
Next step: Proceed only with the exact American Standard model procedure and compatible part information. If isolation or access is abnormal, stop, protect the cabinet, and arrange qualified plumbing service.
Stop if: Do not loosen a cartridge retainer or supply connection while water is pressurized, and do not force seized trim or hardware.
Why this matters
Why: A fully isolated valve is a prerequisite for any approved cartridge work. A valve that will not close, trapped pressure, or seized hardware turns a small drip into a flood or damage risk and requires a plumber.
-
Check 6
After an approved aerator or model-specific cartridge service, dry the faucet and observe several normal OFF periods for a return drip; also inspect the cabinet, shutoffs, and adjacent wall or floor for water damage without repeatedly cycling a leaking valve.
Expected result: The drip stops and all connections remain dry, the spout still drips, water appears under the cabinet, the faucet becomes loose, or a supply stop, wall, or floor is wet.
Next step: Keep the affected supply isolated when safe and arrange qualified service for any persistent drip, cabinet leak, loose faucet, failed shutoff, or water damage. Do not keep tightening or reopening the faucet to test it.
Stop if: Stop for a rapid leak, water near electrical equipment, a burst supply line, flooding, or a shutoff that cannot stop the flow.
Why this matters
Why: A dry spout after correct service supports that the addressed valve path was involved. Persistent spout dripping can mean the cartridge, seal, seat, or procedure is wrong; underside water can be a separate plumbing leak or installation issue.
Use your observations
Decision map
Find the observation that best matches what you see, then follow the next safe action.
-
PATH 01Next step
What you see
The first wet point is the spout, the handle reaches OFF normally, and rinsing a dirty aerator or gently operating the handle does not stop the drip.
Do this next
Use the exact American Standard model instructions and parts information, isolate hot and cold supplies before approved access, and arrange service if the cartridge procedure or part fit is uncertain.
Why this path and its safety boundary
Why it matters: A cartridge, cartridge seal, or valve debris issue is more likely than a supply or mounting leak. The symptom does not identify a specific cartridge family.
-
PATH 02Next step
What you see
The drip stops only when the handle is moved farther, the handle is loose, or the handle is stiff and does not reach its normal OFF position.
Do this next
Stop forcing the control and have the exact model inspected. If water must be isolated, use the normal supply stops only when they operate safely; do not remove the handle under pressure.
Why this path and its safety boundary
Why it matters: Handle alignment, retainer, stem, or cartridge movement is more likely than an aerator-only problem. Forcing the handle can damage the valve or finish.
-
PATH 03Next step
What you see
The spout is dry but water appears around the handle, faucet body, supply connection, spray hose, mounting area, cabinet, wall, or floor.
Do this next
Isolate the affected supply if the shutoff works normally, dry and protect the cabinet, and arrange qualified plumbing service for a pressurized, hidden, or recurring leak.
Why this path and its safety boundary
Why it matters: A body seal, supply, hose, mounting, or plumbing connection is more likely than a dripping cartridge. A cartridge replacement may not address the source.
-
PATH 04Next step
What you see
Only the American Standard brand is known, the faucet configuration is unclear, or a proposed cartridge resembles but does not exactly match the original.
Do this next
Do not order or install the part. Locate the exact model and manufacturer's diagram or use qualified service to identify the cartridge and seals.
Why this path and its safety boundary
Why it matters: Compatibility and installation risk are high because American Standard uses different cartridge families across single-control and two-handle faucets.
-
PATH 05Next step
What you see
The spout continues dripping after a correctly matched, model-approved cartridge or seal service, or the leak returns quickly with water damage.
Do this next
Keep the affected supply isolated when safe and arrange qualified plumbing diagnosis. Do not keep tightening, grinding, lubricating, or repeatedly replacing cartridges without a diagnosis.
Why this path and its safety boundary
Why it matters: The valve seat, body, retainer, installation, water pressure condition, or another component may be involved; the original part may not have been the cause.
Helpful context
Understand the symptom
Confirm that the drip is coming through the valve
A drop from the spout with the handle off is different from water around the handle, a leak at a supply connection, or water under the sink. A cartridge can control the spout, but it cannot explain every leak that appears near a faucet. Dry the area, watch the first wet point, and note whether the drip is continuous or appears only after the faucet is used.
A dirty aerator can mimic a valve problem
American Standard's faucet guidance recommends rinsing a dirty aerator when flow is distorted and operating the handles several times from OFF to ON without forcing them when a spout drips. These are limited, low-risk checks for an accessible faucet. They do not prove that the cartridge is healthy or authorize disassembly of the valve body.
Cartridge fit is model-specific
American Standard sells different cartridge families for single-control and two-handle faucets, and its product pages describe different constructions and applications. The brand name alone is not enough to choose a replacement. Use the faucet's exact model, handle arrangement, and manufacturer's parts information, or have a plumber identify the cartridge after the water is isolated.
Isolate water before any approved repair
If the exact model instructions support cartridge service, turn off the applicable hot and cold supplies first and relieve pressure only as the instructions direct. Do not pull a stuck handle, pry trim, or loosen a cartridge retainer while the valve is pressurized. A shutoff that will not close, a corroded valve, or water under the cabinet is a reason to stop and call a qualified plumber.
Safety boundary
Stop conditions
- Stop and isolate water for a rapid leak, a shutoff that will not close, water under the cabinet, flooding, or water near an electrical outlet or appliance.
- Do not remove a handle, retainer, cartridge, supply fitting, or hose while the faucet is pressurized, and do not force seized hardware or a stiff valve stem.
- Do not guess cartridge compatibility from brand, color, dimensions, photograph, or appearance; use the exact American Standard model and manufacturer's fit information.
- Do not drill, pry, scratch, grind, lubricate, or use harsh chemicals on the aerator, cartridge, faucet finish, or valve body as a drip test.
- Arrange qualified plumbing service for a drip that persists after accessible checks, a leak at the body or under-sink plumbing, a failed supply stop, hidden water damage, or any repair requiring disassembly beyond the exact model instructions.
Only after diagnosis
Potential parts
- American Standard faucet cartridge
Consider this category only when the drip is confirmed at the spout with the handle fully OFF and exact-model diagnosis identifies a worn, damaged, or contaminated cartridge.
Confirm the exact American Standard faucet model, handle configuration, cartridge family, and manufacturer's fit information; do not substitute a similar-looking cartridge. - American Standard faucet cartridge seal or O-ring kit
Consider this category only when qualified inspection finds a seal or O-ring leak at the cartridge or stem and the exact model procedure supports replacement.
Confirm the exact model, seal location, material, and manufacturer's fit information; do not add lubricant or stretch a seal as a trial. - American Standard faucet handle or retainer component
Consider this category only when the handle cannot reach OFF, is loose or damaged, or qualified diagnosis finds a retainer or handle alignment issue that leaves the cartridge partly open.
Confirm the exact faucet model and handle arrangement; do not force or remove seized hardware under pressure.
When checks do not resolve it
Need a professional?
Arrange qualified plumbing service when an American Standard faucet continues dripping from the spout after the handle and accessible aerator checks, when the exact cartridge or model procedure is uncertain, when a supply stop will not isolate water, or when the leak is at the faucet body, hose, supply connection, cabinet, wall, or floor. Use urgent help for rapid flow, flooding, or water near electrical equipment.
Safety scope: This article supports identifying the first wet point, normal handle and aerator checks, model identification, and water isolation before any model-approved cartridge work. Do not work on pressurized connections, seized trim, hidden plumbing, supply valves, or wet electrical surroundings.
Common questions
FAQ
Does a dripping American Standard faucet always need a new cartridge?
No. A dirty aerator, handle that is not reaching OFF, a loose retainer, a body seal, or a supply connection can create or mimic a cartridge drip. Confirm that water exits the spout with the handle fully OFF, rinse an accessible aerator as instructed, and use the exact model information before considering a cartridge.
What can I safely try for an American Standard faucet dripping from the spout?
Dry the faucet and confirm the first wet point. Return the handle gently to its normal OFF position, and if flow is distorted, rinse the accessible aerator as American Standard's instructions allow. If the spout still drips, stop forcing the control and arrange exact-model cartridge diagnosis or plumbing service.
How do I know which American Standard cartridge I need?
Use the exact faucet model, handle configuration, and manufacturer's parts diagram. American Standard lists different cartridge families for single-control and two-handle faucets, so brand, color, or visual similarity is not enough. If the model cannot be identified, have a plumber identify the part before disassembly.
Should I shut off water before replacing an American Standard faucet cartridge?
Yes, but follow the exact model instructions and confirm the hot and cold supplies have isolated water before opening any approved cartridge access. Do not loosen a retainer or supply connection under pressure, and stop if a shutoff will not close or the hardware is seized.
When is a faucet drip an urgent plumbing problem?
Treat rapid flow, a failed shutoff, water under the cabinet or in a wall or floor, flooding, or water near an electrical outlet as urgent. Isolate the affected supply only if the shutoff operates safely, protect the area, and arrange qualified plumbing help.
Read the exact guide
Official sources
- Culinaire Bottom Mount Kitchen Faucets Installation InstructionsAmerican Standard · American Standard Culinaire faucet instructions; exact supply, cartridge, and handle details vary by model.
- Single Control Faucet Replacement Valve CartridgeAmerican Standard · The named single-control cartridge product page; exact faucet families and fit must be confirmed before use.
- How to Replace the Spout Seal Kit for Your Reliant FaucetAmerican Standard · American Standard Reliant faucet service article; use the limited drip-check principles and defer to the exact faucet manual for other models.
- Faucet Replacement Valve Cartridge for 2-Handle FaucetsAmerican Standard · The named replacement cartridge and compatible American Standard two-handle faucet families; not a universal cartridge or installation guide.
Community feedback
Share a repair observation
Share a plain-text repair observation. Accepted observations are published automatically; this page may take a moment to update.