
On this page
Start here
Quick answer
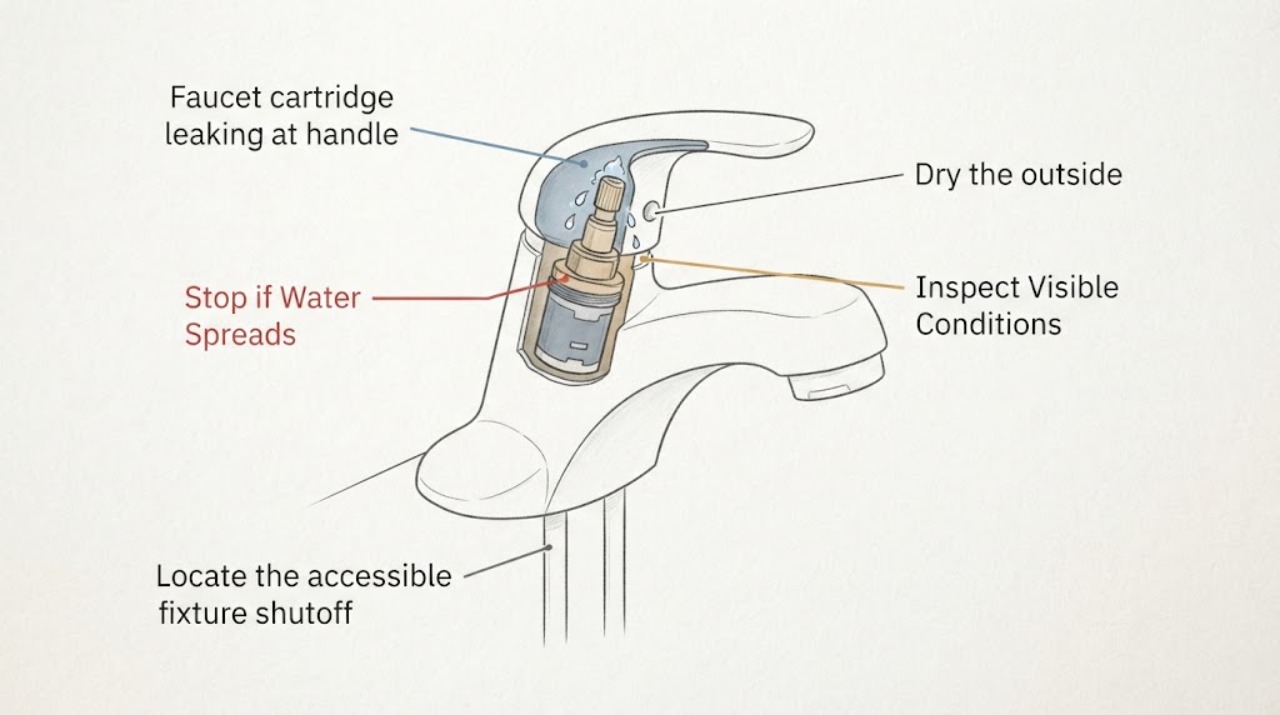
First identify whether water is truly coming from beneath the handle, the faucet base, the spout, or a supply connection, and whether it happens only while the faucet runs or continues when it is off. A handle-area leak is commonly associated with the valve or cartridge, but the exact cartridge and seals depend on the faucet model. Before any disassembly, close the fixture water supply gently and confirm that flow has stopped; if the shutoff will not close, the fitting is corroded, or water sprays or spreads, stop and call a plumber. Do not force the handle or order a cartridge until the faucet identity and leak location are documented.
Work through in order
Diagnostic checks
Use only checks that match the exact appliance or system and its official guide.
-
Check 1
Dry the outside of the faucet and place a clean dry towel or tissue around the handle base, faucet base, and spout without removing trim; use the normal handle briefly only if it moves freely and there is no spray.
Expected result: Record whether moisture first appears beneath the handle, at the base, from the spout, at a supply connection, or not at all, and whether it occurs only while water is running or continues when the handle is off.
Next step: Photograph the first wet location and the on/off timing; do not assume a cartridge is the cause until the path is separated from splash and nearby connections.
Stop if: Stop immediately for a spray, rapidly spreading water, an unstable handle, a hot-water burn risk, or water approaching electrical equipment.
Why this matters
Why: Moisture that starts beneath the handle while the faucet is on or off is consistent with a valve or cartridge seal concern, while a base, spout, or supply leak points to a different part of the faucet or plumbing.
-
Check 2
Observe the handle and its surrounding trim from a normal standing position while making only a normal, gentle on/off movement; do not force, loosen, pry, or remove the handle.
Expected result: Record smooth movement, binding, excessive looseness, a handle that will not shut the water off, or water that appears as the handle moves; note whether the leak is continuous at rest.
Next step: Leave the handle in a safe position, document the behavior, and use the fixture shutoff only as described in the next check before any disassembly.
Stop if: Stop operating the faucet if the handle cracks, spins freely, will not close the water, or causes a sudden increase in leakage.
Why this matters
Why: A handle that binds, feels loose, or cannot control flow may reflect cartridge, stem, handle, or mounting problems, and a continuous leak raises the priority of shutting off the fixture and arranging service.
-
Check 3
Locate the accessible fixture shutoff valves under or beside the sink or at the fixture supply, and inspect their visible condition without forcing or disassembling them; if disassembly is planned, close the fixture water gently and confirm that the faucet no longer flows.
Expected result: Record whether the shutoffs are identifiable, dry and operable, stuck or corroded, and whether water actually stops after closure; if a shutoff cannot stop flow, leave the assembly intact.
Next step: Proceed only with a qualified repair plan after flow is confirmed off; if the shutoff fails, close the main supply only when its location and operation are already known and safe, then call a plumber.
Stop if: Stop for a shutoff that will not turn normally, a leak at the valve or supply, damaged tubing, spray, flooding, or any need to use force.
Why this matters
Why: Confirmed shutoff is a prerequisite for safe cartridge or seal work. A stuck, leaking, corroded, or ineffective shutoff means the faucet cannot be safely opened by the user.
-
Check 4
Read the faucet brand, model, finish, and handle configuration from a visible label, existing document, or safe photograph without removing the handle, escutcheon, cartridge, or supply lines.
Expected result: Record a confirmed model, a partial identity, or no identifiable information; note whether the faucet has one handle or two and whether it is a bathroom, kitchen, or other fixture.
Next step: Give the identity record and leak photos to the manufacturer or plumber and obtain model-specific part confirmation before ordering anything.
Stop if: Do not remove trim or handles merely to expose a part number; stop if identification would require water, glass, electrical, or concealed plumbing work.
Why this matters
Why: Cartridge, stem-valve, and seal designs are not universal. Kohler and Moen both direct model-based identification for replacement parts, so a generic cartridge may not fit or seal.
-
Check 5
After the fixture is dry and the water is off, look at the visible handle base, faucet body, and supply area for mineral deposits, corrosion, staining, cracks, or movement without touching a pressurized connection.
Expected result: Record clean and dry surfaces, white or green deposits, rust, cracked finish, wetness returning with the supply closed, or water that has tracked from another location.
Next step: Keep the supply off if leakage continues, preserve the observations, and ask a plumber to assess the cartridge, seals, valve body, connections, and any water damage.
Stop if: Stop for corrosion that crumbles, a cracked body or supply, concealed leakage, contaminated standing water, or water near electrical equipment.
Why this matters
Why: Deposits or corrosion can prevent a seal or shutoff from being reliable, and wetness with the fixture off can indicate a connection or body leak rather than an isolated cartridge seal.
Use your observations
Decision map
Find the observation that best matches what you see, then follow the next safe action.
-
PATH 01Next step
What you see
Water clearly begins beneath the handle and continues while the faucet is on or off, with a confirmed model and a working fixture shutoff.
Do this next
Treat the valve or cartridge as a leading possibility and arrange model-specific repair or replacement. Do not order a generic part or open the faucet until the water is confirmed off.
-
PATH 02Next step
What you see
Water begins at the base, spout, supply connection, or nearby splash rather than beneath the handle.
Do this next
Do not assume the cartridge is responsible. Keep the fixture dry, document the source and timing, and request the appropriate faucet or plumbing assessment.
-
PATH 03Next step
What you see
The leak appears only while the faucet is running and stops when it is off.
Do this next
Record the exact path and whether handle movement changes it; a body, spout, connection, or cartridge seal may be involved. Have the model and observations reviewed before selecting a part.
-
PATH 04Next step
What you see
The fixture shutoff is stuck, corroded, leaking, or does not stop flow.
Do this next
Do not force it or disassemble the faucet. Leave the assembly intact, use a known-safe main shutoff only if you already know how to operate it, and call a plumber.
-
PATH 05Next step
What you see
Water sprays, the leak is rapidly spreading, the faucet body or supply is cracked, or water is near electrical equipment.
Do this next
Stop using the fixture, keep people away from the water, isolate water or power only when it is safe and already accessible, and seek urgent professional help.
Helpful context
Understand the symptom
The leak location changes the diagnosis
Kohler describes a continuous leak under the handle, whether the faucet is on or off, as a valve or cartridge issue and notes that the replacement part varies with the faucet model. Moen likewise explains that water around a handle is usually associated with the cartridge. Those are useful clues, not a universal diagnosis: water can track from the base, spout, supply connection, or nearby splash and appear at the handle.
Prepare before opening anything
Keep the checks external and brief. Have a towel ready, identify the fixture shutoffs, and record the faucet brand or model from an existing label, manual, receipt, or safe photograph. If a repair will require opening the handle area, the fixture water must be off and the result confirmed first. A shutoff that is stuck, damaged, or unable to stop flow is a reason to use a plumber rather than apply more force.
Only after diagnosis
Potential parts
- faucet cartridge
Consider this only when the leak is confirmed beneath the handle, the faucet model is identified, and a professional or model-specific source confirms the cartridge is the relevant valve component.
Confirm the exact faucet model, handle configuration, cartridge design, dimensions, and manufacturer fit information before ordering. - faucet stem valve
Consider this only for a compatible multi-handle or stem-style faucet after the leak location and valve type are confirmed; it is not interchangeable with every cartridge faucet.
Match the faucet model and stem profile through reliable manufacturer or professional identification; do not infer fit from appearance alone. - faucet o-ring kit
Consider seals only if inspection confirms a replaceable seal is the failed component and the faucet's model-specific service information supports that option.
Seal material, size, location, and lubrication requirements vary; confirm compatibility with the faucet and water service before use.
When checks do not resolve it
Need a professional?
Call a plumber when the fixture shutoff will not close or leaks, the faucet body or supply is corroded or cracked, the leak sprays or spreads, the source is unclear, or cartridge access requires disassembly. Request prompt service for continuing leakage and urgent help for flooding or water near electrical equipment.
Have this ready
- Provide the faucet brand and model if known, one- or two-handle configuration, exact first-wet location, whether the leak occurs on or off, shutoff behavior, photos, corrosion or mineral deposits, and any water-damage observations.
Common questions
FAQ
Does water under the handle always mean the cartridge is bad?
No. It is a useful cartridge or valve clue, but water can track from the base, spout, supply connection, or splash. Dry the exterior, observe where moisture first appears, and record whether it occurs on or off.
What must I do before opening the handle area?
Close the fixture water supply gently and confirm that the faucet no longer flows. If the shutoff is stuck, corroded, leaking, or ineffective, do not force it; call a plumber.
How do I choose the correct replacement cartridge?
Identify the faucet brand and model from safe records or visible labels and confirm the part through model-specific documentation or a plumber. Cartridges and seals are not universal.
When should I stop using the faucet?
Stop for a spray, rapidly spreading leak, cracked or corroded fittings, a shutoff that cannot stop flow, flooding, or water near electrical equipment. Isolate water only when safe and seek professional help.
Read the exact guide
Official sources
- Leaking Under the Handle | Bathroom FaucetsKohler · Kohler bathroom faucet troubleshooting context; other faucet designs and models may differ.
- Bathroom Faucet: Leaking Around the Handle of the FaucetMoen · Moen faucet guidance used for general symptom context; exact repair and fit depend on the installed model.
Community feedback
Share a repair observation
Share a plain-text repair observation. Accepted observations are published automatically; this page may take a moment to update.