
On this page
Start here
Quick answer
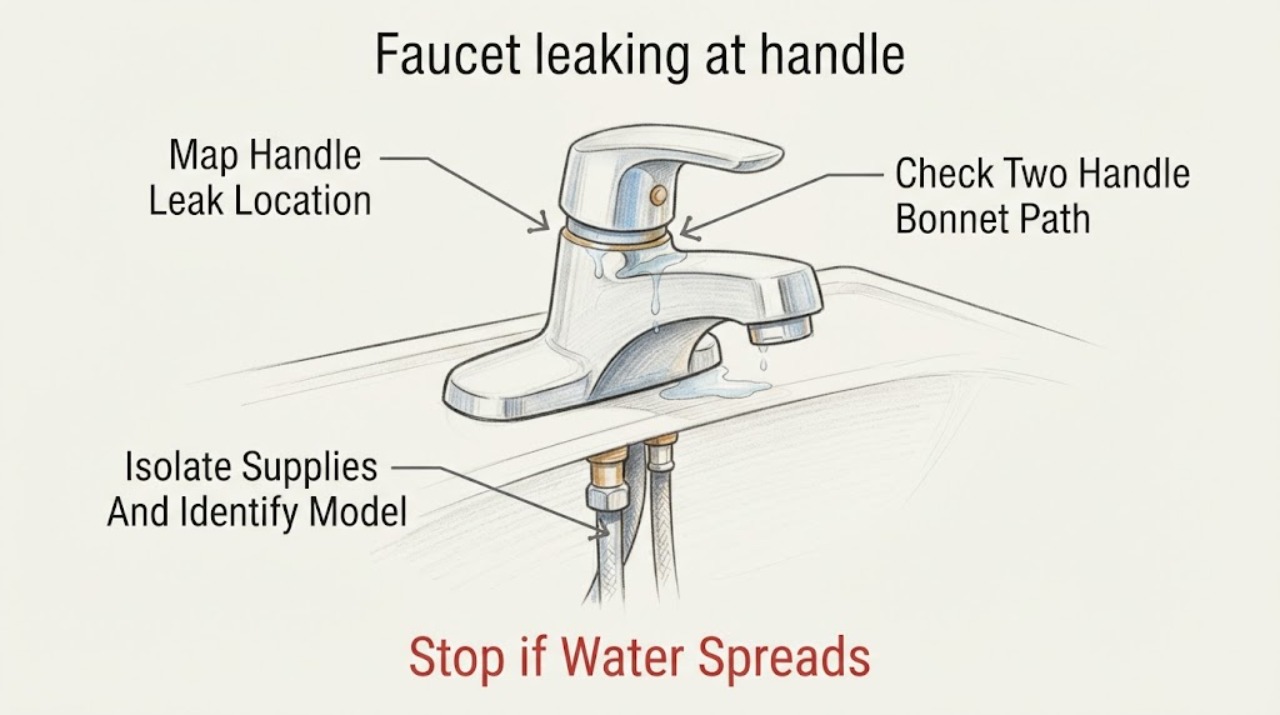
First confirm that the water is actually coming from the handle area, not the spout tip, spout base, supply connection, or below the counter. A Delta two-handle faucet that leaks under one handle can need a bonnet or stem-related check, while a single-control faucet may need a model-specific cartridge or seal diagnosis; a leak that appears only while water is running points to a different path than a leak that continues with the handle off. Dry the faucet, close the local hot and cold supplies before inspecting any part, and identify the exact model. Do not loosen a pressurized fitting, force a seized cap or supply stop, or continue using the faucet if it sprays, reaches a cabinet or wall, cannot be isolated, or is near energized electrical equipment.
Before you begin
Safety first
- This article covers drying and locating the leak, closing working local supplies, identifying the exact Delta model, and observing from a safe position. Do not work on pressurized fittings, force seized parts, disassemble a faucet body without the exact model path, or work near energized electrical equipment and water.
Work through in order
Diagnostic checks
Use only checks that match the exact appliance or system and its official guide.
-
Check 1
Dry the Delta faucet and counter, operate the handle once, then observe the first point that becomes wet: under the handle, at the spout tip, around the spout base, at a supply connection, or below the counter; note whether it happens only while water flows or continues after shutoff.
Expected result: Record the exact wet point, handle position, and timing. A handle-area wet point should be distinguished from water that runs down from the spout or arrives from below the counter.
Next step: Use the matching branch below, identify whether the faucet has one or two handles, and identify the exact model before selecting a part; isolate the supplies and arrange service if water reaches a cabinet, wall, or electrical equipment.
Stop if: Do not remove a handle, bonnet, cartridge, stem, hose, or fitting while the faucet remains pressurized.
Why this matters
Why: Leak location and timing select different Delta troubleshooting paths. A spout or aerator drip is not evidence by itself that the handle valve is leaking, and a leak that continues while off is different from one that appears only during flow.
-
Check 2
Close the local hot and cold supply stops serving the faucet, confirm that the faucet no longer has supply flow, and record the complete Delta model marking from the faucet, installation material, product record, or parts information.
Expected result: Note whether each supply stop closes fully, whether pressure or seepage remains, and whether the model marking is complete and readable.
Next step: Keep the supplies closed and arrange plumbing service if a stop will not close or the model cannot be identified; otherwise use the exact model's Delta instructions for the appropriate next check.
Stop if: Do not force a seized supply stop, loosen a pressurized connection, or rely on a generic cartridge or stem procedure.
Why this matters
Why: A supply stop that will not isolate the faucet makes internal inspection unsafe. An incomplete model identity prevents reliable distinction among Delta bonnet, stem, cartridge, seat, spring, and seal arrangements.
-
Check 3
If the Delta faucet has two handles and the confirmed leak is under one handle, use the exact model instructions to check whether the handle-area bonnet is visibly loose only after the supplies are closed; note which hot or cold side is implicated.
Expected result: Record whether the wetness is centered under one handle, whether the bonnet appears loose, and whether the leak returns from that side when the faucet is briefly observed after safe isolation is restored.
Next step: Follow the exact Delta model path or have a plumber confirm the stem, bonnet, seat, spring, or seal diagnosis before ordering a part; stop if the cap, cam, or bonnet turns unexpectedly or resists removal.
Stop if: Do not force a bonnet or cap, continue if an internal cam turns with the part, or disassemble a two-handle valve while water pressure remains.
Why this matters
Why: Delta's two-handle guidance treats a leak under a handle as a possible bonnet or stem-assembly issue, but the affected side and faucet model matter. A loose-looking handle does not prove that tightening or a stem replacement is the correct repair.
-
Check 4
If the Delta faucet has one control and the confirmed leak is at the handle, compare the symptom with the exact model's Delta cartridge, valve, bonnet, and seal instructions while the supplies remain closed; do not disassemble the cartridge based only on its appearance.
Expected result: Record whether water appears only while the handle is moved or running, whether it continues with the handle off, and whether the model documentation identifies a cartridge or seal service path.
Next step: Use the exact Delta model procedure or arrange faucet service for cartridge or seal diagnosis; do not force the retaining cap or continue disassembly if the correct model path is unclear.
Stop if: Do not work on a pressurized faucet, force a seized retaining part, or substitute a generic cartridge because it looks similar.
Why this matters
Why: A single-control handle leak can involve a model-specific cartridge, valve, bonnet, or seal path, and the same visible handle can conceal different internal designs. Persistent leakage while off should not be treated as a simple external handle adjustment without model confirmation.
-
Check 5
With the supplies closed, dry and inspect the spout tip, spout base, escutcheon, accessible supply connections, mounting area, cabinet floor, and underside of the counter to see whether water is traveling from a different point than the handle.
Expected result: Record whether the first wet point is the spout tip, a spout base, a supply or mounting connection, or a concealed area rather than the handle joint.
Next step: Keep the local supplies closed for any active or concealed leak and arrange plumbing service; if the spout tip is the only wet point, follow the Delta aerator or spout-specific diagnosis instead of the handle branch.
Stop if: Do not loosen supply nuts, remove the faucet from the counter, probe a weep opening, or work where water can contact energized electrical equipment.
Why this matters
Why: Delta provides separate paths for spout or aerator dripping and for under-handle leakage. A supply, mounting, body, or concealed leak will not be corrected by replacing a handle cartridge or stem alone.
-
Check 6
After an exact model-specific Delta seal, bonnet, stem, cartridge, or valve procedure has been completed—or after a technician's repair—open the supplies slowly and observe the handle area, spout, base, supply connections, and cabinet through a full on/off cycle.
Expected result: Check whether the original handle leak is gone, whether any second leak path appears, and whether water remains under the counter after shutoff.
Next step: Close the supplies again for any continuing leak and give the plumber or Delta technician the model, leak location, affected side, part category, and verification result rather than trying unrelated replacement parts.
Stop if: Stop immediately for spray, flooding, a supply stop that will not close, or water near energized electrical equipment.
Why this matters
Why: A dry handle and surrounding area after shutoff supports that the identified path was corrected. A returning leak, new wet location, or moisture below the counter means the diagnosis, part fit, seal, or another plumbing path remains unresolved.
Use your observations
Decision map
Find the observation that best matches what you see, then follow the next safe action.
-
PATH 01Safety boundary
What you see
Water first appears under the Delta handle only while the faucet is running, then stops when the handle is closed.
Do this next
Keep the supplies closed, identify the model, and follow the appropriate single-control or two-handle Delta instructions for the handle-area component.
Why this path and its safety boundary
Why it matters: This pattern is more consistent with a handle-area seal, O-ring, bonnet, or model-specific valve path than with a spout-tip aerator drip, but the exact faucet design still controls the diagnosis.
Safety stop: Arrange service if the leak sprays, reaches the cabinet, persists while off, or the retaining part is seized or turns unexpectedly.
-
PATH 02Safety boundary
What you see
Water continues from the handle area after the faucet is off, or the area becomes wet without a new flow cycle.
Do this next
Close both local supplies, identify the exact model, and have the cartridge or stem path confirmed before ordering a replacement.
Why this path and its safety boundary
Why it matters: A valve, cartridge, stem, bonnet seal, or another internal path may be allowing water through; this is not a confirmed loose-handle problem.
Safety stop: Do not leave the faucet pressurized while it leaks or force a cap, cam, cartridge, or stem assembly.
-
PATH 03Safety boundary
What you see
A two-handle Delta faucet leaks under only the hot or cold handle, while the other handle area stays dry.
Do this next
Record the affected side and use the exact model's Delta parts and service instructions; a plumber should confirm the component if the bonnet or stem cannot be checked safely.
Why this path and its safety boundary
Why it matters: The affected valve's bonnet, stem assembly, seat, spring, or seal is a more relevant diagnostic path than replacing both sides automatically.
Safety stop: Stop if the cam turns while loosening, pressure remains, or the leak changes into a spray or below-counter leak.
-
PATH 04Safety boundary
What you see
The first wet point is the spout tip, spout base, supply connection, mounting area, cabinet, or wall rather than the handle joint.
Do this next
Keep the supplies closed for an active or concealed leak; follow the matching Delta spout or aerator diagnosis only when the water is limited to that accessible path, otherwise arrange plumbing service.
Why this path and its safety boundary
Why it matters: The handle is probably not the primary leak path. Delta's spout, aerator, supply, or other faucet guidance applies instead, and a handle cartridge or stem may not address it.
Safety stop: Do not loosen supply connections, remove the faucet, or work near energized electrical equipment or water inside a wall.
-
PATH 05Safety boundary
What you see
The leak returns after the exact model-specific seal, bonnet, stem, cartridge, or valve check, or a second leak location appears.
Do this next
Close the supplies, stop further disassembly, and provide the model, affected side, leak timing, and repair history to a qualified plumber or Delta service technician.
Why this path and its safety boundary
Why it matters: The initial path may have been incomplete, the part may not match or be seated correctly, or the faucet body, supply, or household plumbing may also be involved.
Safety stop: Do not stack replacement parts, use sealant to mask an internal leak, or leave an active leak unattended.
Helpful context
Understand the symptom
Confirm the leak is really at the handle
Water can travel along a faucet body or handle and make the wrong part look guilty. Dry the faucet and watch the first point that becomes wet during a brief, controlled use and after shutoff: under the handle, at the spout tip, around the spout base, or below the counter. Delta's separate guidance for spout and aerator leaks is why a cartridge or stem should not be chosen from the symptom word alone.
Delta designs do not share one universal handle repair
A Delta single-control faucet and a Delta two-handle faucet can use different valve, stem, bonnet, cartridge, seat, spring, or seal arrangements. The exact model and whether the leak occurs only while flowing or also while off determine which part family is plausible. Treat a similarly shaped replacement as unconfirmed until the model-specific Delta instructions or parts information matches it.
Protect the cabinet while you diagnose
A handle leak can wet the escutcheon, counter, cabinet floor, or wall opening. Keep a towel or container in place after the local supplies are closed, and leave those supplies closed if the leak continues. A leak that sprays, enters a concealed space, cannot be isolated, or is near energized electrical equipment needs prompt plumbing service.
Safety boundary
Stop conditions
- Close the faucet's local hot and cold supplies and arrange prompt plumbing service for spray, flooding, a leak into a cabinet or wall, water near energized electrical equipment, or a supply stop that will not isolate.
- Do not loosen a handle, bonnet, cartridge, stem, hose, nut, or body fitting while the faucet is pressurized; do not force seized parts or a supply stop.
- Do not choose a Delta cartridge, stem, seat, spring, bonnet seal, or O-ring by appearance alone. Identify the exact faucet model and use its model-specific instructions or parts information.
- If a cap or cam turns unexpectedly, pressure remains, or the leak persists after the model-specific check, stop disassembly and arrange qualified plumbing or faucet service.
Only after diagnosis
Potential parts
- Delta faucet cartridge or valve
Consider this class only when a single-control or continuous handle-area leak matches the exact Delta model's cartridge or valve diagnosis.
Match the exact Delta model and handle/faucet family using the model-specific parts information; Delta cartridges and valves are not universal. - Delta faucet stem assembly or seats and springs
Consider this class only when a two-handle faucet's affected hot or cold side and model-specific diagnosis point to its stem, seat, or spring path.
Confirm the exact Delta faucet model, side, and valve design before ordering; do not replace both sides by assumption. - Delta faucet bonnet seal or O-ring
Consider this class only when the confirmed handle-area leak and exact model instructions identify a seal or O-ring as the failed path.
Use the exact Delta model's service-part information and seal specification; a generic-looking O-ring is not confirmed compatible. - Delta faucet retaining bonnet or cap
Consider this class only when the exact model's retaining part is damaged and the handle-area diagnosis confirms it is the source or necessary repair component.
Confirm the exact model, finish, and internal valve arrangement before ordering; do not force a seized or turning cap.
When checks do not resolve it
Need a professional?
Arrange plumbing or faucet service when a local supply stop will not close, water enters a cabinet or wall, the faucet sprays or floods, the model cannot be identified, a retaining part is seized or turns unexpectedly, or the leak continues after the exact Delta model's handle-area check. A persistent leak may require diagnosis of a seal, bonnet, stem, cartridge, valve, faucet body, supply connection, or household plumbing path.
Safety scope: This article covers drying and locating the leak, closing working local supplies, identifying the exact Delta model, and observing from a safe position. Do not work on pressurized fittings, force seized parts, disassemble a faucet body without the exact model path, or work near energized electrical equipment and water.
Common questions
FAQ
Why is my Delta faucet leaking under the handle only when the water is running?
That timing makes a handle-area seal, O-ring, bonnet, or model-specific valve path more plausible than an end-of-spout aerator drip, but it does not identify the failed part. Dry the faucet, close the local supplies, identify the model, and follow the matching single-control or two-handle Delta path.
What if the Delta handle area stays wet after the faucet is off?
A leak that continues while off may involve a cartridge, valve, stem, bonnet seal, or another internal path. Close the local hot and cold supplies and have the exact model diagnosis confirm the component before ordering a replacement.
Does a Delta faucet leaking at the handle always need a cartridge?
No. Delta uses different single-control and two-handle designs, and the visible handle can leak because of a bonnet, stem assembly, seat, spring, seal, O-ring, cartridge, valve, or a leak traveling from another location. Identify the first wet point and exact model before choosing a part.
When should I stop checking a Delta faucet leak and call a plumber?
Stop and close the local supplies if a stop will not isolate, a retaining part is seized or turns unexpectedly, the faucet sprays or floods, water enters a cabinet or wall, the leak is near energized electrical equipment, the model is unclear, or the leak persists after the model-specific check.
Read the exact guide
Official sources
- What do I do about water dripping from the spout of my two-handle lavatory faucet?Delta Faucet · Delta two-handle lavatory faucets with a drip from the spout; it is a separate path from a confirmed under-handle leak.
- Leaks - Service & Parts FAQDelta Faucet · Delta faucets; the exact faucet model and handle configuration control the applicable repair instructions.
- SINGLE HANDLE KITCHEN FAUCETDelta Faucet Company · The single-handle kitchen faucet installation and maintenance manual represented by this Delta document; apply only when the faucet design matches the manual.
- What do I do if my two-handle faucet leaks under the handle?Delta Faucet · Delta two-handle faucets; exact model instructions and the affected valve side control the repair.
- What do I do if my lavatory faucet drips from the aerator?Delta Faucet · Delta lavatory faucets where the first wet point is the aerator or spout tip; it does not establish a handle-area leak.
Community feedback
Share a repair observation
Share a plain-text repair observation. Accepted observations are published automatically; this page may take a moment to update.