
On this page
Start here
Quick answer
A faucet can leak around or under its handle while the spout stays dry. First identify whether the water appears only while the faucet is running or continues after the handle is off, and whether it starts at the handle, spout-to-body joint, or underneath the counter. Dry the area and observe without removing the handle; a leak that changes with the handle often points to a cartridge, valve, seal, or O-ring, but the exact part depends on the faucet model. Check only accessible shutoff valves and supply connections for an active leak, without forcing or loosening anything. If water continues when the faucet is off, the leak is spreading, or the source is unclear, isolate the fixture only if the valve operates normally and arrange a plumber. Do not keep using a leaking faucet, guess at a cartridge, or open a pressurized connection.
Before you begin
Safety first
- User checks are limited to drying, observing leak timing, identifying the model, and visually checking accessible connections. A qualified plumber must handle faucet disassembly, cartridge or seal replacement, pressurized connections, seized shutoffs, concealed leaks, and any water-damage assessment.
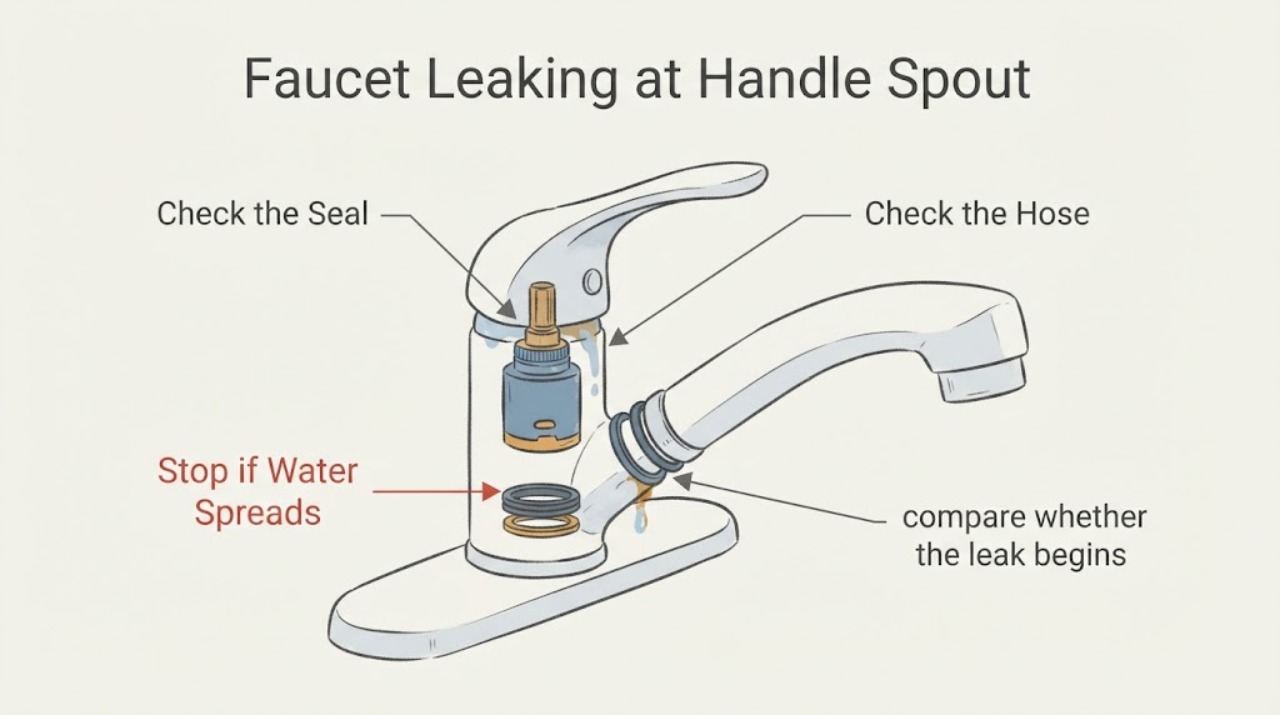
Work through in order
Diagnostic checks
Use only checks that match the exact appliance or system and its official guide.
-
Check 1
With the faucet initially off, dry the handle, faucet body, spout joint, countertop, and cabinet below; if there is no spray or immediate flooding, run the faucet briefly and turn it off, watching from a safe position for the first wet point.
Expected result: Water appears only while the faucet is on, continues after it is off, starts under the handle, begins at the spout-to-body joint, or appears only below the counter.
Next step: Record the timing and first wet point, then follow the matching branch. Stop using the faucet if the leak sprays, grows quickly, or reaches electrical equipment.
Stop if: Stop immediately for uncontrolled flow, a burst hose, water near electrical equipment, or any need to reach through a hot or pressurized spray.
Why this matters
Why: Leak timing and location separate an under-handle seal or cartridge path from a spout O-ring, valve, hose, or connection below the counter. Water may travel, so this is a narrowing clue rather than proof of a failed part.
-
Check 2
Look beneath the counter for the hot and cold shutoff valves, supply hoses, and faucet connections without touching a wet fitting; note a wet valve, kinked hose, loose-looking connection, corrosion, or dry connections. Do not use a wrench or loosen a connection.
Expected result: Water is coming from a supply hose, shutoff, or connection below the counter, or all visible connections are dry while the handle area leaks.
Next step: If a shutoff operates normally and there is active leakage, close it gently only if you can do so without reaching through water; otherwise keep clear and call a plumber. Do not tighten or disconnect a wet fitting as a test.
Stop if: Stop for a seized or corroded valve, spraying connection, damaged hose, water near an outlet or appliance, or uncertainty about which valve serves the faucet.
Why this matters
Why: A below-counter leak may be independent of the handle seal and can cause cabinet or floor damage. Dry connections make the faucet body, cartridge, O-rings, or concealed path more likely, but water can still be tracking from above.
-
Check 3
After the area is dry and only if the faucet remains controllable, compare whether the leak begins with the handle movement, occurs while water is flowing, or continues for a sustained period after the handle is fully off; do not repeatedly cycle a worsening leak.
Expected result: The leak is continuous only while on, continues while off, changes when the handle is moved, or is too active to observe safely.
Next step: Photograph the handle and body, note the timing, and arrange service for a continuing or recurring leak. Isolate the faucet from a normally operating shutoff if needed to prevent damage; do not keep testing it.
Stop if: Stop for a leak that continues with the faucet off, a handle that is loose or stuck, or water that reaches the cabinet base, wall, outlet, or appliance.
Why this matters
Why: A leak while on can involve seals or O-rings that are under flow pressure. A leak while off can involve a valve or cartridge that is not controlling water, or a related check-valve assembly. Handle movement may expose a seal problem but does not identify the model-specific part.
-
Check 4
Record the faucet brand and model if safely visible, whether it has one or two handles, and whether the spout is fixed, pull-out, or pull-down; photograph the leak location without removing the handle, cap, cartridge, or spout.
Expected result: The model and design are clear, only a partial marking is available, or the faucet type remains uncertain.
Next step: Give the model and photos to a plumber or use the exact manufacturer's support guide. If the model cannot be identified, treat the part choice as unresolved and arrange diagnosis.
Stop if: Stop if identifying the model would require removing a cover, handle, set screw, pressurized fitting, or decorative trim that may conceal the leak.
Why this matters
Why: Different faucet designs use different cartridges, O-rings, seals, and check-valve arrangements. An uncertain model makes a generic repair kit or cartridge selection unreliable.
-
Check 5
From above, observe the seam where the spout meets the faucet body and the area where the handle attaches while the faucet is on and off; keep the handle and spout stationary except for normal operation and do not twist or lift the spout to provoke a leak.
Expected result: Water starts at the spout seam, rises through the handle area, appears from a weep hole or body opening, or the body stays dry while water appears only below the counter.
Next step: Stop normal use and provide the exact location and timing to the plumber. Do not apply sealant to the seam or open the faucet body to confirm a component.
Stop if: Stop for an open body, sharp edge, uncontrolled stream, or any leak that cannot be contained at the normal shutoff.
Why this matters
Why: A spout-to-body leak can involve O-rings, while water through or under the handle can involve seals, a cartridge, or a spacer or check-valve assembly. A below-counter source points to connections or hoses instead.
-
Check 6
If the leak persists, arrange qualified plumbing service and provide the model, leak timing, first wet point, photos, and whether a normally operating shutoff was closed; do not disassemble the faucet or keep using it to see whether the spout eventually drips.
Expected result: The leak stops only when the fixture is isolated, returns when water is restored, continues while isolated, or the source remains uncertain.
Next step: Leave the fixture isolated if safe and dry to do so, protect the cabinet without touching wet electrical items, and let the plumber identify the cartridge, seal, O-ring, valve, hose, or concealed connection before parts are selected.
Stop if: Stop for flooding, water near electrical equipment, a failed shutoff, structural cabinet damage, or any need to remove a pressurized connection.
Why this matters
Why: A leak that responds to fixture isolation is within or immediately connected to the faucet supply path. Continued water after isolation may be residual water or a different plumbing leak and needs professional assessment.
Use your observations
Decision map
Find the observation that best matches what you see, then follow the next safe action.
-
PATH 01Next step
What you see
Water appears under the handle while the faucet is on, the spout is dry, and the leak stops when the handle is off.
Do this next
Stop using the faucet, record the exact model and first wet point, and arrange a plumber for model-specific seal or cartridge diagnosis. Do not tighten or remove the handle as a blind fix.
Why this path and its safety boundary
Why it matters: An under-handle seal, O-ring, cartridge, or valve may be leaking under flow pressure; the dry spout makes a spout-outlet drip less likely but does not prove the part.
-
PATH 02Next step
What you see
Water continues from around the handle after the faucet is off, even though the spout remains dry.
Do this next
Close a normally operating fixture shutoff if necessary to prevent damage and request prompt plumbing service. Do not leave the faucet pressurized or open the valve body.
Why this path and its safety boundary
Why it matters: A valve or cartridge may not be controlling flow, or a related check-valve or spacer assembly may be worn; residual water alone cannot be distinguished safely by repeated testing.
-
PATH 03Next step
What you see
Water begins at the seam below the spout or between the spout and handle, while the handle area itself stays dry.
Do this next
Document the seam and model, then arrange model-specific service. Do not twist, pull, or seal the spout to test the joint.
Why this path and its safety boundary
Why it matters: A spout O-ring or cartridge-related seal may be involved, and the exact count and size of seals vary by model.
-
PATH 04Next step
What you see
The handle area appears wet, but the first wet point is a hose, shutoff, or connection below the counter.
Do this next
Isolate the fixture only with a normally operating shutoff if safe, keep the cabinet dry without touching wet electrical equipment, and call a plumber for the hose or connection.
Why this path and its safety boundary
Why it matters: A supply-side leak is more likely than a handle seal; water can travel upward or along the cabinet and mislead the visual diagnosis.
-
PATH 05Next step
What you see
The source cannot be located, the leak grows quickly, or water reaches an outlet, appliance, cabinet base, wall, or floor.
Do this next
Leave the area clear, close the fixture shutoff or main water supply only if it can be reached safely without contact with water or electricity, and obtain urgent plumbing or emergency help.
Why this path and its safety boundary
Why it matters: This is an active water-damage or electrical hazard rather than a routine faucet-part diagnosis.
Helpful context
Understand the symptom
A dry spout does not rule out a handle leak
Water can escape from the seal around the handle or from the faucet body while the outlet remains dry. The timing matters: a leak only while water is flowing points toward seals or O-rings under pressure, while a leak that continues with the handle off can indicate a cartridge, valve, or check-valve problem. These are diagnostic possibilities, not a part identification.
Locate the first wet point without disassembly
Dry the handle, faucet body, spout joint, and the cabinet below, then operate the faucet briefly only if there is no active spray or electrical hazard. Watch from a safe position for the first wet point. Water can run along the body or countertop, so the wettest spot is not always the entry point. Do not remove the handle or loosen a bonnet, hose, or cartridge as a first check.
Model identity controls any replacement
Cartridges, seals, O-rings, and check-valve assemblies are not universal. Record the brand, model marking, number of handles, pull-out or pull-down design, and where water first appears. A plumber or the exact manufacturer guide can then identify the correct repair path. Do not buy a replacement based only on color, shape, or a generic faucet description.
Safety boundary
Stop conditions
- Do not remove the handle, cartridge, spout, bonnet, hose, or valve body as a generic diagnostic test while the faucet is pressurized.
- Do not force or wrench a shutoff, tighten a wet fitting, apply caulk or sealant to the handle seam, or keep cycling a worsening leak.
- Stop for spraying water, a burst hose, a seized or corroded valve, water near electrical equipment, flooding, or a leak that continues after safe isolation.
- Do not assume a dry spout means the handle leak is harmless; keep the fixture isolated if safe and arrange service for persistent leakage.
- Do not choose a cartridge, O-ring, seal, or check-valve assembly by appearance alone; confirm the exact faucet model and diagnosis first.
Only after diagnosis
Potential parts
- faucet cartridge or valve
Consider only after the exact faucet model and leak timing support a cartridge or valve diagnosis, especially when water appears around the handle while on or continues while off.
Cartridges are model-specific and may not be interchangeable even within one brand; confirm the exact model and valve configuration before ordering. - spout or cartridge O-rings and seals
Consider only if inspection identifies the spout-to-body or handle seal as the first wet point and the manufacturer or plumber confirms the correct seal set.
O-ring number, size, material, and location vary by model; do not substitute a generic ring or petroleum lubricant without exact guidance. - spacer or check-valve assembly
Consider only when a model-specific diagnosis finds that this assembly contributes to a leak that continues with the faucet off.
The assembly is not present or interchangeable across all faucets; verify the model and manufacturer parts documentation before purchase.
When checks do not resolve it
Need a professional?
Arrange prompt plumbing service for a leak that continues while the faucet is off, recurs after drying, appears around the handle or spout joint, or cannot be traced to a safe visible connection. Seek urgent help for rapid flow, a failed shutoff, water near electrical equipment, flooding, cabinet or wall damage, or an uncontrolled leak.
Safety scope: User checks are limited to drying, observing leak timing, identifying the model, and visually checking accessible connections. A qualified plumber must handle faucet disassembly, cartridge or seal replacement, pressurized connections, seized shutoffs, concealed leaks, and any water-damage assessment.
Common questions
FAQ
Can a faucet leak under the handle while the spout stays dry?
Yes. Water can escape at an under-handle seal, cartridge, valve, or nearby O-ring without dripping from the outlet. Dry the area and observe the first wet point, then stop using the faucet and arrange service if it persists.
Why does the leak happen only when the faucet is on?
A seal or O-ring may leak only when water is flowing and pressure is present. That timing narrows the path but does not identify a universal part; model-specific service is needed if cleaning and safe observation do not resolve it.
What if water keeps leaking after I turn the handle off?
A valve or cartridge may not be controlling the water, or a related check-valve assembly may be involved. Isolate the fixture with a normally operating shutoff if safe and call a plumber rather than repeatedly cycling the handle.
Could the leak actually be from the spout joint?
Yes. A leak between the spout and handle can involve scratched or torn O-rings on the cartridge or spout. Locate the first wet point and identify the faucet model before choosing a seal or cartridge.
Should I tighten the handle or bonnet nut?
Do not tighten parts blindly. Over-tightening or opening the faucet can worsen seals or release pressurized water. Keep the fixture isolated if needed and have a plumber identify the model-specific repair.
When is a handle leak an emergency?
Obtain urgent help for rapid flow, flooding, a failed shutoff, water near electrical equipment, cabinet or wall damage, or a leak that cannot be safely isolated. Leave the area clear and do not dismantle the faucet.
Read the exact guide
Official sources
- Kitchen Faucet: Leaking Around The HandleMoen Solutions · Moen kitchen-faucet guidance; the exact faucet model and design control the cartridge and repair, and the article limits generic advice to diagnosis.
- Kitchen faucet leaks between the spout and the handleMoen Solutions · Moen kitchen-faucet guidance; non-pullout, pullout, and pulldown designs differ and exact model identification is required.
- Leaking Under the Handle | Kitchen Faucets | Kohler AssistKohler Assist · Kohler kitchen-faucet guidance used for leak-timing distinctions; the exact faucet model controls the available valve and seal assembly.
Community feedback
Share a repair observation
Share a plain-text repair observation. Accepted observations are published automatically; this page may take a moment to update.