
On this page
Start here
Quick answer
First find where the American Standard sink faucet is dripping: from the spout with the handles off, around a handle or valve stem, or below the sink at a supply connection. Turn off the hot and cold stop valves before opening a handle or valve area, dry the faucet, and observe whether the drip stops. A spout drip with the supply isolated usually points to a valve cartridge or stem seal that is not closing; a leak around the handle can point to a stem seal, O-ring, retainer, or loose handle assembly; a leak below the sink is a connection or supply-line problem. American Standard uses different valve and cartridge arrangements across faucet families, so use the full model number before selecting a part. Do not force a stuck stem or continue using a faucet that leaks into the cabinet or near electrical equipment.
Work through in order
Diagnostic checks
Use only checks that match the exact appliance or system and its official guide.
-
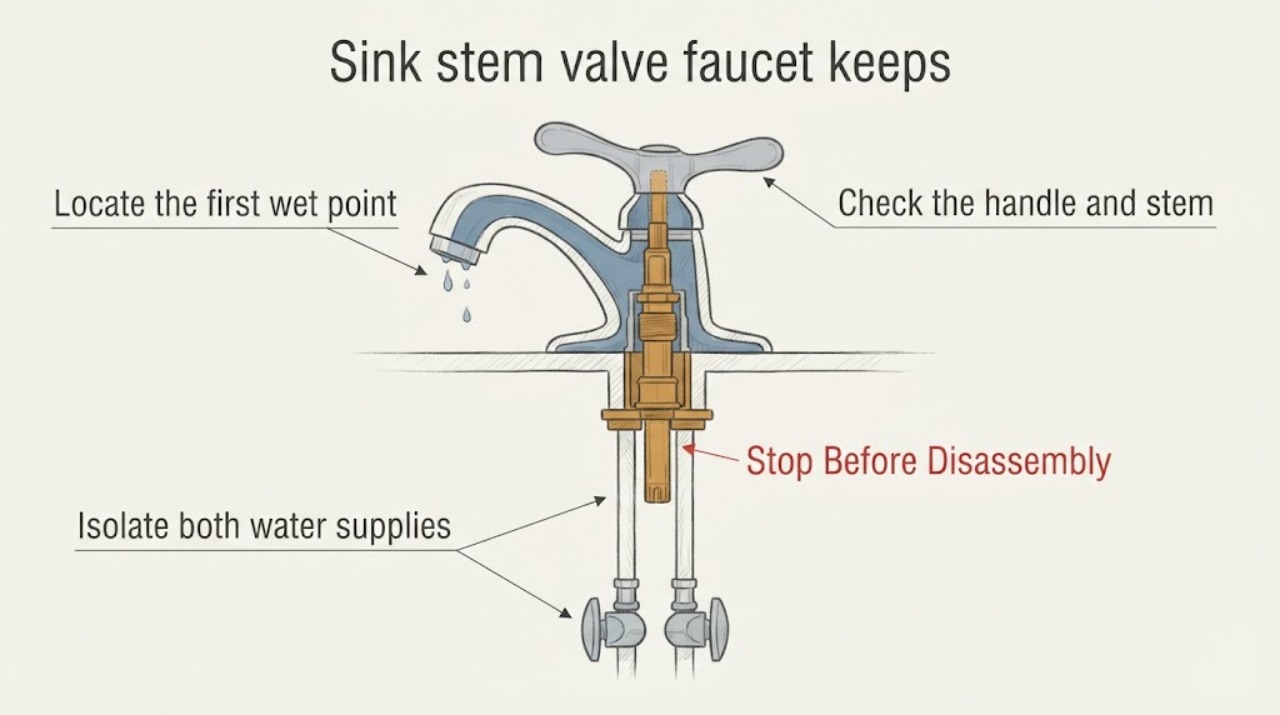
Locate the first wet point
Dry the spout, handle bases, valve-stem area, faucet body, supply tubes, and shutoff connections. Leave both handles in the off position and watch without operating the faucet; use a dry tissue or container to identify whether the next drop forms at the spout, around a handle, or underneath the sink.
Expected result: Water forms at the spout with handles off, around one handle or stem, around the faucet body, or at a supply tube or shutoff below the sink.
Next step: Record the wet location and whether the drip is hot-side, cold-side, or present with both handles off. Continue only with the matching low-risk check; arrange service for a leak inside the cabinet or near electrical equipment.
Stop if: Do not remove a handle or connection before identifying the leak location and isolating the water supply.
Why this matters
Why: A closed-spout drip favors a valve cartridge or stem that is not sealing. A handle-area leak favors a stem seal, O-ring, retainer, or handle assembly. A leak below the sink favors a supply or connection issue and may not be fixed by a stem part.
-
Isolate both water supplies
Place a towel under the sink and turn the hot and cold stop valves clockwise only until they are closed, without forcing a valve that is stuck. Open the faucet briefly to release trapped pressure, then leave the handles off and observe whether the dripping stops.
Expected result: The spout drip stops after both supplies are closed; water continues to flow; a stop valve seeps or will not turn; or the leak is still present below the sink.
Next step: If the supplies isolate the faucet, use the model-specific stem or cartridge path. If they do not, close the main supply only if safely accessible or call a plumber; do not proceed with the faucet disassembled under pressure.
Stop if: Do not force a corroded stop valve, open a pressurized faucet body, or leave a cabinet leak unattended.
Why this matters
Why: A drip that stops when the supplies are isolated is inside the faucet's pressurized valve path. Continued flow points to an incompletely closed supply, a failed stop valve, or another plumbing source; a below-sink leak needs connection diagnosis.
-
Check the handle and stem area without forcing it
With both supplies isolated, inspect the visible handle, index cap, handle screw, base, and stem area for looseness, mineral buildup, a split seal, or water emerging around the stem. Use the exact American Standard guide for any handle removal; do not pry a stuck handle or turn the stem beyond its normal stop.
Expected result: The handle is loose, water appears around the stem only when that handle is operated, the stem area is dry but the spout still drips, or the handle or retaining hardware is damaged.
Next step: Tighten only a clearly loose, model-permitted handle fastener. If the leak requires seal or valve access, follow the exact model guide or have a plumber service the stem assembly.
Stop if: Do not force the stem, drill the handle, apply heat, or remove retaining hardware that is seized or inaccessible.
Why this matters
Why: A handle-area leak can be external stem sealing or retaining hardware, while a dry handle area with a continuing spout drip keeps the valve cartridge or internal seat as the stronger suspect. A loose or damaged handle can prevent full valve closure but does not identify the internal part.
-
Use the model guide to identify the valve type
Find the complete American Standard model number on the faucet or its documentation and compare the parts diagram with the installed handle arrangement. Determine whether the faucet uses one control or two, which side is dripping, and whether the guide names a stem valve, cartridge, seal, or O-ring; do not assume a generic stem fits.
Expected result: The guide identifies a matching valve cartridge or stem assembly; the faucet has separate hot and cold valves; the model cannot be identified; or the installed faucet differs from the guide.
Next step: Use the model-specific diagram to select the diagnostic part category. If the model is missing or the faucet differs from the guide, take photos and call a plumber or manufacturer support rather than ordering by appearance.
Stop if: Do not substitute a cartridge, stem, seal, or handle assembly based only on thread size, appearance, or a generic search result.
Why this matters
Why: American Standard publishes different valve arrangements across faucet families. A two-handle cartridge may be reversible for hot or cold use in some models, but that does not establish compatibility with an unidentified faucet.
-
Clean only the accessible aerator or spout area
If the faucet is isolated and the wet point is the spout, remove and rinse the aerator only if the model instructions permit it. Inspect the spout outlet for mineral debris and, for a model with a documented spout-seal procedure, follow that guide without disturbing the valve body.
Expected result: The aerator is clogged but the spout stops dripping when the handles are off; the spout seal area is wet; or cleaning does not change a closed-spout drip.
Next step: Rinse and reseat the aerator if permitted. For a spout-seal leak, use the exact model guide; for a continuing closed-spout drip, proceed to model-specific valve service or call a plumber.
Stop if: Do not insert sharp tools into the valve, scrape sealing surfaces, or use harsh cleaners that can damage the finish or seals.
Why this matters
Why: Aerator debris can distort or reduce flow but usually does not create a persistent drip from a closed valve. A wet spout seal can be a separate seal issue, while an unchanged closed-spout drip keeps the stem or cartridge as the likely internal cause.
-
Reassemble and verify all leak points
After a model-approved seal or valve service, confirm the handle, retaining parts, spout, and aerator are seated. Open the hot and cold stops slowly while watching the faucet body, stem areas, supply connections, and spout; operate each handle through its normal range without forcing it.
Expected result: The faucet stays dry with handles off and during normal flow; the spout still drips; water appears at the stem, base, or supply connection; or the handle binds or will not shut off.
Next step: Close the stops again and call a plumber if any leak or binding remains. Do not increase force or keep using a faucet that sends water into the cabinet.
Stop if: Do not leave the faucet pressurized after a failed leak check or restore a connection that drips under pressure.
Why this matters
Why: A dry faucet after reassembly supports a corrected seal or valve path. A continuing drip means the valve part may be wrong, damaged, or incompletely seated; a new external leak can indicate a disturbed seal or connection.
-
Escalate a supply-side or unresolved leak
If the drip continues after the model-specific valve or stem check, if a stop valve will not isolate the faucet, or if water comes from below the sink, keep the faucet isolated. Record which side and location leak, the model number, recent work, and whether the faucet drips only when open or also when closed.
Expected result: The stem or cartridge has no confirmed match, a stop valve seeps, a supply tube or connection leaks, the faucet body is cracked, or a closed-spout drip remains after service.
Next step: Leave the affected supply closed and arrange qualified plumbing service. Have the technician verify the faucet model, valve assembly, seals, supply connections, and cabinet for water damage.
Stop if: Do not continue using the faucet, force a stem, leave a cabinet leak to run, or open concealed plumbing to find the source.
Why this matters
Why: These patterns can involve a wrong or damaged valve part, a failed stop or supply connection, a faucet-body defect, or a deeper plumbing issue rather than a simple handle adjustment.
Use your observations
Decision map
Find the observation that best matches what you see, then follow the next safe action.
-
PATH 01Next step
What you see
The spout forms drops with both handles off, the drip stops when the hot and cold supplies are isolated, and no water appears around the handle or below the sink.
Do this next
Use the exact American Standard model guide to identify the correct valve or cartridge category, then have the part serviced or replaced if the guide permits. Do not choose a generic stem by appearance.
Why this path and its safety boundary
Why it matters: The pressurized valve path is the strongest suspect: a stem valve, cartridge, internal seal, or seating surface may not be closing.
-
PATH 02Next step
What you see
The spout is dry when off, but water appears around one handle or the stem only while that handle is operated or pressurized.
Do this next
Keep the supply isolated, follow the exact model's handle and seal instructions, and call a plumber if the handle is stuck, the seal is inaccessible, or the leak reaches the cabinet.
Why this path and its safety boundary
Why it matters: An external stem seal, O-ring, retainer, or handle-area connection is more likely than a spout valve-seat leak.
-
PATH 03Next step
What you see
The outlet has distorted or reduced flow, visible aerator debris, or a documented spout-seal leak, but there is no continuing closed-spout drip after the supply is isolated and the valve is off.
Do this next
Clean or service only the accessible component named by the model guide, then verify the faucet remains dry with the handles off.
Why this path and its safety boundary
Why it matters: An aerator or spout seal issue may be separate from the stem valve. Cleaning the aerator can improve flow but is not a valve repair.
-
PATH 04Next step
What you see
Water appears at a supply tube, stop valve, faucet shank, or cabinet connection, or the leak continues after the faucet stops are closed.
Do this next
Close the affected stop or main supply if safely accessible, contain the water, and call a qualified plumber. Do not open the faucet body while the connection remains pressurized.
Why this path and its safety boundary
Why it matters: The leak is likely at a supply or plumbing connection rather than the stem valve. A cabinet leak can damage surrounding materials quickly.
-
PATH 05Safety boundary
What you see
A closed-spout drip remains after the model-specific valve check, the replacement part cannot be matched confidently, the handle binds, or a stop valve cannot isolate the faucet.
Do this next
Keep the faucet isolated and schedule qualified plumbing service. Provide the full model number, photos, leak location, side affected, and any part or repair history.
Why this path and its safety boundary
Why it matters: A wrong or damaged stem or cartridge, failed seat or faucet body, seized hardware, or upstream plumbing fault is more likely than a simple loose handle.
Safety stop: Do not force the stem, substitute an unverified valve, repeatedly cycle the faucet, or leave it pressurized while it drips.
Helpful context
Understand the symptom
The drip location changes the diagnosis
A drop forming at the spout when both handles are off is a valve-closing problem until proven otherwise. Water around a handle or valve stem can be a seal or retaining-area leak, while water below the sink may come from a supply connection rather than the faucet stem. Dry each area, place a container under the spout, and record the first place that becomes wet before removing a part.
American Standard uses more than one faucet design
American Standard's product pages show both single-control and two-handle faucet families with ceramic disc valve cartridges, but the handles, cartridge shape, retaining hardware, and service steps differ by model. A stem valve label alone is not enough to choose a replacement. Retrieve the full model number and use its parts diagram or installation guide before opening the faucet.
Start repair only after the supply is isolated
American Standard's published faucet guides say to turn off the water supply before removing the handle, cartridge, spout, or seals. If a stop valve does not shut the flow off, a stem will not come free, or the faucet body is damaged, stop rather than forcing the assembly. A clean, dry reassembly still needs a slow leak check at the spout, handle, and connections.
Do not confuse an aerator or spout seal with a stem leak
A dirty aerator can distort or reduce flow, but it does not normally explain a persistent drop from a closed spout. American Standard's service guidance separately calls out rinsing an aerator, operating the handles without forcing them, and replacing spout seals or a cartridge for model-specific work. Diagnose the wet location before buying a valve part.
Safety boundary
Stop conditions
- Close the hot and cold supplies before opening a handle, stem, cartridge, spout, or seal area; do not force a stuck stop valve.
- Do not force, drill, heat, or pry a stuck stem or handle, and do not substitute a valve part without the complete American Standard model match.
- Keep the affected supply closed for water below the sink, a cracked faucet body, a stop-valve leak, cabinet water damage, or a leak near electrical equipment.
- Do not leave a faucet pressurized after a failed leak check or use harsh cleaners, sharp tools, or abrasive methods on valve or seal surfaces.
Only after diagnosis
Potential parts
- American Standard stem valve or valve cartridge
Consider this category only when a closed-spout drip stops with the supplies isolated and the full faucet model identifies a matching stem or cartridge arrangement.
American Standard uses different one- and two-handle valve families; confirm the complete model, hot or cold side, and documented part fit before ordering. - handle-area O-ring or stem seal
Consider this category only when water is proven to emerge around the handle or stem rather than from the closed spout or under-sink supply connection.
Confirm the exact faucet model and seal arrangement; do not infer compatibility from a similar-looking handle. - spout seal kit
Consider this category only when the model guide identifies a spout-seal path and the leak is around the spout base, not a continuing drip from the closed valve outlet.
Match the exact American Standard faucet model and follow its seal instructions; a spout seal does not replace a failed stem valve.
When checks do not resolve it
Need a professional?
Call a qualified plumber when the drip continues after the exact American Standard model's low-risk checks, the valve or stem cannot be identified, a stop valve will not isolate the faucet, water leaks below the sink, the faucet body is cracked, or the repair requires seized hardware, concealed plumbing, or supply-line work. Keep the affected supply closed until the leak is evaluated.
Have this ready
- Provide the full American Standard model number, one- or two-handle layout, hot or cold side affected, exact first wet point, whether the drip stops with both supplies closed, photographs of the handle and under-sink connections, and any recent faucet or valve work.
Common questions
FAQ
Why does my American Standard sink faucet drip when the handles are off?
A drop from the spout with both handles off usually points to a valve cartridge, stem valve, or internal seal that is not closing. Confirm the drip stops when the hot and cold supplies are isolated, then use the full American Standard model to identify the correct valve arrangement.
Is a leak around the handle the same as a spout drip?
Not necessarily. Water around the handle or stem can involve an external stem seal, O-ring, retainer, or handle assembly, while a closed-spout drip points more toward the valve's internal sealing path. Dry the faucet and locate the first wet point before selecting a part.
Can I replace an American Standard faucet stem with a generic cartridge?
Do not assume compatibility from appearance. American Standard publishes different single- and two-handle faucet families and model-specific parts diagrams. Identify the complete model and the hot or cold side before choosing a stem, cartridge, or seal.
Will cleaning the aerator fix a faucet that keeps dripping?
Cleaning an aerator can correct distorted or reduced flow, but it usually does not repair a persistent drop from a closed spout. If the faucet still drips after the aerator is clean and the supplies are isolated, the model-specific stem, cartridge, or seal path needs attention.
Read the exact guide
Official sources
- Faucet Replacement Valve Cartridge for 2-Handle FaucetsAmerican Standard · American Standard two-handle kitchen and bath faucet valve-cartridge scope and hot/cold application guidance
- How To Replace the Hand Spray Diverter for Your Colony Soft FaucetAmerican Standard · American Standard faucet service sequence showing water-supply isolation, handle and cartridge access, and model-specific reassembly
- Chatfield® Single-Handle Pull-Out Kitchen FaucetAmerican Standard · American Standard single-handle kitchen faucet valve-cartridge, handle, supply-line, and model-specific parts distinction
- Portsmouth® Single-Handle Pull-Out Dual-Spray Kitchen Faucet 1.8 gpm/6.8 L/minAmerican Standard · American Standard single-handle kitchen faucet ceramic-disc valve, check-valve, and model-specific installation or parts guidance
- How To Replace the Spout Seal Kit for Your Reliant FaucetAmerican Standard · American Standard faucet spout-seal service sequence and supply isolation guidance
Community feedback
Share a repair observation
Share a plain-text repair observation. Accepted observations are published automatically; this page may take a moment to update.